# Set up and test hosted pages with Payflow Gateway (/api/nvp-soap/payflow/test-hosted-pages)
Learn how to set up a hosted checkout page and use the PayPal sandbox to test transactions.
| | | |
| -- | -------- | ----------------------------------------------------------------------------------------------------------------------------------------------------------------- |
| 1. | Required | [Create a business account in the sandbox](#create-a-business-account-in-the-sandbox). |
| 2. | Optional | [Create a test-only Payflow Gateway account](#create-a-test-only-payflow-gateway-account). You can skip this step if you already have PayPal Manager credentials. |
| 3. | Required | [Set up PayPal Manager](#set-up-paypal-manager). |
| 4. | Required | [Customize a hosted checkout page](#customize-a-hosted-checkout-page). |
| 5. | Required | [Verify the testing prerequisites](#verify-the-testing-prerequisites). |
Next, create a business account in the sandbox.
## Create a business account in the sandbox [#create-a-business-account-in-the-sandbox]
To access your account through Payflow instead of PayPal sandbox API calls, you must link a sandbox account to Payflow to work in test mode.
1. Log in to the [Developer Dashboard](/).
2. Click **Dashboard**.
3. Under Sandbox, click **Accounts**.
4. Click **Create Account**.
5. Set the account to **Business**, choose your **Country** (United States, Canada or United Kingdom), and click **Create**.
6. Locate and click on the three dots under **Manage accounts** at the end of the row for your account and choose **View/edit** from the dropdown.
7. In the **Profile** tab of your account, click **Upgrade to Pro** and then **Enable**.
8. Copy the email address under **Email ID** for use in the next step.
Next, create a PayPal Manager account.
## Create a test-only Payflow Gateway account [#create-a-test-only-payflow-gateway-account]
In this step you create a Payflow Gateway account and log in to PayPal Manager. If you already have a live account and login credentials for PayPal Manager, proceed to [Set up PayPal Manager](#set-up-paypal-manager).
To create a Payflow Gateway account and log in to PayPal Manager:
1. Sign up for Payflow for your region.
* [United States](https://registration.paypal.com/welcomePage.do?partner=PayPal\&producttype=C2\&country=US\&mode=try)
* [Canada](https://registration.paypal.com/welcomePage.do?partner=PayPalCA\&producttype=C2\&country=CA\&mode=try)
* [Australia](https://registration.paypal.com/welcomePage.do?partner=VSA\&producttype=C2\&country=AU\&mode=try)
* [New Zealand](https://registration.paypal.com/welcomePage.do?partner=PayPalNZ\&producttype=C2\&country=NZ\&mode=try)
2. Click **Continue**.
3. On the Create Payflow Gateway Account page, select **I do not have a Processor. Set up test account.**
4. Fill out the form to create a unique, case-sensitive merchant login.
5. Accept the terms and conditions, and then click **Continue**.
6. Click **Log in to PayPal Manager**.
> **Note:** **Important:** Do not click **Activate Now** or you will activate the account.
You should have the following Payflow test credentials:
* PARTNER - PayPal.
* VENDOR - Your unique, case-sensitive merchant login.
* USER - The same merchant login, also the default admin user.
* PWD - Your password.
When you log in to PayPal Manager to run test API calls, you can leave the USER field blank. To run live API calls or integrate software, such as a shopping cart, you must specify a user, such as the default admin user. The default admin user has the same name as the merchant login.
Next, set up PayPal Manager.
## Set up PayPal Manager [#set-up-paypal-manager]
1. In [PayPal Manager](https://manager.paypal.com/), go to **Service Settings**, click **Hosted Checkout Pages**, and then click **Set Up**.
2. Verify that **Transaction Process Mode** is set to **Test**.
3. In the **Error URL** field, enter a placeholder, such as `https://example.com/error`. A secure token API call can override this setting. For an example, see [Try the test demos](#try-the-test-demos).
4. Under **PayPal Express Checkout**, paste the business account email you created in the sandbox into the **PayPal sandbox email address** field.
* If you do not specify an email address or the email address contains spaces at the end, your test returns one of these errors:
* `Invalid Merchant Configuration`
* `PayPal Express Checkout is not set up on this account!`
5. Under **Billing Information**, find **Make these fields required** and check the required fields. Do the same for **Make these fields editable**.
6. Set **Payment Confirmation** to **On my website**.
7. Set **Enable Secure Token** to **Yes**.
8. Click **Save Changes**.
If your account does not have the Fraud Protection section, proceed to [Customize a hosted checkout page](#customize-a-hosted-checkout-page).
9. Under **Service Settings**, select **Fraud Protection**, **Test Setup**, and **Edit Standard Filters**.
10. Clear all the boxes in the left-most column. Then click **Deploy**.
Fraud protection settings and other account-level changes will propagate and take effect within one hour. Until then, test transactions with test credit card numbers will generate message alerts indicating that fraud filters are flagging them for review.
Next, customize a hosted checkout page using the Layout C template.
## Customize a hosted checkout page [#customize-a-hosted-checkout-page]
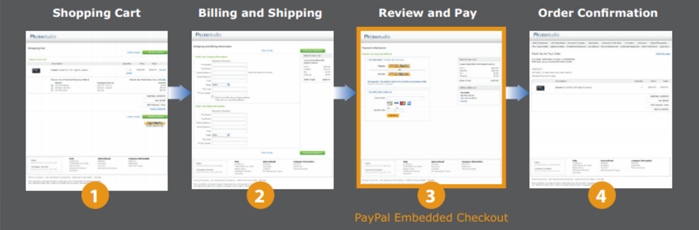
If you have a PayPal Payments Advanced or Payflow Link account, or you want to use an embeddable iframe, use Layout C as the template for your hosted page. The iframe seamlessly blends with the rest of your site, but PayPal hosts it. PayPal's servers collect the customer's payment information directly, reducing your security and PCI compliance burden. Sensitive payment information, such as card numbers and security codes, are never captured on or re-transmitted through your servers.
This diagram shows a checkout flow that embeds a securely hosted iframe:
Complete these steps to customize a checkout page using Layout C:
1. In [PayPal Manager](https://manager.paypal.com/), go to **Service Settings**, click **Hosted Checkout Pages**, and then click **Customize**.
2. Under **Choose a layout and color**, click **Layout C**.
3. To fit your site's color scheme, adjust the colors of the border, header text, **Pay Now** button background, and the button text.
4. Click **Save and Publish**.
Next, prepare to test transactions through your hosted page.
## Verify the testing prerequisites [#verify-the-testing-prerequisites]
Complete these steps before you run test transactions:
| | | |
| -- | -------- | ---------------------------------------------------------------------- |
| 1. | Required | [Set the redirect URL](#set-the-redirect-url). |
| 2. | Required | [Get test credit card information](#get-test-credit-card-information). |
| 3. | Optional | [Review the testing tips](#testing-tips). |
| 4. | Optional | [Try the test demos](#try-the-test-demos). |
Next, set the redirect URL.
### Set the redirect URL [#set-the-redirect-url]
To submit test transactions, including those using `CREATESECURETOKEN`, set the redirect URL to:
`https://pilot-payflowlink.paypal.com`
> **Note:** **Note** Since Payflow is operating out of multiple data centers we highly suggest that all API calls are done using the host URLs above. Should you hard code the IP addresses to send transactions via the Payflow API, PayPal cannot be responsible should your transactions fail should a data center be offline due to any issues or any scheduled maintenances.
For all Payflow account types using layout C, set the source URL when loading the iframe:
```html lineNumbers
```
If testing layouts A or B using a secure token, set the redirect URL in the `action` input field:
```html lineNumbers
```
Next, verify you are have the correct test credit card information.
### Get test credit card information [#get-test-credit-card-information]
To test non-PayPal credit card processing, use this test credit card information:
* Visa number - 4111 1111 1111 1111
* Expiration date - 12/19
* Card security code - 123
The default non-PayPal credit card processor is FISERV Nashville.
To test PayPal credit card processing (all live PayPal Payments Pro and PayPal Payments Advanced accounts):
1. Log in to [the Developer Dashboard](/dashboard/) and create a pre-configured buyer account.
2. Click **View Details** to see the account's test VISA number and expiration date.
3. Use "123" as the card security code.
> **Note:** **Note:** If you use the incorrect test credit card information with any PayPal Payments account, you receive a declined response or an error message, such as `10001-Generic Processor Error`.
### Testing tips [#testing-tips]
To ensure successful testing:
* Send all API calls to `https://pilot-payflowpro.paypal.com`. See note below.
* When loading a hosted page, verify the variable MODE is set to TEST.
* Set the **Transaction Process Mode** to **TEST**.
* Test with the correct credit card number. Using "4111 1111 1111 1111" with a PayPal Payments account is a common mistake.
When your tests are complete and you are ready to go live, change these settings:
* Send all API calls to `https://payflowpro.paypal.com`. See note below.
* When loading a hosted page, remove the variable MODE or set to LIVE.
* Set the **Transaction Process Mode** to **LIVE**.
* Use real, valid credit card information.
> **Note:** **Note** Since Payflow is operating out of multiple data centers we highly suggest that all API calls are done using the host URLs above. Should you hard code the IP addresses to send transactions via the Payflow API, PayPal cannot be responsible should your transactions fail should a data center be offline due to any issues or any scheduled maintenances.
### Try the test demos [#try-the-test-demos]
Click this link to download the Payflow basic test demos:
[payflowbasictestdemos.zip](https://www.paypalobjects.com/webstatic/en_US/developer/other/payflowbasictestdemos.zip)
This zip file contains two demos for PayPal Payments Advanced and PayPal Payments Pro in PHP and ASP.NET C#. The easy-to-use demo code is a fully functional micro-framework. After you understand one of the demos, see the [Payflow Gateway Developer Guide](/api/nvp-soap/payflow/integration-guide/) for additional details and features.
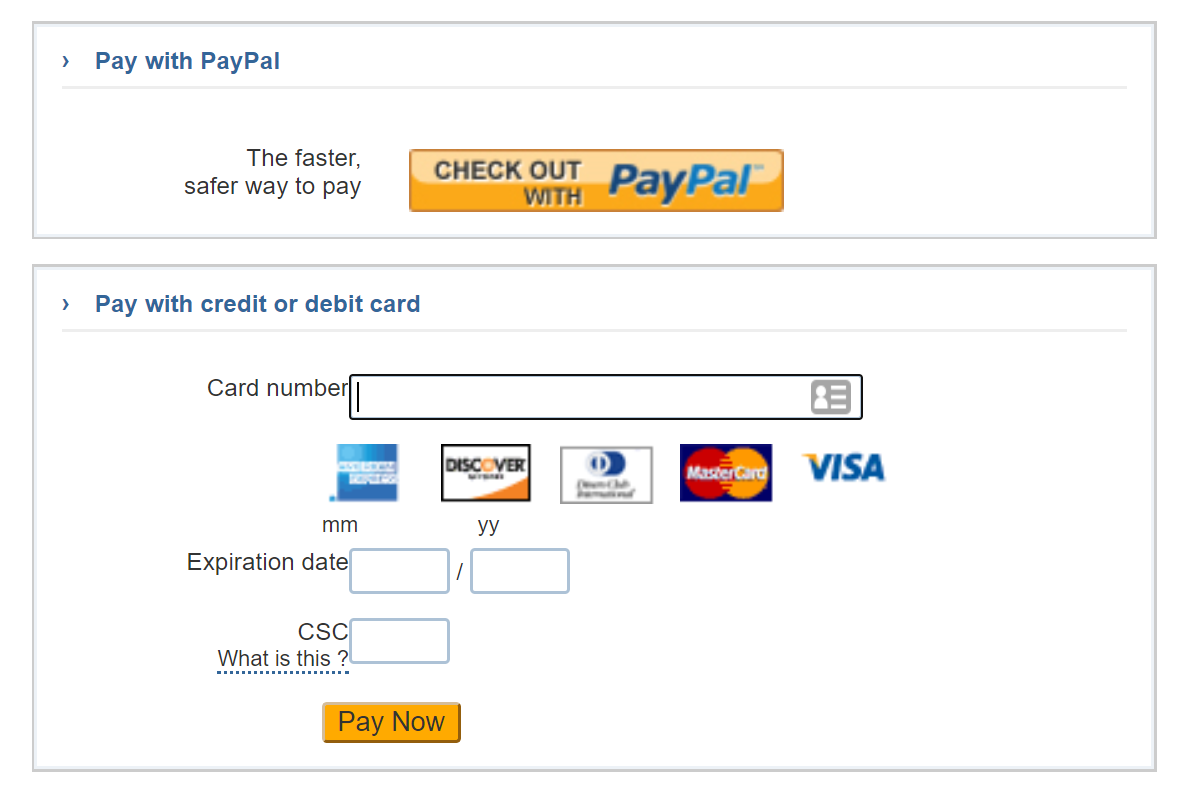
This screenshot is from the PayPal Payments Advanced demo. It shows a Layout C hosted checkout page embedded in a sample site as an iframe:
## More information [#more-information]
* [Getting started with hosted pages](/api/nvp-soap/payflow/gs-ppa-hosted-pages/)
* For more information about testing Payflow Gateway, see [Testing Transactions](/api/nvp-soap/payflow/integration-guide/test-transactions/).