# Introducing Adaptive Payments (/archive/adaptive-payments/integration-guide/APIntro)
> **Note:** **Important:** Adaptive Payments is not available for new
> integrations. PayPal provides this documentation to support existing
> integrations. If you're starting an integration,
> [we recommend our latest solutions](https://www.paypal.com/us/business/accept-payments).
The Adaptive Payments API enables you to send money in many different
scenarios, from simple to complex.
## Adaptive Payments Actors and Objects [#adaptive-payments-actors-and-objects]
Adaptive payments handles payments between a *sender* of a payment and
one or more *receivers* of the payment. You are an
*application owner*, such as a merchant that owns a website, the owner
of a widget on a social networking site, the provider of a payment application
on mobile phones, and so on. Your application is the caller of Adaptive
Payments API operations.
> **Note:** **Note:** The application owner must have a PayPal Business
> account. Senders and receivers can have any PayPal account type. Senders and
> receivers are not required to have PayPal accounts initially. PayPal prompts
> a sender to create an account before a payment can be completed. A receiver
> must create an account to receive the funds after the payment completes.
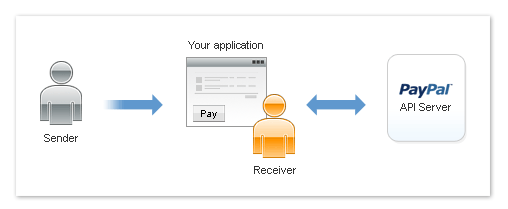
With many applications, you may be both the application owner and a receiver.
For example, as the owner of a website, you are the receiver of payments from
the senders who are your customers. The following diagram shows the
relationship between a sender, you as a receiver, and PayPal:
You are not required to be a receiver. For example, if you own a shopping
cart, you are not required to receive payments directly. You can facilitate
payments between the sender and receivers that provide the actual goods. The
following diagram shows the relationship between a sender, you as an
application owner that directs payments to receivers, and PayPal:

This diagram shows a payment in which the sender pays multiple receivers in a
parallel payment. With parallel payments, the sender can see the transaction
to each receiver.
The following diagram shows the relationship between a sender, you as an
application owner that directs payments to receivers, and PayPal in a chained
payment:
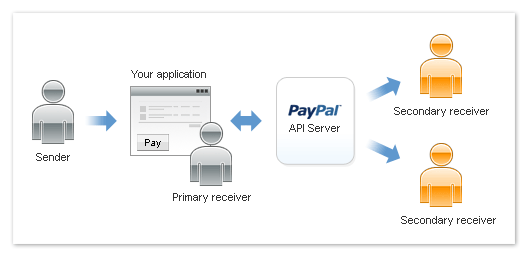
In a chained payment, the sender pays the primary receiver an amount, from
which the primary receiver pays secondary receivers. The sender only knows
about the primary receiver, not the secondary receivers. The secondary
receivers only know about the primary receiver, not the sender.
The following diagram shows the relationship between you as both the sender
and the application owner that directs payments to receivers:
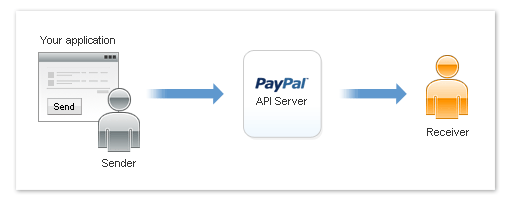
For example, you might use this configuration in a sales commission
application that transfers funds owed for commissions from your account to the
accounts of your sales force.
## Simple, Parallel, and Chained Payments [#simple-parallel-and-chained-payments]
Adaptive Payments provides several kinds of payment: simple, parallel, and
chained payments. You create each kind of payment with the
`Pay` API.
* Simple payments enable a
sender to send a single payment to a single receiver. For example, your
website can use an Adaptive Payments payment flow to transfer money
resulting from a sale from your customer's PayPal account to your own
account. This is the traditional kind of payment.
* Parallel payments enable a
sender to send a single payment to multiple receivers. For example, your
application might be a shopping cart that enables a buyer to pay for items
from several merchants with one payment. Your shopping cart allocates the
payment to merchants that actually provided the items. PayPal then deducts
money from the sender's account and deposits it in the receivers' accounts.
* Chained payments enable a
sender to send a single payment to a primary receiver. The primary receiver
keeps part of the payment and pays secondary receivers the remainder. For
example, your application could be an online travel agency that handles
bookings for airfare, hotel reservations, and car rentals. The sender sees
only you as the primary receiver. You allocate the payment for your
commission and the actual cost of services provided by other receivers.
PayPal then deducts money from the sender's account and deposits it in both
your account and the secondary receivers' accounts.
> **Note:** **Note:** Chained payments also include delayed chained
> payments, in which payments to secondary receivers can be delayed for up
> to 90 days.
### Simple Payments [#simple-payments]
Simple payments enable a sender to send a single payment to a single receiver.
This is sometimes considered a traditional payment, such as a payment from a
buyer to a seller.
Scenarios involving simple payments might include the following scenarios:
* Buyer makes a payment on a merchant's website.
* Buyer makes a single payment for a cart of items from the same merchant.
* Person on a social networking site makes a payment for a purchase to the
receiver. For example, a sender sends money to pay for lunch at a
restaurant.
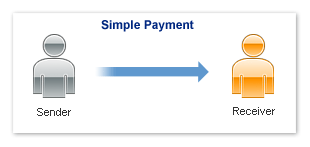
In these cases, the sender sends a payment to a single receiver. The following
example shows a sender making a simple payment:
### Parallel Payments [#parallel-payments]
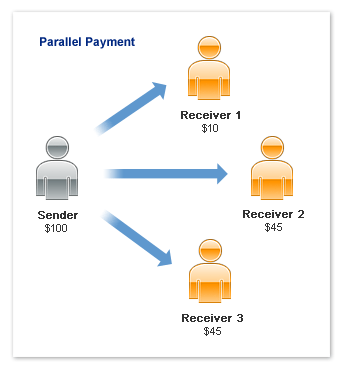
A parallel payment is a payment from a sender that is split directly among 2-6
receivers. Technically, a parallel payment is a set of multiple payments made
in a single `Pay` request.
Parallel payments are useful in cases when a buyer intends to make a single
payment for items from multiple sellers. Examples include the following
scenarios:
* a single payment for multiple items from different merchants, such as a
combination of items in your inventory and items that partners drop ship for
you.
* purchases of items related to an event, such as a trip that requires
airfare, car rental, and a hotel booking.
In these cases, the sender knows the receivers and the amount paid to each
one. The following example shows a sender paying 3 receivers in a single
parallel payment:
> **Note:** **Note:** This scenario is an example only and does not take
> PayPal fees into account.
### Chained Payments [#chained-payments]
A chained payment is a payment from a sender that is indirectly split among
multiple receivers. It is an extension of a typical payment from a sender to a
receiver, in which a receiver, known as the *primary receiver*, passes
part of the payment to other receivers, who are called
*secondary receivers*.
> **Note:** **Note:** The API caller must get permission from PayPal to use
> chained payments.
You can have at most one primary receiver and 1-9 secondary receivers. Chained
payments are useful in cases when the primary receiver acts as an agent for
other receivers. The sender deals only with the primary receiver and does not
know about the secondary receivers, including how a payment is split among
receivers. The following example shows a sender making a payment of $100:
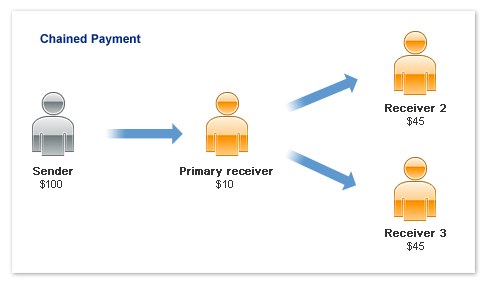
In this example, the primary receiver receives $100 from the sender's
perspective. The primary receiver actually receives only $10 and passes a
total of $90 to secondary receivers, Receiver 2 and Receiver 3.
> **Note:** **Note:** This scenario is an example only and does not take
> PayPal fees into account.
#### Delayed Chained Payments [#delayed-chained-payments]
By default, payments to all receivers in a chained payment are immediate.
However, you can choose to delay a payment to a secondary receiver. For
example, as primary receiver, you may require secondary receivers to perform
some action, such as shipping goods or waiting for expiration of a return
period, before making payment. To complete the payment, you must explicitly
execute a payment to secondary receivers after the sender pays you. The
payment must occur within 90 days, after which you cannot complete the payment
as part of the original chained payment.
## Payment Approval [#payment-approval]
The sender of a payment must approve the transfer. The sender can log in to
paypal.com to approve each payment, pre-approve payments, or when the sender
is your application, be implicitly approved to make payments.
> **Note:** **Note:** Preapproval requests require permission from PayPal.
The payment approval types are:
* Explicit approval payments, in which the sender logs in to paypal.com to
approve each payment. Explicitly approving payments is the traditional way
to pay with PayPal. This method is the only option unless the sender has set
up a preapproval agreement or you, the API caller, are also the sender.
* Preapproved payments, in which a sender logs in to PayPal and sets up
pre-approvals that approve future payments or set up a preapproval during
the embedded payment flow. The sender logs in to paypal.com once to set up
the preapproval. After the sender agrees to the preapproval, specific
approval is unnecessary.
* Implicit approval payments, in which your application is both the sender of
a payment and the caller of the Adaptive Payments `Pay` API. In
this case, PayPal makes the payment from your own account, which eliminates
the need for approval.
## Adaptive Payments Service Permissions [#adaptive-payments-service-permissions]
Adaptive Payments services are divided into these categories:
*standard services* that do not require specific permission to use and
*advanced services* that require permission from PayPal to use. You
obtain permission to use a service when you submit an application to PayPal.
You can use the following standard services without requesting specific
permission:
* Making simple or parallel payments that require explicit approval of the
sender
* Getting payment details
* Making refunds
* Performing currency conversions
To use any other service, you must receive permission from PayPal to use the
service when you submit your application. For example, if your application
makes chained payments, which is an advanced service, you request permission
when you submit your application. Later, if you modify your application to
support pre-approvals, which is also an advanced service, you must resubmit
your application to obtain permission from PayPal to use the service.
> **Note:** **Important:** If you allow a third party to PayPal to execute
> an application on your behalf, the third party becomes the API caller
> because the party is now calling the Adaptive Payments API. The third party
> must also have permission from PayPal to use the advanced service. For
> example, if an application supports chained payments, both you and the third
> party must have permission to use the service.
## Explicit Approval Payment Flow [#explicit-approval-payment-flow]
Explicit approval payments require the sender to log in to paypal.com to
approve the payment. You control the interaction between your application and
PayPal by specifying URLs for redirection in various situations.
The following diagram shows the basic flow of control for a payment (such as
payment for items in a shopping cart at a web store) that requires the sender
to log in to paypal.com to approve the payment:
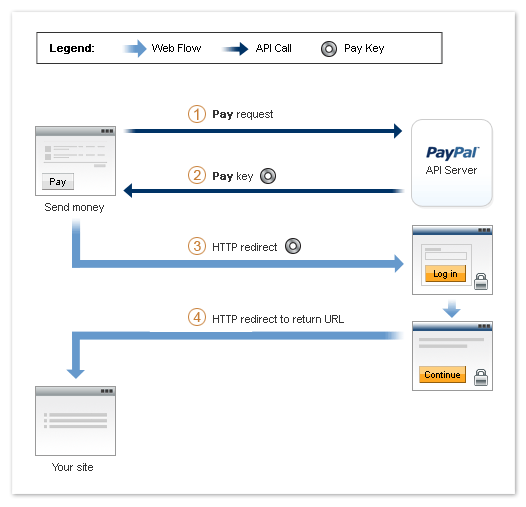
The following items correspond to the circled numbers in the diagram:
1. Your site or device sends a `Pay` request to PayPal on behalf of
a sender.
2. PayPal responds with a key that you use when you direct the sender to
PayPal.
3. You redirect your sender's browser to paypal.com.
4. After the sender authorizes the transfer of funds, PayPal redirects your
sender's browser to the location you specify.
> **Note:** **Note:** The cancel operation is not shown in the diagram.
> Cancellation is handled by a separate cancellation URL to which PayPal
> redirects the sender's browser any time the sender cancels while on
> paypal.com.
In addition to these steps, PayPal notifies you and the sender of the payment.
## Preapproved Payments Flow [#preapproved-payments-flow]
Preapproved payments require the sender to log in to paypal.com to set up the
payment agreement with a particular vendor. You control the interaction
between your application and PayPal by specifying URLs for redirection in
various situations.
The sender logs in to paypal.com and sets up the preapproval, which includes
setting the following information:
* Duration of the preapproval, from the start date to the end date, inclusive
* The maximum amount being pre-approved
* The maximum number of payments
The following diagram shows the basic flow of control during a preapproval
operation:
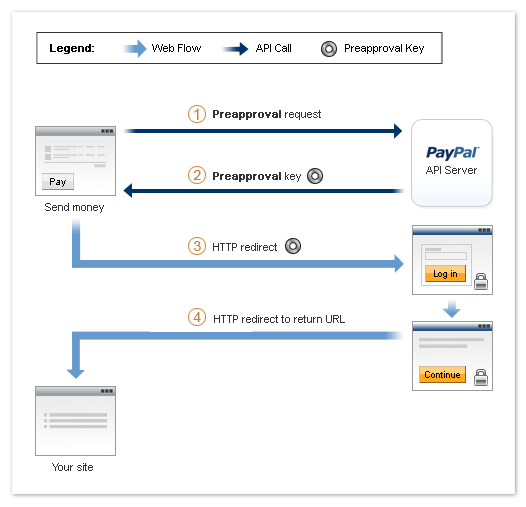
The following items correspond to the circled numbers in the diagram:
1. Your site or device sends a `Preapproval` request to PayPal on
behalf of a sender.
2. PayPal responds with a key, called a *preapproval key*, that you use
when you direct the sender to PayPal, and once the preapproval has been
established, whenever you automatically complete a payment on behalf of the
sender.
3. You redirect your sender's browser to PayPal.
4. After the sender logs in to paypal.com and sets up the preapproval, PayPal
redirects the sender's browser to a location you specify.
> **Note:** **Note:** The cancel operation is not shown in the above
> diagram. Cancellation is handled by a separate cancellation URL to which
> PayPal redirects the sender's browser any time the sender cancels while on
> paypal.com.
In addition to the steps shown above, PayPal sends an email notifying you and
the sender that the preapproval has been created.
After the sender sets up the approval, you can make payments on the sender's
behalf directly. The sender is no longer required to log in to PayPal to
complete the payment. The following diagram shows the basic flow of control
during a `Pay` operation:
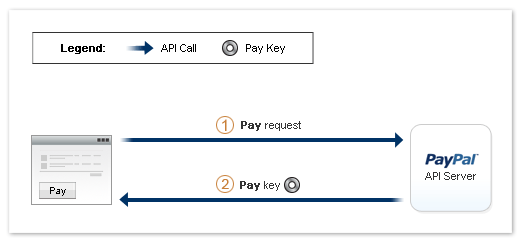
The following items correspond to the circled numbers in the diagram:
1. Your site or device sends a `Pay` request to PayPal on behalf
of a sender. You can require the sender to provide a personal
identification number (PIN); however, logging in to paypal.com is no
longer required.
> **Note:** **Note:** You must provide a preapproval key that
> identifies the agreement.
2. PayPal still responds with a payment key that you can use for other API
operations, such as for obtaining details of the payment or for issuing a
refund.
## Implicit Approval Payments Flow [#implicit-approval-payments-flow]
Implicit approval payments are payments where the sender and the API caller
are using the same account. Because PayPal draws the funds for the payment
from your own account, there is no approval necessary, and as such there is no
visible flow for implicit approval payments.
The following diagram shows the basic flow of control during an implicitly
approved payment operation:

The following items correspond to the circled numbers in the diagram:
1. Your site or device sends a `Pay` request to PayPal.
> **Note:** **Note:** A web flow is not required.
2. PayPal responds with a key that you use for other API operations.
## Embedded Payments [#embedded-payments]
An *embedded payment* is a payment that initiates a visual presentation
of the Adaptive Payments payment flow in which the sender appears to never
leave your checkout or payment page. Embedded payments make it easier for a
sender to make a payment because PayPal may allow the sender to bypass the
PayPal login step.
The ability to bypass the login relies on a remember me cookie,
which is stored in the sender's browser when the sender chooses to take
advantage of being remembered. Opting in reduces the number of steps to
purchase goods or services without significantly increasing the risk that the
sender's account might be misused. After the initial login, PayPal bypasses
the login step if subsequent payments meet specific criteria, such as a
subsequent payment for a small amount.
### Embedded Payment Flow Presentations [#embedded-payment-flow-presentations]
PayPal provides the following kinds of visual presentations for the embedded
payment flow:
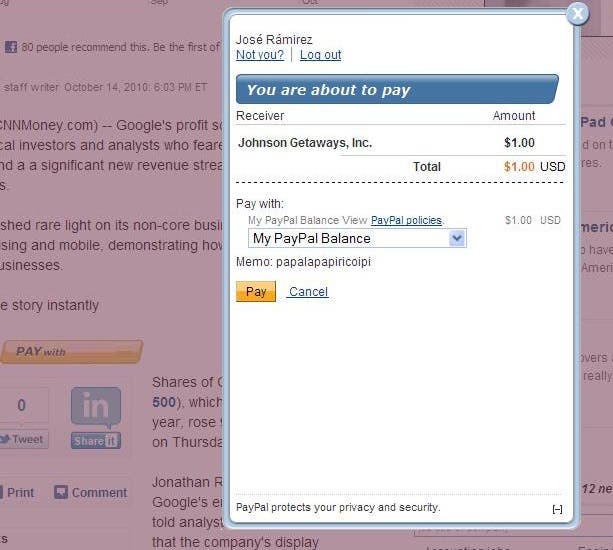
* The payment flow can be embedded as a lightbox on your web page, which
gives the impression that the payment is handled completely within your
website:
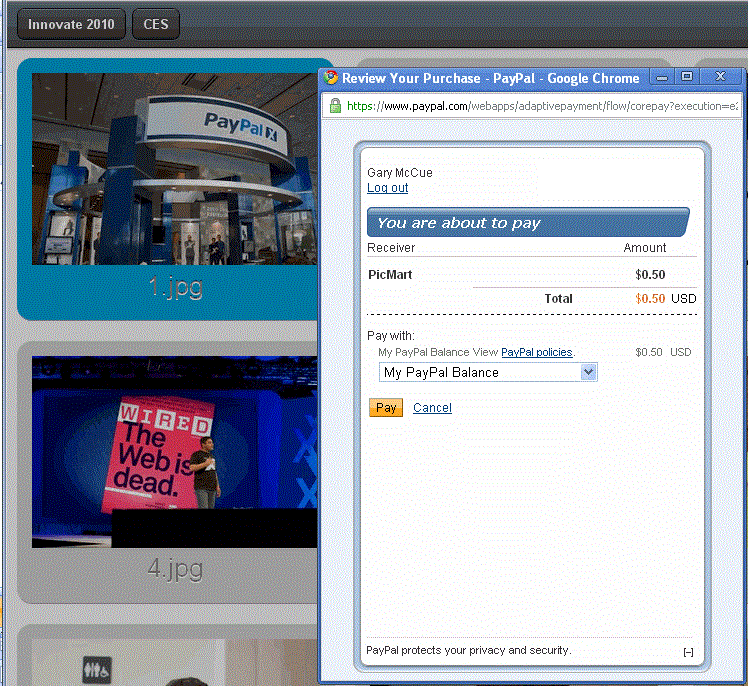
* The payment flow can appear in a mini-browser window that appears in front
of your web page, which does not require an IFRAME:
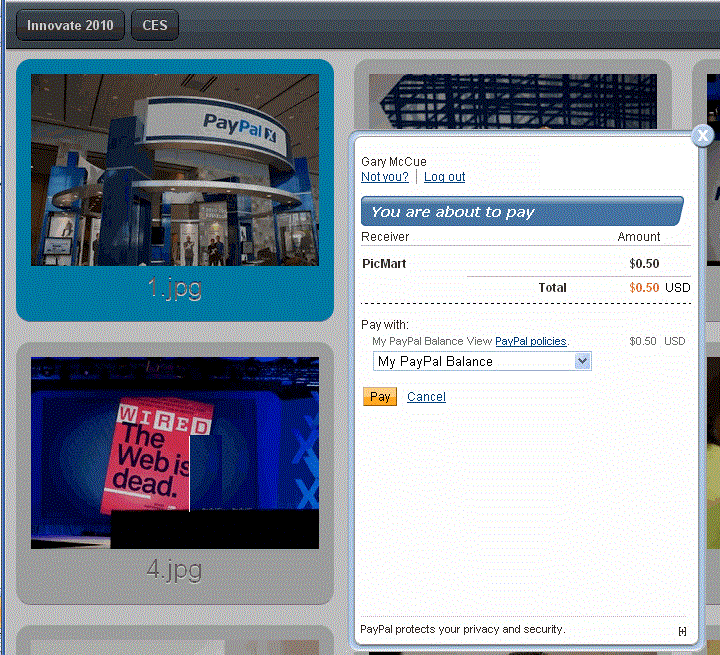
* The payment flow can be embedded as a lightbox in an IFRAME on your web
page, which gives the impression that the payment is handled completely
within your website:
You choose your preferred visual presentation when you invoke the embedded
payment flow. In some cases, PayPal may override your choice to use a
lightbox; for example, when the sender is required to log into PayPal for the
initial payment.
### Kinds of Embedded Payments [#kinds-of-embedded-payments]
Embedded payments can include
* simple payments
* parallel payments
* chained payments
You can also enable pre-approvals for future payments or enable shipping
addresses to be associated with embedded payments.
> **Note:** **Important:** Payments for digital goods must use the embedded
> payment flow. You cannot associate a preapproval for future payments or
> enable shipping addresses in a payment for digital goods.
### Embedded Payments Implementation Basics [#embedded-payments-implementation-basics]
To implement the embedded payment flow, you must
* include JavaScript code from PayPal on your checkout or payment web pages
* use the functions provided in the JavaScript to coordinate the PayPal flow
with the appearance of your web pages
* launch your preferred embedded payment flow, which is either the lightbox or
mini-browser, and redirect the sender's browser to the PayPal URL that
supports embedded payments, which is
`https://www.paypal.com/webapps/adaptivepayment/flow/pay?paykey=...`
You must call the `Pay` API operation to obtain a payment key
before launching the embedded payment flow. If the payment is specifically for
digital goods, modify your `Pay` API operation to specify that each
receiver is receiving payment for digital goods.
### Embedded Payment Experience [#embedded-payment-experience]
To the sender of a payment, the embedded payment experience appears to be
built into your website. The PayPal-supplied JavaScript provides all the code
needed to set up the flow as an IFRAME within the sender's browser and as a
pop-up mini-browser that appears in front of your website. Typically, the
sender initiates a payment by clicking a button:
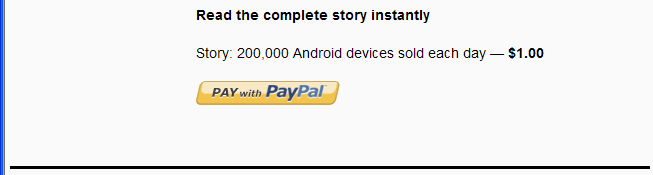
PayPal responds to the JavaScript that initiates the flow. If it is the first
payment, or if PayPal determines that the payment requires the sender to log
in, PayPal displays a Log In button in the IFRAME created by the JavaScript:

The IFRAME also enables the sender to sign up for a PayPal account or pay as a
guest without logging in.
> **Note:** **Note:** Guest checkout only provides the visual benefits of
> an embedded payment. It does not reduce the payment steps.
After clicking Log In, PayPal displays a
*Log in to your PayPal account* page in the mini-browser. The sender
enters an email address and password and can also check a box, which allows
the sender to skip this step for subsequent purchases:
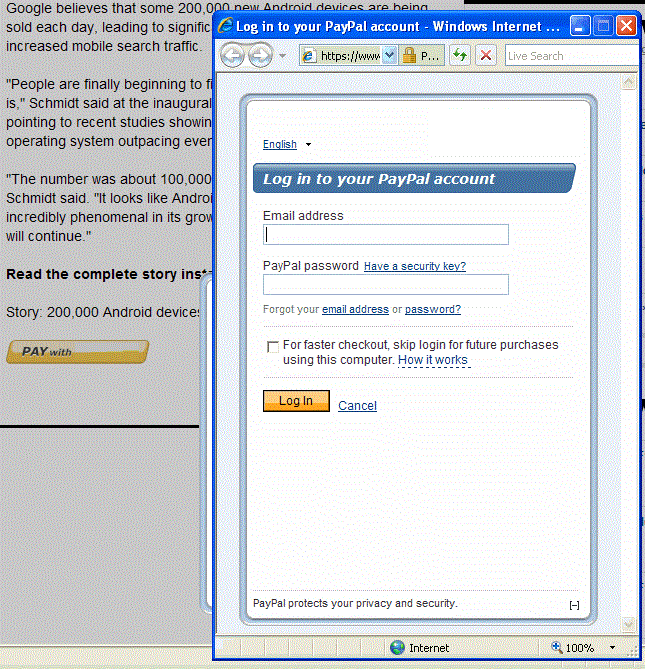
The check box controls the remember me behavior for log in. This
behavior allows the sender to skip the log in step in cases where there is
little risk of the account being misused.
> **Note:** **Important:** Opting in to the
> remember me behavior does not guarantee that the sender will
> not be asked to provide log in credentials.
After logging in, PayPal displays the *You are about to pay* page,
sometimes called the review your payment page in the
mini-browser:
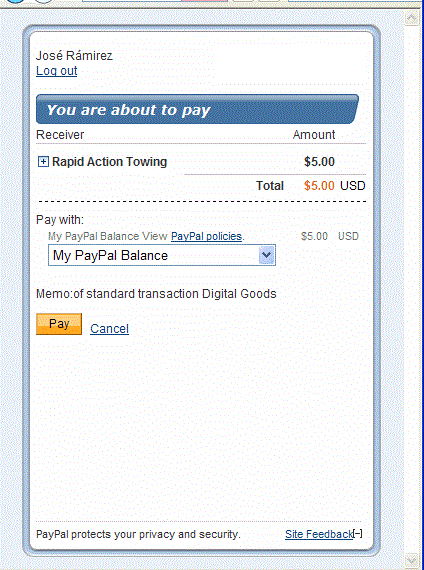
If the sender chooses *Cancel*, PayPal redirects the sender's browser
to the cancel URL specified in the Pay API operation's request message. If the
sender chooses *Pay*, the *Thank you for using PayPal* page
appears in the mini-browser:
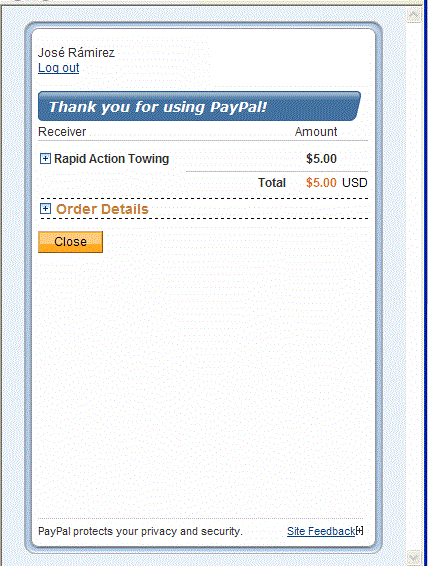
When the sender clicks *Close*, PayPal redirects the sender's browser
to the return URL specified in the Pay API operation's request message.
> **Note:** **Note:** You are responsible for closing the mini-browser
> after PayPal redirects to the page specified in either the return or cancel
> URL. PayPal provides a JavaScript function that you call to close a PayPal
> mini-browser or lightbox.
For subsequent payments in which PayPal does not require the account holder to
log in again and the account holder has chosen to be remembered, the PayPal
payment pages appear in a lightbox rather than in a mini-browser and PayPal
bypasses the log in steps. For these payments, the actions you take to launch
the flow and close the lightbox, remain the same. For example, the lightbox
for reviewing a payment would appear in your page as follows:
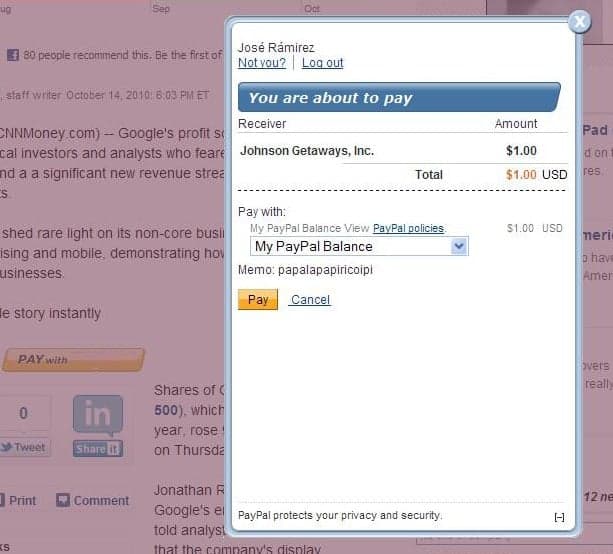
The lightbox containing the confirmation would appear in your page as follows:
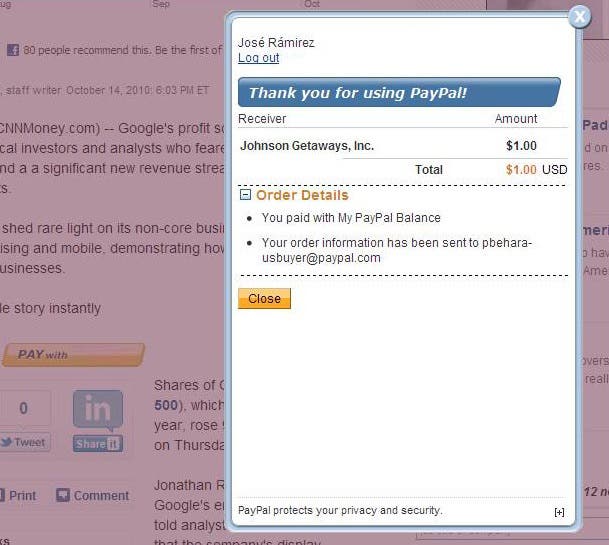
### Pre-approve future payments check box [#pre-approve-future-payments-check-box]
You can add a **Preapprove future payments** check box to the
sender's embedded payment experience, which enables the sender to pre-approve
subsequent payments. If you specify both a payment key and a preapproval key
when you call the `Pay` API operation, PayPal displays the check
box on the payment page in the mini-browser:

If the payment sender checks the preapproval box, the confirmation page
provides details about the preapproval:
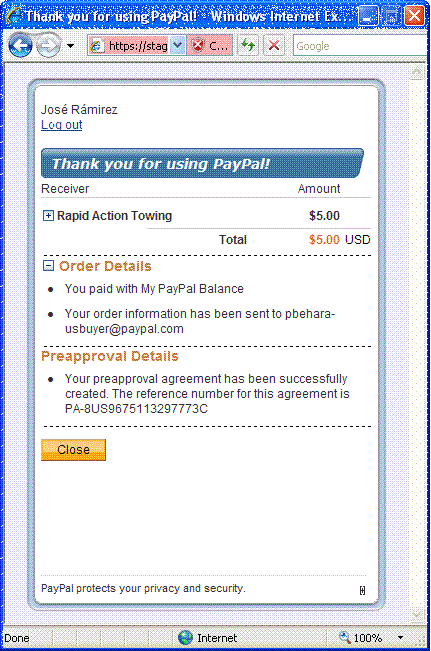
> **Note:** **Note:** Unless there is an error with the payment itself,
> PayPal transfers the money regardless of whether the preapproval for future
> payments was successful.
### Shipping Address Information [#shipping-address-information]
You can display and collect shipping address information. PayPal displays the
default shipping address when you set
`senderOptions.requireShippingAddressSelection` to
`true` in your request to `SetPaymentOptions`:
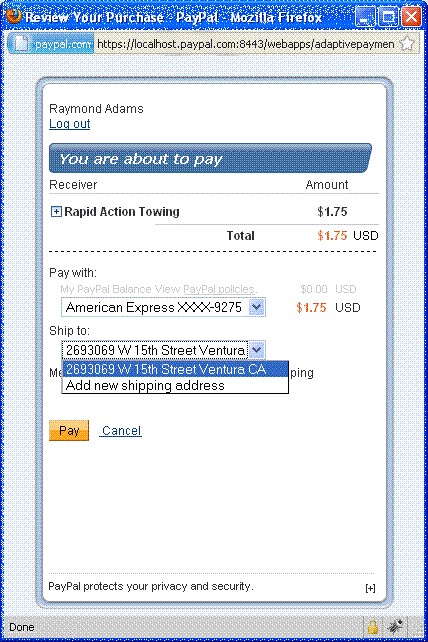
The sender of a payment can select one of the available shipping addresses or
add a new shipping address by selecting *Add new shipping address* from
the *Ship to:* drop-down menu:
### Embedded Payment Experience [#embedded-payment-experience-1]
To the sender of a payment, the embedded payment experience appears to be
built into your website. The PayPal-supplied JavaScript provides all the code
needed to set up the flow as an IFRAME within the sender's browser and as a
pop-up mini-browser that appears in front of your website.
Typically, the sender initiates a payment by clicking a button:

PayPal responds to the JavaScript that initiates the flow. If it is the first
payment, or if PayPal determines that the payment requires the sender to log
in, PayPal displays a **Log In** button in the IFRAME created by
the JavaScript:

The IFRAME also enables the sender to sign up for a PayPal account or pay as a
guest without logging in.
> **Note:** **Note:** Guest checkout only provides the visual benefits of
> an embedded payment. It does not reduce the payment steps.
After clicking Log In, PayPal displays a
*Log in to your PayPal account* page in the mini-browser. The sender
enters an email address and password and can also check a box, which allows
the sender to skip this step for subsequent purchases:

The check box controls the remember me behavior for log in. This
behavior allows the sender to skip the log in step in cases where there is
little risk of the account being misused.
> **Note:** **Important:** Opting in to the remember me behavior does not
> guarantee that the sender will not be asked to provide log in credentials.
After logging in, PayPal displays the *You are about to pay* page,
sometimes called the *review your payment* page in the mini-browser:

If the sender clicks **Cancel**, PayPal redirects the sender's
browser to the cancel URL specified in the Pay API operation's request
message. If the sender clicks **Pay**, the
*Thank you for using PayPal* page appears in the mini-browser:

When the sender clicks **Close**, PayPal redirects the sender's
browser to the return URL specified in the Pay API operation's request
message.
> **Note:** **Note:** You are responsible for closing the mini-browser
> after PayPal redirects to the page specified in either the return or cancel
> URL. PayPal provides a JavaScript function that you call to close a PayPal
> mini-browser or lightbox.
For subsequent payments in which PayPal does not require the account holder to
log in again and the account holder has chosen to be remembered, PayPal
bypasses the log in steps.
For example, the lightbox for reviewing a payment would appear in your page as
follows:

The lightbox containing the confirmation would appear in your page as follows:

The actions you take to launch the flow and close the lightbox are the same
steps you take for the mini-browser.
#### Pre-approve future payments check box [#pre-approve-future-payments-check-box-1]
You can add a **Preapprove future payments** check box to the
sender's embedded payment experience, which enables the sender to pre-approve
subsequent payments. If you invoke the embedded payment flow, passing both a
payment key obtained by calling `Pay` and a preapproval key
obtained by calling `Preapproval`, PayPal displays the check box on
the payment page:

If the payment sender checks the preapproval box, the confirmation page
provides details about the preapproval:

> **Note:** **Note:** Unless there is an error with the payment itself,
> PayPal transfers the money regardless of whether the preapproval for future
> payments was successful.
#### Embedded Preapproval Experience [#embedded-preapproval-experience]
Adaptive Payments provides a preapproval experience using a mini-browser.You
can invoke the embedded preapproval flow by passing the preapproval key. Here
is an example :
`https://www.paypal.com/webapps/adaptivepayment/flow/preapproval?preapprovalKey=PA-xxxxxxxxxxxx&expType=mini`
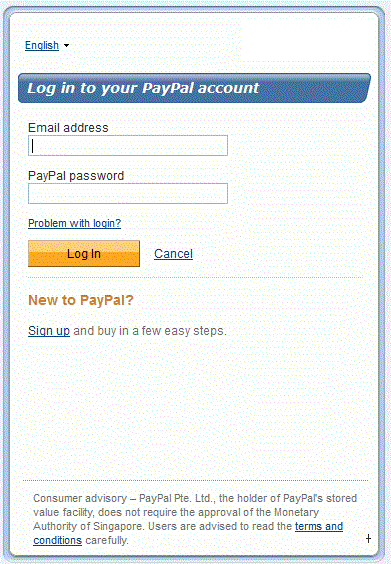
PayPal first asks the user to log into their PayPal account:
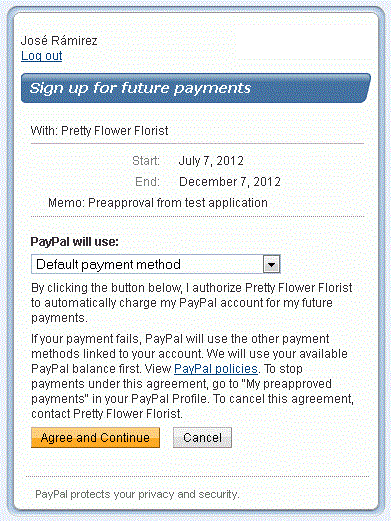
After signing in, the user is presented with a consent form that the user must
agree to:
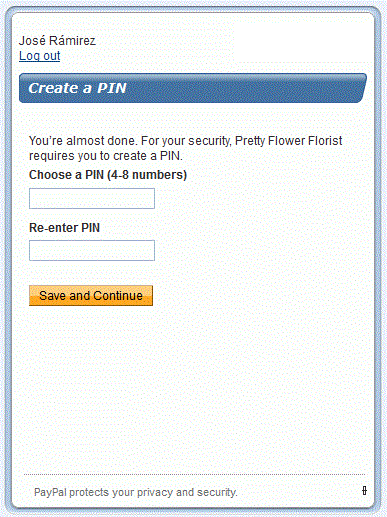
If the seller has enabled PIN code entry, after consenting to the agreement,
the user is prompted to enter a PIN code by the seller:
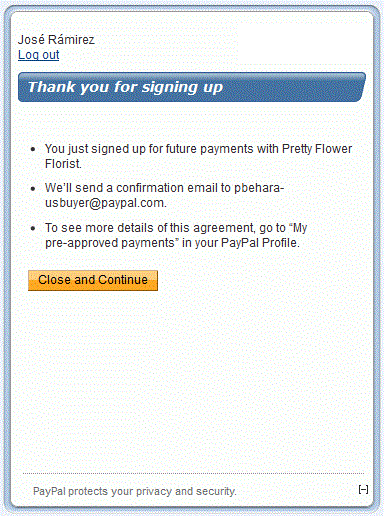
Finally, the user is presented with a confirmation screen:
#### Shipping Address Selection [#shipping-address-selection]
You can display and collect shipping address information for a transaction
with the embedded payment flow. PayPal displays the default shipping address
when you set `senderOptions.requireShippingAddressSelection` to
`true` in your request to `SetPaymentOptions`:

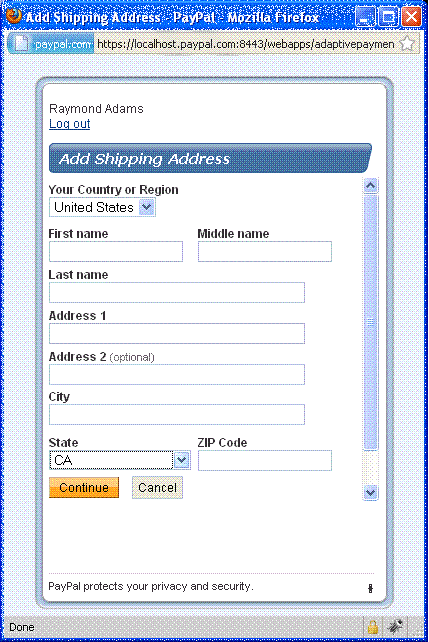
The sender of a payment can select one of the available shipping addresses or
add a new shipping address by selecting *Add new shipping address* from
the *Ship to:* drop-down menu:
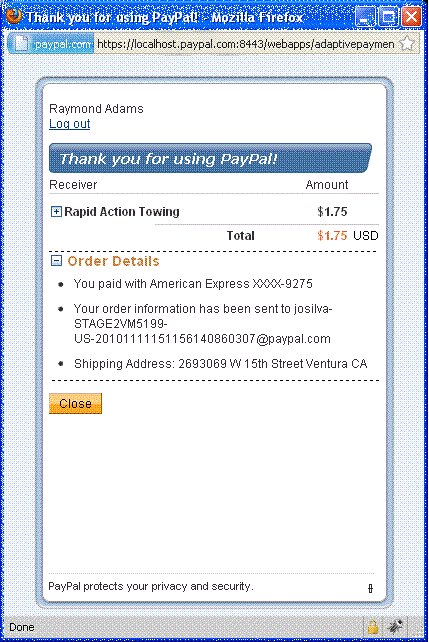
After the sender of the payment clicks *Pay*, PayPal displays the
selected shipping address on the *Thank you for using PayPal* page:
You can call the `GetShippingAddresses` API operation to obtain the
selected shipping address for the transaction using the key associated with
the payment.
### Setting Up Web Pages to Invoke the Embedded Payment Flow Using a Lightbox [#setting-up-web-pages-to-invoke-the-embedded-payment-flow-using-a-lightbox]
Use the JavaScript functions in
`https://www.paypalobjects.com/js/external/dg.js` to set up and
control the embedded payment flow. This example initiates the embedded payment
flow after obtaining a payment key.
This example assumes that you obtain a payment key before initiating the flow
and that the key does not change or expire before the sender completes the
flow.
To set up a web page to invoke the embedded payment flow:
1. Call the `Pay` API operation to obtain a valid pay key.
2. Create your form or button.
* You must include the pay key and redirect to
`https://www.paypal.com/webapps/adaptivepayment/flow/pay`.
* Optionally, include a preapproval key if you want to enable the
selection of *Preapproval for future payments*
* Specify that a lightbox opens in the PayPal-created `IFRAME`,
`PPDGFrame`.
* Set the `expType` parameter to indicate your preference for
the context in which the PayPal payment flow is displayed. You must
specify `light` for lightbox.
``
> **Note:** **Note:** To modify an existing application to use the
> embedded payment flow, change the redirect from
> `https://www.paypal.com/cgi-bin/webscr?cmd=_ap-payment&paykey=...`
> to
> `https://www.paypal.com/webapps/adaptivepayment/flow/pay?paykey=...`
> after obtaining the pay key.
3. Include the PayPal JavaScript functions from `dg.js`.
```html lineNumbers
```
4. Create an embedded flow object and associate it with your payment form or
button.
```html lineNumbers
```
On the pages you identify as the return and cancel URLs in the
`Pay` API operation, you must include the PayPal JavaScript
functions from `dg.js` and close the PayPal window, as in the
following example:
```text lineNumbers
dgFlow = top.dgFlow || top.opener.top.dgFlow;
dgFlow.closeFlow();
top.close();
```
### Setting Up Web Pages to Invoke the Embedded Payment Flow Using a mini-browser [#setting-up-web-pages-to-invoke-the-embedded-payment-flow-using-a-mini-browser]
Use the JavaScript functions in
`https://www.paypalobjects.com/js/external/apdg.js` to set up and
control the embedded payment flow. This example shows how to initiate the
embedded payment flow after obtaining a payment key.
> **Note:** **Note:** For a pre-approval authorization, use the following
> redirect URL (instead of the redirect URL in the steps below):
```html lineNumbers
https://www.sandbox.paypal.com/cgi-bin/webscr?cmd=_ap-preapproval&preapprovalkey=...
```
This example assumes that you obtain a payment key before initiating the flow
and that the key does not change or expire before the sender completes the
flow.
To set up a web page to invoke the embedded payment flow:
1. Call the `Pay` API operation to obtain a valid pay key.
2. Create your form or button.
* You must include the pay key and redirect to
`https://www.paypal.com/webapps/adaptivepayment/flow/pay`.
* Optionally, include a preapproval key if you want to enable the
selection of *Preapproval for future payments*
* Set the `expType` parameter to `mini` to indicate
your preference for the context in which the PayPal payment flow is
displayed.
``
> **Note:** **Note:** To modify an existing application to use the
> embedded payment flow, change the redirect from
> `https://www.paypal.com/cgi-bin/webscr?cmd=_ap-payment&paykey=...`
> to
>
> ```html lineNumbers
> https://www.paypal.com/webapps/adaptivepayment/flow/pay?
> paykey=...
> ```
>
> after obtaining the pay key.
>
> after obtaining the pay key.
3. Include the PayPal JavaScript functions from `apdg.js`.
```html lineNumbers
```
4. Create an embedded flow object and associate it with your payment form or
button.
``
The following mini-browser return script can be used to determine whether the
payment successfully completed:
```text lineNumbers
PAYMENTDETAILS=$(wget --output-document=- \
--quiet \
--header="X-PAYPAL-SERVICE-VERSION: 1.0.0" \
--header="X-PAYPAL-SECURITY-USERID: $APIUSER" \
--header="X-PAYPAL-SECURITY-PASSWORD: $APIPASS" \
--header="X-PAYPAL-SECURITY-SIGNATURE: $APISIG" \
--header="X-PAYPAL-REQUEST-DATA-FORMAT: NV" \
--header="X-PAYPAL-RESPONSE-DATA-FORMAT: NV" \
--header="X-PAYPAL-APPLICATION-ID: $APPLICATIONID" \
--post-data="payKey=$PAYKEY&requestEnvelope.errorLanguage=en_US" \
https://www.paypal.com/AdaptivePayments/PaymentDetails)
if echo $PAYMENTDETAILS | grep -q "\&status=COMPLETED"
then echo "Thank you for approving pay key $PAYKEY"
else echo "Sorry, you were unable to approve pay key $PAYKEY. Please try another transaction!"
fi
```
### Displaying and Collecting Shipping Addresses [#displaying-and-collecting-shipping-addresses]
PayPal displays the default shipping address and allows the payment sender to
change the address when you set
`senderOptions.requireShippingAddressSelection` to
`true` in your request to the `SetPaymentOptions` API
operation. You call the `GetShippingAddresses` API operation to
obtain the selected shipping address after invoking the embedded payment flow.
The steps in this example assume that you have implemented the JavaScript for
invoking the embedded payment flow, that you have set up your button or form
to invoke the flow, and that you have included the code to close the window
associated with the flow.
To display and collect the selected shipping address
1. Call the `Pay` API operation with `actionType` set to
`CREATE` to obtain a payment key.
2. Set `senderOptions.requireShippingAddressSelection` to
`true` in your request to `SetPaymentOptions` and call
the API operation.
3. Redirect the payment sender's browser to the embedded payment flow at
`https://www.paypal.com/webapps/adaptivepayment/flow/pay?paykey=...`
after obtaining the pay key.
4. After returning from the flow, call the
`GetShippingAddresses` API operation to obtain the selected
shipping address.
## Guest Payments [#guest-payments]
Adaptive payments supports *guest payments*, which are payments using a
sender's credit card without logging into PayPal to complete the
transaction.The sender is not explicitly identified as a PayPal account holder
during the transaction and is not required to have a PayPal account.
Each receiver of a guest payment must be a verified PayPal Business Verified
or Premier Verified account holder.
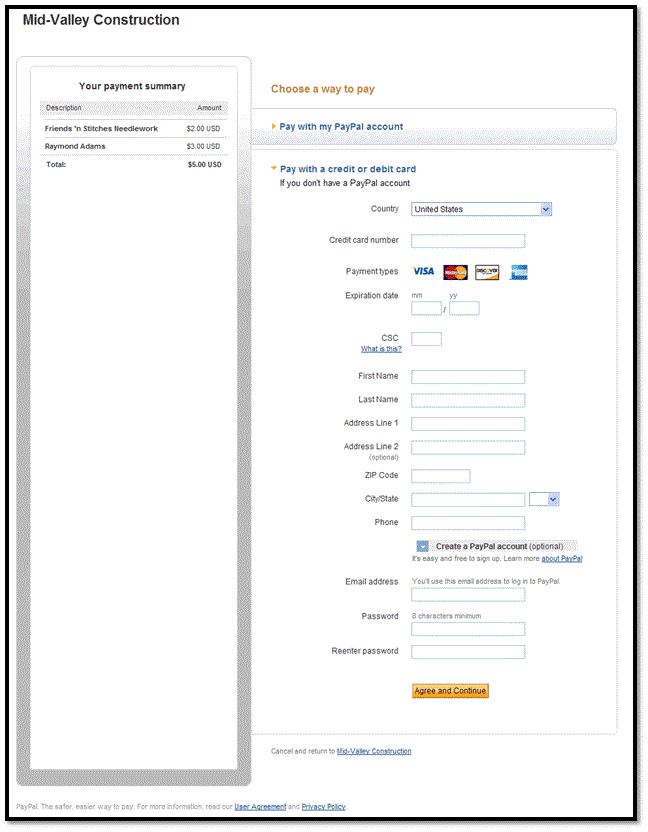
PayPal handles guest payments in the same way that it handles explicitly
approved payments. Instead of logging into PayPal to complete transaction, the
sender provides credit card information on the PayPal payment screen:
> **Note:** **Note:** For European Union countries, only 10 guest payments
> are allowed per card.
## Fee Payment Configuration [#fee-payment-configuration]
You can set up a payment transaction so that either the sender of a payment
pays the fee or the receivers of a payment pay the fee. If receivers pay the
fee, you can specify whether the primary receiver in a chained payment pays
the entire fee or whether all receivers pay a portion of the fee.
You can specify who pays these fees. Fee payment configurations include:
* [Sender Pays the Fee](#sender-pays-the-fee)
* [Receiver Pays the Fee in a Parallel Payment](#receiver-pays-the-fee-in-a-parallel-payment)
* [Each Receiver Pays the Fee in a Chained Payment](#each-receiver-pays-the-fee-in-a-chained-payment)
* [Primary Receiver Pays the Fee in a Chained Payment](#primary-receiver-pays-the-fee-in-a-chained-payment)
> **Note:** **Note:** Fees are determined by PayPal and are based on
> criteria, such as the transaction volume of the receiver. In the examples
> that follow, the fees shown are representative only and not actual fees.
### Sender Pays the Fee [#sender-pays-the-fee]
The sender can pay a fee for a simple payment or parallel payment. The
following example shows fees being paid by the sender of a parallel payment,
based on the assessment for each receiver:
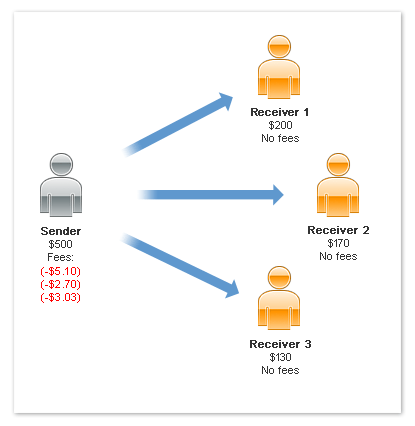
In this example, the sender pays a total of $510.83, which includes all fees.
> **Note:** **Note:** The previous example scenario does not represent
> actual PayPal fees.
### Receiver Pays the Fee in a Parallel Payment [#receiver-pays-the-fee-in-a-parallel-payment]
If the receivers pay the fee in a parallel payment, each receiver pays a
portion of the fee, based on their assessment. The following example shows the
receivers paying the fees:

> **Note:** **Note:** The scenario above is an example only and is not
> representative of actual PayPal fees.
### Each Receiver Pays the Fee in a Chained Payment [#each-receiver-pays-the-fee-in-a-chained-payment]
If the receivers pay the fee in a chained payment, each receiver pays a
portion of the fee, based on their assessment. The following example shows the
receivers paying the fees:
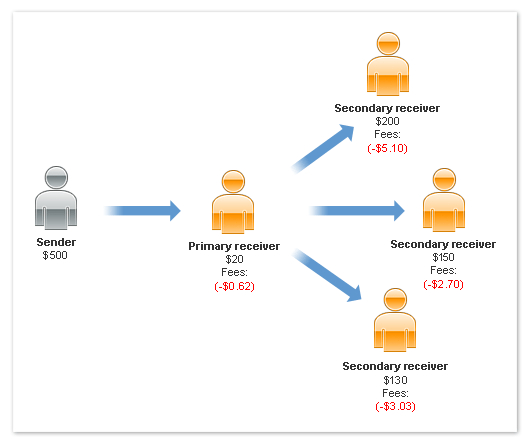
In this example, the primary receiver, identified as the merchant, pays a fee
for $20 received. Each of the other receivers also pay a fee on the amount
each receives.
> **Note:** **Note:** The scenario above is an example only and is not
> representative of actual PayPal fees.
### Primary Receiver Pays the Fee in a Chained Payment [#primary-receiver-pays-the-fee-in-a-chained-payment]
If only the primary receiver pays the fee in a chained payment, other
receivers pay no fees. The fees paid by the primary receiver, however, are
based upon the total fees assigned to all receivers. The following example
shows only the primary receiver, identified as the merchant, paying all fees:
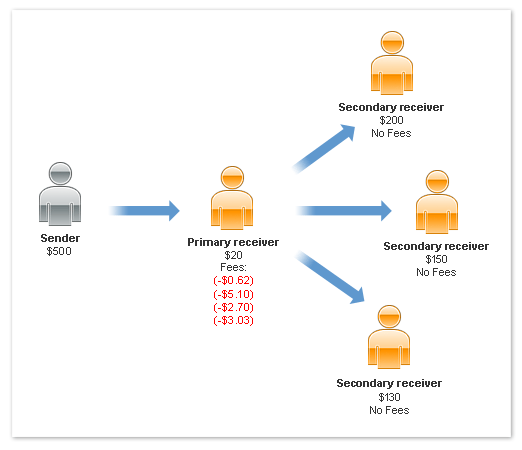
> **Note:** **Note:** The scenario above is an example only and is not
> representative of actual PayPal fees.
## Remittance Transfer Rule [#remittance-transfer-rule]
The Consumer Financial Protection Bureau adopted the Remittance Transfer Rule,
which provides new protections to consumers who send remittance transfers to
other consumers or businesses in a foreign country. The rule requires fee
disclosures and cancellation procedures, as well as new dispute resolution
procedures.
> **Note:** **Note:** This guide summarizes the Remittance Transfer Rule,
> but you should consider obtaining legal advice for your compliance
> obligations.
### Rule Application [#rule-application]
The Remittance Transfer Rule applies to:
* Remittances initiated from US based accounts to non-US accounts.
* Transactions worth more than $15 regardless of the funding currency.
* Payments where the sender is a consumer and the recipient is a natural
person or a business.
### Pre-Payment Disclosure [#pre-payment-disclosure]
The Remittance Transfer Rule specifies pre-payment disclosure to senders; that
is, before payment is authorized. Disclosure includes the recipient's name,
the amount transferred in the funded and received currencies, all fees and
taxes charged, the exchange rate, the total amount charged to the sender
(including the fees and taxes), and the final amount received by the
recipient. You use the
[GetPrePaymentDisclosure](/archive/adaptive-payments/api/get-prepayment-disclosure)
API to disclose this required information.
#### Sample GetPrePaymentDisclosure Request with Different Currencies [#sample-getprepaymentdisclosure-request-with-different-currencies]
```html lineNumbers
?
en_US
AP-05072631H6034030W
```
#### Sample GetPrePaymentDisclosure Response with Different Currencies [#sample-getprepaymentdisclosure-response-with-different-currencies]
```html lineNumbers
2014-02-10T21:20:52.403-08:00
Success
bb0c65de3fa4e
9531812
RTR
EACHRECEIVER
USD
23.77
USD
23.77
USD
EUR
0.6732
lkanisettive-pl-bus@paypal.com
EUR
16.00
PL
EUR
0.97
EUR
0.00
EUR
15.03
If your recipient does not have an account yet, the actual fees amount may be different after the account is created
```
### Post-Payment Disclosure [#post-payment-disclosure]
The Remittance Transfer Rule specifies post-payment disclosure; that is, after
payment is authorized. Disclosure includes the recipient's name and
information (phone number and/or email address and address if available),
pre-payment disclosures, the date by which the recipient can access the funds,
information about the state agency that licenses the provider for payment, and
cancellation and dispute resolution rights. Mobile transactions need not be
displayed on the screen but can be sent via email. The
[ExecutePayment](/archive/adaptive-payments/api/execute-payment)
API includes the call to disclose the required post-payment information.
#### Sample ExecutePayment Response with Different Currencies [#sample-executepayment-response-with-different-currencies]
```html lineNumbers
2014-02-10T21:21:51.235-08:00
Success
0bed3d804d45f
9531812
COMPLETED
lkanisettive-pl-bus@paypal.com
2014-08-15-07:00
The payment is credited to the recipient PayPal account. The recipient can access the funds according to the terms of their PayPal User agreement. This should not impact the shipping date or any agreement you have with the seller.
State of New Jersey Department of Banking and Insurance
(609) 292-7272
https://example.com
```