# Create an Automatic Billing button (/archive/paypal-payments-standard/integration-guide/auto-bill-step-1)
> **Warning:** This product is [deprecated](/archive/product-lifecycle) and should not be used for new integrations. Use [Payment Links and Buttons](/payment-links-buttons/overview) instead. For information about migrating, visit the [Upgrade Hub](https://developer.paypal.com/upgrade/wps/guide/).
> **Note:** **Note:** You must have a PayPal Business account to create and use Automatic Billing buttons. In addition, you must be approved for PayPal Payments Standard Enhanced Recurring Payments. For more information, contact your PayPal representative.
Learn how to create an Automatic Billing button by using the Create a PayPal payment button page.
| | | |
| -- | -------- | ---------------------------------------------------------------------------------------------------- |
| 1. | Required | [Open the Make a PayPal Button page.](#open-the-make-a-paypal-button-page) |
| 2. | Required | [Enter payment details.](#enter-payment-details) |
| 3. | Required | [Enter billing information.](#enter-billing-information) |
| 4. | Optional | [Customize button text and appearance.](#customize-the-button-text-and-appearance) |
| 5. | Optional | [Associate transactions with your PayPal account.](#associate-transactions-with-your-paypal-account) |
## Open the Make a PayPal Button page [#open-the-make-a-paypal-button-page]
1. Go to [paypal.com/buttons](https://www.paypal.com/buttons).
2. Log in with the PayPal account you want to use to make the button.
3. Select the button you want to make.
## Enter payment details [#enter-payment-details]
1. In **Item name**, enter the name of the item or service that you want to sell.
2. (Optional) If you assign tracking numbers to your products or you want PayPal to track inventory levels, enter a unique inventory ID or tracking number in **Item ID**.
3. To change the default currency, click a different currency from the **Currency** drop-down menu. The default currency is listed in your Profile, under My Money and PayPal balance.
## Enter billing information [#enter-billing-information]
With Automatic Billing buttons, buyers agree to pay you automatically when you bill them. When they sign up for automatic billing on your website, the buyers select a maximum limit that they will allow you to charge them.
> **Note:** **Important:** PayPal does not collect payments from buyers until you initiate a monthly bill. When you know the amount you want to bill a customer each month, you must initiate a billing request. After you enter your customer's billing amount, PayPal collects the payment automatically. PayPal allows you to bill a customer only once in any monthly billing cycle. For more information on initiating a monthly bill, see [Automatic Billing: initiate a monthly bill](/archive/paypal-payments-standard/integration-guide/manage-billing-plans).
**To allow a customer to set the maximum payment amount:**
1. Under **Set up your button**, leave **Let my customers choose their own maximum payment limits** checked. (Default)
2. (Optional) In **Description**, enter a description of the goods or services for which you will bill customers. The description appears above the text box where they choose the monthly maximum. For example, you might enter: `Regular house cleaning` Prior to checkout, buyers enter monthly maximums in a text box above the button.
3. In **Minimum payment limit**, enter the lowest payment amount in **USD**. Customers cannot check out with a lower amount. 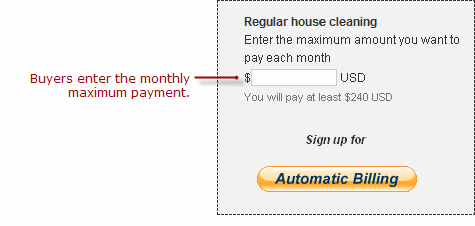 **To set the minimum and maximum payment amounts:**
1. Click **I'll set the payment limits** to set both the minimum and maximum amount you will charge ahead of time.
2. (Optional) In **Description**, enter a description of the goods or services for which you will bill customers. The description appears above the text box where they choose the monthly maximum. For example, you might enter: `Regular house cleaning`
3. Under **Set your drop down menu options**, enter the lowest maximum payment amount you want buyers to choose in the **Option 1** field.
4. Add successively higher maximums for up to 10 options. Before checkout, buyers select the monthly payment from a drop-down menu with the options that you set.
**To set the minimum and maximum payment amounts:**
1. Click **I'll set the payment limits** to set both the minimum and maximum amount you will charge ahead of time.
2. (Optional) In **Description**, enter a description of the goods or services for which you will bill customers. The description appears above the text box where they choose the monthly maximum. For example, you might enter: `Regular house cleaning`
3. Under **Set your drop down menu options**, enter the lowest maximum payment amount you want buyers to choose in the **Option 1** field.
4. Add successively higher maximums for up to 10 options. Before checkout, buyers select the monthly payment from a drop-down menu with the options that you set.  5. Click **Done** to view your button in Your customer's view. > **Note:** **Note:** If you're satisfied with your button, you can stop here. Click **Create Button** to generate the HTML code snippet for your button. For detailed steps, see [Copy and paste button code](/archive/paypal-payments-standard/integration-guide/copy-paste-code).
## Customize the button text and appearance [#customize-the-button-text-and-appearance]
You can change the appearance and text of the default PayPal button or you can enter a URL to use your own button image.
You can change the appearance and text of the default PayPal button or you can enter a URL to use your own button image.
1. Click **Customize text or appearance**.
2. To use a smaller version of the default PayPal button, click **Use smaller button**.
3. By default, credit card logos are displayed beneath the payment button. To hide the logos, uncheck **Display credit card logos**. > **Note:** **Note:** This option is not applicable to Add to Cart buttons.
4. To change the default language, click the **Country and language for button** menu and select a country and language. If you change the country and language, verify that Currency is set appropriately. The default language is specified in Preferred language, under My Settings in your Profile.
5. To use your own button (not hosted by PayPal), select **Use your own button image** and then enter the URL of your button image. If your image is hosted on an SSL-secured server, change the text box to begin with `https://`.
## Associate transactions with your PayPal account [#associate-transactions-with-your-paypal-account]
By default, transactions from your payment button are associated with your PayPal merchant ID. To associate transactions to an email address instead, click **Use my primary email address**. If your Profile contains multiple email addresses, click the address to use as the primary email address for this button.
By default, transactions from your payment button are associated with your PayPal merchant ID. To associate transactions to an email address instead, click
> **Note:** **Tip:** PayPal recommends using the default option so that your email address will not be exposed within the button code.
## Next [#next]
Choose one of these steps:
* Click **Create Button** on the Create a PayPal payment button page, and then [copy and paste the HTML snippet](/archive/paypal-payments-standard/integration-guide/copy-paste-code) to your web page.
* [Track inventory, profits, and loss](/archive/paypal-payments-standard/integration-guide/step-2).
* [Customize advanced features](/archive/paypal-payments-standard/integration-guide/step-3).
## Additional information [#additional-information]
* [Initiate a monthly automatic bill](/archive/paypal-payments-standard/integration-guide/manage-billing-plans)
* [Automatic Billing checkout experience](/archive/paypal-payments-standard/integration-guide/checkout-exp-auto-bill).
5. Click **Done** to view your button in Your customer's view. > **Note:** **Note:** If you're satisfied with your button, you can stop here. Click **Create Button** to generate the HTML code snippet for your button. For detailed steps, see [Copy and paste button code](/archive/paypal-payments-standard/integration-guide/copy-paste-code).
## Customize the button text and appearance [#customize-the-button-text-and-appearance]
You can change the appearance and text of the default PayPal button or you can enter a URL to use your own button image.
You can change the appearance and text of the default PayPal button or you can enter a URL to use your own button image.
1. Click **Customize text or appearance**.
2. To use a smaller version of the default PayPal button, click **Use smaller button**.
3. By default, credit card logos are displayed beneath the payment button. To hide the logos, uncheck **Display credit card logos**. > **Note:** **Note:** This option is not applicable to Add to Cart buttons.
4. To change the default language, click the **Country and language for button** menu and select a country and language. If you change the country and language, verify that Currency is set appropriately. The default language is specified in Preferred language, under My Settings in your Profile.
5. To use your own button (not hosted by PayPal), select **Use your own button image** and then enter the URL of your button image. If your image is hosted on an SSL-secured server, change the text box to begin with `https://`.
## Associate transactions with your PayPal account [#associate-transactions-with-your-paypal-account]
By default, transactions from your payment button are associated with your PayPal merchant ID. To associate transactions to an email address instead, click **Use my primary email address**. If your Profile contains multiple email addresses, click the address to use as the primary email address for this button.
By default, transactions from your payment button are associated with your PayPal merchant ID. To associate transactions to an email address instead, click
> **Note:** **Tip:** PayPal recommends using the default option so that your email address will not be exposed within the button code.
## Next [#next]
Choose one of these steps:
* Click **Create Button** on the Create a PayPal payment button page, and then [copy and paste the HTML snippet](/archive/paypal-payments-standard/integration-guide/copy-paste-code) to your web page.
* [Track inventory, profits, and loss](/archive/paypal-payments-standard/integration-guide/step-2).
* [Customize advanced features](/archive/paypal-payments-standard/integration-guide/step-3).
## Additional information [#additional-information]
* [Initiate a monthly automatic bill](/archive/paypal-payments-standard/integration-guide/manage-billing-plans)
* [Automatic Billing checkout experience](/archive/paypal-payments-standard/integration-guide/checkout-exp-auto-bill).