# Secure your HTML payment buttons (/archive/paypal-payments-standard/integration-guide/encryptedwebpayments)
> **Warning:** This product is [deprecated](/archive/product-lifecycle) and should not be used for new integrations. Use [Payment Links and Buttons](/payment-links-buttons/overview) instead. For information about migrating, visit the [Upgrade Hub](https://developer.paypal.com/upgrade/wps/guide/).
All PayPal Payments Standard buttons created using the
[Create a PayPal payment button](https://www.paypal.com/us/cgi-bin/webscr?cmd=_button-designer)
page are protected automatically. Either all payment data is saved by PayPal
and only a single button ID is shared between the merchant website and PayPal,
or the payment button code is encrypted before it is displayed on the merchant
website.
All PayPal Payments Standard buttons created using the
If your implementation allows it, PayPal recommends using the Create a PayPal
payment button page to create all payment buttons.
| Strategy for Securing Payment Buttons | See |
| ------------------------------------------------------------------------------------------------------------------------------------------------------------------------------------------------------------------------------------------------------------------------------------------------------------------------------- | ---------------------------------------------------------------------------------------------------- |
| Create all your payment buttons using the Create a PayPal payment button page on the PayPal website. All buttons created using this tool are secure by default, so there is no further security action required. | [Create a payment button](/archive/paypal-payments-standard/integration-guide/create-payment-button) |
| Use the Button Manager API to dynamically create secure buttons. Note that you must be comfortable programming in languages such as Java and PHP to use the Button Manager API. | [PayPal Payments Standard Button Manager API Overview](/archive/button-manager/integration-guide) |
| Manually create payment buttons, and then manually encrypt them using the Encrypted Website Payments (EWP) command line encryption utility. Note that you should only use this method if your implementation will not allow you to use the Create a PayPal payment button page. | [Using EWP to Protect Manually Created Payment Buttons](#id08A3I0QC0X4) |
| Edit your PayPal account profile to block unprotected and non-encrypted buttons. This adds security to your system by blocking payments made from unexpected sources. | [Blocking Unprotected and Non-encrypted Website Payments](#id08A3I0R00ZJ) |
## Encrypted Website Payments (EWP) [#encrypted-website-payments-ewp]
EWP is a PayPal Payments Standard feature that uses public and private keys to
encrypt the payment button code used on merchant websites. The encryption
hides the payment details so they cannot be seen by anyone viewing the website
source code in a browser.
> **Note:** **Important:** The EWP feature is only required to be used for
> manually created buttons.
If you manually create buttons without using EWP, the non-secured or
non-encrypted HTML button code can be viewed by anyone. Because of this, a
malicious third party can copy a page, change button HTML variables such as
price, and make fraudulent payments. The EWP encryption combats malicious
attacks on merchants where if the button were not encrypted, the HTML
attributes of the button, such as price, invoice number, or even the return
URL would be displayed in plain text and could easily be modified to spoof
payments.
If you manually create buttons without using EWP, the non-secured or
non-encrypted HTML button code can be viewed by anyone. Because of this, a
malicious third party can copy a page, change button HTML variables such as
price, and make fraudulent payments. The EWP encryption combats malicious
attacks on merchants where if the button were not encrypted, the HTML
attributes of the button, such as price, invoice number, or even the return
URL would be displayed in plain text and could easily be modified to spoof
payments.
* [How Encrypted Website Payments Work](#id08A3I0P0B30)
* [Public Key Encryption Used by Encrypted Website Payments](#id08A3I0P0MRO)
### How Encrypted Website Payments Work [#how-encrypted-website-payments-work]
The EWP feature relies on standard public key encryption for protection. With
public and private keys, you can manually or programmatically encrypt payment
button code to hide the payment details before the buttons are displayed on
your website. The table below illustrates the sequence of actions that occur
with payment buttons protected by using EWP.
The EWP feature relies on standard public key encryption for protection. With
public and private keys, you can manually or programmatically encrypt payment
button code to hide the payment details before the buttons are displayed on
your website. The table below illustrates the sequence of actions that occur
with payment buttons protected by using EWP.
| Website Actions | Payer Actions | PayPal Actions |
| ---------------------------------------------------------------------------------------------------------------------------------------------------------------------------------------------------------------------------------------------------------------------------------------------------------------------- | ------------------------------------------ | ------------------------------------------------------------------------------------------------------------------------------------------------------------------------------------ |
| Generate a public key for the website, upload it to PayPal, and download the PayPal public certificate to the website. > **Note:** **Note:** Do this action only once, when you first integrate PayPal Payments Standard with your website. | | |
| Manually write the HTML code for a payment button. | | |
| Encrypt the payment button code by using the PayPal public key and then signing the encrypted code with the website's private key. | | |
| Publish the signed, encrypted HTML code for the payment button to the website. | Click the published PayPal payment button. | PayPal checks the authenticity of the data by using the website's public key, which was previously uploaded to PayPal. |
| | | PayPal decrypts the protected button code by using the PayPal private key. |
| | | PayPal redirects the payer's browser to the appropriate PayPal checkout experience, as specified in the HTML variables of the decrypted button code. |
### Public Key Encryption Used by Encrypted Website Payments [#public-key-encryption-used-by-encrypted-website-payments]
EWP uses public key encryption, or asymmetric cryptography, which provides
security and convenience by allowing senders and receivers of encrypted
communication to exchange public keys to unlock each others messages. The
fundamental aspects of public key encryption are:
* **Public keys** – Public keys are created by receivers and are given to senders before they encrypt and send information. Public certificates comprise a public key and identity information, such as the originator of the key and an expiry date. Public certificates can be signed by certificate authorities, who guarantee that public certificate and their public keys belong to the named entities.
You and PayPal exchange each others' public certificates.
* **Private keys –** Private keys created by receivers are kept to themselves.
You create a private key and keep it in your system. PayPal keeps it private key on its system.
* **The encryption process –** Senders use their private key and receivers' public keys to encrypt information before sending it. Receivers use their private keys and senders' public keys to decrypt information after receiving it. This encryption process also uses digital signatures in public certificates to verify the sender of the information.
You use your private key and PayPal's public key to encrypt your HTML button code. PayPal uses its private key and your public key to decrypt button code after people click your payment buttons.
## Using EWP to Protect Manually Created Payment Buttons [#using-ewp-to-protect-manually-created-payment-buttons]
Because manually created payment buttons are not saved on the PayPal website,
you should use EWP to encrypt the button code before placing the code on your
webpage. The following steps describe that process:
1. [Set Up Certificates](#id08A3I0P20E9) before Using EWP
2. [Download and Configure EWP software for Manually Created Buttons](#setting_up_ewp_software_for_manual_buttons)
3. [Use the Downloaded Software to Manually Encrypt the Payment Button Code](#encrypt_the_payment_button)
### Set Up Certificates [#set-up-certificates]
This section describes how to configure the public certificates and private
keys on your server.
> **Note:** **Important:** The certificate security may already be set up
> on your server(s). To determine if you have a public certificate already
> installed, check your profile as described in the initial steps of the
> following procedure that details how to upload a certificate to your
> account.
 1. [Generate your private key](#id08A3I0PD04Y)
2. [Generate your public certificate](#id08A3I0Q02XW)
3. [Upload your public certificate to your PayPal account](#id08A3I0Q0CQN)
4. [Download the PayPal public certificate from the PayPal website](#id08A3I0Q0QBI)
PayPal uses only X.509 public certificates, not public keys. A public key can
be used for decryption but contains no information identifying who provided
the key. A public certificate includes a public key along with information
about the key, such as when the key expires and who owns the key. PayPal
accepts public certificates in OpenSSL PEM format from any established
certificate authority, such as VeriSign.
PayPal uses only X.509 public certificates, not public keys. A public key can
be used for decryption but contains no information identifying who provided
the key. A public certificate includes a public key along with information
about the key, such as when the key expires and who owns the key. PayPal
accepts public certificates in OpenSSL PEM format from any established
certificate authority, such as VeriSign.
[https://www.openssl.org](https://www.openssl.org)), which is detailed in the following section.
[https://www.openssl.org](https://www.openssl.org)
#### Generating Your Private Key Using OpenSSL [#generating-your-private-key-using-openssl]
Using the `openssl` program, enter the following command to
generate your private key. The command generates a 1024-bit ASRSA private key
that is stored in the file `my-prvkey.pem`:
```text lineNumbers
openssl genrsa -out my-prvkey.pem 1024
```
#### Generating Your Public Certificate Using OpenSSL [#generating-your-public-certificate-using-openssl]
The public certificate must be in PEM format. To generate your certificate,
enter the following `openssl` command, which generates a public
certificate in the file `my-pubcert.pem`:
```text lineNumbers
openssl req -new -key my-prvkey.pem -x509 -days 365 -out my-pubcert.pem
```
#### Uploading Your Public Certificate to Your PayPal Account [#uploading-your-public-certificate-to-your-paypal-account]
To upload your public certificate to your PayPal account:
1. Log in to your PayPal business account at [www.paypal.com](https://www.paypal.com).
2. Click your profile name in the top right corner of your account and then click **Account Settings**.
3. Click **Website payments** on the left side of the page, then in the middle click Update across from **Encrypted payment settings**. The **Website Payment Certificates** page opens.
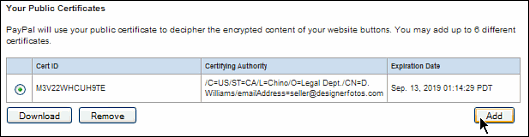
4. Scroll down the page to the **Your Public Certificates** section, and click the **Add** button at the bottom of the page. The Add Certificate page opens.
5. Click the **Browse** button, and select the public certificate that you want to upload to PayPal from your local computer.
> **Note:** **Note:** The file you upload must be in PEM format.
6. Click the **Add** button. After your public certificate uploads successfully, it appears in the **Your Public Certificates** section of the **Website Payment Certificates** page.
7. Store the certificate ID that PayPal assigned to your public certificate in a secure place. You need the certificate ID that PayPal assigned to encrypt your payment buttons by using the Encrypted Website Payment software provided by PayPal.
#### Downloading the PayPal Public Certificate From the PayPal Website [#downloading-the-paypal-public-certificate-from-the-paypal-website]
To download the PayPal public certificate:
1. Log in to your PayPal business account at [www.paypal.com](https://www.paypal.com).
2. Click your profile name in the top right corner of your account and then click **Account Settings**.
3. Click **Website payments** on the left side of the page, then in the middle click Update across from **Encrypted payment settings**. The **Website Payment Certificates** page opens.
4. Scroll down the page to the **PayPal Public Certificates** section.
1. [Generate your private key](#id08A3I0PD04Y)
2. [Generate your public certificate](#id08A3I0Q02XW)
3. [Upload your public certificate to your PayPal account](#id08A3I0Q0CQN)
4. [Download the PayPal public certificate from the PayPal website](#id08A3I0Q0QBI)
PayPal uses only X.509 public certificates, not public keys. A public key can
be used for decryption but contains no information identifying who provided
the key. A public certificate includes a public key along with information
about the key, such as when the key expires and who owns the key. PayPal
accepts public certificates in OpenSSL PEM format from any established
certificate authority, such as VeriSign.
PayPal uses only X.509 public certificates, not public keys. A public key can
be used for decryption but contains no information identifying who provided
the key. A public certificate includes a public key along with information
about the key, such as when the key expires and who owns the key. PayPal
accepts public certificates in OpenSSL PEM format from any established
certificate authority, such as VeriSign.
[https://www.openssl.org](https://www.openssl.org)), which is detailed in the following section.
[https://www.openssl.org](https://www.openssl.org)
#### Generating Your Private Key Using OpenSSL [#generating-your-private-key-using-openssl]
Using the `openssl` program, enter the following command to
generate your private key. The command generates a 1024-bit ASRSA private key
that is stored in the file `my-prvkey.pem`:
```text lineNumbers
openssl genrsa -out my-prvkey.pem 1024
```
#### Generating Your Public Certificate Using OpenSSL [#generating-your-public-certificate-using-openssl]
The public certificate must be in PEM format. To generate your certificate,
enter the following `openssl` command, which generates a public
certificate in the file `my-pubcert.pem`:
```text lineNumbers
openssl req -new -key my-prvkey.pem -x509 -days 365 -out my-pubcert.pem
```
#### Uploading Your Public Certificate to Your PayPal Account [#uploading-your-public-certificate-to-your-paypal-account]
To upload your public certificate to your PayPal account:
1. Log in to your PayPal business account at [www.paypal.com](https://www.paypal.com).
2. Click your profile name in the top right corner of your account and then click **Account Settings**.
3. Click **Website payments** on the left side of the page, then in the middle click Update across from **Encrypted payment settings**. The **Website Payment Certificates** page opens.
4. Scroll down the page to the **Your Public Certificates** section, and click the **Add** button at the bottom of the page. The Add Certificate page opens.
5. Click the **Browse** button, and select the public certificate that you want to upload to PayPal from your local computer.
> **Note:** **Note:** The file you upload must be in PEM format.
6. Click the **Add** button. After your public certificate uploads successfully, it appears in the **Your Public Certificates** section of the **Website Payment Certificates** page.
7. Store the certificate ID that PayPal assigned to your public certificate in a secure place. You need the certificate ID that PayPal assigned to encrypt your payment buttons by using the Encrypted Website Payment software provided by PayPal.
#### Downloading the PayPal Public Certificate From the PayPal Website [#downloading-the-paypal-public-certificate-from-the-paypal-website]
To download the PayPal public certificate:
1. Log in to your PayPal business account at [www.paypal.com](https://www.paypal.com).
2. Click your profile name in the top right corner of your account and then click **Account Settings**.
3. Click **Website payments** on the left side of the page, then in the middle click Update across from **Encrypted payment settings**. The **Website Payment Certificates** page opens.
4. Scroll down the page to the **PayPal Public Certificates** section.
 5. Click the **Download** button, and save the file in a secure location on your web server which can be accessed from your website code.
##### Removing a Public Certificate [#removing-a-public-certificate]
> **Note:** **Important:** If you remove your public certificate, its
> associated certificate ID is no longer valid for encrypting buttons, and any
> buttons that you generated or wrote manually for your website that use the
> ID will not function correctly.
To remove one or more of your public certificates:
1. Log in to your PayPal business account at [www.paypal.com](https://www.paypal.com).
2. Click your profile name in the top right corner of your account and then click **Account Settings**.
3. Click **Website payments** on the left side of the page, then in the middle click Update across from **Encrypted payment settings**. The **Website Payment Certificates** page opens.
4. Scroll down the page to the **Your Public Certificates** section.
5. Select the radio button next to the certificate you want to remove, and click the **Remove** button. The Remove Certificate page opens.
6. Click the **Remove** button to confirm the removal of the public certificate that you selected.
### Download and Configure EWP software for Manually Created Buttons [#download-and-configure-ewp-software-for-manually-created-buttons]
EWP includes both Java and Microsoft Windows versions of the software that
needs to be downloaded and installed on your web server if you use manually
created buttons. To use EWP to protect manually created payment buttons on
your website, follow the procedure below to set up and configure EWP to work
on your web server.
1. Download either the Java or Windows software from the following location after logging in to PayPal: [https://www.paypal.com/us/cgi-bin/webscr?cmd=p/xcl/rec/ewp-code](https://www.paypal.com/us/cgi-bin/webscr?cmd=p/xcl/rec/ewp-code)
2. Extract and store the software in a folder on your web server that can be accessed by your website code.
3. Copy your private key, public certificate, p12 file and the PayPal public certificate to the same folder on your web server where the software i located.
4. Update your PayPal account profile to block unprotected and non-encrypted payments. See [Blocking Unprotected and Non-encrypted Website Payments](#id08A3I0R00ZJ) for detailed instructions.
### Use the Downloaded Software to Manually Encrypt the Payment Button Code [#use-the-downloaded-software-to-manually-encrypt-the-payment-button-code]
To use the downloaded software to manually encrypt the payment button code:
1. Create a separate input file that contains PayPal Payments Standard variables and values for each encrypted button that you need to generate manually. Save the file(s) to a location on local system. Each variable and value must be on a separate line, as shown in the following example.
> **Note:** **Note:** The `cert_id` variable identifies the public certificate you uploaded to PayPal website.
```text lineNumbers
cert_id=Z24MFU6DSHBXQ
cmd=_xclick
business=sales@company.com
item_name=Handheld Computer
item_number=1234
custom=sc-id-789
amount=500.00
currency_code=USD
tax=41.25
shipping=20.00
address_override=1
address1=123 Main St
city=Austin
state=TX
zip=94085
country=USA
cancel_return=https://example.com/cancel
```
2. From the command line, run the encryption software using the appropriate syntax, as shown in the table below:
| Software | Command Line |
| ----------------- | ----------------------------------------------------------------------------------------------- |
| Java | `1java ButtonEncryption CertFile PKCS12File PPCertFile Password InputFile OutputFile [Sandbox]` |
| Microsoft Windows | `1PPEncrypt CertFile PrivKeyFile PPCertFile InputFile OutputFile [Sandbox]` |
The following are definitions for the properties used in the table above:
| Property | Description |
| ------------ | --------------------------------------------------------------------------------------------------------------------------------------------------------------------------------------- |
| `CertFile` | The pathname to your own public certificate |
| `PKCS12File` | The pathname to the PKCS12-format of your own public certificate |
| `PPCertFile` | The pathname to a copy of the PayPal public certificate |
| `Password` | The passphrase to the PKCS12-format of your own public certificate |
| `InputFile` | The pathname to file containing the non-encrypted Website Payments HTML Form variables |
| `OutputFile` | A file name for the encrypted output |
| `[Sandbox]` | The optional word `Sandbox` that lets you test payment buttons in the PayPal sandbox that you protected with Encrypted Website Payments |
3. Copy the code from the output file specified in the command run in the previous step, for each button. Then copy the encrypted button code for each button to the location you want to place the button on your website.
## Blocking Unprotected and Non-Encrypted Website Payments [#blocking-unprotected-and-non-encrypted-website-payments]
For extra security of your non-hosted encrypted payment buttons, update your
PayPal account profile to block all non-encrypted payments. To block payments
from unprotected and non-encrypted PayPal Payments Standard buttons:
1. Log in to your PayPal business account at [www.paypal.com](https://www.paypal.com) .
2. Click your profile name in the top right corner of your account and then click **Account Settings**.
3. Click **Website payments** on the left side of the page, then in the middle click Update across from **Website preferences**. The **Website Payment Preferences** page opens.
4. Scroll down the page to the **Encrypted Website Payments** section.
5. Click the **Download** button, and save the file in a secure location on your web server which can be accessed from your website code.
##### Removing a Public Certificate [#removing-a-public-certificate]
> **Note:** **Important:** If you remove your public certificate, its
> associated certificate ID is no longer valid for encrypting buttons, and any
> buttons that you generated or wrote manually for your website that use the
> ID will not function correctly.
To remove one or more of your public certificates:
1. Log in to your PayPal business account at [www.paypal.com](https://www.paypal.com).
2. Click your profile name in the top right corner of your account and then click **Account Settings**.
3. Click **Website payments** on the left side of the page, then in the middle click Update across from **Encrypted payment settings**. The **Website Payment Certificates** page opens.
4. Scroll down the page to the **Your Public Certificates** section.
5. Select the radio button next to the certificate you want to remove, and click the **Remove** button. The Remove Certificate page opens.
6. Click the **Remove** button to confirm the removal of the public certificate that you selected.
### Download and Configure EWP software for Manually Created Buttons [#download-and-configure-ewp-software-for-manually-created-buttons]
EWP includes both Java and Microsoft Windows versions of the software that
needs to be downloaded and installed on your web server if you use manually
created buttons. To use EWP to protect manually created payment buttons on
your website, follow the procedure below to set up and configure EWP to work
on your web server.
1. Download either the Java or Windows software from the following location after logging in to PayPal: [https://www.paypal.com/us/cgi-bin/webscr?cmd=p/xcl/rec/ewp-code](https://www.paypal.com/us/cgi-bin/webscr?cmd=p/xcl/rec/ewp-code)
2. Extract and store the software in a folder on your web server that can be accessed by your website code.
3. Copy your private key, public certificate, p12 file and the PayPal public certificate to the same folder on your web server where the software i located.
4. Update your PayPal account profile to block unprotected and non-encrypted payments. See [Blocking Unprotected and Non-encrypted Website Payments](#id08A3I0R00ZJ) for detailed instructions.
### Use the Downloaded Software to Manually Encrypt the Payment Button Code [#use-the-downloaded-software-to-manually-encrypt-the-payment-button-code]
To use the downloaded software to manually encrypt the payment button code:
1. Create a separate input file that contains PayPal Payments Standard variables and values for each encrypted button that you need to generate manually. Save the file(s) to a location on local system. Each variable and value must be on a separate line, as shown in the following example.
> **Note:** **Note:** The `cert_id` variable identifies the public certificate you uploaded to PayPal website.
```text lineNumbers
cert_id=Z24MFU6DSHBXQ
cmd=_xclick
business=sales@company.com
item_name=Handheld Computer
item_number=1234
custom=sc-id-789
amount=500.00
currency_code=USD
tax=41.25
shipping=20.00
address_override=1
address1=123 Main St
city=Austin
state=TX
zip=94085
country=USA
cancel_return=https://example.com/cancel
```
2. From the command line, run the encryption software using the appropriate syntax, as shown in the table below:
| Software | Command Line |
| ----------------- | ----------------------------------------------------------------------------------------------- |
| Java | `1java ButtonEncryption CertFile PKCS12File PPCertFile Password InputFile OutputFile [Sandbox]` |
| Microsoft Windows | `1PPEncrypt CertFile PrivKeyFile PPCertFile InputFile OutputFile [Sandbox]` |
The following are definitions for the properties used in the table above:
| Property | Description |
| ------------ | --------------------------------------------------------------------------------------------------------------------------------------------------------------------------------------- |
| `CertFile` | The pathname to your own public certificate |
| `PKCS12File` | The pathname to the PKCS12-format of your own public certificate |
| `PPCertFile` | The pathname to a copy of the PayPal public certificate |
| `Password` | The passphrase to the PKCS12-format of your own public certificate |
| `InputFile` | The pathname to file containing the non-encrypted Website Payments HTML Form variables |
| `OutputFile` | A file name for the encrypted output |
| `[Sandbox]` | The optional word `Sandbox` that lets you test payment buttons in the PayPal sandbox that you protected with Encrypted Website Payments |
3. Copy the code from the output file specified in the command run in the previous step, for each button. Then copy the encrypted button code for each button to the location you want to place the button on your website.
## Blocking Unprotected and Non-Encrypted Website Payments [#blocking-unprotected-and-non-encrypted-website-payments]
For extra security of your non-hosted encrypted payment buttons, update your
PayPal account profile to block all non-encrypted payments. To block payments
from unprotected and non-encrypted PayPal Payments Standard buttons:
1. Log in to your PayPal business account at [www.paypal.com](https://www.paypal.com) .
2. Click your profile name in the top right corner of your account and then click **Account Settings**.
3. Click **Website payments** on the left side of the page, then in the middle click Update across from **Website preferences**. The **Website Payment Preferences** page opens.
4. Scroll down the page to the **Encrypted Website Payments** section.
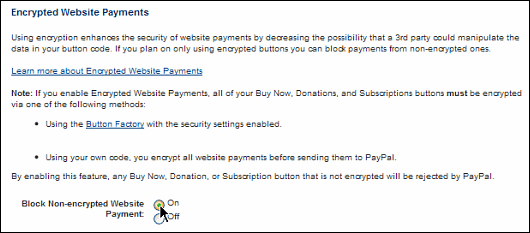 5. Next to the **Block Non-encrypted Website Payment** label, select the **On** radio button.
6. Scroll to the bottom of the page, and click the **Save** button.
5. Next to the **Block Non-encrypted Website Payment** label, select the **On** radio button.
6. Scroll to the bottom of the page, and click the **Save** button.