# Integrate card payments (/limited-release/commerce-platform/accept-payments/advanced/integrate)


## How it works [#how-it-works]

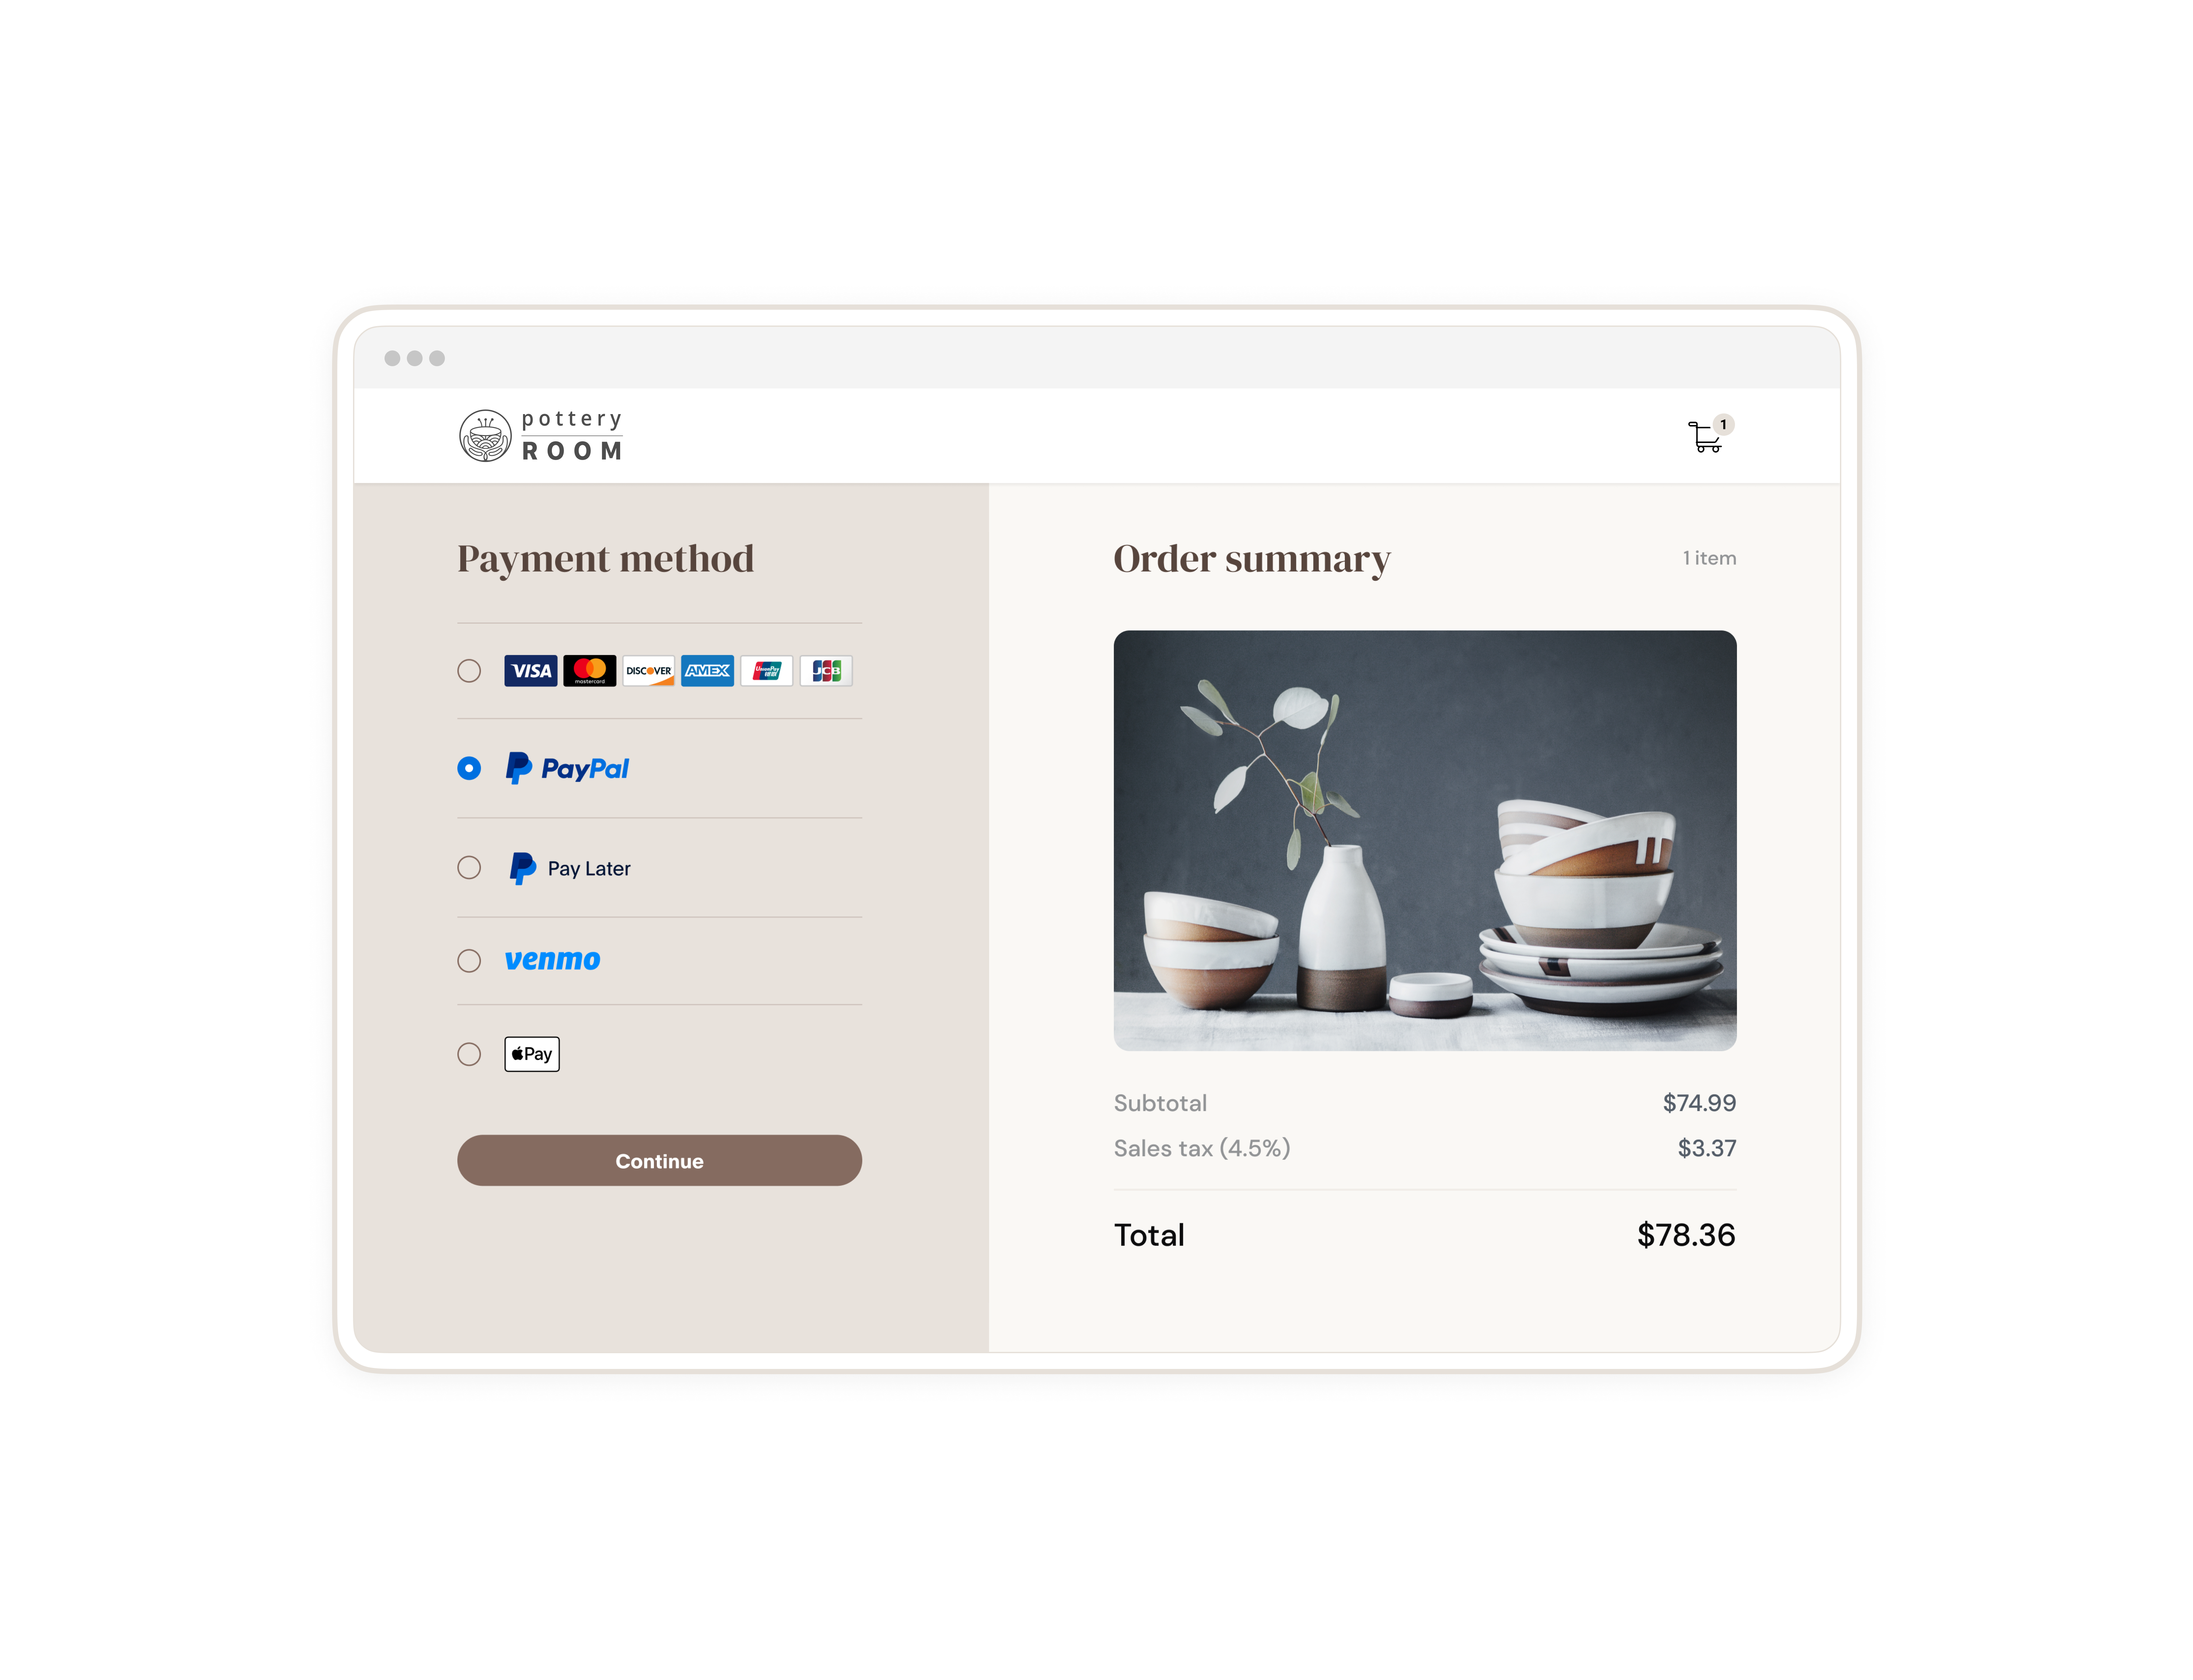
Integrate Expanded Checkout to present credit and debit card fields customized with your site's branding style. Expanded Checkout helps customers pay with PayPal, debit and credit cards, Pay Later options, Venmo, and other payment methods.

You can find more ways to extend your integration in [Customize your buyer's experience](/limited-release/commerce-platform/accept-payments/advanced/customize/).

<img src="https://www.paypalobjects.com/ppdevdocs/img/advanced-checkout-integration-example.png" alt="image" />

> **Info:** **Important:** This JavaScript SDK documentation uses the `CardFields` component.

## Sequence diagram [#sequence-diagram]

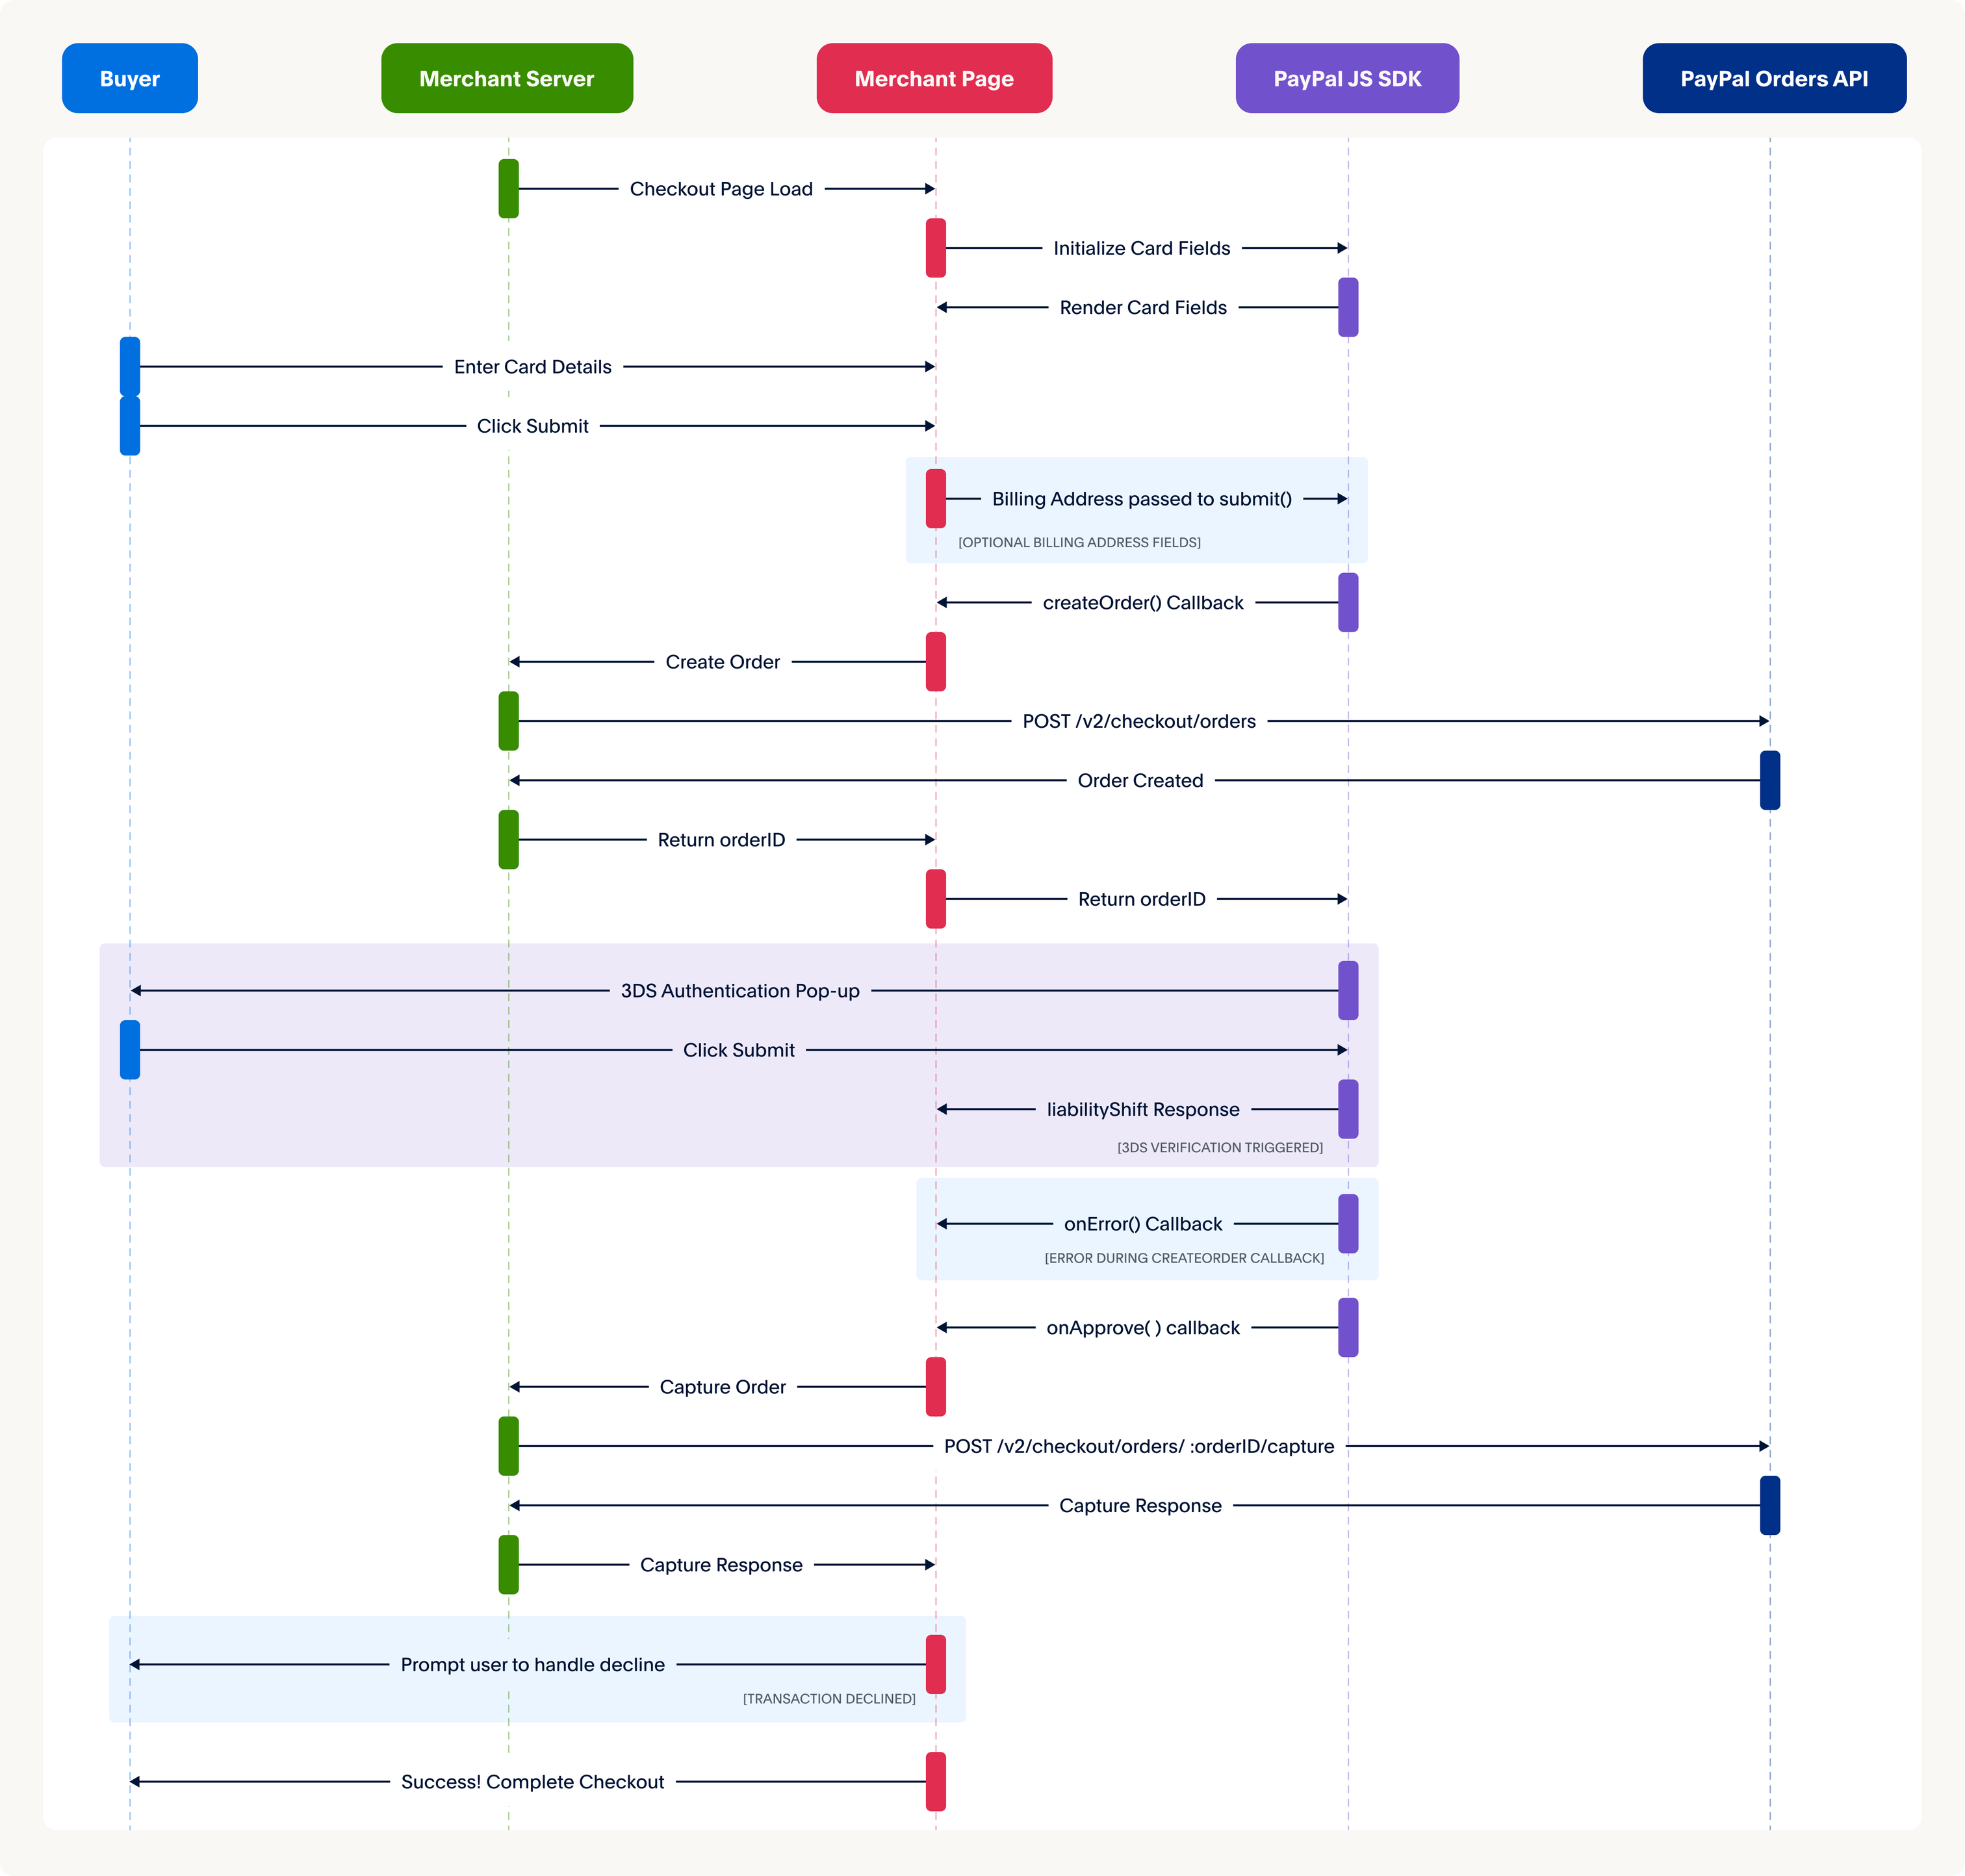
The following sequence diagram shows an Expanded Checkout integration with card fields and 3D Secure:
<img src="https://www.paypalobjects.com/devdoc/HostedCardFields3Ds%20SequenceDiagram.png" />

1. The script tag fetches the JavaScript SDK when your checkout page renders.
2. Your page uses the JavaScript SDK to render card fields.
3. The buyer enters their card details into the card fields.
4. Optionally, you can collect the billing address with your own input fields and include the values in the submit method.
5. The buyer selects the **Submit** button which calls the `CardFields.submit` method.
6. The `createOrder` callback requests your server to create a PayPal order.
7. Your server requests the PayPal Orders API with the appropriate 3DS verification.
8. The `createOrder` callback returns an `orderId` to your page.
9. Depending on the 3DS verification method passed by your `createOrder` call, the buyer sees a 3DS User Authentication from the card-issuing bank.
10. The `onApprove` callback returns a `liabilityShift` response that your page can use to determine how to process the order.
11. If there are no issues during the `createOrder` process, the `onApprove` callback sends a capture request to your server.
12. Your server requests the PayPal Orders API to capture the order.
13. Your page can use the capture response to verify the payment was completed, catch issues with the payment method, and approve or decline the transaction.

## User experience [#user-experience]

The PayPal card fields component can be rendered on your page and customized to match your user experience. You can load the PayPal buttons component alongside card fields to help your buyer select their preferred payment method. The PayPal buttons component shows up on your page based on the configurations set in the JavaScript SDK.

When your buyer chooses to pay with a credit or debit card:

1. Card fields will render on your page.
2. The buyer fills each of the fields with their card information, such as cardholder name, card number, expiration date, postal code, and CVV.
3. Optionally, the buyer can enter their billing address into your own input elements to pass along with the order.
4. After the buyer has filled in the card fields, the buyer selects the **Pay** or **Submit** button to process the card transaction.
5. The order goes to PayPal servers, where we process the payment.

## Know before you code [#know-before-you-code]

> **Info:** ### You need a developer account to get sandbox credentials [#you-need-a-developer-account-to-get-sandbox-credentials]
>
> PayPal uses [REST API credentials](/api/rest/), which you can get from the developer dashboard.
>
> * Client ID: authenticates your account with PayPal and identifies an app in your sandbox.
> * Client secret: authorizes an app in your sandbox. Keep this secret safe and don't share it.

> **Info:** ### You need a developer account to get sandbox credentials [#you-need-a-developer-account-to-get-sandbox-credentials-1]
>
> You need a combo of PayPal and third-party tools
>
> * [JavaScript SDK](/sdk/js/): Adds PayPal-supported payment methods.
> * [Orders REST API](/api/orders/v2): Create, update, retrieve, authorize, and capture orders.
> * [npm](https://www.npmjs.com/package/npm): Registry used to install the necessary third-party libraries.
>
> You can use Postman to explore and test PayPal APIs.

## 1. Prerequisites [#1-prerequisites]

### Check your account setup for advanced card payments [#check-your-account-setup-for-advanced-card-payments]

This integration requires a sandbox business account with Advanced Credit and Debit Card Payments, which should be enabled automatically in your sandbox account.

To confirm that Advanced Credit and Debit Card Payments are enabled for you, check your sandbox business account:

1. Log into the [PayPal Developer Dashboard](/dashboard/), go to Apps & Credentials > Sandbox > REST API apps, and select the name of your app.
2. Go to Features > Accept payments.
3. Select the Advanced Credit and Debit Card Payments checkbox and select Save Changes.

> **Info:** **Note:** If you created a sandbox business account through [sandbox.paypal.com](https://www.sandbox.paypal.com/signin), and Advanced Credit and Debit Card Payment is not enabled, [complete the sandbox onboarding steps](https://www.sandbox.paypal.com/bizsignup).

### Set up npm [#set-up-npm]

You'll need to have npm installed to run this sample application For more info, [visit npm's documentation](https://www.npmjs.com/package/npm).

1. Install third-party libraries

Install the following third-party libraries to set up your integration. Here is a sample command to install them all at the same time:

```text lineNumbers
npm install dotenv ejs express node-fetch
```

Select any of the links below to see more detailed installation instructions for each library:

| Third-party libraries                                  | Description                                                                                                                                |
| ------------------------------------------------------ | ------------------------------------------------------------------------------------------------------------------------------------------ |
| [Dotenv](https://www.npmjs.com/package/dotenv)         | This zero-dependency module separates your configuration and code by loading environment variables from an `.env` file into `process.env`. |
| [ejs](https://www.npmjs.com/package/ejs)               | These templates help you deliver HTML markup using plain JavaScript.                                                                       |
| [express](https://www.npmjs.com/package/express)       | This lean Node.js web application framework supports web and mobile applications.                                                          |
| [node-fetch](https://www.npmjs.com/package/node-fetch) | This function helps you make API requests, similar to `window.fetch`.                                                                      |

2. Verify package.json

A `package.json` file has a list of the packages and version numbers needed for your app. You can share your `package.json` file with other developers so they can use the same settings as you.

The following snippet is an example of a `package.json` file for a PayPal integration. Compare this sample to the `package.json` in your project:

```text lineNumbers
{
"name":"paypal-js-advanced-integration-ib",
"description":"Sample Node.js web app to integrate PayPal Advanced Checkout for online payments",
"version":"1.0.1",
"main":"server/YOUR-SERVER-NAME.js",
"type":"module",
"scripts":{
"start":"node server/YOUR-SERVER-NAME.js",
},
"dependencies":{
"dotenv":"^16.3.1",
"express":"^4.18.2",
"node-fetch":"^3.3.2"
}
}
```

* Pass the name of your server file using `main` by replacing the default `YOUR-SERVER-NAME.js` on lines 5 and 8.
* Use `scripts.test` and `scripts.start` to customize how your app starts up.

If you're having trouble with your app:

* Try reinstalling your local library and package files using `npm install`.
* If you're getting the following node error, include `"type": "module"` in your `package.json` file: `Warning: To load an ES module, set "type": "module" in the package.json or use the .mjs extension (Use `node --trace-warnings ...` to show where the warning was created)`.
* See line 6 of the sample `package.json` file for an example.

3. Set up .env

A `.env` file is a line-delimited text file that sets your local working environment variables. Use this `.env` file to securely pass the client ID and app secret for your app.

This code shows an example `.env` file. Replace the `CLIENT_ID` and `APP_SECRET` with values from your app:

> **Note:** **Note:** View your `CLIENT_ID`and`APP_SECRET` in the [PayPal Developer Dashboard](/dashboard/) under **Apps Credentials**.

```text lineNumbers
APP_SECRET="YOUR_SECRET_GOES_HERE"
```

> **Note:** **Important:** These are the 3D Secure instructions for the JavaScript SDK component `CardFields`. If your integration uses the `HostedFields` component, see [Integrate 3D Secure using Hosted Fields](/limited-release/commerce-platform/accept-payments/advanced/customize/use-3d-secure/js-sdk/) instead.

## 2. Integrate front end [#2-integrate-front-end]

This section explains how to set up your front end to integrate Expanded Checkout payments.

### Front-end process [#front-end-process]

1. Your app shows PayPal payment buttons and card fields.
2. Your app calls server endpoints to create the order and capture payment. The request details depend on whether the buyer uses the PayPal button or checkout form.

#### Front-end code [#front-end-code]

This example uses 2 files,`app.js` and `checkout.ejs`, to show how to set up the back end to integrate with advanced payments:

* `/public/app.js` handles the client-side logic and defines how the PayPal front-end components connect with the back-end. Use this file to set up the PayPal checkout using the PayPal JavaScript SDK, and handle the payer's interactions with the PayPal checkout button. Save the `app.js` file in a folder named `/public`.
* `/server/views/checkout.ejs` is an Embedded JavaScript (EJS) file that builds the checkout page, adds the PayPal button, and loads the `app.js` file. Save the `checkout.ejs` file in a folder named `/server/views`.

### Initialize JavaScript SDK [#initialize-javascript-sdk]

Add the JavaScript SDK to your web page and include the following:

* Your app's client ID.
* A `<div>` to render the PayPal buttons.
* A `<div>` to render each of the card fields.

The JavaScript file in the sample code includes reference routes on the server that you'll add later.

* Include the `<script>` tag on any page that shows the PayPal buttons. This script will fetch all the necessary JavaScript to access the buttons on the `window` object.
* Pass a `client-id` and specify which `components` you want to use. The SDK offers buttons, marks, card fields, and other components. This sample focuses on the `buttons` component.
* In addition to passing the `client-id` and specifying which components you want to use, you can also pass the currency you want to use for pricing. In this example, USD is used.

```text lineNumbers
<!--checkout.ejs file-->
<!DOCTYPEhtml>
<htmllang="en">
<head>
<metacharset="UTF-8"/>
<metaname="viewport"content="width=device-width, initial-scale=1.0"/>
<linkrel="stylesheet"type="text/css"href="https://www.paypalobjects.com/webstatic/en_US/developer/docs/css/cardfields.css"/>
<title>PayPal JS SDK Advanced Integration - Checkout Flow</title>
<scriptsrc="https://www.paypal.com/sdk/js?components=buttons,card-fields&client-id=<CLIENT_ID>&merchant-id=<MERCHANT_ID>¤cy=USD&intent=capture"data-partner-attribution-id="<BN_CODE>"data-client-token="<CLIENT_TOKEN>"></script>
</head>
<body>
<divid="paypal-button-container"class="paypal-button-container"></div>
<!-- Containers for card fields hosted by PayPal -->
<divid="card-form"class="card_container">
<divid="card-name-field-container"></div>
<divid="card-number-field-container"></div>
<divid="card-expiry-field-container"></div>
<divid="card-cvv-field-container"></div>
<div>
<labelfor="card-billing-address-line-1">Billing address line 1</label>
<inputtype="text"id="card-billing-address-line-1"name="card-billing-address-line-1"autocomplete="off"placeholder="Billing address line 1"/>
</div>
<div>
<labelfor="card-billing-address-line-2">Billing address line 2</label>
<inputtype="text"id="card-billing-address-line-2"name="card-billing-address-line-2"autocomplete="off"placeholder="Billing address line 2"/>
</div>
<div>
<labelfor="card-billing-address-admin-area-line-1">Admin area line 1</label>
<inputtype="text"id="card-billing-address-admin-area-line-1"name="card-billing-address-admin-area-line-1"autocomplete="off"placeholder="Admin area line 1"/>
</div>
<div>
<labelfor="card-billing-address-admin-area-line-2">Admin area line 2</label>
<inputtype="text"id="card-billing-address-admin-area-line-2"name="card-billing-address-admin-area-line-2"autocomplete="off"placeholder="Admin area line 2"/>
</div>
<div>
<labelfor="card-billing-address-country-code">Country code</label>
<inputtype="text"id="card-billing-address-country-code"name="card-billing-address-country-code"autocomplete="off"placeholder="Country code"/>
</div>
<div>
<labelfor="card-billing-address-postal-code">Postal/zip code</label>
<inputtype="text"id="card-billing-address-postal-code"name="card-billing-address-postal-code"autocomplete="off"placeholder="Postal/zip code"/>
</div>
<br/><br/>
<buttonid="card-field-submit-button"type="button">
      Pay now with Card
</button>
</div>
<pid="result-message"></p>
<scriptsrc="app.js"></script>
</body>
</html>
```

### Render card fields and PayPal buttons [#render-card-fields-and-paypal-buttons]

After setting up the SDK for your website, you need to render the PayPal buttons and the card field components.

#### Card fields [#card-fields]

The PayPal namespace has a `CardFields` component to accept and save cards without handling card information. PayPal handles all security and compliance issues associated with processing cards. The `CardFields` function checks to see if a payment is eligible for card fields. If not, the card fields won't appear during the payment flow.

The `/public/app.js` file needs a function that submits a `createOrder()` request:

* Declare a `createOrder` callback that launches when the customer selects the payment button. The callback starts the order and returns an order ID. After the customer checks out using the PayPal pop-up, this order ID helps you to confirm when the payment is completed.
* Set up your app to call `cardField.isEligible()` for each card field to determine if a payment is eligible for card fields.
* Render each card field by declaring it as an object in `cardField` and then applying a `.render()` function.
* Create the order by calling the `createOrder` function.
* Define styles for the card fields. You can change these styles for your implementation.
* Define the `selector` and `placeholder` values for the input fields. You can edit this section for your implementation, such as adding more fields. For more information about optional configurations, see [Options in the JavaScript SDK reference](/sdk/js/reference/#link-options/).
* Set up your app to capture the payment when it is eligible for card fields by adding code to the PayPal button in `/server/view/checkout.ejs`, right after rendering the card fields.
* You need to declare an event listener `/public/app.js` for when the payer submits an eligible card payment.
* Pass the card field values, such as the cardholder's name and address, to the `POST` call. Anything you pass into the `submit` function is sent to the iframe that communicates with the Orders API. The iframe retrieves the data and sends it along to the `POST` call. See the [Orders v2 API reference](/api/orders/v2) for details about billing address fields and other parameters. For example, use the [2-character country code to test the billing address](/api/codes/country-region).

Completing the payment launches an `onApprove` callback, which sends a `POST` call to `/v2/checkout/orders/{id}/capture` to capture the order using the orderId in the data object in `/server/server.js`. Use the `onApprove` response to update business logic, show a celebration page, or handle error responses.

Set up your app to handle the payment capture response, such as when the payment is captured, when the payer's instrument is declined, or when there is an error:

* Include a function that shows a message to the user by passing data to the `result-message` HTML element container of `checkout.ejs`.
* Your app needs to call the JavaScript SDK that defines the PayPal card fields and links them to the `createOrder()` function.
* If your website handles shipping physical items, see [details about our shipping callbacks](/sdk/js/reference/#onshippingaddresschangedata).

#### PayPal buttons [#paypal-buttons]

The `paypal` namespace has a `Buttons` function that initiates the callbacks needed to set up a payment. The `app.js` file needs a function that submits a `createOrder()` request.

* Declare a `createOrder` callback that launches when the customer selects the payment button. The callback starts the order and returns an order ID. After the customer checks out using the PayPal pop-up, this order ID helps you to confirm when the payment is completed.
* Completing the payment launches an `onApprove` callback. Use the `onApprove` response to update business logic, show a celebration page, or handle error responses.
* Set up your app to handle the payment capture response, such as when the payment is captured, when the payer's instrument is declined, or when there is an error.
* Include a function that shows a message to the user by passing data to the `result-message` HTML element container of `checkout.ejs`.
* Your app must call the JavaScript SDK that defines the PayPal buttons and links them to the `createOrder()` function.

```text lineNumbers
// app.js file
// Render the button component
paypal
.Buttons({
// Sets up the transaction when a payment button is selected
createOrder: createOrderCallback,
onApprove: onApproveCallback,
onError:function(error){
// Do something with the error from the SDK
},
style:{
shape:"rect",
layout:"vertical",
color:"gold",
label:"paypal",
},
message:{
amount:100,
},
})
.render("#paypal-button-container");
// Render each field after checking for eligibility
const cardField =window.paypal.CardFields({
createOrder: createOrderCallback,
onApprove: onApproveCallback,
style:{
input:{
"font-size":"16px",
"font-family":"courier, monospace",
"font-weight":"lighter",
color:"#ccc",
},
".invalid":{
color:"purple"
},
// Optional to handle buyer checkout errors
onError:(err)=>{
// redirect to your error catch-all page
window.location.assign("/your-error-page-here");
},
},
});
if(cardField.isEligible()){
const nameField = cardField.NameField({
style:{
input:{
color:"blue"
},
".invalid":{
color:"purple"
}
},
});
  nameField.render("#card-name-field-container");
const numberField = cardField.NumberField({
style:{
input:{
color:"blue"
}
},
});
  numberField.render("#card-number-field-container");
const cvvField = cardField.CVVField({
style:{
input:{
color:"blue"
}
},
});
  cvvField.render("#card-cvv-field-container");
const expiryField = cardField.ExpiryField({
style:{
input:{
color:"blue"
}
},
});
  expiryField.render("#card-expiry-field-container");
// Add click listener to submit button and call the submit function on the CardField component
document
.getElementById("card-field-submit-button")
.addEventListener("click",()=>{
      cardField
.submit({
// From your billing address fields
billingAddress:{
addressLine1:document.getElementById(
"card-billing-address-line-1"
).value,
addressLine2:document.getElementById(
"card-billing-address-line-2"
).value,
adminArea1:document.getElementById(
"card-billing-address-admin-area-line-1"
).value,
adminArea2:document.getElementById(
"card-billing-address-admin-area-line-2"
).value,
countryCode:document.getElementById(
"card-billing-address-country-code"
).value,
postalCode:document.getElementById(
"card-billing-address-postal-code"
).value,
},
})
.then(()=>{
// submit successful
});
});
}
asyncfunctioncreateOrderCallback(){
resultMessage("");
try{
const response =awaitfetch("/api/orders",{
method:"POST",
headers:{
"Content-Type":"application/json",
},
// Use the "body" param to optionally pass additional order information
// like product ids and quantities
body:JSON.stringify({
cart:[{
id:"YOUR_PRODUCT_ID",
quantity:"YOUR_PRODUCT_QUANTITY",
},],
}),
});
const orderData =await response.json();
if(orderData.id){
return orderData.id;
}else{
const errorDetail = orderData?.details?.[0];
const errorMessage = errorDetail ?
`${errorDetail.issue}${errorDetail.description} (${orderData.debug_id})`:
JSON.stringify(orderData);
thrownewError(errorMessage);
}
}catch(error){
console.error(error);
resultMessage(`Could not initiate PayPal Checkout...<br><br>${error}`);
}
}
asyncfunctiononApproveCallback(data, actions){
try{
const response =awaitfetch(`/api/orders/${data.orderID}/capture`,{
method:"POST",
headers:{
"Content-Type":"application/json",
},
});
const orderData =await response.json();
// Three cases to handle:
//   (1) Recoverable INSTRUMENT_DECLINED -> call actions.restart()
//   (2) Other non-recoverable errors -> Show a failure message
//   (3) Successful transaction -> Show confirmation or thank you message
const transaction =
      orderData?.purchase_units?.[0]?.payments?.captures?.[0]||
      orderData?.purchase_units?.[0]?.payments?.authorizations?.[0];
const errorDetail = orderData?.details?.[0];
// Optional to handle funding failures
// This actions.restart() behavior only applies to the buttons component
if(
      errorDetail?.issue ==="INSTRUMENT_DECLINED"&&
!data.card&&
      actions
){
// (1) Recoverable INSTRUMENT_DECLINED -> call actions.restart()
// recoverable state, per /platforms/checkout/standard/customize/handle-funding-failures
return actions.restart();
}elseif(
// End optional failure handling
if(errorDetail ||!transaction || transaction.status==="DECLINED"){
// (2) Other non-recoverable errors -> Show a failure message
let errorMessage;
if(transaction){
        errorMessage =`Transaction ${transaction.status}: ${transaction.id}`;
}elseif(errorDetail){
        errorMessage =`${errorDetail.description} (${orderData.debug_id})`;
}else{
        errorMessage =JSON.stringify(orderData);
}
thrownewError(errorMessage);
}else{
// (3) Successful transaction -> Show confirmation or thank you message
// Or go to another URL:  actions.redirect('thank_you.html');
resultMessage(
`Transaction ${transaction.status}: ${transaction.id}<br><br>See console for all available details`
);
console.log(
"Capture result",
        orderData,
JSON.stringify(orderData,null,2)
);
}
}catch(error){
console.error(error);
resultMessage(
`Sorry, your transaction could not be processed...<br><br>${error}`
);
}
}
// Example function to show a result to the user. Your site's UI library can be used instead.
functionresultMessage(message){
const container =document.querySelector("#result-message");
  container.innerHTML= message;
}
```

### Customize card fields and buttons [#customize-card-fields-and-buttons]

This section explains how to customize the PayPal buttons and card fields for your integration.

#### Configure card field layout [#configure-card-field-layout]

Copy and paste both [examples of card field style objects](/limited-release/commerce-platform/accept-payments/advanced/customize/card-fields-style-guide/) into your existing `/client/checkout.ejs` and `/public/app.js` files.

* Include the required card form elements: `NumberField`, `CVVField`, and `ExpiryField`. To learn about the available card form elements, see [card fields](/sdk/js/reference/#card-fields).
* Add your own fields to accept billing address information.
* A complete set of sample integration code is available from the [GitHub repo](https://github.com/paypal-examples/docs-examples/tree/main/advanced-integration/v2/).
* **Optional**: Change the layout, width, height, and outer styling of the card fields, such as`border`,`box-shadow`,and`background`. You can modify the elements you supply as containers.

#### Configure buttons layout [#configure-buttons-layout]

Depending on where you want these buttons to appear on your website, you can lay out the buttons in a horizontal or vertical stack. You can also customize the buttons with different colors and shapes.

To override the default style settings for your page, use a `style` object inside the `Buttons` component. Read more about how to customize your payment buttons in the [style section of the JavaScript SDK reference page](/sdk/js/reference/#link-style).

Integrate 3D Secure

To trigger 3D Secure authentication, pass the verification method in the [Create order](/api/orders/v2/orders-create) payload. The verification method can be a contingencies parameter with `SCA_ALWAYS` or `SCA_WHEN_REQUIRED`:

* Pass `SCA_ALWAYS` to trigger an authentication for every transaction.
* Pass `SCA_WHEN_REQUIRED` to trigger an authentication only when required by a regional compliance mandate such as PSD2. 3D Secure is supported only in countries with a [PSD2 compliance mandate](https://www.paypal.com/uk/webapps/mpp/PSD2?_ga=2.116566086.1787736910.1725899171-736687466.1725650270).

## 3. Integrate back end [#3-integrate-back-end]

This section explains how to set up your back end to integrate Expanded Checkout payments.

### Back-end process [#back-end-process]

1. Your app shows a customer the available payment methods on the server side.
2. Your app creates an order on the back end by making a call to the [Create Orders v2 API endpoint](/api/orders/v2/orders-create).
3. Your app makes a call to the [Capture Payment for Order API endpoint](/api/orders/v2/orders-capture) on the back end to move the money when the buyer confirms the order.

#### Back-end code [#back-end-code]

1. Generate a PayPal-Auth-Assertion header

Pass the `PayPal-Auth-Assertion` header with standard `Content-Type`, `Authorization`, and `PayPal-Request-ID` headers. Copy and modify the following code to generate the `PayPal-Auth-Assertion` header.

```text lineNumbers
// Node.js

function encodeObjectToBase64(object) {
  const objectString = JSON.stringify(object);
  return Buffer
    .from(objectString)
    .toString("base64");
}

const clientId = "CLIENT-ID";
const sellerPayerId = "SELLER-PAYER-ID"; // preferred
// const sellerEmail = "SELLER-ACCOUNT-EMAIL"; // use instead if payer-id unknown

const header = {
  alg: "none"
};
const encodedHeader = encodeObjectToBase64(header);

const payload = {
  iss: clientId,
  payer_id: sellerPayerId
  // email: sellerEmail
};
const encodedPayload = encodeObjectToBase64(payload);

const jwt = `${encodedHeader}.${encodedPayload}.`; // json web token
console.log(`Paypal-Auth-Assertion=${jwt}`);
```

> **Note:** **Note:** The previous example contains period characters ( . ) according to JSON web standard structure.

#### Modify the code: [#modify-the-code]

* Replace `CLIENT-ID` with the client ID of the platform or marketplace from the PayPal developer dashboard.
* Replace `SELLER-PAYER-ID` with the payer ID or the email of the receiving seller's PayPal account.

2. Set up your back end

Set up API endpoints on your server to call the PayPal Orders v2 API.

Create API endpoints on your server that communicate with the [Orders v2 API](/api/orders/v2) to create an order and capture payment for an order.

> **Note:** **Important:** If you process payments that require [Strong Customer Authentication](https://www.paypal.com/uk/webapps/mpp/psd2?_ga=2.151578745.1787736910.1725899171-736687466.1725650270), you need to provide additional context with [payment indicators](/limited-release/commerce-platform/accept-payments/advanced/customize/pass-sca-indicators).

The following `/server/server.js` code sample shows how to integrate the back-end code for Expanded Checkout. The code adds routes to an Express server to create orders and capture payments using the Orders v2 API.

Save the `server.js` file in a folder named `/server`.

```text lineNumbers
// server.js file
import express from "express";
import fetch from "node-fetch";
import "dotenv/config";

const {
  BN_CODE,
  PAYPAL_CLIENT_ID,
  PAYPAL_CLIENT_SECRET,
  PORT = 8888
} = process.env;
const base = "https://api-m.sandbox.paypal.com";
const app = express();

app.set("view engine", "ejs");
app.set("views", "./server/views");
app.use(express.static("client"));

// parse post params sent in body in json format
app.use(express.json());

const SELLER_PAYER_ID = "" //Add Seller Payer ID

/**
  * Generate an OAuth 2.0 access token for authenticating with PayPal REST APIs.
  * @see /api/rest/authentication
  */
const generateAccessToken = async () => {
  try {
    if (!PAYPAL_CLIENT_ID || !PAYPAL_CLIENT_SECRET) {
      throw new Error("MISSING_API_CREDENTIALS");
    }
    const auth = Buffer.from(
      PAYPAL_CLIENT_ID + ":" + PAYPAL_CLIENT_SECRET,
    ).toString("base64");
    //const bn_code = BN_CODE;
    const response = await fetch(`${base}/v1/oauth2/token`, {
      method: "POST",
      body: "grant_type=client_credentials",
      headers: {
        Authorization: `Basic ${auth}`,
        "PayPal-Partner-Attribution-Id": BN_CODE,
      },
    });

    const data = await response.json();
    return data.access_token;
  } catch (error) {
    console.error("Failed to generate Access Token:", error);
  }
};

const authassertion = async () => {

  function encodeObjectToBase64(object) {
    const objectString = JSON.stringify(object);
    return Buffer
      .from(objectString)
      .toString("base64");
  }; ]n
  const clientId = PAYPAL_CLIENT_ID;
  const sellerPayerId = SELLER_PAYER_ID; // preferred
  // const sellerEmail = "SELLER-ACCOUNT-EMAIL"; // use instead if payer-id unknown

  const header = {
    alg: "none"
  };
  const encodedHeader = encodeObjectToBase64(header);

  const payload = {
    iss: clientId,
    payer_id: sellerPayerId
    // email: sellerEmail
  };
  const encodedPayload = encodeObjectToBase64(payload);

  const jwt = `${encodedHeader}.${encodedPayload}.`; // json web token
  //console.log(`Paypal-Auth-Assertion=${jwt}`);

  return jwt;
};

/**
  * Generate a client token for rendering the hosted card fields.
  * @see https://developer.paypal.com/docs/checkout/advanced/integrate/#link-integratebackend
  */
const generateClientToken = async () => {
  const accessToken = await generateAccessToken();
  const url = `${base}/v1/identity/generate-token`;
  const response = await fetch(url, {
    method: "POST",
    headers: {
      Authorization: `Bearer ${accessToken}`,
      "Accept-Language": "en_US",
      "Content-Type": "application/json",
      "PayPal-Partner-Attribution-Id": BN_CODE,
    },
  });

  return handleResponse(response);
};

/**
  * Create an order to start the transaction.
  * @see /api/orders/v2/orders-create
  */
const createOrder = async (cart) => {
  // Use the cart information passed from the front-end to calculate the purchase unit details
  console.log(
    "shopping cart information passed from the frontend createOrder() callback:",
    cart,
  );

  const accessToken = await generateAccessToken();
  const auth_assertion = await authassertion();
  const url = `${base}/v2/checkout/orders`;
  const payload = {
    intent: "CAPTURE",
    purchase_units: [{
      amount: {
        currency_code: "USD",
        value: "100.00",
      },
    }, ],
  };

  const response = await fetch(url, {
    headers: {
      "Content-Type": "application/json",
      Authorization: `Bearer ${accessToken}`,
      "PayPal-Partner-Attribution-Id": BN_CODE,
      "PayPal-Auth-Assertion": `${auth_assertion}`,
      // Uncomment one of these to force an error for negative testing (in sandbox mode only). Documentation:
      // https://developer.paypal.com/negative-testing/request-headers
      // "PayPal-Mock-Response": '{"mock_application_codes": "MISSING_REQUIRED_PARAMETER"}'
      // "PayPal-Mock-Response": '{"mock_application_codes": "PERMISSION_DENIED"}'
      // "PayPal-Mock-Response": '{"mock_application_codes": "INTERNAL_SERVER_ERROR"}'
    },
    method: "POST",
    body: JSON.stringify(payload),
  });

  return handleResponse(response);
};

/**
  * Capture payment for the created order to complete the transaction.
  * @see /api/orders/v2/orders-capture
  */
const captureOrder = async (orderID) => {
  const accessToken = await generateAccessToken();
  const auth_assertion = await authassertion();
  const url = `${base}/v2/checkout/orders/${orderID}/capture`;

  const response = await fetch(url, {
    method: "POST",
    headers: {
      "Content-Type": "application/json",
      Authorization: `Bearer ${accessToken}`,
      "PayPal-Partner-Attribution-Id": BN_CODE,
      "PayPal-Auth-Assertion": `${auth_assertion}`,
      // Uncomment one of these to force an error for negative testing (in sandbox mode only). Documentation:
      // https://developer.paypal.com/negative-testing/request-headers
      // "PayPal-Mock-Response": '{"mock_application_codes": "INSTRUMENT_DECLINED"}'
      // "PayPal-Mock-Response": '{"mock_application_codes": "TRANSACTION_REFUSED"}'
      // "PayPal-Mock-Response": '{"mock_application_codes": "INTERNAL_SERVER_ERROR"}'
    },
  });

  return handleResponse(response);
};

async function handleResponse(response) {
  try {
    const jsonResponse = await response.json();
    return {
      jsonResponse,
      httpStatusCode: response.status,
    };
  } catch (err) {
    const errorMessage = await response.text();
    throw new Error(errorMessage);
  }
}

// Render checkout page with client id & unique client token
app.get("/", async (req, res) => {
  try {
    const {
      jsonResponse
    } = await generateClientToken();
    res.render("checkout", {
      clientId: PAYPAL_CLIENT_ID,
      clientToken: jsonResponse.client_token,
      BN_CODE: BN_CODE,
    });
  } catch (err) {
    res.status(500).send(err.message);
  }
});

app.post("/api/orders", async (req, res) => {
  try {
    // Use the cart information passed from the front-end to calculate the order amount details
    const {
      cart
    } = req.body;
    const {
      jsonResponse,
      httpStatusCode
    } = await createOrder(cart);
    res.status(httpStatusCode).json(jsonResponse);
  } catch (error) {
    console.error("Failed to create order:", error);
    res.status(500).json({
      error: "Failed to create order."
    });
  }
});

app.post("/api/orders/:orderID/capture", async (req, res) => {
  try {
    const {
      orderID
    } = req.params;
    const {
      jsonResponse,
      httpStatusCode
    } = await captureOrder(orderID);
    res.status(httpStatusCode).json(jsonResponse);
  } catch (error) {
    console.error("Failed to create order:", error);
    res.status(500).json({
      error: "Failed to capture order."
    });
  }
});

app.listen(PORT, () => {
  console.log(`Node server listening at http://localhost:${PORT}/`);
});

/** If needed, refund a captured payment to buyer **/
const refundCapturedPayment = async (capturedPaymentId) => {
  const accessToken = await generateAccessToken();
  const url = `${base}/v2/payments/captures/${capturedPaymentId}/refund`;

  const response = await fetch(url, {
    headers: {
      "Content-Type": "application/json",
      Authorization: `Bearer ${accessToken}`,
    },
    method: "POST",
  });

  return handleResponse(response);
};

// refundCapturedPayment route
app.post("/api/payments/refund", async (req, res) => {
  try {
    const {
      capturedPaymentId
    } = req.body;
    const {
      jsonResponse,
      httpStatusCode
    } = await refundCapturedPayment(
      capturedPaymentId
    );
    res.status(httpStatusCode).json(jsonResponse);
  } catch (error) {
    console.error("Failed refund captured payment:", error);
    res.status(500).json({
      error: "Failed refund captured payment."
    });
  }
});
```

## 4. Test integration [#4-test-integration]

Before going live, test your integration in the [sandbox environment](/sandbox-testing/overview).

Learn more about the following resources on the [Card Testing](/sandbox-testing/card-testing) page:

* Use [test card numbers](/sandbox-testing/card-testing#test-card-numbers) to simulate successful payments for Expanded Checkout integrations.
* Use [negative testing](/negative-testing/overview) to simulate card error scenarios.
* Test [3D Secure authentication](/sandbox-testing/card-testing#simulate-3d-secure-card-payments) scenarios.
* Test your integration by following [these recommended use cases](/sandbox-testing/card-testing#test-integration). See the [Orders v2 API](/api/orders/v2) for details about billing address fields and other parameters. For example, use the [2-character country code](/api/codes/country-region) to test the billing address.
* [Save payment methods](/limited-release/commerce-platform/accept-payments/save-payments/) so payers don't have to enter details for future transactions.
* Use [webhooks](/api/rest/webhooks/) for event notifications.

> **Info:** Use the [credit card generator](/sandbox-testing/card-testing#credit-card-generator) to generate additional test credit cards for sandbox testing.

## Next steps and customizations [#next-steps-and-customizations]

> **Info:** Add security to your checkout experience or create customizations for your audience. Before you go live, you should complete [the integration checklist.](/platforms/integration-checklist)
>
> To optionally add more payment methods, refer to,
>
> * [Pay with Venmo](/limited-release/commerce-platform/accept-payments/pay-with-venmo/): Add the Venmo button to your checkout integration.
> * [Alternative payment methods](/limited-release/commerce-platform/accept-payments/apm/): Support local payment methods across the globe.
>
> To optionally add security and customizations, refer to,
>
> * [Capture payment](/api/orders/v2/orders-capture): Captures payment for an order.
> * [Refund a captured payment](/api/payments/v2/captures-refund): Refund all or part of a captured payment.
> * [Real-time account updater](/limited-release/commerce-platform/accept-payments/advanced/customize/use-real-time-updation/): Reduce declines by getting card updates from the issuer.
