# Pay with Apple Pay SDK (/limited-release/commerce-platform/accept-payments/apm/apple-pay)
Apple Pay is a mobile payment and digital wallet service provided by Apple Inc.
Buyers can use Apple Pay on PayPal to make payments on the web using the Safari web browser or an iOS device.
Sellers can use Apple Pay on PayPal to sell:
* physical goods, such as clothes and electronics
* digital goods, such as software
* intangible professional services, such as concerts or gym memberships.
[Visit this site](https://developer.apple.com/documentation/passkit/apple_pay) for more information about Apple Pay.
 ### Supported countries and currencies [#supported-countries-and-currencies]
Apple Pay supports payments in 36 countries and 22 currencies:
* **Countries:** Australia, Austria, Belgium, Bulgaria, Canada, China, Cyprus, Czech Republic, Denmark, Estonia, Finland, France, Germany, Greece, Hong Kong, Hungary, Ireland, Italy, Japan, Latvia, Liechtenstein, Lithuania, Luxembourg, Malta, Netherlands, Norway, Poland, Portugal, Romania, Singapore, Slovakia, Slovenia, Spain, Sweden, United States, United Kingdom
* **Currencies:** `AUD`, `BRL`, `CAD`, `CHF`, `CZK`, `DKK`, `EUR`, `GBP`, `HKD`, `HUF`, `ILS`, `JPY`, `MXN`, `NOK`, `NZD`, `PHP`, `PLN`, `SEK`, `SGD`, `THB`, `TWD`, `USD`
## How it works [#how-it-works]
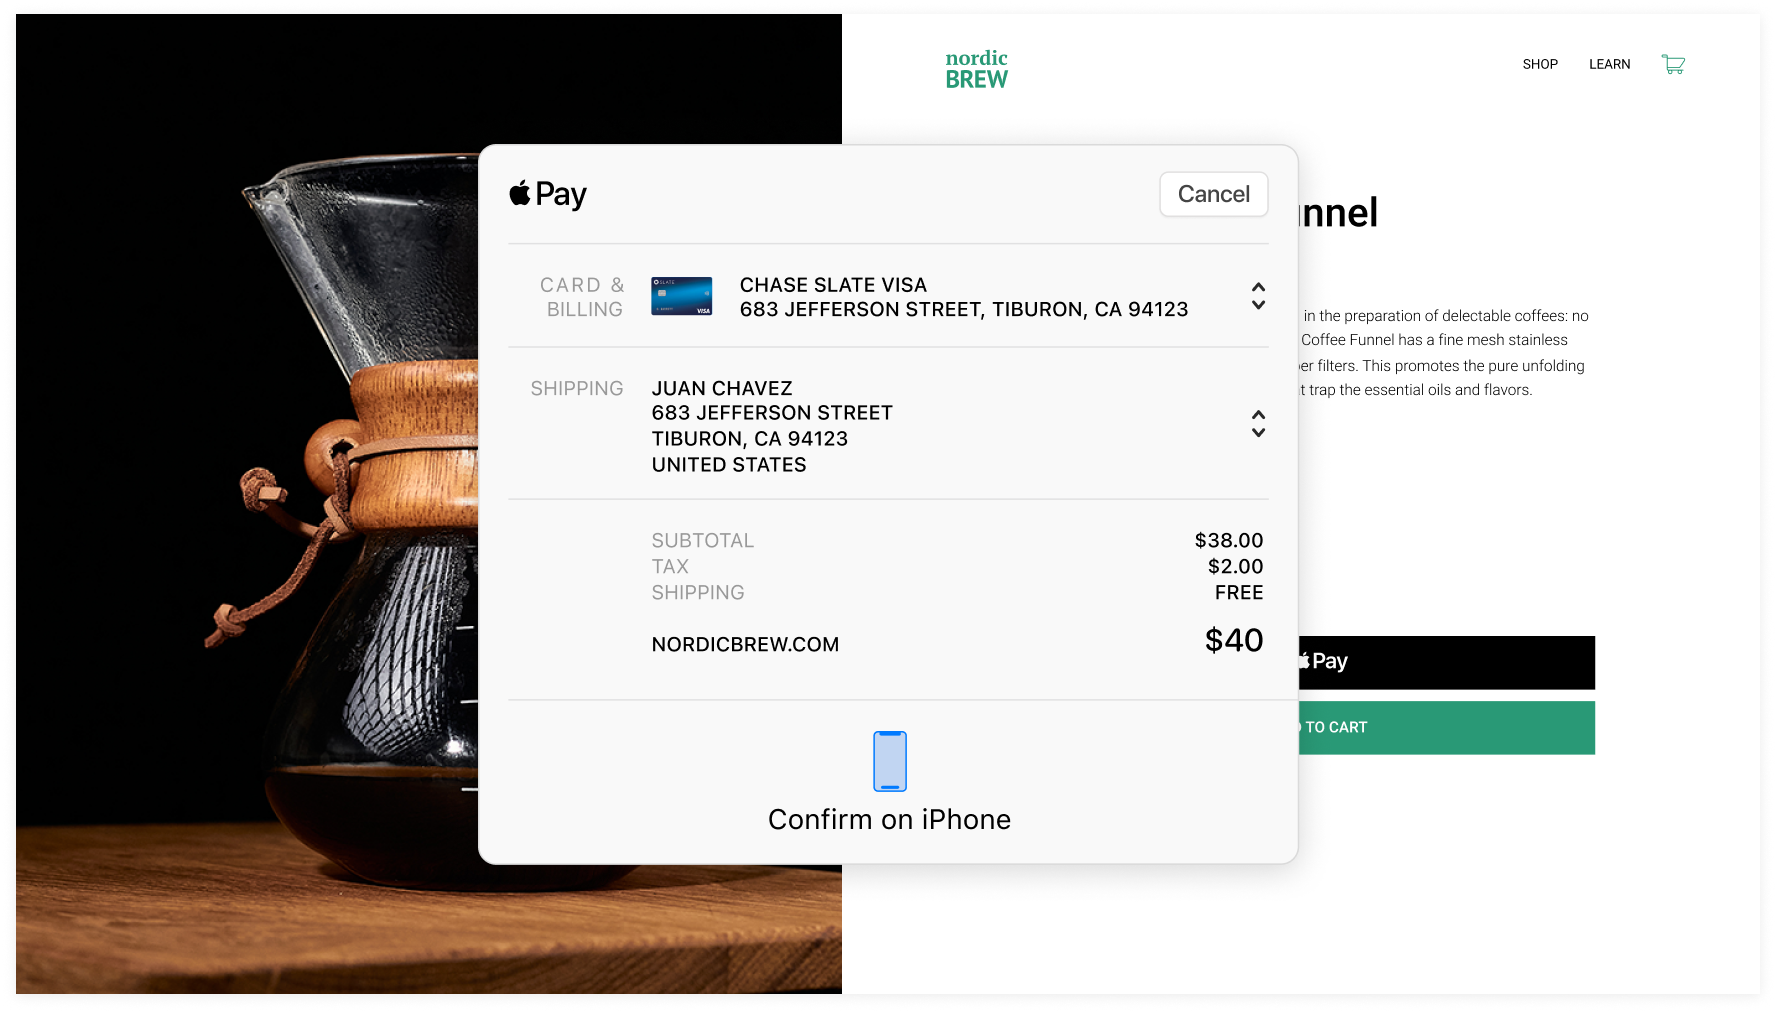
The Apple Pay button shows up on your website when a customer uses the Safari web browser on an eligible device. When your buyer selects the Apple Pay button, they confirm purchase details and authorize the payment on a payment sheet.
[Visit this site](https://support.apple.com/en-us/102896) for more details about Apple Pay's compatibility.
* A buyer taps or clicks on the Apple Pay button on your website.
* The Safari browser or iOS device shows the payer a payment sheet.
* The buyer can choose a different shipping address and payment method.
* The buyer authorizes the payment
### Supported countries and currencies [#supported-countries-and-currencies]
Apple Pay supports payments in 36 countries and 22 currencies:
* **Countries:** Australia, Austria, Belgium, Bulgaria, Canada, China, Cyprus, Czech Republic, Denmark, Estonia, Finland, France, Germany, Greece, Hong Kong, Hungary, Ireland, Italy, Japan, Latvia, Liechtenstein, Lithuania, Luxembourg, Malta, Netherlands, Norway, Poland, Portugal, Romania, Singapore, Slovakia, Slovenia, Spain, Sweden, United States, United Kingdom
* **Currencies:** `AUD`, `BRL`, `CAD`, `CHF`, `CZK`, `DKK`, `EUR`, `GBP`, `HKD`, `HUF`, `ILS`, `JPY`, `MXN`, `NOK`, `NZD`, `PHP`, `PLN`, `SEK`, `SGD`, `THB`, `TWD`, `USD`
## How it works [#how-it-works]
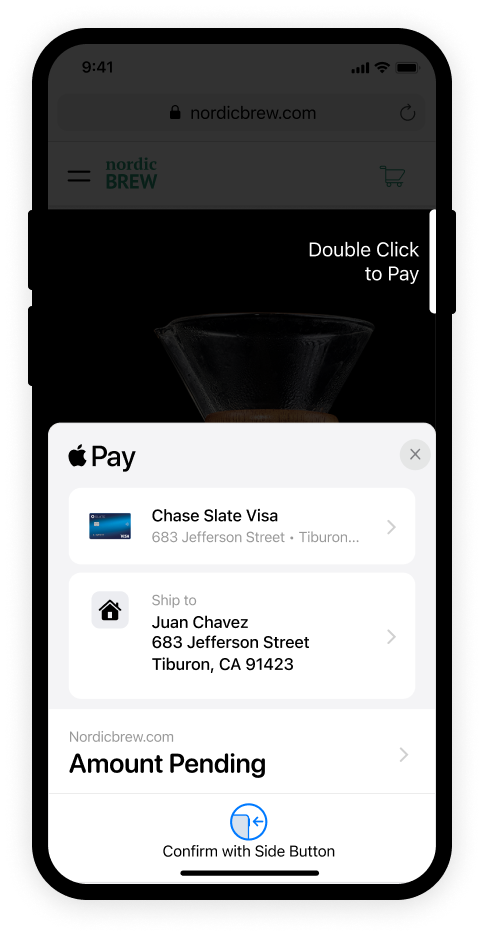
The Apple Pay button shows up on your website when a customer uses the Safari web browser on an eligible device. When your buyer selects the Apple Pay button, they confirm purchase details and authorize the payment on a payment sheet.
[Visit this site](https://support.apple.com/en-us/102896) for more details about Apple Pay's compatibility.
* A buyer taps or clicks on the Apple Pay button on your website.
* The Safari browser or iOS device shows the payer a payment sheet.
* The buyer can choose a different shipping address and payment method.
* The buyer authorizes the payment
 ## Integration video [#integration-video]
Watch our video tutorial for this integration:
## Know before you code [#know-before-you-code]
> **Info:** You must be an approved partner to integrate the Apple Pay SDK.
>
> For customers to pay with Apple Pay, they must be in a region where Apple Pay is supported, and their devices must meet the following requirements:
>
> * Device compatibility: The device must support Apple Pay.
> * iOS version: iOS 12.1 or later.
> * Desktop: macOS 10.14.1 or later.
> * Supported browsers: Safari. With the [latest Apple Pay SDK](https://applepay.cdn-apple.com/jsapi/1.latest/apple-pay-sdk.js), customers can also pay using non-Safari browsers.
>
> PayPal also provides iframe support for ApplePay. To use ApplePay within an iframe:
>
> * The iframe tag must have the attribute `allow="payment"`.
> * The parent domain hosting the iframe needs to have it's domain validated by following the usual process with PayPal.
>
> [Check Compatibility](https://support.apple.com/en-us/HT208531)
> **Info:** Currently supports Apple Pay one-time payments with the payer present.
>
> Review Apple's terms and conditions for the Apple Pay platform. See Apple's [developer terms](https://developer.apple.com/app-store/review/guidelines/) for more information.
>
> [Check Apple Docs](https://www.apple.com/legal/applepayments/)
## 1. Set up your sandbox account to accept Apple Pay [#1-set-up-your-sandbox-account-to-accept-apple-pay]
Before you can accept Apple Pay on your website, verify that your sandbox business account supports Apple Pay.
Partners can use the PayPal Developer Dashboard to set up their sandbox accounts to accept Apple Pay. The integration for partner accounts includes creating a sandbox business account through sandbox.paypal.com. If the Apple Pay status for the account shows as disabled, complete the sandbox onboarding steps to enable Apple Pay.
1. Log into the [PayPal Developer Dashboard](/dashboard/applications/sandbox) and go to your sandbox account.
2. Go to **Apps & Credentials**.
3. Make sure you are in the PayPal sandbox environment by selecting **Sandbox** at the top.
4. Select or create an app.
5. Scroll down to **Mobile and digital payments** and check if Apple Pay is enabled. If Apple Pay isn't enabled, select the **Apple Pay** checkbox.
If you created a sandbox business account through [sandbox.paypal.com](https://sandbox.paypal.com/), and the Apple Pay status for the account shows as disabled, [complete the sandbox onboarding steps](https://www.sandbox.paypal.com/bizsignup/add-product?product=payment_methods\&country.x=US\&locale.x=en_US\&capabilities=APPLE_PAY) to enable Apple Pay.
> **Info:** **Tip:** When your integration is ready to go live, read the Go live section for details about the additional steps needed for Apple Pay onboarding.
## 2. Set up your testing environment [#2-set-up-your-testing-environment]
Before you develop your Apple Pay on the web integration, you need to [set up your PayPal account, client ID, and sandbox emails](/api/rest/) for testing.
1. Download and host the domain association file for your sandbox environment.
2. Register your sandbox domain.
3. Create an Apple Pay sandbox account for testing. You don't need an Apple developer account to go live.
> **Info:** **Important:** You need to verify any domain names that you want to show an Apple Pay button. Apple rejects payments from unverified domains. The Apple Pay payment method won't work if the domain isn't registered.
### Download and host sandbox domain association file [#download-and-host-sandbox-domain-association-file]
1. [Download](https://paypalobjects.com/devdoc/apple-pay/sandbox/apple-developer-merchantid-domain-association) the domain association file for your sandbox environment.
2. Host the file on your test environment at `/.well-known/apple-developer-merchantid-domain-association.`
### Register your sandbox domain [#register-your-sandbox-domain]
1. Request an access token by sending a POST request to `https://api-m.sandbox.paypal.com/v1/oauth2/token`. Note the access token from the response body.
2. Generate a [PayPal Auth Assertion](/api/rest/requests/#paypal-auth-assertion) header and make a note of it. Make sure to replace `merchant_payer_id` with the merchant ID for which you are registering the domain.
3. Register the domain by sending a POST request to `https://api-m.sandbox.paypal.com/v1/customer/wallet-domains`. Include the following in your request:
1\. The authorization header with the value `Bearer: <your_access_token>`.
2\. The `paypal-auth-assertion` header with the value `your_generated_auth_assertion`.
3\. `"provider_type": "APPLE_PAY"` to indicate that this is an `APPLE_PAY` domain registration.
4\. `"domain": {"name": "example.com" }`, and replace "example.com" with the domain you would like to register.
Example JSON request:
```text lineNumbers
// Register a domain
{
"provider_type":"APPLE_PAY",
"domain": {
"name":"example.com"
}
}
```
4. You will receive a `201 CREATED` response with the merchant and domain registration details if this is successful.
### Deregister your sandbox domain [#deregister-your-sandbox-domain]
1. Request an access token by sending a POST request to `https://api-m.sandbox.paypal.com/v1/oauth2/token`. Note the access token from the response body.
2. Generate a [PayPal Auth Assertion](/api/rest/requests/#paypal-auth-assertion) header and make a note of it. Make sure to replace `merchant_payer_id` with the merchant ID for which you are deregistering the domain.
3. Deregister the domain by sending a POST request to `https://api-m.sandbox.paypal.com/v1/customer/unregister-wallet-domain`. Include the following in your request:
1\. The authorization header with the value `Bearer: <your_access_token>`.
2\. The `paypal-auth-assertion` header with the value `your_generated_auth_assertion`.
3\. `"provider_type": "APPLE_PAY"` to indicate that this is an `APPLE_PAY` domain deregistration
4\. `"domain": { "name": "example.com" }`, and replace "example.com" with the domain you would like to deregister.
5\. `"reason": "Why you are deregistering this domain"` to indicate the reason for deregistration.
Example JSON request:
```text lineNumbers
// Deregister a domain
{
"provider_type":"APPLE_PAY",
"domain": {
"name":"example.com"
},
"reason":"Merchant requested to deregister domain",
}
```
4. You will receive a `200 OK` response with the merchant and domain deregistration details if this is successful.
### View list of registered sandbox domains [#view-list-of-registered-sandbox-domains]
1. Request an access token by sending a POST request to `https://api-m.sandbox.paypal.com/v1/oauth2/token`. Note the access token from the response body.
2. Generate a [PayPal Auth Assertion](/api/rest/requests/#paypal-auth-assertion) header and make a note of it. Make sure to replace `merchant_payer_id` with the merchant ID that you are registering the domain for.
3. Query the list of registered domains by sending a GET request to `https://api-m.sandbox.paypal.com/v1/customer/wallet-domains`.
1\. The authorization header with the value `Bearer: `.
2\. The `paypal-auth-assertion` header with the value `your_generated_auth_assertion` to indicate the merchant for which you are getting the domain.
4. You will receive a `200 OK` response with the registered domain under the `wallet_domains` field if this is successful.
## Create Apple Pay sandbox account [#create-apple-pay-sandbox-account]
Create an Apple Pay sandbox account on the Apple Developer website to get a test wallet and test cards to test your Apple Pay integration.
If you already have an Apple sandbox account, you can use that account.
1. Create an [Apple developer account](https://developer.apple.com/).
2. Create an [Apple sandbox account](https://developer.apple.com/apple-pay/sandbox-testing/).
## 3. Integrate Apple Pay checkout [#3-integrate-apple-pay-checkout]
Follow this integration process to add Apple Pay as a checkout option, customize the payment experience, and process payments.
> **Info:** **Important:** You can find a complete example in the [GitHub repo](https://github.com/paypal-examples/applepay).
### Call the Orders API [#call-the-orders-api]
To accept Apple Pay directly on your website, create API endpoints on your server that communicate with the [PayPal Orders V2 API](/api/orders/v2). These endpoints can create an order, authorize payment, and capture payment for an order.
### Server-side example (Node.js) [#server-side-example-nodejs]
The following example uses the [PayPal Orders V2 API](/api/orders/v2) to add routes to an Express server for creating orders and capturing payments. Find the complete sample code in the [GitHub repo](https://github.com/paypal-examples/docs-examples/tree/main/advanced-integration).
#### server.js
```text lineNumbers
import * as PayPal from "./paypal-api.js";
// Create order
app.post("/api/orders", async (req, res) => {
const order = await paypal.createOrder();
res.json(order);
});
// Capture payment
app.post("/api/orders/:orderID/capture", async (req, res) => {
const {
orderID
} = req.params;
const captureData = await paypal.capturePayment(orderID);
res.json(captureData);
});
```
#### paypal-api.js
```text lineNumbers
// Create an order
export async function createOrder() {
const purchaseAmount = "100.00"; // TODO: pull amount from a database or session
const accessToken = await generateAccessToken();
const url = `${base}/v2/checkout/orders`;
const response = await fetch(url, {
method: "post",
headers: {
"Content-Type": "application/json",
"Authorization": `Bearer ${accessToken}`,
"PayPal-Partner-Attribution-Id": ""
},
body: JSON.stringify({
intent: "CAPTURE",
purchase_units: [
{
amount: {
currency_code: "USD",
value: purchaseAmount
},
},
],
}),
});
const data = await response.json();
return data;
}
// capture payment for an order
export async function capturePayment(orderId) {
const accessToken = await generateAccessToken();
const url = `${base}/v2/checkout/orders/${orderId}/capture`;
const response = await fetch(url, {
method: "post",
headers: {
"Content-Type": "application/json",
"Authorization": `Bearer ${accessToken}`,
},
});
const data = await response.json();
return data;
}
```
## 4. Set up your Apple Pay button [#4-set-up-your-apple-pay-button]
You need to Integrate with the Apple Pay JavaScript SDK and PayPal JavaScript SDK to add Apple Pay to your site.
### Integrate PayPal JavaScript SDK [#integrate-paypal-javascript-sdk]
Use this script to integrate with the PayPal JavaScript SDK:
```text lineNumbers
```
Include `applepay` in the `components` list.
### Integrate Apple JavaScript SDK [#integrate-apple-javascript-sdk]
Use this script to integrate with the Apple JavaScript SDK:
```text lineNumbers
```
PayPal's Apple Pay component interacts with your JavaScript code in 4 areas:
1. Checking merchant eligibility for Apple Pay: `paypal.Applepay().config()`
2. Creating an Apple Pay session
3. Handling the `onvalidatemerchant` callback: `paypal.Applepay().validateMerchant()`
4. Handling the `onpaymentauthorized` callback: `paypal.Applepay().confirmOrder()`
Before you show the Apple Pay button, make sure that you can create an Apple Pay instance and that the device can make an Apple Pay payment.
Use [`ApplePaySession.canMakePayments`](https://developer.apple.com/documentation/apple_pay_on_the_web/applepaysession/1778027-canmakepayments) to check if the device can make Apple Pay payments.
> **Info:** **Tip:** When testing, you need to be logged into the iCloud account for your testing environment. Testing in the sandbox requires you to log into an [iTunes Connect sandbox tester account](https://developer.apple.com/apple-pay/sandbox-testing/), which you can create with an [Apple Developer account](https://developer.apple.com/help/account/). When you test in a live environment, log into a live iCloud account.
Check for device and merchant eligibility before setting up the Apple Pay button.
To check eligibility, use the PayPal JavaScript SDK API `paypal.Applepay().config()`.
```text lineNumbers
```
```text lineNumbers
if (!window.ApplePaySession) {
console.error('This device does not support Apple Pay');
}
if (!ApplePaySession.canMakePayments()) {
console.error('This device is not capable of making Apple Pay payments');
}
const applepay = paypal.Applepay();
applepay.config()
.then(applepayConfig => {
if (applepayConfig.isEligible) {
document.getElementById("applepay-container").innerHTML = '';
}
})
.catch(applepayConfigError => {
console.error('Error while fetching Apple Pay configuration.');
});
```
You can find more details on how to set up the Apple Pay button in [Apple's developer documentation](https://developer.apple.com/documentation/apple_pay_on_the_web/displaying_apple_pay_buttons_using_css).
## Create Apple Pay sandbox account [#create-apple-pay-sandbox-account-1]
Create an Apple Pay sandbox account on the Apple Developer website to get a test wallet and test cards to test your Apple Pay integration.
If you already have an Apple sandbox account, you can use that account.
1. Create an [Apple developer account](https://developer.apple.com/).
2. Create an [Apple sandbox account](https://developer.apple.com/apple-pay/sandbox-testing/).
## 5. Show the payment sheet [#5-show-the-payment-sheet]
After you have created the Apple Pay session and added the callbacks, call the session's begin method to show the payment sheet. You can only call the `begin` method when a payer explicitly requests a payment, such as inside an `onclick` event. The `begin` method throws a JavaScript exception if the buyer doesn't explicitly request the action:
```text lineNumbers
session.begin();
```
After the payer starts a payment in the browser, they use their Apple device to authorize the payment.
### Customize payment [#customize-payment]
Customize payment using the [Apple Pay JavaScript SDK](https://developer.apple.com/documentation/apple_pay_on_the_web).
The commonly used customizations for Apple Pay are:
| Customization | Apple Pay SDK Details |
| ----------------------------------------------------------------------------------------------------- | ----------------------------------------------------------------------------------------------------------------------------------------------------------------------------------------------------------------------------------------------------------------------------------------------------------------------------------------------------------------------------------------------------- |
| A set of line items that explain the subtotal, tax, discount, and additional charges for the payment. | [`lineItems`](https://developer.apple.com/documentation/apple_pay_on_the_web/applepaypaymentrequest/1916120-lineitems) |
| The billing information fields that the payer must provide to fulfill the order. | [`requiredBillingContactFields`](https://developer.apple.com/documentation/apple_pay_on_the_web/applepaypaymentrequest/2216120-requiredbillingcontactfields) |
| The shipping information fields that the payer must provide to fulfill the order. | [`requiredShippingContactFields`](https://developer.apple.com/documentation/apple_pay_on_the_web/applepaypaymentrequest/2216121-requiredshippingcontactfields) |
| The payer's billing contact information. | [`billingContact`](https://developer.apple.com/documentation/apple_pay_on_the_web/applepaypaymentrequest/1916125-billingcontact) |
| The payer's shipping contact information.
## Integration video [#integration-video]
Watch our video tutorial for this integration:
## Know before you code [#know-before-you-code]
> **Info:** You must be an approved partner to integrate the Apple Pay SDK.
>
> For customers to pay with Apple Pay, they must be in a region where Apple Pay is supported, and their devices must meet the following requirements:
>
> * Device compatibility: The device must support Apple Pay.
> * iOS version: iOS 12.1 or later.
> * Desktop: macOS 10.14.1 or later.
> * Supported browsers: Safari. With the [latest Apple Pay SDK](https://applepay.cdn-apple.com/jsapi/1.latest/apple-pay-sdk.js), customers can also pay using non-Safari browsers.
>
> PayPal also provides iframe support for ApplePay. To use ApplePay within an iframe:
>
> * The iframe tag must have the attribute `allow="payment"`.
> * The parent domain hosting the iframe needs to have it's domain validated by following the usual process with PayPal.
>
> [Check Compatibility](https://support.apple.com/en-us/HT208531)
> **Info:** Currently supports Apple Pay one-time payments with the payer present.
>
> Review Apple's terms and conditions for the Apple Pay platform. See Apple's [developer terms](https://developer.apple.com/app-store/review/guidelines/) for more information.
>
> [Check Apple Docs](https://www.apple.com/legal/applepayments/)
## 1. Set up your sandbox account to accept Apple Pay [#1-set-up-your-sandbox-account-to-accept-apple-pay]
Before you can accept Apple Pay on your website, verify that your sandbox business account supports Apple Pay.
Partners can use the PayPal Developer Dashboard to set up their sandbox accounts to accept Apple Pay. The integration for partner accounts includes creating a sandbox business account through sandbox.paypal.com. If the Apple Pay status for the account shows as disabled, complete the sandbox onboarding steps to enable Apple Pay.
1. Log into the [PayPal Developer Dashboard](/dashboard/applications/sandbox) and go to your sandbox account.
2. Go to **Apps & Credentials**.
3. Make sure you are in the PayPal sandbox environment by selecting **Sandbox** at the top.
4. Select or create an app.
5. Scroll down to **Mobile and digital payments** and check if Apple Pay is enabled. If Apple Pay isn't enabled, select the **Apple Pay** checkbox.
If you created a sandbox business account through [sandbox.paypal.com](https://sandbox.paypal.com/), and the Apple Pay status for the account shows as disabled, [complete the sandbox onboarding steps](https://www.sandbox.paypal.com/bizsignup/add-product?product=payment_methods\&country.x=US\&locale.x=en_US\&capabilities=APPLE_PAY) to enable Apple Pay.
> **Info:** **Tip:** When your integration is ready to go live, read the Go live section for details about the additional steps needed for Apple Pay onboarding.
## 2. Set up your testing environment [#2-set-up-your-testing-environment]
Before you develop your Apple Pay on the web integration, you need to [set up your PayPal account, client ID, and sandbox emails](/api/rest/) for testing.
1. Download and host the domain association file for your sandbox environment.
2. Register your sandbox domain.
3. Create an Apple Pay sandbox account for testing. You don't need an Apple developer account to go live.
> **Info:** **Important:** You need to verify any domain names that you want to show an Apple Pay button. Apple rejects payments from unverified domains. The Apple Pay payment method won't work if the domain isn't registered.
### Download and host sandbox domain association file [#download-and-host-sandbox-domain-association-file]
1. [Download](https://paypalobjects.com/devdoc/apple-pay/sandbox/apple-developer-merchantid-domain-association) the domain association file for your sandbox environment.
2. Host the file on your test environment at `/.well-known/apple-developer-merchantid-domain-association.`
### Register your sandbox domain [#register-your-sandbox-domain]
1. Request an access token by sending a POST request to `https://api-m.sandbox.paypal.com/v1/oauth2/token`. Note the access token from the response body.
2. Generate a [PayPal Auth Assertion](/api/rest/requests/#paypal-auth-assertion) header and make a note of it. Make sure to replace `merchant_payer_id` with the merchant ID for which you are registering the domain.
3. Register the domain by sending a POST request to `https://api-m.sandbox.paypal.com/v1/customer/wallet-domains`. Include the following in your request:
1\. The authorization header with the value `Bearer: <your_access_token>`.
2\. The `paypal-auth-assertion` header with the value `your_generated_auth_assertion`.
3\. `"provider_type": "APPLE_PAY"` to indicate that this is an `APPLE_PAY` domain registration.
4\. `"domain": {"name": "example.com" }`, and replace "example.com" with the domain you would like to register.
Example JSON request:
```text lineNumbers
// Register a domain
{
"provider_type":"APPLE_PAY",
"domain": {
"name":"example.com"
}
}
```
4. You will receive a `201 CREATED` response with the merchant and domain registration details if this is successful.
### Deregister your sandbox domain [#deregister-your-sandbox-domain]
1. Request an access token by sending a POST request to `https://api-m.sandbox.paypal.com/v1/oauth2/token`. Note the access token from the response body.
2. Generate a [PayPal Auth Assertion](/api/rest/requests/#paypal-auth-assertion) header and make a note of it. Make sure to replace `merchant_payer_id` with the merchant ID for which you are deregistering the domain.
3. Deregister the domain by sending a POST request to `https://api-m.sandbox.paypal.com/v1/customer/unregister-wallet-domain`. Include the following in your request:
1\. The authorization header with the value `Bearer: <your_access_token>`.
2\. The `paypal-auth-assertion` header with the value `your_generated_auth_assertion`.
3\. `"provider_type": "APPLE_PAY"` to indicate that this is an `APPLE_PAY` domain deregistration
4\. `"domain": { "name": "example.com" }`, and replace "example.com" with the domain you would like to deregister.
5\. `"reason": "Why you are deregistering this domain"` to indicate the reason for deregistration.
Example JSON request:
```text lineNumbers
// Deregister a domain
{
"provider_type":"APPLE_PAY",
"domain": {
"name":"example.com"
},
"reason":"Merchant requested to deregister domain",
}
```
4. You will receive a `200 OK` response with the merchant and domain deregistration details if this is successful.
### View list of registered sandbox domains [#view-list-of-registered-sandbox-domains]
1. Request an access token by sending a POST request to `https://api-m.sandbox.paypal.com/v1/oauth2/token`. Note the access token from the response body.
2. Generate a [PayPal Auth Assertion](/api/rest/requests/#paypal-auth-assertion) header and make a note of it. Make sure to replace `merchant_payer_id` with the merchant ID that you are registering the domain for.
3. Query the list of registered domains by sending a GET request to `https://api-m.sandbox.paypal.com/v1/customer/wallet-domains`.
1\. The authorization header with the value `Bearer: `.
2\. The `paypal-auth-assertion` header with the value `your_generated_auth_assertion` to indicate the merchant for which you are getting the domain.
4. You will receive a `200 OK` response with the registered domain under the `wallet_domains` field if this is successful.
## Create Apple Pay sandbox account [#create-apple-pay-sandbox-account]
Create an Apple Pay sandbox account on the Apple Developer website to get a test wallet and test cards to test your Apple Pay integration.
If you already have an Apple sandbox account, you can use that account.
1. Create an [Apple developer account](https://developer.apple.com/).
2. Create an [Apple sandbox account](https://developer.apple.com/apple-pay/sandbox-testing/).
## 3. Integrate Apple Pay checkout [#3-integrate-apple-pay-checkout]
Follow this integration process to add Apple Pay as a checkout option, customize the payment experience, and process payments.
> **Info:** **Important:** You can find a complete example in the [GitHub repo](https://github.com/paypal-examples/applepay).
### Call the Orders API [#call-the-orders-api]
To accept Apple Pay directly on your website, create API endpoints on your server that communicate with the [PayPal Orders V2 API](/api/orders/v2). These endpoints can create an order, authorize payment, and capture payment for an order.
### Server-side example (Node.js) [#server-side-example-nodejs]
The following example uses the [PayPal Orders V2 API](/api/orders/v2) to add routes to an Express server for creating orders and capturing payments. Find the complete sample code in the [GitHub repo](https://github.com/paypal-examples/docs-examples/tree/main/advanced-integration).
#### server.js
```text lineNumbers
import * as PayPal from "./paypal-api.js";
// Create order
app.post("/api/orders", async (req, res) => {
const order = await paypal.createOrder();
res.json(order);
});
// Capture payment
app.post("/api/orders/:orderID/capture", async (req, res) => {
const {
orderID
} = req.params;
const captureData = await paypal.capturePayment(orderID);
res.json(captureData);
});
```
#### paypal-api.js
```text lineNumbers
// Create an order
export async function createOrder() {
const purchaseAmount = "100.00"; // TODO: pull amount from a database or session
const accessToken = await generateAccessToken();
const url = `${base}/v2/checkout/orders`;
const response = await fetch(url, {
method: "post",
headers: {
"Content-Type": "application/json",
"Authorization": `Bearer ${accessToken}`,
"PayPal-Partner-Attribution-Id": ""
},
body: JSON.stringify({
intent: "CAPTURE",
purchase_units: [
{
amount: {
currency_code: "USD",
value: purchaseAmount
},
},
],
}),
});
const data = await response.json();
return data;
}
// capture payment for an order
export async function capturePayment(orderId) {
const accessToken = await generateAccessToken();
const url = `${base}/v2/checkout/orders/${orderId}/capture`;
const response = await fetch(url, {
method: "post",
headers: {
"Content-Type": "application/json",
"Authorization": `Bearer ${accessToken}`,
},
});
const data = await response.json();
return data;
}
```
## 4. Set up your Apple Pay button [#4-set-up-your-apple-pay-button]
You need to Integrate with the Apple Pay JavaScript SDK and PayPal JavaScript SDK to add Apple Pay to your site.
### Integrate PayPal JavaScript SDK [#integrate-paypal-javascript-sdk]
Use this script to integrate with the PayPal JavaScript SDK:
```text lineNumbers
```
Include `applepay` in the `components` list.
### Integrate Apple JavaScript SDK [#integrate-apple-javascript-sdk]
Use this script to integrate with the Apple JavaScript SDK:
```text lineNumbers
```
PayPal's Apple Pay component interacts with your JavaScript code in 4 areas:
1. Checking merchant eligibility for Apple Pay: `paypal.Applepay().config()`
2. Creating an Apple Pay session
3. Handling the `onvalidatemerchant` callback: `paypal.Applepay().validateMerchant()`
4. Handling the `onpaymentauthorized` callback: `paypal.Applepay().confirmOrder()`
Before you show the Apple Pay button, make sure that you can create an Apple Pay instance and that the device can make an Apple Pay payment.
Use [`ApplePaySession.canMakePayments`](https://developer.apple.com/documentation/apple_pay_on_the_web/applepaysession/1778027-canmakepayments) to check if the device can make Apple Pay payments.
> **Info:** **Tip:** When testing, you need to be logged into the iCloud account for your testing environment. Testing in the sandbox requires you to log into an [iTunes Connect sandbox tester account](https://developer.apple.com/apple-pay/sandbox-testing/), which you can create with an [Apple Developer account](https://developer.apple.com/help/account/). When you test in a live environment, log into a live iCloud account.
Check for device and merchant eligibility before setting up the Apple Pay button.
To check eligibility, use the PayPal JavaScript SDK API `paypal.Applepay().config()`.
```text lineNumbers
```
```text lineNumbers
if (!window.ApplePaySession) {
console.error('This device does not support Apple Pay');
}
if (!ApplePaySession.canMakePayments()) {
console.error('This device is not capable of making Apple Pay payments');
}
const applepay = paypal.Applepay();
applepay.config()
.then(applepayConfig => {
if (applepayConfig.isEligible) {
document.getElementById("applepay-container").innerHTML = '';
}
})
.catch(applepayConfigError => {
console.error('Error while fetching Apple Pay configuration.');
});
```
You can find more details on how to set up the Apple Pay button in [Apple's developer documentation](https://developer.apple.com/documentation/apple_pay_on_the_web/displaying_apple_pay_buttons_using_css).
## Create Apple Pay sandbox account [#create-apple-pay-sandbox-account-1]
Create an Apple Pay sandbox account on the Apple Developer website to get a test wallet and test cards to test your Apple Pay integration.
If you already have an Apple sandbox account, you can use that account.
1. Create an [Apple developer account](https://developer.apple.com/).
2. Create an [Apple sandbox account](https://developer.apple.com/apple-pay/sandbox-testing/).
## 5. Show the payment sheet [#5-show-the-payment-sheet]
After you have created the Apple Pay session and added the callbacks, call the session's begin method to show the payment sheet. You can only call the `begin` method when a payer explicitly requests a payment, such as inside an `onclick` event. The `begin` method throws a JavaScript exception if the buyer doesn't explicitly request the action:
```text lineNumbers
session.begin();
```
After the payer starts a payment in the browser, they use their Apple device to authorize the payment.
### Customize payment [#customize-payment]
Customize payment using the [Apple Pay JavaScript SDK](https://developer.apple.com/documentation/apple_pay_on_the_web).
The commonly used customizations for Apple Pay are:
| Customization | Apple Pay SDK Details |
| ----------------------------------------------------------------------------------------------------- | ----------------------------------------------------------------------------------------------------------------------------------------------------------------------------------------------------------------------------------------------------------------------------------------------------------------------------------------------------------------------------------------------------- |
| A set of line items that explain the subtotal, tax, discount, and additional charges for the payment. | [`lineItems`](https://developer.apple.com/documentation/apple_pay_on_the_web/applepaypaymentrequest/1916120-lineitems) |
| The billing information fields that the payer must provide to fulfill the order. | [`requiredBillingContactFields`](https://developer.apple.com/documentation/apple_pay_on_the_web/applepaypaymentrequest/2216120-requiredbillingcontactfields) |
| The shipping information fields that the payer must provide to fulfill the order. | [`requiredShippingContactFields`](https://developer.apple.com/documentation/apple_pay_on_the_web/applepaypaymentrequest/2216121-requiredshippingcontactfields) |
| The payer's billing contact information. | [`billingContact`](https://developer.apple.com/documentation/apple_pay_on_the_web/applepaypaymentrequest/1916125-billingcontact) |
| The payer's shipping contact information.
| [`shippingContact`](https://developer.apple.com/documentation/apple_pay_on_the_web/applepaypaymentrequest/1916127-shippingcontact)
Call the [`onshippingcontactselected`](https://developer.apple.com/documentation/apple_pay_on_the_web/applepaysession/1778009-onshippingcontactselected) event handler when the user selects a shipping contact in the payment sheet.
|
| The shipping method for a payment request.
| [`ApplePayShippingMethod`](https://developer.apple.com/documentation/apple_pay_on_the_web/applepayshippingmethod)Call the [`onshippingmethodselected`](https://developer.apple.com/documentation/apple_pay_on_the_web/applepaysession/1778028-onshippingmethodselected) event handler when the user selects a shipping method in the payment sheet. |
## 6. Test your integration [#6-test-your-integration]
Ensure your integration with Apple Pay is configured properly for sandbox and production environments.
Use your personal sandbox login information during checkout to complete a payment using Apple Pay. Then, log into the sandbox site [sandbox.paypal.com](https://www.sandbox.paypal.com/us/home) to see that the money has moved into your account.
1. Open your test page with the Safari web browser on an iOS device or computer.
2. Get a test card from your Apple sandbox account.
3. Add the test card to your Apple Wallet on your iOS device or by using the Safari browser on the web.
4. Tap the Apple Pay button to open a pop-up with the Apple Pay payment sheet.
5. Make a payment using the Apple Pay payment sheet.
6. If you have an additional confirmation page on your merchant website, continue to confirm the payment.
7. Log in to your merchant account and continue to your confirmation page to confirm that the money you used for payment showed up in the account.
## 7. Go live [#7-go-live]
Make Apple Pay available to buyers using your website or app.
> **Info:** **Important:** Before going live, complete [production onboarding](https://paypal.com/bizsignup/add-product?product=payment_methods\&country.x=US\&locale.x=en_US\&capabilities=APPLE_PAY) to process Apple Pay payments with your live PayPal account.
Live environment
If you are a new partner setting up a marketplace or platform for individual sellers, [contact us](https://www.paypal.com/us/cshelp/contact-us?_ga=2.148285298.496491259.1730035904-2088268300.1721295590)to become an approved partner. Then, see [Get Started](/limited-release/commerce-platform/get-started/) and [Configure your account](/limited-release/commerce-platform/onboard-merchants/create-merchant-accounts/) to sign up for a [PayPal business account](https://www.paypal.com/us/business).
Use your personal production login information during checkout to complete an Apple Pay transaction. Log into **paypal.com** to see the money move out of your account.
Getting started in your live environment
You need to verify any domain names in your production environment that will show an Apple Pay button. If Apple hasn't verified a domain, they will reject any payments from that domain.
* Download and host the domain association file for your live environment.
* Register your live domain on your PayPal Developer Dashboard.
> **Info:** **Important:** The Apple Pay payment method won't work if the domain isn't registered. There is no option to override this.
#### Download and host live domain association file [#download-and-host-live-domain-association-file]
1. Download the domain association file for your live environment.
2. Host the file on your production site at `/.well-known/apple-developer-merchantid-domain-association`.
[Download](https://paypalobjects.com/devdoc/apple-pay/well-known/apple-developer-merchantid-domain-association)
> **Info:** **Important:** The partner that owns the domain is responsible for registering that domain.
### Register your live domain [#register-your-live-domain]
1. Request an access token by sending a POST request to `https://api.paypal.com/v1/oauth2/token`. Note the access token from the response body.
2. Generate a [PayPal Auth Assertion](/api/rest/requests/#paypal-auth-assertion) header and make a note of it. Make sure to replace `merchant_payer_id` with the Merchant ID for which you are registering the domain.
3. Register the domain by sending a POST request to `https://api-m.paypal.com/v1/customer/wallet-domains`. Include the following in your request:
1\. The authorization header with the value `Bearer: <your_access_token>`.
2\. The `paypal-auth-assertion` header with the value `your_generated_auth_assertion`.
3\. `"provider_type": "APPLE_PAY"` to indicate that this is an `APPLE_PAY` domain registration.
4\. `"domain": { "name": "example.com" }`, and replace "example.com" with the domain you would like to register.
Example JSON request:
```text lineNumbers
// Register a domain
{
"provider_type":"APPLE_PAY",
"domain":{
"name":"example.com"
}
}
```
4. You will receive a `201 CREATED` response with the merchant and domain registration details if this is successful.
> **Info:** **Note:** When Apple verifies a domain, it makes a request to retrieve the domain verification file. Ensure that:
>
> * The file is not served with a `3XX` status code. Apple does not support HTTP URL redirects for the domain association file.
> * This file is served via HTTPS 1.1.
> * **Important:** This file is served with `Content-Type: application/octet-stream` to indicate that this is a binary file download.
> * The HTTP response for this request returns this file as a binary object and not as HTML, or plain text.
> * Access to this file is not behind a firewall. See [Apple documentation](https://developer.apple.com/documentation/apple_pay_on_the_web/setting_up_your_server) on allowing Apple IP addresses.
### Deregister your live domain [#deregister-your-live-domain]
1. Request an access token by sending a POST request to `https://api.paypal.com/v1/oauth2/token`. Note the access token from the response body.
2. Generate a [PayPal Auth Assertion](/api/rest/requests/#paypal-auth-assertion) header and make a note of it. Make sure to replace `merchant_payer_id` with the merchant ID for which you are deregistering the domain.
3. Deregister the domain by sending a POST request to `https://api-m.paypal.com/v1/customer/unregister-wallet-domain`. Include the following in your request:
1\. The authorization header with the value `Bearer: <your_access_token>`.
2\. The `paypal-auth-assertion` header with the value `your_generated_auth_assertion`.
3\. `"provider_type": "APPLE_PAY"` to indicate that this is an `APPLE_PAY` domain deregistration
4\. `"domain": { "name": "example.com" }`, and replace "example.com" with the domain you would like to deregister.
5\. `"reason": "Why you are deregistering this domain"` to indicate the reason for deregistration.
Example JSON request:
```text lineNumbers
// Deregister a domain
{
"provider_type":"APPLE_PAY",
"domain":{
"name":"example.com"
},
"reason":"Merchant requested to deregister domain",
}
```
4. You will receive a `200 OK` response with the merchant and domain deregistration details if this is successful.
### View list of registered live domains [#view-list-of-registered-live-domains]
1. Request an access token by sending a POST request to `https://api.paypal.com/v1/oauth2/token`. Note the access token from the response body.
2. Generate a [PayPal Auth Assertion](/api/rest/requests/#paypal-auth-assertion) header and make a note of it. Make sure to replace `merchant_payer_id` with the merchant ID that you are registering the domain for.
3. Query the list of registered domains by sending a GET request to `https://api.paypal.com/v1/customer/wallet-domains`.
1\. The authorization header with the value `Bearer: `.
2\. The `paypal-auth-assertion` header with the value `your_generated_auth_assertion` to indicate the merchant for which you are getting the domain.
4. You will receive a `200 OK` response with the registered domains under the `wallet_domains` field if this is successful.
### Testing your live environment [#testing-your-live-environment]
When testing a purchase in production, consider:
* The business account receiving money can't also make the purchase.
* If you create a personal account with the same information as the business account, those accounts might experience restrictions.
**How to test Apple Pay payments in a live environment**
1. Open your test page with Safari on iOS or desktop.
2. Select the Apple Pay button to open a pop-up with the Apple Pay payment sheet.
3. Proceed with the Apple Pay checkout transaction.
4. If you have an additional confirmation page on your merchant website, confirm the payment.
5. Log in to your seller account and confirm that the money has moved into that account.
### Troubleshoot your integration [#troubleshoot-your-integration]
Make sure that there are no browser console warnings or errors. The JavaScript SDK configuration attributes have distinct validation checks for input formatting and values.
If the validation fails, the web browser's developer console shows warning messages that say which property is incorrect and what you need to do to address the issue. The library generally attempts to revert to the safe default values if missing or incorrect inputs exist.
## Next steps and customizations [#next-steps-and-customizations]
Get started testing, add security to your checkout experience, or create customizations for your audience.
> **Info:** Integrate Expanded Checkout
>
> Add more card payment options to your integration.