# Integrate PayPal Checkout (/limited-release/commerce-platform/accept-payments/standard/integrate)
## How it works [#how-it-works]
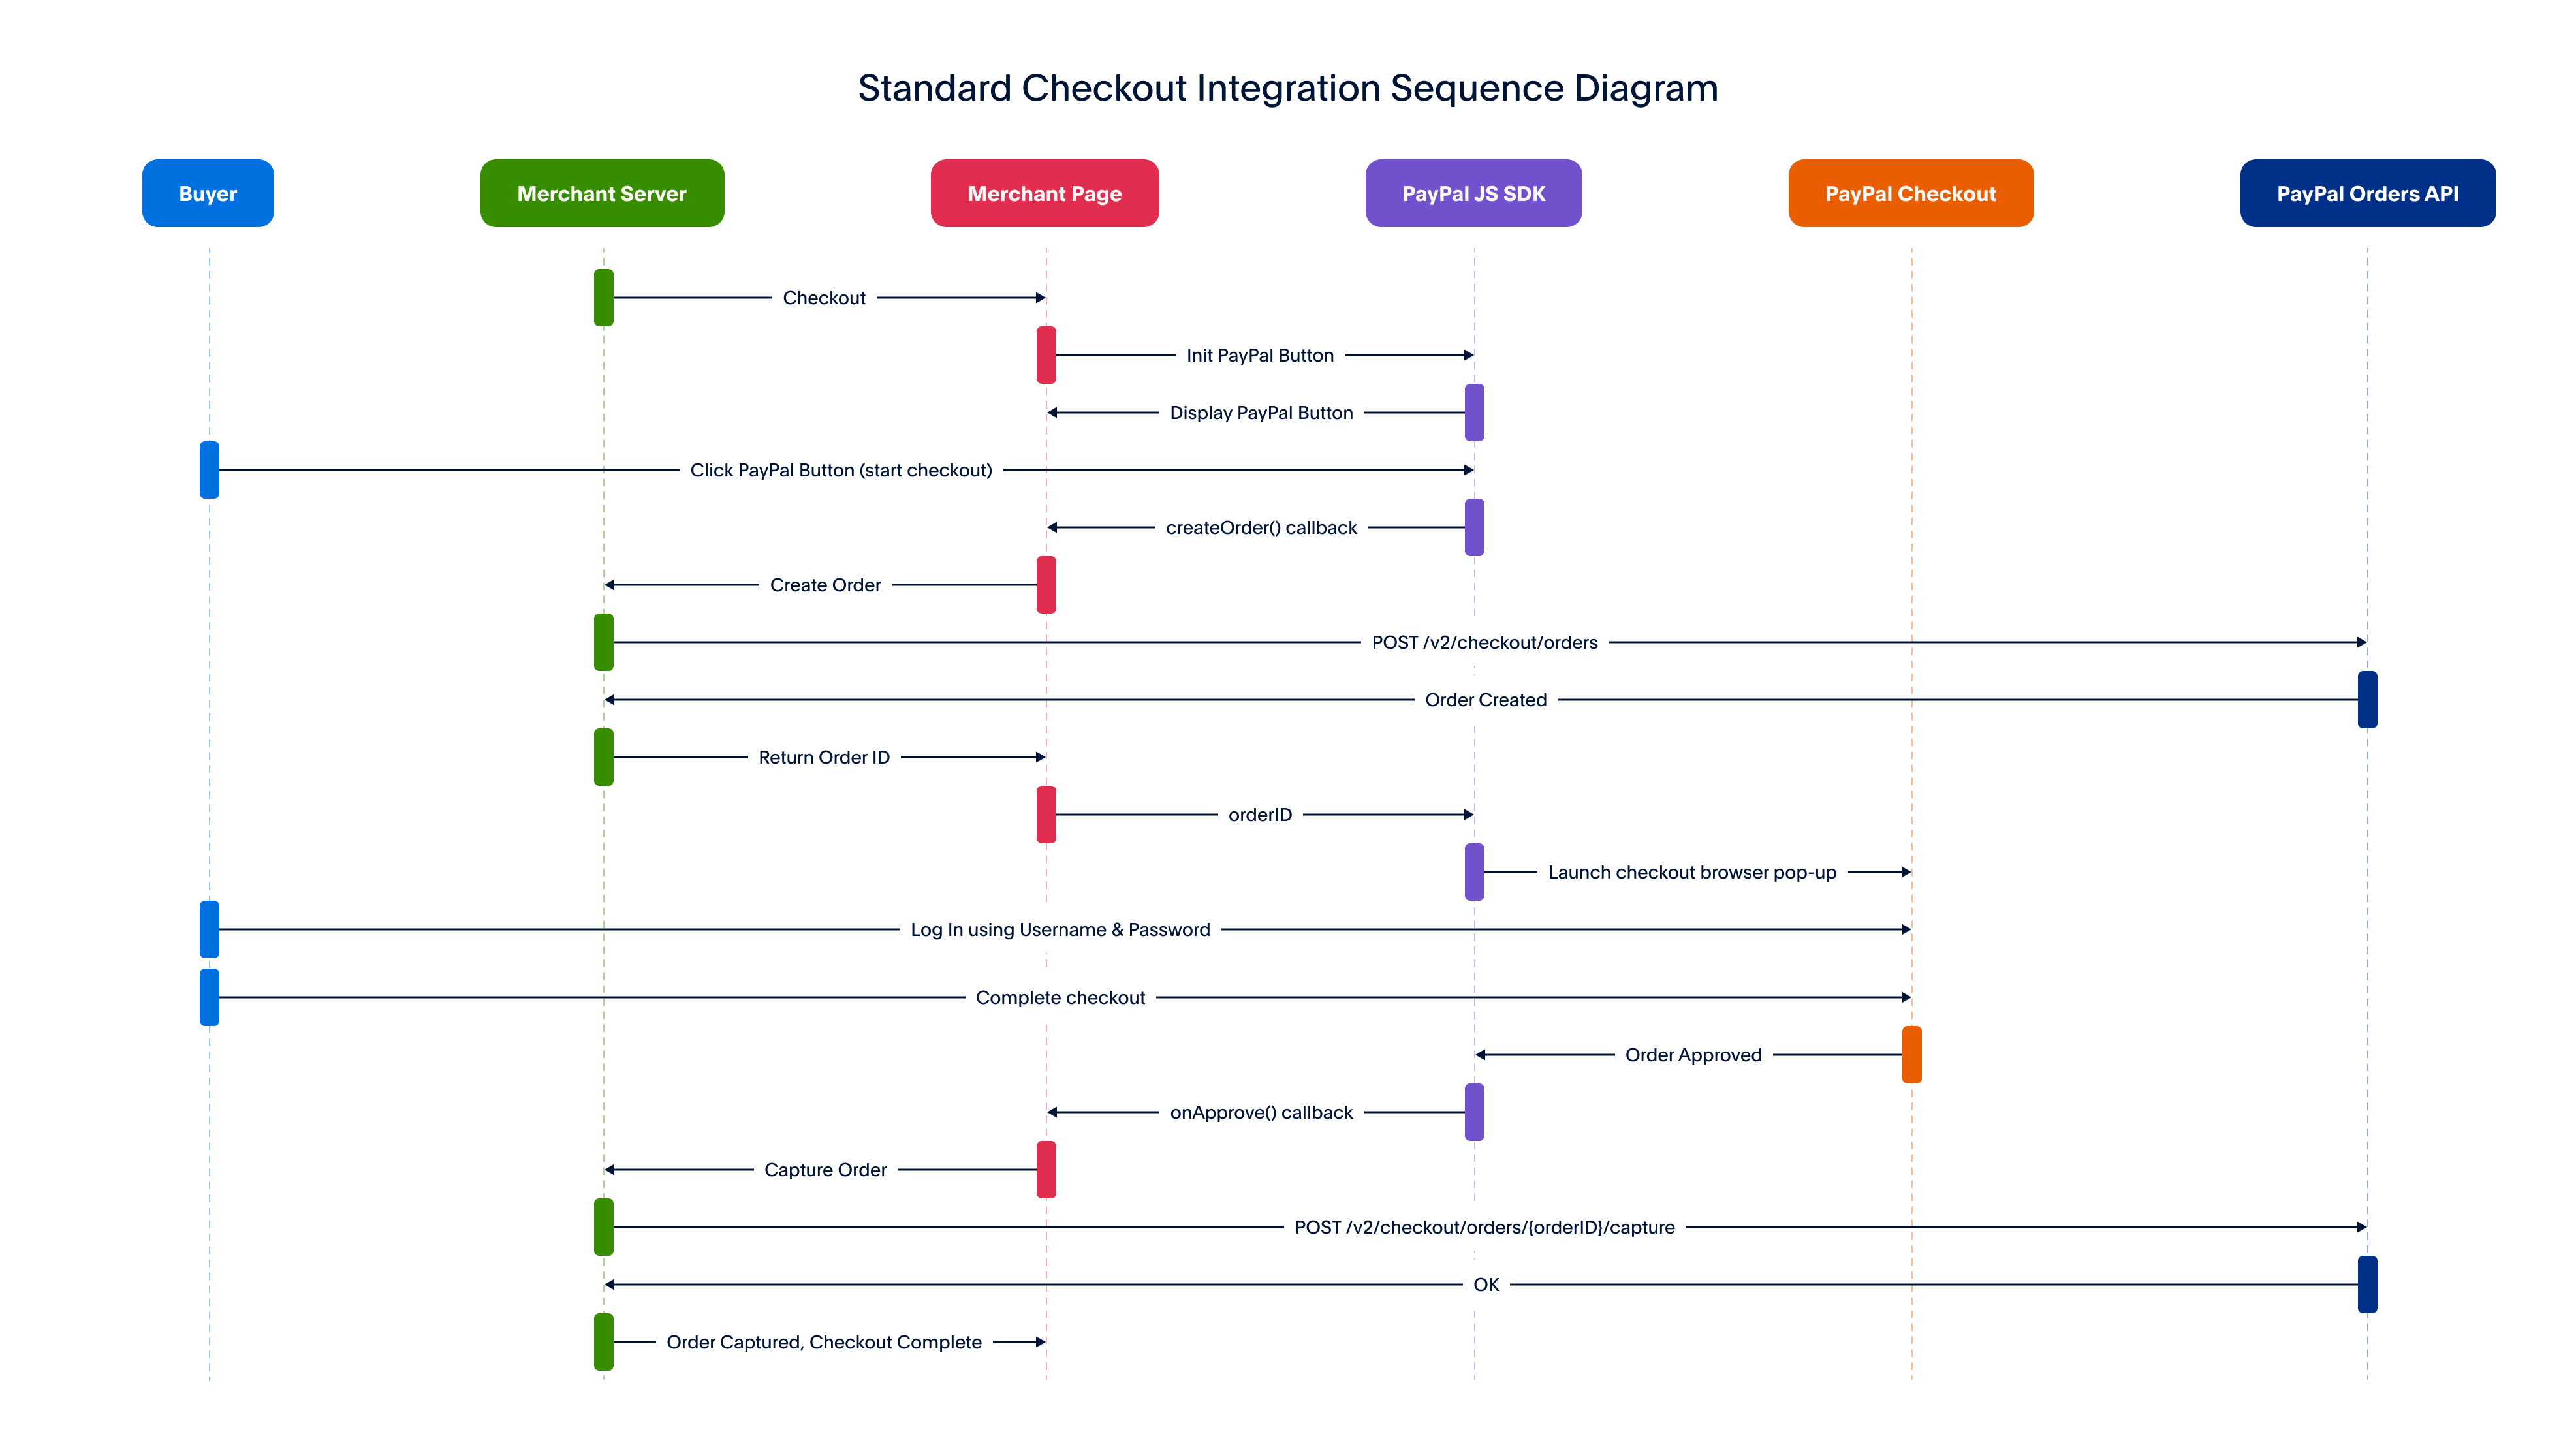
Integrate PayPal Checkout to show the PayPal payment buttons. To extend your integration, see [Customize your buyers' experience](/limited-release/commerce-platform/accept-payments/advanced/customize/).
After you integrate PayPal Checkout, you can also offer the following options with some additional configuration:
* Pay Later
* Venmo
* PayPal Credit
This integration guide follows the code in this [GitHub sample](https://github.com/paypal-examples/docs-examples/tree/main/standard-integration).
 ## Know before you code [#know-before-you-code]
> **Info:** ### You need the following to use this integration: [#you-need-the-following-to-use-this-integration]
>
> * Be an [approved partner](/limited-release/commerce-platform/).
> * [Onboard your sellers](/limited-release/commerce-platform/onboard-merchants) before you begin the integration.
> * Have an access token.
>
> [Get access token](/limited-release/commerce-platform/onboard-merchants/create-merchant-accounts/)
> **Info:** ### You need a developer account to get sandbox credentials [#you-need-a-developer-account-to-get-sandbox-credentials]
>
> PayPal uses the following REST API credentials, which you can get from the developer dashboard:
>
> * **Client ID**: Authenticates your account with PayPal and identifies an app in your sandbox.
> * **Client secret**: Authorizes an app in your sandbox. Keep this secret safe and don't share it.
>
> [Dashboard](/dashboard/)
>
> [Read the guide](/sandbox-testing/overview)
> **Info:** ### You'll need both PayPal and third-party tools [#youll-need-both-paypal-and-third-party-tools]
>
> * [JavaScript SDK](/sdk/js/): Adds PayPal-supported payment methods.
> * [Orders REST API](/api/orders/v2): Create, update, retrieve, authorize, and capture orders.
> * [npm](https://www.npmjs.com/): Registry used to install third-party libraries.
> **Info:** ### Explore PayPal APIs with Postman [#explore-paypal-apis-with-postman]
>
> You can use Postman to explore and test PayPal APIs. Learn more in our [Postman guide](/api/rest/postman).
## 1. Set up your environment [#1-set-up-your-environment]
Complete the following steps to set up your development environment.
### 1. Set up npm [#1-set-up-npm]
This sample integration uses Node.js. You'll need to install npm to run the sample application. For more info, [visit npm's documentation](https://www.npmjs.com/package/npm).
### 2. Install third-party libraries [#2-install-third-party-libraries]
You'll need to install the following third-party libraries to set up your integration. This sample command installs all libraries at the same time:
```text lineNumbers
npm install dotenv express node-fetch
```
| Third-party libraries | Description |
| ------------------------------------------------------ | --------------------------------------------------------------------------------------------------------- |
| [dotenv](https://www.npmjs.com/package/dotenv) | Separates your configuration and code by loading environment variables from a .env file into process.env. |
| [express](https://www.npmjs.com/package/express) | This lean Node.js web application framework supports web and mobile applications. |
| [node-fetch](https://www.npmjs.com/package/node-fetch) | This function helps you make API requests, similar to `window.fetch`. |
### 3. Verify Package.json [#3-verify-packagejson]
A `package.json` file lists the packages and version numbers your app needs. You can share your `package.json` file with other developers so they can use the same settings as you.
The following code sample shows a `package.json` file for a PayPal integration. Compare this sample to the `paste` in your project:
```javascript lineNumbers
{
"name": "paypal-standard-integration",
"description": "Sample Node.js web app to integrate PayPal Standard Checkout for online payments",
"version": "1.0.0",
"main": "server/server.js",
"type": "module",
"scripts":
{
"test": "echo \"Error: no test specified\" && exit 1",
"start": "nodemon server/server.js",
"format": "npx prettier --write **/*.{js,md}",
"format:check": "npx prettier --check **/*.{js,md}",
"lint": "npx eslint server/*.js --env=node && npx eslint client/*.js --env=browser"
},
"license": "Apache-2.0",
"dependencies":
{
"dotenv": "^16.3.1",
"express": "^4.18.2",
"node-fetch": "^3.3.2"
},
"devDependencies":
{
"nodemon": "^3.0.1"
}
}
```
Replace `YOUR-SERVER-NAME.js` in `main` with the name of your server file on lines 5 and 9.
If you're having trouble with your app, reinstall your local library and package files using `npm install`.
If you're getting the following node error, include `"type": "module"` in your `package.json` file. This line isn't automatically added when `package.json` is created.
`Warning: To load an ES module, set "type": "module" in the package.json or use the .mjs extension (Use `node --trace-warnings ...` to show where the warning was created)`
See line 6 of the sample `package.json` file for an example.
### 4. Set up .env [#4-set-up-env]
A `.env` file is a line-delimited text file that sets your local working environment variables. Use this `.env` file to securely pass the client ID and client secret for your app.
The following code shows an example `.env` file. Replace the `PAYPAL-CLIENT-ID` and `PAYPAL-CLIENT-SECRET` with values from your app:
```javascript lineNumbers
PAYPAL_CLIENT_ID=YOUR_CLIENT_ID_GOES_HERE
PAYPAL_CLIENT_SECRET=YOUR_SECRET_GOES_HERE
```
> **Note:** **Note:** View your client ID and client secret in the [PayPal Developer Dashboard](/dashboard/) under **Apps & Credentials**.
## 2. Integrate back end [#2-integrate-back-end]
This section explains how to set up your back end to integrate Paypal Checkout.
### Back-end process [#back-end-process]
1. Your app creates an order on the back end by making a call to the [Create Orders API endpoint](/api/orders/v2/orders-create).
2. Your app moves the money when the payer confirms the order by making a call to to the [Capture Payment for Order API](/api/orders/v2/orders-capture) endpoint on the back end.
3. You can also customize the way you capture money. For example, you can use [Authorize and Capture](/limited-release/commerce-platform/accept-payments/standard/customize/auth-capture/) which places a hold on buyer's money until the buyer is authorized. See the pages under [Customize](/limited-release/commerce-platform/accept-payments/standard/customize/) for more information.
## Back-end code [#back-end-code]
This sample shows how to generate a `PayPal-Auth-Assertion` header, add it to a `node.js` file, and set up a `/server/server.js` file to integrate with PayPal Checkout.
#### 1.Generate a PayPal-Auth-Assertion header [#1generate-a-paypal-auth-assertion-header]
Pass the `PayPal-Auth-Assertion` header with standard `Content-Type`, `Authorization`, and `PayPal-Request-ID` headers. Copy and modify the following code to generate the `PayPal-Auth-Assertion` header.
```javascript lineNumbers
const clientId = "CLIENT-ID";
const sellerPayerId = "SELLER-PAYER-ID"
const jwt = getAuthAssertionValue(clientId, sellerPayerId);
console.log(jwt);
function getAuthAssertionValue(clientId, sellerPayerId) {
const header = {
"alg": "none"
};
const encodedHeader = base64url(header);
const payload = {
"iss": clientId,
"payer_id": sellerPayerId
};
const encodedPayload = base64url(payload);
return `${encodedHeader}.${encodedPayload}.`;
}
function base64url(json) {
return btoa(JSON.stringify(json))
.replace(/=+$/, '')
.replace(/\+/g, '-')
.replace(/\//g, '_');
}
```
The preceding example contains period characters ( `.` ), which are required.
#### Modify the code: [#modify-the-code]
* Replace `CLIENT-ID` with the client ID of the platform or marketplace from the PayPal developer dashboard.
* Replace `SELLER-PAYER-ID` with the payer ID or the email of the receiving seller's PayPal account.
Example functions to generate the `PayPal-Auth-Assertion` header:
```javascript lineNumbers
const clientID = "Acuy17p2LcOf9RMv8SUVBb3wic3FPEP2NHFFqfSCBRFrNFdmbC1JQ0w8HIKRxW3RDy2R8QTL93eptFYl";
const merchantIDOrEmail = "identity_seller@paypal.com";
const auth1 = Buffer.from('{"alg":"none"}').toString("base64");
const auth2 = Buffer.from(`{"iss":${clientID},"payer_id":${merchantIDOrEmail}}`).toString("base64");
const authAssertionHeader = `${auth1}.${auth2}.`;
```
### 2. Set up your back end [#2-set-up-your-back-end]
The following code sample uses the `server.js` file to set up the back-end to integrate with PayPal Checkout.
```javascript lineNumbers
import express from "express";
import fetch from "node-fetch";
import "dotenv/config";
import path from "path";
const
{
PAYPAL_CLIENT_ID,
PAYPAL_CLIENT_SECRET,
PORT = 8888
} = process.env;
const base = "https://api-m.sandbox.paypal.com";
const app = express();
// host static files
app.use(express.static("client"));
// parse post params sent in body in json format
app.use(express.json());
/**
* Generate an OAuth 2.0 access token for authenticating with PayPal REST APIs.
* @see /api/rest/authentication
*/
const generateAccessToken = async () =>
{
try
{
if (!PAYPAL_CLIENT_ID || !PAYPAL_CLIENT_SECRET)
{
throw new Error("MISSING_API_CREDENTIALS");
}
const auth = Buffer.from(
PAYPAL_CLIENT_ID + ":" + PAYPAL_CLIENT_SECRET,
).toString("base64");
const response = await fetch(`${base}/v1/oauth2/token`,
{
method: "POST",
body: "grant_type=client_credentials",
headers:
{
Authorization: `Basic ${auth}`,
},
});
const data = await response.json();
return data.access_token;
}
catch (error)
{
console.error("Failed to generate Access Token:", error);
}
};
/**
* Create an order to start the transaction.
* @see /api/orders/v2/orders-create
*/
const createOrder = async (cart) =>
{
// use the cart information passed from the front-end to calculate the purchase unit details
console.log(
"shopping cart information passed from the frontend createOrder() callback:",
cart,
);
const accessToken = await generateAccessToken();
const url = `${base}/v2/checkout/orders`;
const payload = {
intent: "CAPTURE",
purchase_units: [
{
amount:
{
currency_code: "USD",
value: "100.00",
},
}, ],
};
const response = await fetch(url,
{
headers:
{
"Content-Type": "application/json",
Authorization: `Bearer ${accessToken}`,
// Uncomment one of these to force an error for negative testing (in sandbox mode only). Documentation:
// https://developer.paypal.com/negative-testing/request-headers
// "PayPal-Mock-Response": '{"mock_application_codes": "MISSING_REQUIRED_PARAMETER"}'
// "PayPal-Mock-Response": '{"mock_application_codes": "PERMISSION_DENIED"}'
// "PayPal-Mock-Response": '{"mock_application_codes": "INTERNAL_SERVER_ERROR"}'
},
method: "POST",
body: JSON.stringify(payload),
});
return handleResponse(response);
};
/**
* Capture payment for the created order to complete the transaction.
* @see /api/orders/v2/orders-capture
*/
const captureOrder = async (orderID) =>
{
const accessToken = await generateAccessToken();
const url = `${base}/v2/checkout/orders/${orderID}/capture`;
const response = await fetch(url,
{
method: "POST",
headers:
{
"Content-Type": "application/json",
Authorization: `Bearer ${accessToken}`,
// Uncomment one of these to force an error for negative testing (in sandbox mode only). Documentation:
// https://developer.paypal.com/negative-testing/request-headers
// "PayPal-Mock-Response": '{"mock_application_codes": "INSTRUMENT_DECLINED"}'
// "PayPal-Mock-Response": '{"mock_application_codes": "TRANSACTION_REFUSED"}'
// "PayPal-Mock-Response": '{"mock_application_codes": "INTERNAL_SERVER_ERROR"}'
},
});
return handleResponse(response);
};
async function handleResponse(response)
{
try
{
const jsonResponse = await response.json();
return {
jsonResponse,
httpStatusCode: response.status,
};
}
catch (err)
{
const errorMessage = await response.text();
throw new Error(errorMessage);
}
}
app.post("/api/orders", async (req, res) =>
{
try
{
// use the cart information passed from the front-end to calculate the order amount detals
const
{
cart
} = req.body;
const
{
jsonResponse,
httpStatusCode
} = await createOrder(cart);
res.status(httpStatusCode).json(jsonResponse);
}
catch (error)
{
console.error("Failed to create order:", error);
res.status(500).json(
{
error: "Failed to create order."
});
}
});
app.post("/api/orders/:orderID/capture", async (req, res) =>
{
try
{
const
{
orderID
} = req.params;
const
{
jsonResponse,
httpStatusCode
} = await captureOrder(orderID);
res.status(httpStatusCode).json(jsonResponse);
}
catch (error)
{
console.error("Failed to create order:", error);
res.status(500).json(
{
error: "Failed to capture order."
});
}
});
// serve index.html
app.get("/", (req, res) =>
{
res.sendFile(path.resolve("./client/checkout.html"));
});
app.listen(PORT, () =>
{
console.log(`Node server listening at http://localhost:${PORT}/`);
});
```
### Understand the server.js code sample [#understand-the-serverjs-code-sample]
The following section explains key parts of the `server.js` code sample.
In the back-end code, you'll need to modify as follows:
* Change `BN-CODE` to your PayPal Partner Attribution ID.
* Change `ACCESS-TOKEN` to your access token.
* Change `PAYPAL-AUTH-ASSERTION` to the `Paypal-auth-assertion` header you generated in the **Generate a PayPal-Auth-Assertion header** section.
#### Declare imports [#declare-imports]
This section of code imports the dotenv dependency, the express module, the node fetch module and the path module.
```javascript lineNumbers
import express from "express";
import fetch from "node-fetch";
import "dotenv/config";
import path from "path";
```
#### Set up port and server [#set-up-port-and-server]
This section of code sets up the port to run your server and starts the express Node.js web application framework. It also retreives variables and sets the base sandbox URL.
```javascript lineNumbers
const { PAYPAL_CLIENT_ID, PAYPAL_CLIENT_SECRET, PORT = 8888 } = process.env;
const base = "https://api-m.sandbox.paypal.com";
const app = express();
```
* Line 1 uses the DotEnv library to import and declare the client ID and client secret from your .env file.
* Line 2 declares the base URL for PayPal's sandbox API.
#### Additional functions [#additional-functions]
This section of the code defines a file directory for static files and calls the express.json function to parse JSON response bodies.
```javascript lineNumbers
// host static files
app.use(express.static("client"));
// parse post params sent in body in json format
app.use(express.json());
```
#### Generate access token [#generate-access-token]
You need an access token to authenticate all [REST API requests](/api/rest/authentication/). The following code sample makes a POST call to the `/v1/oauth2/` token endpoint to create an access token.
```javascript lineNumbers
/**
* Generate an OAuth 2.0 access token for authenticating with PayPal REST APIs.
* @see /api/rest/authentication
*/
const generateAccessToken = async () =>
{
try
{
if (!PAYPAL_CLIENT_ID || !PAYPAL_CLIENT_SECRET)
{
throw new Error("MISSING_API_CREDENTIALS");
}
const auth = Buffer.from(
PAYPAL_CLIENT_ID + ":" + PAYPAL_CLIENT_SECRET,
).toString("base64");
const response = await fetch(`${base}/v1/oauth2/token`,
{
method: "POST",
body: "grant_type=client_credentials",
headers:
{
Authorization: `Basic ${auth}`,
},
});
const data = await response.json();
return data.access_token;
}
catch (error)
{
console.error("Failed to generate Access Token:", error);
}
};
```
* Lines 10-12 combine the `PAYPAL_CLIENT_ID` and `PAYPAL_CLIENT_SECRET` as a key-value pair.
* Lines 13-18 define a response that makes a `POST` call to the `/v1/oauth2/token` API endpoint to generate an access token.
* Lines 21-22 establish a listener to capture the response data from the request and return the `access_token`.
#### Create order [#create-order]
Create an order to start a payment between a payer and a seller by making a `POST` request to `/v2/checkout/orders`.
If you process payments that require [Strong Customer Authentication](/reference/guidelines/psd2-compliance/sca/), you need to provide additional context with payment indicators.
```javascript lineNumbers
/**
* Create an order to start the transaction.
* @see /api/orders/v2/orders-create
*/
const createOrder = async (cart) =>
{
// use the cart information passed from the front-end to calculate the purchase unit details
console.log(
"shopping cart information passed from the frontend createOrder() callback:",
cart,
);
const accessToken = await generateAccessToken();
const url = `${base}/v2/checkout/orders`;
const payload = {
intent: "CAPTURE",
purchase_units: [
{
amount:
{
currency_code: "USD",
value: "100.00",
},
}, ],
};
const response = await fetch(url,
{
headers:
{
"Content-Type": "application/json",
Authorization: `Bearer ${accessToken}`,
// Uncomment one of these to force an error for negative testing (in sandbox mode only). Documentation:
// https://developer.paypal.com/negative-testing/request-headers
// "PayPal-Mock-Response": '{"mock_application_codes": "MISSING_REQUIRED_PARAMETER"}'
// "PayPal-Mock-Response": '{"mock_application_codes": "PERMISSION_DENIED"}'
// "PayPal-Mock-Response": '{"mock_application_codes": "INTERNAL_SERVER_ERROR"}'
"PayPal - Partner - Attribution - Id": "BN - CODE",
"PayPal - Auth - Assertion": "PAYPAL - AUTH - ASSERTION",
},
method: "POST",
body: JSON.stringify(payload),
});
return handleResponse(response);
};
```
* Line 5 calls the `createOrder` function and uses the cart information from the front-end to calculate the purchase units for the order.
* Line 12 establishes a listener to capture the `accessToken` from the `generateAccessToken()` function later in the API call.
* Lines 13-38 create an order by sending a `POST` request to the Orders v2 API, using the `accessToken`.
> **Info:** See the [Create order endpoint of the PayPal Orders v2 API](/api/orders/v2/orders-create) for sample responses and other details.
#### Processor response codes [#processor-response-codes]
Payment processors return processor response codes when they receive a transaction request. For advanced card payments, the code displays in the authorization object under the `response_code` field.
```javascript lineNumbers
"processor_response": {
"avs_code": "Y",
"cvv_code": "S",
"payment_advice_code": "",
"response_code": "0000"
}
```
If an external payment processor declines a transaction, PayPal returns a `HTTP 201 CREATED` status code and a status of `DECLINED` in the capture status.
See the Orders API `response_code` object to get the processor response code for the non-PayPal payment processor errors.
#### Capture payment [#capture-payment]
Capture an order to move money from the payer to the merchant by making a `POST` call to the `/v2/checkout/orders/ORDER-ID/capture` endpoint.
```javascript lineNumbers
/**
* Capture payment for the created order to complete the transaction.
* @see /api/orders/v2/orders-capture
*/
const captureOrder = async (orderID) =>
{
const accessToken = await generateAccessToken();
const url = `${base}/v2/checkout/orders/${orderID}/capture`;
const response = await fetch(url,
{
method: "POST",
headers:
{
"Content-Type": "application/json",
Authorization: `Bearer ${accessToken}`,
// Uncomment one of these to force an error for negative testing (in sandbox mode only). Documentation:
// https://developer.paypal.com/negative-testing/request-headers
// "PayPal-Mock-Response": '{"mock_application_codes": "INSTRUMENT_DECLINED"}'
// "PayPal-Mock-Response": '{"mock_application_codes": "TRANSACTION_REFUSED"}'
// "PayPal-Mock-Response": '{"mock_application_codes": "INTERNAL_SERVER_ERROR"}'
"PayPal - Partner - Attribution - Id": "BN - CODE",
"PayPal - Auth - Assertion": "PAYPAL - AUTH - ASSERTION",
},
});
```
* Line 5 establishes a listener to capture the `accessToken` from the `generateAccessToken()` function later in the API call.
* Line 8 declares the URL of the Capture API endpoint using the Order ID generated from the Create Order endpoint.
* Lines 10-16 define a response that makes a `POST` call to the `/v2/checkout/orders/ORDER-ID/capture` endpoint to capture the order, using the `accessToken`.
* Lines 19-21 include mock responses for negative testing in the sandbox.
#### Sample capture response [#sample-capture-response]
This code sample shows a response to a `POST` call to `/v2/checkout/orders/ORDER-ID/capture`. The response is the `orderData` retrieved in the create order section.
```javascript lineNumbers
{
"id": "5O190127TN364715T",
"status": "COMPLETED",
"payment_source":
{
"paypal":
{
"name":
{
"given_name": "Firstname",
"surname": "Lastname"
},
"email_address": "payer@example.com",
"account_id": "QYR5Z8XDVJNXQ",
},
},
"purchase_units": [
{
"reference_id": "d9f80740-38f0-11e8-b467-0ed5f89f718b",
"shipping":
{
"address":
{
"address_line_1": "123 Main St.",
"admin_area_2": "Anytown",
"admin_area_1": "CA",
"postal_code": "12345",
"country_code": "US",
},
},
"payments":
{
"captures": [
{
"id": "3C679366HH908993F",
"status": "COMPLETED",
"amount":
{
"currency_code": "USD",
"value": "100.00",
},
"seller_protection":
{
"status": "ELIGIBLE",
"dispute_categories": [
"ITEM_NOT_RECEIVED",
"UNAUTHORIZED_TRANSACTION",
],
},
"final_capture": true,
"disbursement_mode": "INSTANT",
"seller_receivable_breakdown":
{
"gross_amount":
{
"currency_code": "USD",
"value": "100.00",
},
"paypal_fee":
{
"currency_code": "USD",
"value": "3.00",
},
"net_amount":
{
"currency_code": "USD",
"value": "97.00",
},
},
"create_time": "2018-04-01T21:20:49Z",
"update_time": "2018-04-01T21:20:49Z",
"links": [
{
"href": "https://api-m.paypal.com/v2/payments/captures/3C679366HH908993F",
"rel": "self",
"method": "GET",
},
{
"href": "https://api-m.paypal.com/v2/payments/captures/3C679366HH908993F/refund",
"rel": "refund",
"method": "POST",
}, ],
}, ],
},
}, ],
"payer":
{
"name":
{
"given_name": "Firstname",
"surname": "Lastname",
},
"email_address": "payer@example.com",
"payer_id": "QYR5Z8XDVJNXQ",
},
"links": [
{
"href": "https://api-m.paypal.com/v2/checkout/orders/5O190127TN364715T",
"rel": "self",
"method": "GET",
}, ],
}
```
* Line 2 shows the ID for this `orderData` object.
* Lines 4-16 pass details about the payment source.
* Lines 17-85 pass the `purchase_units` in this transaction. Each purchase unit represents either a full or partial order and establishes a contract between a payer and a merchant.
* Line 19 passes the `reference_id` that identifies the purchase unit in this payment response.
* Lines 22-29 pass details about the shipping address.
* Line 31 declares the payments object that passes the payment details for this capture request.
* Line 37 declares the captures object that passes details about the captured payments for this request.
* Lines 33-83 pass the payment capture details, such as the capture identifier `id`, `amount`, `disbursement_mode`, and `net_amount`.
* Lines 72-82 pass the HATEOAS details of the capture response. See the REST API Response Reference for more details about HATEOAS.
* Lines 86-95 pass details about the payer.
* Lines 96-101 pass the HATEOAS details for the orders response.
#### Handle responses [#handle-responses]
The `handleResponse` function sets up a listener for API responses.
```javascript lineNumbers
async function handleResponse(response) {
try {
const jsonResponse = await response.json();
return {
jsonResponse,
httpStatusCode: response.status,
};
} catch (err) {
const errorMessage = await response.text();
throw new Error(errorMessage);
}
}
app.post("/api/orders", async (req, res) => {
try {
// use the cart information passed from the front-end to calculate the order amount detals
const { cart } = req.body;
const { jsonResponse, httpStatusCode } = await createOrder(cart);
res.status(httpStatusCode).json(jsonResponse);
} catch (error) {
console.error("Failed to create order:", error);
res.status(500).json({ error: "Failed to create order." });
}
});
app.post("/api/orders/:orderID/capture", async (req, res) => {
try {
const { orderID } = req.params;
const { jsonResponse, httpStatusCode } = await captureOrder(orderID);
res.status(httpStatusCode).json(jsonResponse);
} catch (error) {
console.error("Failed to create order:", error);
res.status(500).json({ error: "Failed to capture order." });
}
});
```
* Line 1 creates a function which returns a HTTP status code response. Error status codes send an error message.
* Line 14 makes a `POST` call to the `api/orders/` endpoint and returns an HTTP status code response. Errors status codes send an error message.
* Line 26 makes a `POST` call to the `api/orders/:orderID/capture` endpoint and returns an HTTP status code response for the particular order. Error status codes send an error message.
## 3. Integrate front end [#3-integrate-front-end]
Set up your front-end to integrate PayPal Checkout payments.
### Front-end process [#front-end-process]
1. Your app displays the PayPal checkout buttons.
2. Your app calls server endpoints to create the order and capture payment.
## Front-end code [#front-end-code]
This example uses the [checkout.html](https://github.com/paypal-examples/docs-examples/tree/main/standard-integration/client) file to show how to set up the front end to integrate standard payments.
`/client/checkout.html` handles the client-side logic and defines how the PayPal front-end components connect with the back end. Use this file to set up the PayPal checkout using the JavaScript SDK and handle the payer's interactions with the PayPal checkout button.
#### /client/checkout.html
```text lineNumbers
PayPal JS SDK Standard Integration
```
#### /client/app.js
```text lineNumbers
window.paypal
.Buttons({
async createOrder() {
try {
const response = await fetch("/api/orders", {
method: "POST",
headers: {
"Content-Type": "application/json",
},
// use the "body" param to optionally pass additional order information
// like product ids and quantities
body: JSON.stringify({
cart: [
{
id: "YOUR_PRODUCT_ID",
quantity: "YOUR_PRODUCT_QUANTITY",
},
],
}),
});
const orderData = await response.json();
if (orderData.id) {
return orderData.id;
} else {
const errorDetail = orderData?.details?.[0];
const errorMessage = errorDetail
? `${errorDetail.issue} ${errorDetail.description} (${orderData.debug_id})`
: JSON.stringify(orderData);
throw new Error(errorMessage);
}
} catch (error) {
console.error(error);
resultMessage(`Could not initiate PayPal Checkout...
## Know before you code [#know-before-you-code]
> **Info:** ### You need the following to use this integration: [#you-need-the-following-to-use-this-integration]
>
> * Be an [approved partner](/limited-release/commerce-platform/).
> * [Onboard your sellers](/limited-release/commerce-platform/onboard-merchants) before you begin the integration.
> * Have an access token.
>
> [Get access token](/limited-release/commerce-platform/onboard-merchants/create-merchant-accounts/)
> **Info:** ### You need a developer account to get sandbox credentials [#you-need-a-developer-account-to-get-sandbox-credentials]
>
> PayPal uses the following REST API credentials, which you can get from the developer dashboard:
>
> * **Client ID**: Authenticates your account with PayPal and identifies an app in your sandbox.
> * **Client secret**: Authorizes an app in your sandbox. Keep this secret safe and don't share it.
>
> [Dashboard](/dashboard/)
>
> [Read the guide](/sandbox-testing/overview)
> **Info:** ### You'll need both PayPal and third-party tools [#youll-need-both-paypal-and-third-party-tools]
>
> * [JavaScript SDK](/sdk/js/): Adds PayPal-supported payment methods.
> * [Orders REST API](/api/orders/v2): Create, update, retrieve, authorize, and capture orders.
> * [npm](https://www.npmjs.com/): Registry used to install third-party libraries.
> **Info:** ### Explore PayPal APIs with Postman [#explore-paypal-apis-with-postman]
>
> You can use Postman to explore and test PayPal APIs. Learn more in our [Postman guide](/api/rest/postman).
## 1. Set up your environment [#1-set-up-your-environment]
Complete the following steps to set up your development environment.
### 1. Set up npm [#1-set-up-npm]
This sample integration uses Node.js. You'll need to install npm to run the sample application. For more info, [visit npm's documentation](https://www.npmjs.com/package/npm).
### 2. Install third-party libraries [#2-install-third-party-libraries]
You'll need to install the following third-party libraries to set up your integration. This sample command installs all libraries at the same time:
```text lineNumbers
npm install dotenv express node-fetch
```
| Third-party libraries | Description |
| ------------------------------------------------------ | --------------------------------------------------------------------------------------------------------- |
| [dotenv](https://www.npmjs.com/package/dotenv) | Separates your configuration and code by loading environment variables from a .env file into process.env. |
| [express](https://www.npmjs.com/package/express) | This lean Node.js web application framework supports web and mobile applications. |
| [node-fetch](https://www.npmjs.com/package/node-fetch) | This function helps you make API requests, similar to `window.fetch`. |
### 3. Verify Package.json [#3-verify-packagejson]
A `package.json` file lists the packages and version numbers your app needs. You can share your `package.json` file with other developers so they can use the same settings as you.
The following code sample shows a `package.json` file for a PayPal integration. Compare this sample to the `paste` in your project:
```javascript lineNumbers
{
"name": "paypal-standard-integration",
"description": "Sample Node.js web app to integrate PayPal Standard Checkout for online payments",
"version": "1.0.0",
"main": "server/server.js",
"type": "module",
"scripts":
{
"test": "echo \"Error: no test specified\" && exit 1",
"start": "nodemon server/server.js",
"format": "npx prettier --write **/*.{js,md}",
"format:check": "npx prettier --check **/*.{js,md}",
"lint": "npx eslint server/*.js --env=node && npx eslint client/*.js --env=browser"
},
"license": "Apache-2.0",
"dependencies":
{
"dotenv": "^16.3.1",
"express": "^4.18.2",
"node-fetch": "^3.3.2"
},
"devDependencies":
{
"nodemon": "^3.0.1"
}
}
```
Replace `YOUR-SERVER-NAME.js` in `main` with the name of your server file on lines 5 and 9.
If you're having trouble with your app, reinstall your local library and package files using `npm install`.
If you're getting the following node error, include `"type": "module"` in your `package.json` file. This line isn't automatically added when `package.json` is created.
`Warning: To load an ES module, set "type": "module" in the package.json or use the .mjs extension (Use `node --trace-warnings ...` to show where the warning was created)`
See line 6 of the sample `package.json` file for an example.
### 4. Set up .env [#4-set-up-env]
A `.env` file is a line-delimited text file that sets your local working environment variables. Use this `.env` file to securely pass the client ID and client secret for your app.
The following code shows an example `.env` file. Replace the `PAYPAL-CLIENT-ID` and `PAYPAL-CLIENT-SECRET` with values from your app:
```javascript lineNumbers
PAYPAL_CLIENT_ID=YOUR_CLIENT_ID_GOES_HERE
PAYPAL_CLIENT_SECRET=YOUR_SECRET_GOES_HERE
```
> **Note:** **Note:** View your client ID and client secret in the [PayPal Developer Dashboard](/dashboard/) under **Apps & Credentials**.
## 2. Integrate back end [#2-integrate-back-end]
This section explains how to set up your back end to integrate Paypal Checkout.
### Back-end process [#back-end-process]
1. Your app creates an order on the back end by making a call to the [Create Orders API endpoint](/api/orders/v2/orders-create).
2. Your app moves the money when the payer confirms the order by making a call to to the [Capture Payment for Order API](/api/orders/v2/orders-capture) endpoint on the back end.
3. You can also customize the way you capture money. For example, you can use [Authorize and Capture](/limited-release/commerce-platform/accept-payments/standard/customize/auth-capture/) which places a hold on buyer's money until the buyer is authorized. See the pages under [Customize](/limited-release/commerce-platform/accept-payments/standard/customize/) for more information.
## Back-end code [#back-end-code]
This sample shows how to generate a `PayPal-Auth-Assertion` header, add it to a `node.js` file, and set up a `/server/server.js` file to integrate with PayPal Checkout.
#### 1.Generate a PayPal-Auth-Assertion header [#1generate-a-paypal-auth-assertion-header]
Pass the `PayPal-Auth-Assertion` header with standard `Content-Type`, `Authorization`, and `PayPal-Request-ID` headers. Copy and modify the following code to generate the `PayPal-Auth-Assertion` header.
```javascript lineNumbers
const clientId = "CLIENT-ID";
const sellerPayerId = "SELLER-PAYER-ID"
const jwt = getAuthAssertionValue(clientId, sellerPayerId);
console.log(jwt);
function getAuthAssertionValue(clientId, sellerPayerId) {
const header = {
"alg": "none"
};
const encodedHeader = base64url(header);
const payload = {
"iss": clientId,
"payer_id": sellerPayerId
};
const encodedPayload = base64url(payload);
return `${encodedHeader}.${encodedPayload}.`;
}
function base64url(json) {
return btoa(JSON.stringify(json))
.replace(/=+$/, '')
.replace(/\+/g, '-')
.replace(/\//g, '_');
}
```
The preceding example contains period characters ( `.` ), which are required.
#### Modify the code: [#modify-the-code]
* Replace `CLIENT-ID` with the client ID of the platform or marketplace from the PayPal developer dashboard.
* Replace `SELLER-PAYER-ID` with the payer ID or the email of the receiving seller's PayPal account.
Example functions to generate the `PayPal-Auth-Assertion` header:
```javascript lineNumbers
const clientID = "Acuy17p2LcOf9RMv8SUVBb3wic3FPEP2NHFFqfSCBRFrNFdmbC1JQ0w8HIKRxW3RDy2R8QTL93eptFYl";
const merchantIDOrEmail = "identity_seller@paypal.com";
const auth1 = Buffer.from('{"alg":"none"}').toString("base64");
const auth2 = Buffer.from(`{"iss":${clientID},"payer_id":${merchantIDOrEmail}}`).toString("base64");
const authAssertionHeader = `${auth1}.${auth2}.`;
```
### 2. Set up your back end [#2-set-up-your-back-end]
The following code sample uses the `server.js` file to set up the back-end to integrate with PayPal Checkout.
```javascript lineNumbers
import express from "express";
import fetch from "node-fetch";
import "dotenv/config";
import path from "path";
const
{
PAYPAL_CLIENT_ID,
PAYPAL_CLIENT_SECRET,
PORT = 8888
} = process.env;
const base = "https://api-m.sandbox.paypal.com";
const app = express();
// host static files
app.use(express.static("client"));
// parse post params sent in body in json format
app.use(express.json());
/**
* Generate an OAuth 2.0 access token for authenticating with PayPal REST APIs.
* @see /api/rest/authentication
*/
const generateAccessToken = async () =>
{
try
{
if (!PAYPAL_CLIENT_ID || !PAYPAL_CLIENT_SECRET)
{
throw new Error("MISSING_API_CREDENTIALS");
}
const auth = Buffer.from(
PAYPAL_CLIENT_ID + ":" + PAYPAL_CLIENT_SECRET,
).toString("base64");
const response = await fetch(`${base}/v1/oauth2/token`,
{
method: "POST",
body: "grant_type=client_credentials",
headers:
{
Authorization: `Basic ${auth}`,
},
});
const data = await response.json();
return data.access_token;
}
catch (error)
{
console.error("Failed to generate Access Token:", error);
}
};
/**
* Create an order to start the transaction.
* @see /api/orders/v2/orders-create
*/
const createOrder = async (cart) =>
{
// use the cart information passed from the front-end to calculate the purchase unit details
console.log(
"shopping cart information passed from the frontend createOrder() callback:",
cart,
);
const accessToken = await generateAccessToken();
const url = `${base}/v2/checkout/orders`;
const payload = {
intent: "CAPTURE",
purchase_units: [
{
amount:
{
currency_code: "USD",
value: "100.00",
},
}, ],
};
const response = await fetch(url,
{
headers:
{
"Content-Type": "application/json",
Authorization: `Bearer ${accessToken}`,
// Uncomment one of these to force an error for negative testing (in sandbox mode only). Documentation:
// https://developer.paypal.com/negative-testing/request-headers
// "PayPal-Mock-Response": '{"mock_application_codes": "MISSING_REQUIRED_PARAMETER"}'
// "PayPal-Mock-Response": '{"mock_application_codes": "PERMISSION_DENIED"}'
// "PayPal-Mock-Response": '{"mock_application_codes": "INTERNAL_SERVER_ERROR"}'
},
method: "POST",
body: JSON.stringify(payload),
});
return handleResponse(response);
};
/**
* Capture payment for the created order to complete the transaction.
* @see /api/orders/v2/orders-capture
*/
const captureOrder = async (orderID) =>
{
const accessToken = await generateAccessToken();
const url = `${base}/v2/checkout/orders/${orderID}/capture`;
const response = await fetch(url,
{
method: "POST",
headers:
{
"Content-Type": "application/json",
Authorization: `Bearer ${accessToken}`,
// Uncomment one of these to force an error for negative testing (in sandbox mode only). Documentation:
// https://developer.paypal.com/negative-testing/request-headers
// "PayPal-Mock-Response": '{"mock_application_codes": "INSTRUMENT_DECLINED"}'
// "PayPal-Mock-Response": '{"mock_application_codes": "TRANSACTION_REFUSED"}'
// "PayPal-Mock-Response": '{"mock_application_codes": "INTERNAL_SERVER_ERROR"}'
},
});
return handleResponse(response);
};
async function handleResponse(response)
{
try
{
const jsonResponse = await response.json();
return {
jsonResponse,
httpStatusCode: response.status,
};
}
catch (err)
{
const errorMessage = await response.text();
throw new Error(errorMessage);
}
}
app.post("/api/orders", async (req, res) =>
{
try
{
// use the cart information passed from the front-end to calculate the order amount detals
const
{
cart
} = req.body;
const
{
jsonResponse,
httpStatusCode
} = await createOrder(cart);
res.status(httpStatusCode).json(jsonResponse);
}
catch (error)
{
console.error("Failed to create order:", error);
res.status(500).json(
{
error: "Failed to create order."
});
}
});
app.post("/api/orders/:orderID/capture", async (req, res) =>
{
try
{
const
{
orderID
} = req.params;
const
{
jsonResponse,
httpStatusCode
} = await captureOrder(orderID);
res.status(httpStatusCode).json(jsonResponse);
}
catch (error)
{
console.error("Failed to create order:", error);
res.status(500).json(
{
error: "Failed to capture order."
});
}
});
// serve index.html
app.get("/", (req, res) =>
{
res.sendFile(path.resolve("./client/checkout.html"));
});
app.listen(PORT, () =>
{
console.log(`Node server listening at http://localhost:${PORT}/`);
});
```
### Understand the server.js code sample [#understand-the-serverjs-code-sample]
The following section explains key parts of the `server.js` code sample.
In the back-end code, you'll need to modify as follows:
* Change `BN-CODE` to your PayPal Partner Attribution ID.
* Change `ACCESS-TOKEN` to your access token.
* Change `PAYPAL-AUTH-ASSERTION` to the `Paypal-auth-assertion` header you generated in the **Generate a PayPal-Auth-Assertion header** section.
#### Declare imports [#declare-imports]
This section of code imports the dotenv dependency, the express module, the node fetch module and the path module.
```javascript lineNumbers
import express from "express";
import fetch from "node-fetch";
import "dotenv/config";
import path from "path";
```
#### Set up port and server [#set-up-port-and-server]
This section of code sets up the port to run your server and starts the express Node.js web application framework. It also retreives variables and sets the base sandbox URL.
```javascript lineNumbers
const { PAYPAL_CLIENT_ID, PAYPAL_CLIENT_SECRET, PORT = 8888 } = process.env;
const base = "https://api-m.sandbox.paypal.com";
const app = express();
```
* Line 1 uses the DotEnv library to import and declare the client ID and client secret from your .env file.
* Line 2 declares the base URL for PayPal's sandbox API.
#### Additional functions [#additional-functions]
This section of the code defines a file directory for static files and calls the express.json function to parse JSON response bodies.
```javascript lineNumbers
// host static files
app.use(express.static("client"));
// parse post params sent in body in json format
app.use(express.json());
```
#### Generate access token [#generate-access-token]
You need an access token to authenticate all [REST API requests](/api/rest/authentication/). The following code sample makes a POST call to the `/v1/oauth2/` token endpoint to create an access token.
```javascript lineNumbers
/**
* Generate an OAuth 2.0 access token for authenticating with PayPal REST APIs.
* @see /api/rest/authentication
*/
const generateAccessToken = async () =>
{
try
{
if (!PAYPAL_CLIENT_ID || !PAYPAL_CLIENT_SECRET)
{
throw new Error("MISSING_API_CREDENTIALS");
}
const auth = Buffer.from(
PAYPAL_CLIENT_ID + ":" + PAYPAL_CLIENT_SECRET,
).toString("base64");
const response = await fetch(`${base}/v1/oauth2/token`,
{
method: "POST",
body: "grant_type=client_credentials",
headers:
{
Authorization: `Basic ${auth}`,
},
});
const data = await response.json();
return data.access_token;
}
catch (error)
{
console.error("Failed to generate Access Token:", error);
}
};
```
* Lines 10-12 combine the `PAYPAL_CLIENT_ID` and `PAYPAL_CLIENT_SECRET` as a key-value pair.
* Lines 13-18 define a response that makes a `POST` call to the `/v1/oauth2/token` API endpoint to generate an access token.
* Lines 21-22 establish a listener to capture the response data from the request and return the `access_token`.
#### Create order [#create-order]
Create an order to start a payment between a payer and a seller by making a `POST` request to `/v2/checkout/orders`.
If you process payments that require [Strong Customer Authentication](/reference/guidelines/psd2-compliance/sca/), you need to provide additional context with payment indicators.
```javascript lineNumbers
/**
* Create an order to start the transaction.
* @see /api/orders/v2/orders-create
*/
const createOrder = async (cart) =>
{
// use the cart information passed from the front-end to calculate the purchase unit details
console.log(
"shopping cart information passed from the frontend createOrder() callback:",
cart,
);
const accessToken = await generateAccessToken();
const url = `${base}/v2/checkout/orders`;
const payload = {
intent: "CAPTURE",
purchase_units: [
{
amount:
{
currency_code: "USD",
value: "100.00",
},
}, ],
};
const response = await fetch(url,
{
headers:
{
"Content-Type": "application/json",
Authorization: `Bearer ${accessToken}`,
// Uncomment one of these to force an error for negative testing (in sandbox mode only). Documentation:
// https://developer.paypal.com/negative-testing/request-headers
// "PayPal-Mock-Response": '{"mock_application_codes": "MISSING_REQUIRED_PARAMETER"}'
// "PayPal-Mock-Response": '{"mock_application_codes": "PERMISSION_DENIED"}'
// "PayPal-Mock-Response": '{"mock_application_codes": "INTERNAL_SERVER_ERROR"}'
"PayPal - Partner - Attribution - Id": "BN - CODE",
"PayPal - Auth - Assertion": "PAYPAL - AUTH - ASSERTION",
},
method: "POST",
body: JSON.stringify(payload),
});
return handleResponse(response);
};
```
* Line 5 calls the `createOrder` function and uses the cart information from the front-end to calculate the purchase units for the order.
* Line 12 establishes a listener to capture the `accessToken` from the `generateAccessToken()` function later in the API call.
* Lines 13-38 create an order by sending a `POST` request to the Orders v2 API, using the `accessToken`.
> **Info:** See the [Create order endpoint of the PayPal Orders v2 API](/api/orders/v2/orders-create) for sample responses and other details.
#### Processor response codes [#processor-response-codes]
Payment processors return processor response codes when they receive a transaction request. For advanced card payments, the code displays in the authorization object under the `response_code` field.
```javascript lineNumbers
"processor_response": {
"avs_code": "Y",
"cvv_code": "S",
"payment_advice_code": "",
"response_code": "0000"
}
```
If an external payment processor declines a transaction, PayPal returns a `HTTP 201 CREATED` status code and a status of `DECLINED` in the capture status.
See the Orders API `response_code` object to get the processor response code for the non-PayPal payment processor errors.
#### Capture payment [#capture-payment]
Capture an order to move money from the payer to the merchant by making a `POST` call to the `/v2/checkout/orders/ORDER-ID/capture` endpoint.
```javascript lineNumbers
/**
* Capture payment for the created order to complete the transaction.
* @see /api/orders/v2/orders-capture
*/
const captureOrder = async (orderID) =>
{
const accessToken = await generateAccessToken();
const url = `${base}/v2/checkout/orders/${orderID}/capture`;
const response = await fetch(url,
{
method: "POST",
headers:
{
"Content-Type": "application/json",
Authorization: `Bearer ${accessToken}`,
// Uncomment one of these to force an error for negative testing (in sandbox mode only). Documentation:
// https://developer.paypal.com/negative-testing/request-headers
// "PayPal-Mock-Response": '{"mock_application_codes": "INSTRUMENT_DECLINED"}'
// "PayPal-Mock-Response": '{"mock_application_codes": "TRANSACTION_REFUSED"}'
// "PayPal-Mock-Response": '{"mock_application_codes": "INTERNAL_SERVER_ERROR"}'
"PayPal - Partner - Attribution - Id": "BN - CODE",
"PayPal - Auth - Assertion": "PAYPAL - AUTH - ASSERTION",
},
});
```
* Line 5 establishes a listener to capture the `accessToken` from the `generateAccessToken()` function later in the API call.
* Line 8 declares the URL of the Capture API endpoint using the Order ID generated from the Create Order endpoint.
* Lines 10-16 define a response that makes a `POST` call to the `/v2/checkout/orders/ORDER-ID/capture` endpoint to capture the order, using the `accessToken`.
* Lines 19-21 include mock responses for negative testing in the sandbox.
#### Sample capture response [#sample-capture-response]
This code sample shows a response to a `POST` call to `/v2/checkout/orders/ORDER-ID/capture`. The response is the `orderData` retrieved in the create order section.
```javascript lineNumbers
{
"id": "5O190127TN364715T",
"status": "COMPLETED",
"payment_source":
{
"paypal":
{
"name":
{
"given_name": "Firstname",
"surname": "Lastname"
},
"email_address": "payer@example.com",
"account_id": "QYR5Z8XDVJNXQ",
},
},
"purchase_units": [
{
"reference_id": "d9f80740-38f0-11e8-b467-0ed5f89f718b",
"shipping":
{
"address":
{
"address_line_1": "123 Main St.",
"admin_area_2": "Anytown",
"admin_area_1": "CA",
"postal_code": "12345",
"country_code": "US",
},
},
"payments":
{
"captures": [
{
"id": "3C679366HH908993F",
"status": "COMPLETED",
"amount":
{
"currency_code": "USD",
"value": "100.00",
},
"seller_protection":
{
"status": "ELIGIBLE",
"dispute_categories": [
"ITEM_NOT_RECEIVED",
"UNAUTHORIZED_TRANSACTION",
],
},
"final_capture": true,
"disbursement_mode": "INSTANT",
"seller_receivable_breakdown":
{
"gross_amount":
{
"currency_code": "USD",
"value": "100.00",
},
"paypal_fee":
{
"currency_code": "USD",
"value": "3.00",
},
"net_amount":
{
"currency_code": "USD",
"value": "97.00",
},
},
"create_time": "2018-04-01T21:20:49Z",
"update_time": "2018-04-01T21:20:49Z",
"links": [
{
"href": "https://api-m.paypal.com/v2/payments/captures/3C679366HH908993F",
"rel": "self",
"method": "GET",
},
{
"href": "https://api-m.paypal.com/v2/payments/captures/3C679366HH908993F/refund",
"rel": "refund",
"method": "POST",
}, ],
}, ],
},
}, ],
"payer":
{
"name":
{
"given_name": "Firstname",
"surname": "Lastname",
},
"email_address": "payer@example.com",
"payer_id": "QYR5Z8XDVJNXQ",
},
"links": [
{
"href": "https://api-m.paypal.com/v2/checkout/orders/5O190127TN364715T",
"rel": "self",
"method": "GET",
}, ],
}
```
* Line 2 shows the ID for this `orderData` object.
* Lines 4-16 pass details about the payment source.
* Lines 17-85 pass the `purchase_units` in this transaction. Each purchase unit represents either a full or partial order and establishes a contract between a payer and a merchant.
* Line 19 passes the `reference_id` that identifies the purchase unit in this payment response.
* Lines 22-29 pass details about the shipping address.
* Line 31 declares the payments object that passes the payment details for this capture request.
* Line 37 declares the captures object that passes details about the captured payments for this request.
* Lines 33-83 pass the payment capture details, such as the capture identifier `id`, `amount`, `disbursement_mode`, and `net_amount`.
* Lines 72-82 pass the HATEOAS details of the capture response. See the REST API Response Reference for more details about HATEOAS.
* Lines 86-95 pass details about the payer.
* Lines 96-101 pass the HATEOAS details for the orders response.
#### Handle responses [#handle-responses]
The `handleResponse` function sets up a listener for API responses.
```javascript lineNumbers
async function handleResponse(response) {
try {
const jsonResponse = await response.json();
return {
jsonResponse,
httpStatusCode: response.status,
};
} catch (err) {
const errorMessage = await response.text();
throw new Error(errorMessage);
}
}
app.post("/api/orders", async (req, res) => {
try {
// use the cart information passed from the front-end to calculate the order amount detals
const { cart } = req.body;
const { jsonResponse, httpStatusCode } = await createOrder(cart);
res.status(httpStatusCode).json(jsonResponse);
} catch (error) {
console.error("Failed to create order:", error);
res.status(500).json({ error: "Failed to create order." });
}
});
app.post("/api/orders/:orderID/capture", async (req, res) => {
try {
const { orderID } = req.params;
const { jsonResponse, httpStatusCode } = await captureOrder(orderID);
res.status(httpStatusCode).json(jsonResponse);
} catch (error) {
console.error("Failed to create order:", error);
res.status(500).json({ error: "Failed to capture order." });
}
});
```
* Line 1 creates a function which returns a HTTP status code response. Error status codes send an error message.
* Line 14 makes a `POST` call to the `api/orders/` endpoint and returns an HTTP status code response. Errors status codes send an error message.
* Line 26 makes a `POST` call to the `api/orders/:orderID/capture` endpoint and returns an HTTP status code response for the particular order. Error status codes send an error message.
## 3. Integrate front end [#3-integrate-front-end]
Set up your front-end to integrate PayPal Checkout payments.
### Front-end process [#front-end-process]
1. Your app displays the PayPal checkout buttons.
2. Your app calls server endpoints to create the order and capture payment.
## Front-end code [#front-end-code]
This example uses the [checkout.html](https://github.com/paypal-examples/docs-examples/tree/main/standard-integration/client) file to show how to set up the front end to integrate standard payments.
`/client/checkout.html` handles the client-side logic and defines how the PayPal front-end components connect with the back end. Use this file to set up the PayPal checkout using the JavaScript SDK and handle the payer's interactions with the PayPal checkout button.
#### /client/checkout.html
```text lineNumbers
PayPal JS SDK Standard Integration
```
#### /client/app.js
```text lineNumbers
window.paypal
.Buttons({
async createOrder() {
try {
const response = await fetch("/api/orders", {
method: "POST",
headers: {
"Content-Type": "application/json",
},
// use the "body" param to optionally pass additional order information
// like product ids and quantities
body: JSON.stringify({
cart: [
{
id: "YOUR_PRODUCT_ID",
quantity: "YOUR_PRODUCT_QUANTITY",
},
],
}),
});
const orderData = await response.json();
if (orderData.id) {
return orderData.id;
} else {
const errorDetail = orderData?.details?.[0];
const errorMessage = errorDetail
? `${errorDetail.issue} ${errorDetail.description} (${orderData.debug_id})`
: JSON.stringify(orderData);
throw new Error(errorMessage);
}
} catch (error) {
console.error(error);
resultMessage(`Could not initiate PayPal Checkout...
${error}`);
}
},
async onApprove(data, actions) {
try {
const response = await fetch(`/api/orders/${data.orderID}/capture`, {
method: "POST",
headers: {
"Content-Type": "application/json",
"Authorization": "Bearer ACCESS-TOKEN",
"PayPal-Partner-Attribution-Id": "BN-CODE"
"PayPal-Auth-Assertion": "PAYPAL-AUTH-ASSERTION"
},
});
const orderData = await response.json();
// Three cases to handle:
// (1) Recoverable INSTRUMENT_DECLINED -> call actions.restart()
// (2) Other non-recoverable errors -> Show a failure message
// (3) Successful transaction -> Show confirmation or thank you message
const errorDetail = orderData?.details?.[0];
if (errorDetail?.issue === "INSTRUMENT_DECLINED") {
// (1) Recoverable INSTRUMENT_DECLINED -> call actions.restart()
// recoverable state, per https://developer.paypal.com/checkout/handle-funding-failure/
return actions.restart();
} else if (errorDetail) {
// (2) Other non-recoverable errors -> Show a failure message
throw new Error(`${errorDetail.description} (${orderData.debug_id})`);
} else if (!orderData.purchase_units) {
throw new Error(JSON.stringify(orderData));
} else {
// (3) Successful transaction -> Show confirmation or thank you message
// Or go to another URL: actions.redirect('thank_you.html');
const transaction =
orderData?.purchase_units?.[0]?.payments?.captures?.[0] ||
orderData?.purchase_units?.[0]?.payments?.authorizations?.[0];
resultMessage(
`Transaction ${transaction.status}: ${transaction.id}
See console for all available details`,
);
console.log(
"Capture result",
orderData,
JSON.stringify(orderData, null, 2),
);
}
} catch (error) {
console.error(error);
resultMessage(
`Sorry, your transaction could not be processed...
${error}`,
);
}
},
})
.render("#paypal-button-container");
// Example function to show a result to the user. Your site's UI library can be used instead.
function resultMessage(message) {
const container = document.querySelector("#result-message");
container.innerHTML = message;
}
```
### checkout.html [#checkouthtml]
This section explains the `checkout.html` code sample.
#### PayPal Buttons JavaScript [#paypal-buttons-javascript]
This code sample calls the PayPal JavaScript SDK
```html lineNumbers
PayPal JS SDK Standard Integration
```
* Line 9 displays the PayPal buttons.
* Line 10 displays the transaction results.
* Line 12 calls the PayPal SDK.
* line 13 runs the app.js script to start a checkout transaction.
### app.js [#appjs]
This section explains the `app.js` code sample.
#### PayPal Buttons JavaScript [#paypal-buttons-javascript-1]
This code sample calls the JavaScript SDK that defines the PayPal buttons.
```javascript lineNumbers
window.paypal.Buttons({{…}}).render("#paypal-button-container");
```
### Create order for PayPal Button [#create-order-for-paypal-button]
This code sample defines the `createOrder()` function.
```javascript lineNumbers
async createOrder() {
try {
const response = await fetch("/api/orders", {
method: "POST",
headers: {
"Content-Type": "application/json",
"Authorization": "Bearer ACCESS-TOKEN",
"PayPal-Partner-Attribution-Id": "BN-CODE"
"PayPal-Auth-Assertion": "PAYPAL-AUTH-ASSERTION"
},
// use the "body" param to optionally pass additional order information
// like product ids and quantities
body: JSON.stringify({
cart: [
{
id: "YOUR_PRODUCT_ID",
quantity: "YOUR_PRODUCT_QUANTITY",
},
],
}),
});
const orderData = await response.json();
if (orderData.id) {
return orderData.id;
} else {
const errorDetail = orderData?.details?.[0];
const errorMessage = errorDetail
? `${errorDetail.issue} ${errorDetail.description} (${orderData.debug_id})`
: JSON.stringify(orderData);
throw new Error(errorMessage);
}
} catch (error) {
console.error(error);
resultMessage(`Could not initiate PayPal Checkout...
${error}`);
}
},
```
* Line 3 creates the order by calling the `api/orders` endpoint
* Lines 14-21 pass the SKU and quantity for the product in the cart. See the [`createOrder`](/sdk/js/reference/#createorder) section of the JavaScript SDK reference guide for more information about creating orders. See the Orders REST API documentation for additional customization options.
### Capture payment when approved [#capture-payment-when-approved]
This code sample defines a `POST` call to `/api/orders/orderID/capture`. The orderID is passed from the SDK when you run the [`onCreate()`](/sdk/js/reference/#onapprovedata) call.
```javascript lineNumbers
async onApprove(data, actions) {
try {
const response = await fetch(/api/orders / $ {
data.orderID
}
/capture, {
method: "POST",
headers: {
"Content - Type": "application / json",
"Authorization": "Bearer ACCESS-TOKEN",
"PayPal - Partner - Attribution - Id": "BN - CODE"" PayPal - Auth - Assertion": "PAYPAL - AUTH - ASSERTION"
},
}
);
const orderData = await response.json();
// Three cases to handle:
// (1) Recoverable INSTRUMENT_DECLINED -> call actions.restart()
// (2) Other non-recoverable errors -> Show a failure message
// (3) Successful transaction -> Show confirmation or thank you message
const errorDetail = orderData?.details?.[0];
if (errorDetail?.issue === "INSTRUMENT_DECLINED") {
// (1) Recoverable INSTRUMENT_DECLINED -> call actions.restart()
// recoverable state, per https://developer.paypal.com/checkout/handle-funding-failure/
return actions.restart();
}
else if (errorDetail) {
// (2) Other non-recoverable errors -> Show a failure message
throw new Error(`${errorDetail.description} (${orderData.debug_id})`);
}
else if (!orderData.purchase_units) {
throw new Error(JSON.stringify(orderData));
}
else {
// (3) Successful transaction -> Show confirmation or thank you message
// Or go to another URL: actions.redirect('thank_you.html');
const transaction =
orderData?.purchase_units?.[0]?.payments?.captures?.[0] ||
orderData?.purchase_units?.[0]?.payments?.authorizations?.[0];
resultMessage(
`Transaction ${transaction.status}: ${transaction.id}
See console for all available details`,
);
console.log(
"Capture result",
orderData,
JSON.stringify(orderData, null, 2),
);
}
}
catch (error) {
console.error(error);
resultMessage(
`Sorry, your transaction could not be processed...
${error}`,
);
}
},
})
```
* Line 3 creates the order by calling the `api/orders/capture` endpoint
* Line 11 sets up a listener for responses from the `api/orders/capture` call.
* Lines 17-43 parse the order details from the response.
* Line 31 calls a response function to display the transaction results.
### Display transaction results [#display-transaction-results]
This code sample defines an example `resultMessage()` function.
```javascript lineNumbers
// Example function to show a result to the user. Your site's UI library can be used instead.function resultMessage(message) {const container = document.querySelector("#result-message");container.innerHTML = message;
```
### Render the PayPal buttons [#render-the-paypal-buttons]
This code sample renders the PayPal buttons.
```javascript lineNumbers
.render("#paypal-button-container");
```
### Run your app [#run-your-app]
* Run `npm start` to run your server again.
* Open your browser and navigate to `localhost:8888`
* When your server is running, proceed to the next section to test your integration.
## Design guidance [#design-guidance]
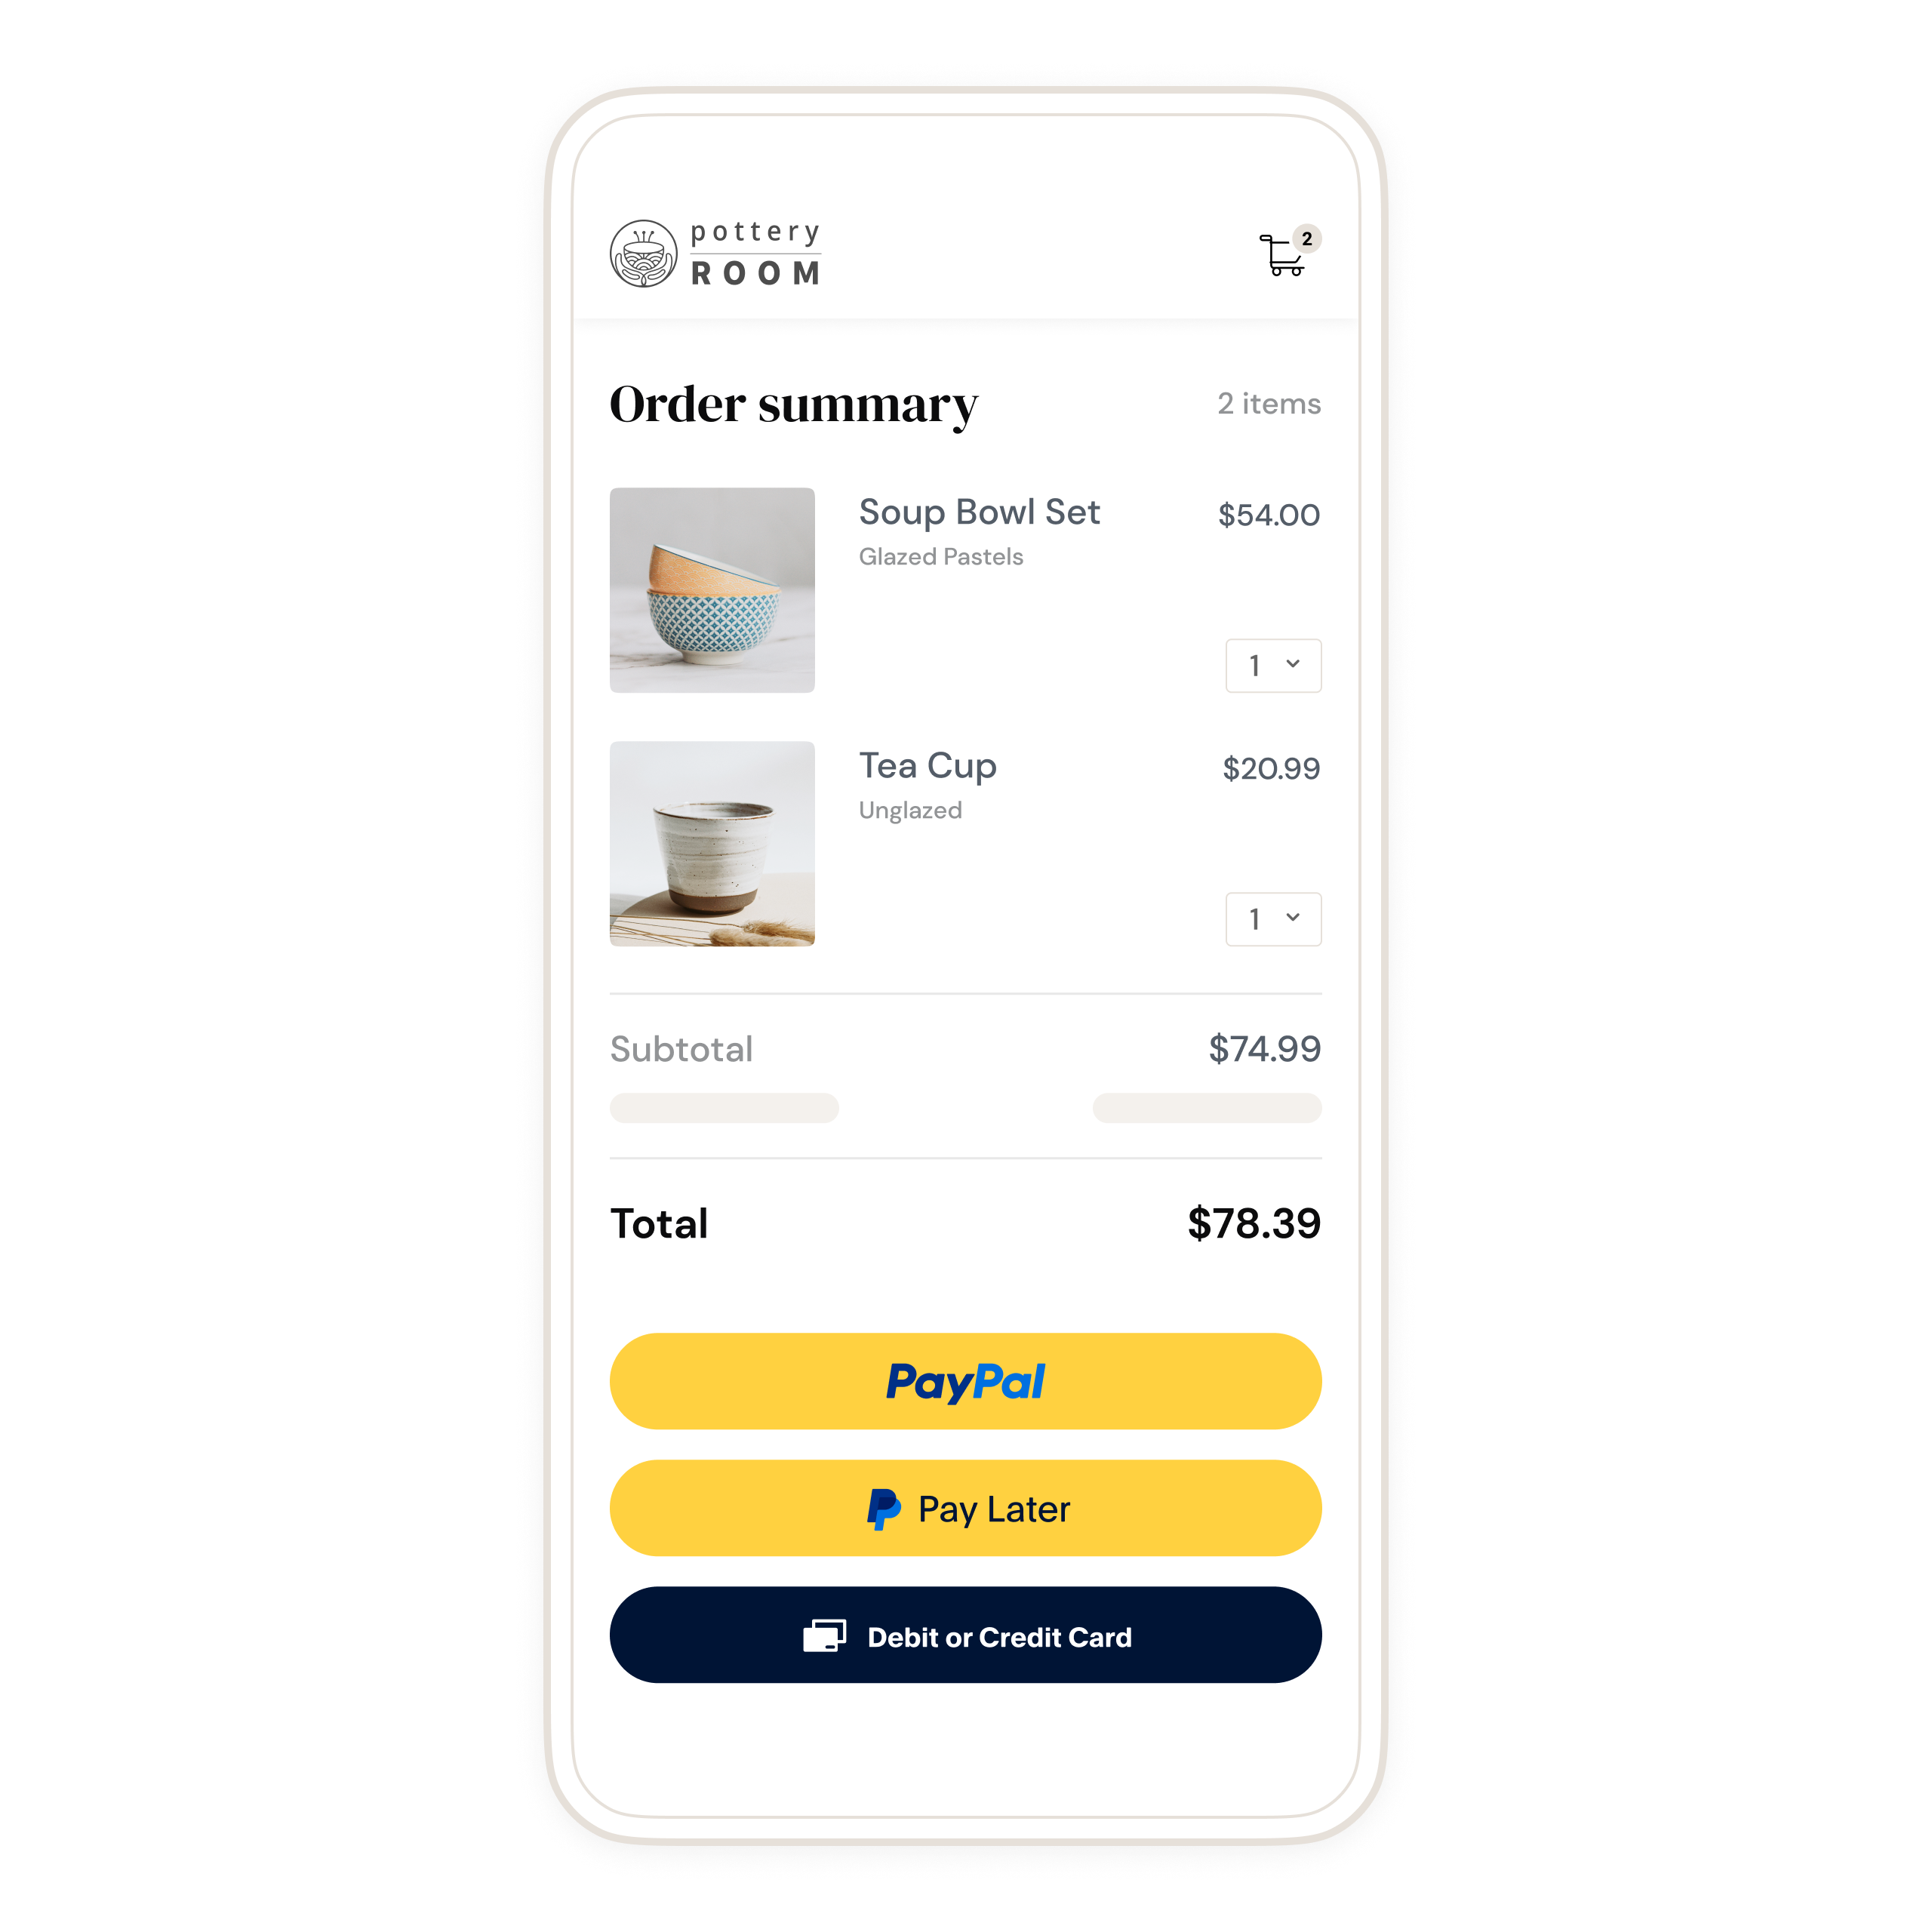
* Show the PayPal button on all pages that start the checkout process.
* Give PayPal equal prominence and function for your payers alongside all other acceptance marks, including cards, split tender, buy online, and pickup in-store.
* It should take no more than 2 steps for your payer to pay and complete their order when they return to your site.
* Leave room on your checkout page for the Debit or Credit Card button to expand. If you place the payment buttons too low on the page, payers won't be able to access the drop-down credit card form fields.
* If the Debit or Credit Card drop-down form isn't available when your payers check out, the PayPal guest checkout shows up in a pop-up window.
 ## 4. Test integration [#4-test-integration]
Before going live, test your integration in the [sandbox environment](/sandbox-testing/overview).
Learn more about the following resources on [card testing](/sandbox-testing/card-testing):
* Successful payments by using [test card numbers](/sandbox-testing/card-testing#test-generated-card-numbers).
* Card error scenarios by using [rejection triggers](/sandbox-testing/card-testing#simulate-card-error-scenarios).
> **Info:** Use the credit [card generator](/sandbox-testing/card-testing#credit-card-generator) to generate test credit cards for sandbox testing.
Test the following use cases before going live:
### Test a purchase as a payer [#test-a-purchase-as-a-payer]
1. Select the PayPal button on your checkout page.
2. Log in using one of your [personal sandbox accounts](https://www.paypal.com/bizsignup/). This ensures the payments will be sent to the correct account. Make sure that you use the sandbox business account that corresponds to the REST app you are using.
3. Note the purchase amount in the PayPal checkout window.
4. Approve the purchase with the **Pay Now button**. The PayPal window closes and redirects you to your page, indicating that the transaction was completed.
**Confirm the money reached the business account**
1. Log in to [the PayPal sandbox](https://www.sandbox.paypal.com/signout) using the [sandbox business account](https://www.paypal.com/signin) that received the payment. Remember that the SDK source now uses a sandbox client ID from one of [your own REST apps](https://www.paypal.com/bizsignup), and not the default test ID.
2. In **Recent Activity**, confirm that the sandbox business account received the money, subtracting any fees.
3. Log out of the account.
### Test a purchase as a card payment [#test-a-purchase-as-a-card-payment]
1. Go to the checkout page for your integration.
2. Generate a test card using the [credit card generator](/sandbox-testing/card-testing#credit-card-generator).
3. Enter the card details in the hosted field, including the name on the card, billing address, and 2-character [country code](/api/codes/country-region). Then, submit the order.
4. Confirm that the order was processed.
5. Log in to your merchant sandbox account and navigate to the activity page to ensure the payment amount shows up in the account.
## 5. Go live [#5-go-live]
Follow this checklist to take your application live:
1. Log into the PayPal Developer Dashboard with your PayPal business account.
2. Obtain your live credentials.
3. Include the new credentials in your integration and Update your PayPal endpoint.
See [Move your app to production](/reference/production/) for more details.
## Customize [#customize]
Add more payment methods or customize your integration.
> **Info:** Pay Later
>
> Payers buy now and pay in installments.
> **Info:** Pay with Venmo
>
> Add the Venmo button to your checkout integration.
> **Info:** Alternative payment methods
>
> Support local payment methods across the globe.
> **Info:** Apple Pay
>
> Add Apple Pay as a payment method.
> **Info:** Capture payment
>
> Captures payment for an order.
> **Info:** Refund a captured payment
>
> Refund all or part of a captured payment.
> **Info:** Real-time account updater
>
> Reduce declines by getting card updates from the issuer.
> **Info:** JavaScript SDK
>
> Customize your integration with script config parameters.
## 4. Test integration [#4-test-integration]
Before going live, test your integration in the [sandbox environment](/sandbox-testing/overview).
Learn more about the following resources on [card testing](/sandbox-testing/card-testing):
* Successful payments by using [test card numbers](/sandbox-testing/card-testing#test-generated-card-numbers).
* Card error scenarios by using [rejection triggers](/sandbox-testing/card-testing#simulate-card-error-scenarios).
> **Info:** Use the credit [card generator](/sandbox-testing/card-testing#credit-card-generator) to generate test credit cards for sandbox testing.
Test the following use cases before going live:
### Test a purchase as a payer [#test-a-purchase-as-a-payer]
1. Select the PayPal button on your checkout page.
2. Log in using one of your [personal sandbox accounts](https://www.paypal.com/bizsignup/). This ensures the payments will be sent to the correct account. Make sure that you use the sandbox business account that corresponds to the REST app you are using.
3. Note the purchase amount in the PayPal checkout window.
4. Approve the purchase with the **Pay Now button**. The PayPal window closes and redirects you to your page, indicating that the transaction was completed.
**Confirm the money reached the business account**
1. Log in to [the PayPal sandbox](https://www.sandbox.paypal.com/signout) using the [sandbox business account](https://www.paypal.com/signin) that received the payment. Remember that the SDK source now uses a sandbox client ID from one of [your own REST apps](https://www.paypal.com/bizsignup), and not the default test ID.
2. In **Recent Activity**, confirm that the sandbox business account received the money, subtracting any fees.
3. Log out of the account.
### Test a purchase as a card payment [#test-a-purchase-as-a-card-payment]
1. Go to the checkout page for your integration.
2. Generate a test card using the [credit card generator](/sandbox-testing/card-testing#credit-card-generator).
3. Enter the card details in the hosted field, including the name on the card, billing address, and 2-character [country code](/api/codes/country-region). Then, submit the order.
4. Confirm that the order was processed.
5. Log in to your merchant sandbox account and navigate to the activity page to ensure the payment amount shows up in the account.
## 5. Go live [#5-go-live]
Follow this checklist to take your application live:
1. Log into the PayPal Developer Dashboard with your PayPal business account.
2. Obtain your live credentials.
3. Include the new credentials in your integration and Update your PayPal endpoint.
See [Move your app to production](/reference/production/) for more details.
## Customize [#customize]
Add more payment methods or customize your integration.
> **Info:** Pay Later
>
> Payers buy now and pay in installments.
> **Info:** Pay with Venmo
>
> Add the Venmo button to your checkout integration.
> **Info:** Alternative payment methods
>
> Support local payment methods across the globe.
> **Info:** Apple Pay
>
> Add Apple Pay as a payment method.
> **Info:** Capture payment
>
> Captures payment for an order.
> **Info:** Refund a captured payment
>
> Refund all or part of a captured payment.
> **Info:** Real-time account updater
>
> Reduce declines by getting card updates from the issuer.
> **Info:** JavaScript SDK
>
> Customize your integration with script config parameters.