# Integrate (/limited-release/log-in-with-paypal/integrate)
This section describes how to complete a basic Log in with PayPal integration in Sandbox. See [LIPP flow](/log-in/upgrade) for the links to use for an earlier LIPP integration.
To take your integration live, see [10. Go live](#10-go-live).
## 1. Create the app [#1-create-the-app]
To get started, [create a PayPal REST API application](/sandbox-testing/overview) to receive the credentials, consisting of a client ID and secret, that you need to make API calls.
## 2. Enable Log in with PayPal [#2-enable-log-in-with-paypal]
After you create an app, you must enable Log in with PayPal for that app in the dashboard:
1. In the Sandbox App Settings section, enter the **Return URL** (redirect\_uri) where your users are redirected after completing the Log in with PayPal flow. You must enter a URL before you can save the Log in with PayPal app settings.
2. Select **Log in with PayPal** and click **Advanced Options**:
1. Select the information you want your users to share with you.
2. Enter the URLs for your privacy policy and user agreement.
| Type | Sample URL | Description |
| ------------------ | ------------------------------------------ | -------------------------------------------------------------- |
| Privacy policy URL | [https://example.com](https://example.com) | The URL to your privacy policy. |
| User agreement URL | [https://example.com](https://example.com) | The URL to either your user agreement or terms and conditions. |
Your customers can view these URLs before agreeing to share their personal information with you. The URLs are reviewed by PayPal's privacy and security team and are necessary for activating Log in with PayPal for your site or app.
For testing, you can enter [https://example.com](https://example.com) in the sandbox app settings, but to go live, you need to enter the live URLs in your live app settings.
3. By default, PayPal requires users to first confirm their email account. Confirmed email indicates that the user's email is active. To allow customers who have not confirmed their emails with PayPal to use Log in with PayPal anyway, select **Enable customers who have yet to confirm their email address with PayPal to log in to your app**.
3. Click **Save**. If you forgot to enter a return URL, the dashboard prompts you for one before you can save your settings.
### Store Your Credentials [#store-your-credentials]
After you successfully create your PayPal application and enable Log in with PayPal, make note of your client ID which is also known as application ID and secret. You'll need these in the next steps as you build your button and call the [Identity API](/limited-release/log-in-with-paypal/integrate).
## 3. App review [#3-app-review]
Because Log in with PayPal involves sharing customer data, you must submit your app to PayPal for review before going live. The review automatically starts for your live app once you select the **Log in with PayPal** option and **Save**. The app review process typically takes up to 7 business days. Ensure you initiate the process at least 7 days before your desired go live date.
## 4. Build the button [#4-build-the-button]
To build the button that your customers will click, you can [use the PayPal JavaScript button](#use-the-paypal-javascript-button) or you can [create your own button](#create-your-own-button).
### Use the PayPal JavaScript button [#use-the-paypal-javascript-button]
This is the simplest method to integrate Log in with PayPal. By modifying the code, you can customize the button, to better suite for your webpage or app.
1. Download the PayPal JavaScript SDK to generate the button code and embed it on your website.
```html lineNumbers
```
Replace `YOUR_CLIENT_ID` with your client ID of your REST app that you created in step 1.
2. Render the button.
Render the Log in with PayPal button to a container element on your web page.
```html lineNumbers
```
| Parameter | Description | Example |
| -------------- | -------------------------------------------------------------------------------------------------------------------------------------------------------------------------------------------------------------------------------------------------------------------------------------------------------------------------------------------------------------------- | --------------------------------------------------------------------------------------------------------------------------------------- |
| `scopes` | Required. List of scopes, passed with space delimitation, that map to the user profile attributes you want the user to share with you. It is mandatory to include `openid` scope. See [Scope attributes](/log-in/references) for details on how attributes map to scopes. | "openid", "profile", "email", "address", "phone" |
| `onApprove` | Required. A JavaScript function to trigger when the Connect process is complete. The `authCode` and `idToken` return in the `onApprove` function. | See code example above. |
| `responseType` | Optional. The response type specifier that determines what you receive in `onApprove` function when the user finishes the Log in with PayPal flow. `code` returns `auth_code` that can be exchanged for an access token (see step 6). `id_token` returns the `auth_code` and `id_token`. Only use `id_token` if instructed by your integration team. Default: `code` | `code`, `id_token`, |
| `onCancel` | Optional. A JavaScript function to trigger when the user cancels or closes the Log in with PayPal window. | |
| `color` | Optional `style` option. Button's background color. Default is `blue`. | `blue`, `silver` |
| `height` | Optional `style` option. To customize the button height, set the `style.height` option to a value from 35 to 50. | |
| `label` | Optional `style` option. The label on the button, can select from four options. Default is `login` ("Log in with PayPal"). | `login` ("Log in with PayPal"), `connect` ("Connect with PayPal"), `signup` ("Sign up with PayPal", `continue` ("Continue with PayPal") |
| `shape` | Optional `style` option. The button shape - pill or rectangular. Default is `pill`. | `pill`, `rect` |
Once the user on your website clicks the JavaScript button, the Log in with PayPal flow will start.
The user has a choice between accepting or cancelling the Log in with PayPal flow. In both cases, the user will be redirected back to the specified return URL, and the `onAccept` or `onCancel` functions will be triggered accordingly.
In case the user accepts the sharing of profile information, you will receive the following data in your `onAccept` function:
* The authorization code which can be exchanged for access token (see section 6). The authentication code is always returned, even when it's not specified in the `responseType` parameter.
* The id token. Returned only in case it was specified in the `responseType` parameter in the request.
#### Button size [#button-size]
By default, the button adapts to the size of its container element. To customize the button width, alter the width of the container element. To customize the button height, set the `style.height` option to a value from 35 to 50.
### Create your own button [#create-your-own-button]
If you'd prefer to create the Log in with PayPal button yourself, you can create your own button and then construct the authorization endpoint and parameters manually. You can either embed a PNG version of the branded Log in with PayPal button or create your own button image using PayPal's [Button Design Guide](/log-in/designer-guide).
1. Decide whether to use the branded Log in with PayPal button or to create your own.
* *Branded Log in with PayPal button* - Use the following URL for the button image location:
```html lineNumbers
https://www.paypalobjects.com/webstatic/en_US/developer/docs/login/log-in-with-paypal-button.png
```
> **Note:** **Note:** Do not download the button image and host it on your server. The button image might become out of sync with updates to the button image made by PayPal.
* *Create your own* - Use Paypal's [Button Design Guide](/log-in/designer-guide) to create your own button.
2. Each time a user clicks the Log in with PayPal button the authorization URL is called. Construct the authorization endpoint according to the following template:
```text lineNumbers
https://www.sandbox.paypal.com/connect?flowEntry=static&client_id=[client id]&scope=[list of scopes]&redirect_uri=[return URL]
```
| Parameter | Description |
| -------------- | ----------------------------------------------------------------------------------------------------------------------------------------------------------------------------------------------------------------------------------------------------------------------------------------------------------------- |
| `client_id` | Replace *client id* with your app's sandbox or live client ID, depending where this URL is used.
Example:
`ARfDleH_j-C17kxbdUzYivR70xP5Uy5N_DrFZVOvyZvNGBaPB_QNbwWkgF7lMsemGJycLRFVwaM` |
| `flowEntry` | Must pass `flowEntry=static` |
| `scope` | Replace *list of scopes* with a space-separated list of scopes. It is mandatory to include *openid* scope. See [Scope attributes](/log-in/references) for details on how attributes map to scopes.
Example:
`openid profile email address https://uri.paypal.com/services/paypalattributes` |
| `redirect_uri` | Page to return to after successful login. This URL must be encoded and exactly match the Return URL you set in the My App & Credentials page.
Example:
`https%3A%2F%2Fwww.myreturnurl.com` |
3. (Optional) Use the following advanced parameters to further customize your button functionality:
| Parameter | Description |
| --------------- | ----------------------------------------------------------------------------------------------------------------------------------------------------------------------------------------------------------------------------------------------------------------------------------------------------------- |
| `response_type` | `code` – to receive authentication code in the response. Pass this value if you want to receive only the authentication code.
`id_token` - to receive id token. Use only by direct instruction of your integration team. Passing this value will return both the authentication code and the id token. |
| `fullPage` | To open the flow in a mini browser, do not pass this parameter.
To open the Log in with PayPal flow as a full page in the same tab, pass `true`. |
| `state` | A string value passed to maintain state between the request and callback. The `state` value will be returned to you, unchanged, in the return URL. For example, if you pass `state=123456`, you will receive it in the return URL: `https://myreturnurl.com?state=123456`. |
Example of full URL:
```text lineNumbers
https://www.sandbox.paypal.com/connect/?flowEntry=static&client_id=ARfDleH_j-C17kxbdUzYivR70xP5Uy5N_DvNGBaPB_QNbwWkgF7lMsemGJycLRFVwaM&response_type=code&scope=openid profile email address&redirect_uri=https%3A%2F%2Fwww.myreturnurl.com&state=123456
```
4. Get authorization code
The user has a choice between accepting or cancelling the Log in with PayPal flow. In both cases, the user will be redirected back to the specified return URL, with response data indicating the user's choice.
In case the user accepts the sharing of profile information, you will receive the following data in the response:
| Parameter | Description |
| --------- | ---------------------------------------------------------------------------------------------------------------------------------------------------------------------------------------- |
| `code` | The authorization code, which can be exchanged for access token (see section 6). `code` is always returned. |
| `token` | The id token. Returned only in case it was specified in the `responseType` parameter in the request. Should be used in accordance to instructions from your PayPal integration engineer. |
| `state` | The string value you passed in the state parameter in the request, unchanged. |
Example:
`https://myreturnurl.com/?code={authorization_code}&token={id_token}&state={state}`
## 6. Get access token [#6-get-access-token]
In this step, you exchange the authorization code for an access token to call PayPal's user profile service. The following diagram illustrates how the access token is used to receive user information.
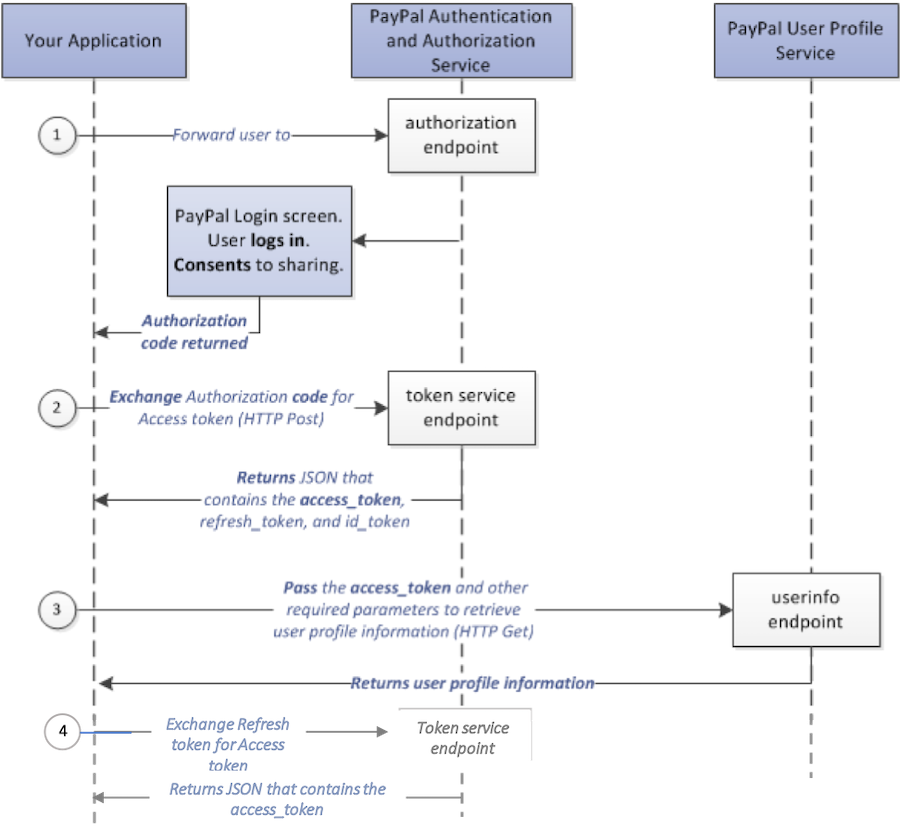 1. Make a call to PayPal's tokenservice endpoint:
`https://api-m.sandbox.paypal.com/v1/oauth2/token`
2. Pass the authorization code to the tokenservice endpoint with the following parameters:
| Parameter | Specify in | Description |
| --------------- | ---------- | ----------------------------------------------------------------------------- |
| `Authorization` | header | Separate your Base64-encoded client ID and secret credentials by a colon (:). |
| `grant_type` | form body | Set to `authorization_code`. |
| code | form body | Enter the PayPal-generated authorization code. |
### Sample Request [#sample-request]
```bash lineNumbers
curl -X POST https://api-m.sandbox.paypal.com/v1/oauth2/token \
-H 'Authorization: Basic {Your Base64-encoded ClientID:Secret}' \
-d 'grant_type=authorization_code&code={authorization_code}'
```
### Response fields [#response-fields]
| Field | Type | Description |
| -------------------------------- | ------ | ----------------------------------------------------------------------------------------------------- |
| `token_type: {type}` | String | Defines the type of token, in this case the token type is Bearer. |
| `expires_in: 28800` | String | Identifies the number of seconds until the access token expires. Default is 28800 seconds or 8 hours. |
| `refresh_token: {refresh token}` | String | Identifies the actual token used to refresh the access token. |
| `access_token: {access token}` | String | Identifies the actual token used to call the user info endpoint. |
#### Sample Response [#sample-response]
```json lineNumbers
{
"token_type": "Bearer",
"expires_in": "28800",
"refresh_token": {refresh_token},
"access_token": {access_token}
}
```
> **Note:** **Note:** The access token expires after a short period of time, so you'll also receive a refresh token that you will use to periodically refresh the access token. When you need to make a call to the user info service, use the refresh token first to get a new access token which you can then use to call the user info service.
## 7. Exchange refresh\_token for access\_token [#7-exchange-refresh_token-for-access_token]
1. Make a call to Paypal's tokenservice endpoint: `https://api-m.sandbox.paypal.com/v1/oauth2/token`
2. Pass the refresh token to the tokenservice endpoint with the following parameters:
| Parameter | Specify in | Description |
| --------------- | ---------- | ----------------------------------------------------------------------------- |
| `Authorization` | header | Separate your Base64-encoded client ID and secret credentials by a colon (:). |
| `grant_type` | form body | Set to refresh\_token. |
Sample request
```bash lineNumbers
curl -X POST https://api-m.sandbox.paypal.com/v1/oauth2/token \
-H 'Authorization: Basic {Your Base64-encoded ClientID:Secret}=' \
-d 'grant_type=refresh_token&refresh_token={refresh token}'
```
### Response fields [#response-fields-1]
| Field | Type | Description |
| ------------------------------ | ------ | ----------------------------------------------------------------------------------------------------- |
| `token_type: {type}` | String | Defines the type of token, in this case the token type is Bearer. |
| `expires_in: 28800` | String | Identifies the number of seconds until the access token expires. Default is 28800 seconds or 8 hours. |
| `access_token: {access token}` | String | Identifies the actual token used to call the user info endpoint. |
Sample response
```json lineNumbers
{
"token_type": "Bearer",
"expires_in": "28800",
"access_token": {access_token}
}
```
## 8. Get customer info [#8-get-customer-info]
Now that you have the access token, call the [Show user profile information](/limited-release/log-in-with-paypal/integrate) method with the desired parameters to obtain the customer information.
## 9. Test the integration [#9-test-the-integration]
To test your integration, complete these steps.
1. Log in to the [Developer Dashboard](https://developer.paypal.com/developer/accounts) and create a new sandbox test account.
2. Click your **Log in with PayPal** button.
3. Log in to PayPal using the test buyer account you created.
4. Make sure you received a non-empty authorization code and a non-empty id\_token, if specified in the response type.
5. Exchange the auth code for a token as described in [6. Get Access Token](#6-get-access-token).
6. Call the user info endpoint with the access token and verify that you received the correct user information.
When your test is complete and you're satisfied with the results, you can launch your new button into production.
## 10. Go live [#10-go-live]
Once your app has been approved to go live, you just need to replace the sandbox endpoints with the live endpoints.
> **Note:** **Note:** "Before going live, PayPal must review your app to approve the sharing of customer data. The review automatically starts once you select the **Log in with PayPal** option in your live application. The app review process typically takes up to 7 business days.
To launch your button into production, complete these steps:
### Replace sandbox credentials with live credentials [#replace-sandbox-credentials-with-live-credentials]
1. Button URL: change the endpoint from [https://www.sandbox.paypal.com/connect](https://www.sandbox.paypal.com/connect)? to [https://www.paypal.com/connect](https://www.paypal.com/connect)? Example
```text lineNumbers
https://www.paypal.com/connect?flowEntry=static&client_id=ARfDleH_j-C17kxbdUzYivR70xP5Uy5N_DvNGBaPB_QNbwWkgF7lMsemGJycLRFVwaM&response_type=code&scope=openid%20profile%20email%20address&redirect_uri=https%3A%2F%2Fwww.google.com%3Fstate=123456
```
2. Code to token: change the endpoint from [https://api-m.sandbox.paypal.com/v1/oauth2/token](https://api-m.sandbox.paypal.com/v1/oauth2/token) to [https://api-m.paypal.com/v1/oauth2/token](https://api-m.paypal.com/v1/oauth2/token)
3. User info: change the endpoint from [https://api-m.sandbox.paypal.com/v1/identity/oauth2/userinfo](https://api-m.sandbox.paypal.com/v1/identity/oauth2/userinfo) to [https://api-m.paypal.com/v1/identity/oauth2/userinfo](https://api-m.paypal.com/v1/identity/oauth2/userinfo)
### Test a live user flow [#test-a-live-user-flow]
1. Click your Log in with PayPal button.
2. Log in to the PayPal window using a real buyer account. If you don't have a real PayPal buyer account, go to the PayPal website and click **Sign Up**.
3. Click on the **Log in with PayPal** button to complete the consent.
4. Make sure you received a non-empty authorization code and a non-empty id\_token, if specified in the response type.
5. Exchange the auth code to token as described in [6. Get Access Token](#6-get-access-token).
6. Call the user info endpoint with the access token and verify that you receive the correct user information.
## Next [#next]
[Best Practices](/log-in/best-practice)
1. Make a call to PayPal's tokenservice endpoint:
`https://api-m.sandbox.paypal.com/v1/oauth2/token`
2. Pass the authorization code to the tokenservice endpoint with the following parameters:
| Parameter | Specify in | Description |
| --------------- | ---------- | ----------------------------------------------------------------------------- |
| `Authorization` | header | Separate your Base64-encoded client ID and secret credentials by a colon (:). |
| `grant_type` | form body | Set to `authorization_code`. |
| code | form body | Enter the PayPal-generated authorization code. |
### Sample Request [#sample-request]
```bash lineNumbers
curl -X POST https://api-m.sandbox.paypal.com/v1/oauth2/token \
-H 'Authorization: Basic {Your Base64-encoded ClientID:Secret}' \
-d 'grant_type=authorization_code&code={authorization_code}'
```
### Response fields [#response-fields]
| Field | Type | Description |
| -------------------------------- | ------ | ----------------------------------------------------------------------------------------------------- |
| `token_type: {type}` | String | Defines the type of token, in this case the token type is Bearer. |
| `expires_in: 28800` | String | Identifies the number of seconds until the access token expires. Default is 28800 seconds or 8 hours. |
| `refresh_token: {refresh token}` | String | Identifies the actual token used to refresh the access token. |
| `access_token: {access token}` | String | Identifies the actual token used to call the user info endpoint. |
#### Sample Response [#sample-response]
```json lineNumbers
{
"token_type": "Bearer",
"expires_in": "28800",
"refresh_token": {refresh_token},
"access_token": {access_token}
}
```
> **Note:** **Note:** The access token expires after a short period of time, so you'll also receive a refresh token that you will use to periodically refresh the access token. When you need to make a call to the user info service, use the refresh token first to get a new access token which you can then use to call the user info service.
## 7. Exchange refresh\_token for access\_token [#7-exchange-refresh_token-for-access_token]
1. Make a call to Paypal's tokenservice endpoint: `https://api-m.sandbox.paypal.com/v1/oauth2/token`
2. Pass the refresh token to the tokenservice endpoint with the following parameters:
| Parameter | Specify in | Description |
| --------------- | ---------- | ----------------------------------------------------------------------------- |
| `Authorization` | header | Separate your Base64-encoded client ID and secret credentials by a colon (:). |
| `grant_type` | form body | Set to refresh\_token. |
Sample request
```bash lineNumbers
curl -X POST https://api-m.sandbox.paypal.com/v1/oauth2/token \
-H 'Authorization: Basic {Your Base64-encoded ClientID:Secret}=' \
-d 'grant_type=refresh_token&refresh_token={refresh token}'
```
### Response fields [#response-fields-1]
| Field | Type | Description |
| ------------------------------ | ------ | ----------------------------------------------------------------------------------------------------- |
| `token_type: {type}` | String | Defines the type of token, in this case the token type is Bearer. |
| `expires_in: 28800` | String | Identifies the number of seconds until the access token expires. Default is 28800 seconds or 8 hours. |
| `access_token: {access token}` | String | Identifies the actual token used to call the user info endpoint. |
Sample response
```json lineNumbers
{
"token_type": "Bearer",
"expires_in": "28800",
"access_token": {access_token}
}
```
## 8. Get customer info [#8-get-customer-info]
Now that you have the access token, call the [Show user profile information](/limited-release/log-in-with-paypal/integrate) method with the desired parameters to obtain the customer information.
## 9. Test the integration [#9-test-the-integration]
To test your integration, complete these steps.
1. Log in to the [Developer Dashboard](https://developer.paypal.com/developer/accounts) and create a new sandbox test account.
2. Click your **Log in with PayPal** button.
3. Log in to PayPal using the test buyer account you created.
4. Make sure you received a non-empty authorization code and a non-empty id\_token, if specified in the response type.
5. Exchange the auth code for a token as described in [6. Get Access Token](#6-get-access-token).
6. Call the user info endpoint with the access token and verify that you received the correct user information.
When your test is complete and you're satisfied with the results, you can launch your new button into production.
## 10. Go live [#10-go-live]
Once your app has been approved to go live, you just need to replace the sandbox endpoints with the live endpoints.
> **Note:** **Note:** "Before going live, PayPal must review your app to approve the sharing of customer data. The review automatically starts once you select the **Log in with PayPal** option in your live application. The app review process typically takes up to 7 business days.
To launch your button into production, complete these steps:
### Replace sandbox credentials with live credentials [#replace-sandbox-credentials-with-live-credentials]
1. Button URL: change the endpoint from [https://www.sandbox.paypal.com/connect](https://www.sandbox.paypal.com/connect)? to [https://www.paypal.com/connect](https://www.paypal.com/connect)? Example
```text lineNumbers
https://www.paypal.com/connect?flowEntry=static&client_id=ARfDleH_j-C17kxbdUzYivR70xP5Uy5N_DvNGBaPB_QNbwWkgF7lMsemGJycLRFVwaM&response_type=code&scope=openid%20profile%20email%20address&redirect_uri=https%3A%2F%2Fwww.google.com%3Fstate=123456
```
2. Code to token: change the endpoint from [https://api-m.sandbox.paypal.com/v1/oauth2/token](https://api-m.sandbox.paypal.com/v1/oauth2/token) to [https://api-m.paypal.com/v1/oauth2/token](https://api-m.paypal.com/v1/oauth2/token)
3. User info: change the endpoint from [https://api-m.sandbox.paypal.com/v1/identity/oauth2/userinfo](https://api-m.sandbox.paypal.com/v1/identity/oauth2/userinfo) to [https://api-m.paypal.com/v1/identity/oauth2/userinfo](https://api-m.paypal.com/v1/identity/oauth2/userinfo)
### Test a live user flow [#test-a-live-user-flow]
1. Click your Log in with PayPal button.
2. Log in to the PayPal window using a real buyer account. If you don't have a real PayPal buyer account, go to the PayPal website and click **Sign Up**.
3. Click on the **Log in with PayPal** button to complete the consent.
4. Make sure you received a non-empty authorization code and a non-empty id\_token, if specified in the response type.
5. Exchange the auth code to token as described in [6. Get Access Token](#6-get-access-token).
6. Call the user info endpoint with the access token and verify that you receive the correct user information.
## Next [#next]
[Best Practices](/log-in/best-practice)