# Integrate iDEAL using the JavaScript SDK (/platforms/checkout/apm/ideal/js-sdk)
Use the JavaScript SDK to render payment fields and buttons and process payments with the Orders API.
### Buyer experience [#buyer-experience]
> **Note:** **Note:** The payment button is disabled in the buyer experience demo. On button click, the user is redirected to their bank to authorize the transaction.
## Know before you code [#know-before-you-code]
* Request approval to enable iDEAL by visiting these sandbox and live links:
* Sandbox: [https://www.sandbox.paypal.com/bizsignup/entry?product=ideal\&capabilities=IDEAL\&country.x=\](https://www.sandbox.paypal.com/bizsignup/entry?product=ideal\&capabilities=IDEAL\&country.x=)
* Live: [https://www.paypal.com/bizsignup/entry?product=ideal\&capabilities=IDEAL\&country.x=\](https://www.paypal.com/bizsignup/entry?product=ideal\&capabilities=IDEAL\&country.x=)
* Partners: Be sure to onboard your merchants upfront, [before they accept payments](/platforms/seller-onboarding/before-payment/). Onboarding after making payments, specifically Progressive Onboarding, isn't supported for alternative payment methods.
> **Note:** **Note:** The integration steps for implementing alternative payment methods are similar. If you've integrated another alternative payment method before, you can reuse that code with adjustments for this payment method.
* Complete the steps in [Get started](/api/rest/) to get your sandbox account information from the Developer Dashboard:
* Client ID: Authenticates your account with PayPal and identifies an app in your sandbox.
* Client Secret: Authorizes an app in
your sandbox. Keep this secret safe
and don't share it.
* Business account credentials
* Make sure the preference for receiving payments in your PayPal business account is set to accept and convert them to the default currency. To verify, in your profile select **Account Settings > Payment preferences > Block payments** and select **Update** to mark this preference.
* This client-side and server-side integration uses the following:
* [PayPal JavaScript SDK](/sdk/js/)
* [Webhooks Management REST API](/api/webhooks/v1/)
* [Orders REST API](/api/orders/v2/)
* Make sure you're [subscribed to the following webhook events](/platforms/checkout/apm/reference/subscribe-to-webhooks/):
* `CHECKOUT.ORDER.APPROVED` - Listen for this webhook and then capture the payment.
* `CHECKOUT.PAYMENT-APPROVAL.REVERSED` - This webhook tells you when an approved order is cancelled and refunded because it wasn't captured within the capture window. Let the payer know about the problem and the reversed order.
* By adding funding sources to your checkout integration, you agree to the [PayPal alternative payment methods agreement](https://www.paypal.com/us/webapps/mpp/ua/apm-tnc). This is in addition to the user agreement applicable to the country in which your business is physically located.
* Request approval to enable iDEAL by visiting these sandbox and live links. Replace `MERCHANT-COUNTRY` in the URL with the 2-character [country code](/api/codes/country-region) for the merchant's country of operation:
* Sandbox: `https://www.sandbox.paypal.com/bizsignup/entry?product=ideal&capabilities=IDEAL&country.x=MERCHANT-COUNTRY`
* Live: `https://www.paypal.com/bizsignup/entry?product=ideal&capabilities=IDEAL&country.x=MERCHANT-COUNTRY`
## To get started [#to-get-started]
> **Info:** ### Run in Postman [#run-in-postman]
>
> Use Postman to explore and test PayPal APIs. Learn more in our [Postman guide](/api/rest/postman/).
> **Info:** ### Get up and running in GitHub Codespaces [#get-up-and-running-in-github-codespaces]
>
> GitHub Codespaces are cloud-based development environments where you can code and test your PayPal integrations. [Learn more](/sandbox-testing/overview).
>
> [Open in Codespaces](https://github.com/login?return_to=https%3A%2F%2Fgithub.com%2Fcodespaces%2Fnew%2Fpaypal-examples%2Fideal)
## 1. Add PayPal JavaScript SDK [#1-add-paypal-javascript-sdk]
Add or update the JavaScript SDK script on your web page.
```html lineNumbers
```
This table lists the parameters you pass to the JavaScript SDK.
| **Query param** | **Default** | **Description** |
| ---------------- | ----------- | ------------------------------------------------------------------------------------------------------------------------------------------------------------------------------------------------------------------------------------------------------------------------------------------------------------------------------------------------------------------------------------------------------------------------------------------------------------------------------------------------- |
| `client-id` | none | Your PayPal REST client ID. This identifies your PayPal account and determines where transactions are paid. |
| `components` | `buttons` | A comma-separated list of components to enable. The `buttons`, `payment-fields`, `marks`, and `funding-eligibility` components are required for payment fields components. |
| `enable-funding` | none | The enabled payment methods to show in buttons and marks.
**Note:** By default, PayPal JavaScript SDK provides smart logic to display only appropriate marks and buttons for the current buyer. This optional parameter bypasses the buyer country check for desired payment methods.
For example:`src=`[https://www.paypal.com/sdk/js?client-id=YOUR\_CLIENT\_ID\&enable-funding=venmo](https://www.paypal.com/sdk/js?client-id=YOUR_CLIENT_ID\&enable-funding=venmo) |
| `currency` | `USD` | This is the currency for the payment. This value needs to match the currency used when creating the order. |
| `locale` | automatic | The locale renders components. By default PayPal detects the correct locale for the buyer based on their geolocation and browser preferences. It is recommended to pass this parameter with a [supported locale](/sdk/js/configuration/#locale) if you need the PayPal buttons to render in the same language as the rest of your site. |
| `intent` | `capture` | The intent for the transaction. This determines whether the funds are captured immediately while the buyer is present on the page. |
| `commit` | `true` | This indicates that the final amount won't change after the buyer returns to your site from PayPal. |
| `vault` | `false` | Whether the payment information in the transaction will be saved. Save your customers' payment information for billing agreements, subscriptions, or recurring payments. Marking this parameter `false` shows all funding sources, including payment methods that can't be saved. |
See additional, [optional parameters](/sdk/js/configuration/).
## 2. Render payment mark [#2-render-payment-mark]
You can use a [mark integration](/platforms/checkout/standard/customize/display-payment-methods/) for payment fields components to present the payment method options to the buyer as radio buttons.
 ```javascript lineNumbers
paypal
.Marks({
fundingSource: paypal.FUNDING.IDEAL,
})
.render("#ideal-mark");
```
## 3. Render payment fields [#3-render-payment-fields]
Use payment fields to collect payment information from buyers. Fields dynamically render based on the selected funding source and you can customize the fields to align with your brand.
You can choose from the following checkout flows:
* [Single page](#single-page)
* [Multi-page](#multi-page)
### Single page [#single-page]
For iDEAL, payment fields collect first name and last name.
If there are validation errors in the input fields, they'll show on the click of the button.
```javascript lineNumbers
paypal
.PaymentFields({
fundingSource: paypal.FUNDING.IDEAL,
/* style object (optional) */
style: {
/* customize field attributes (optional) */
variables: {},
/* set custom rules to apply to fields classes (optional) */
rules: {},
},
fields: {
/* fields prefill info (optional) */
name: {
value: "Firstname Lastname",
},
},
})
.render("#ideal-container");
```
For `style` parameters, please reference this style page: [Custom style for payment fields](/platforms/checkout/apm/reference/style/)
### Multi-page [#multi-page]
A multi-page checkout flow spreads the checkout steps into two or more pages. This experience is applicable when an order details page needs to be shown to the buyer before an order is placed.
> **Note:** **Tip:** German merchants can leverage the multi-page flow to comply with local regulations.
#### First page of the checkout flow [#first-page-of-the-checkout-flow]
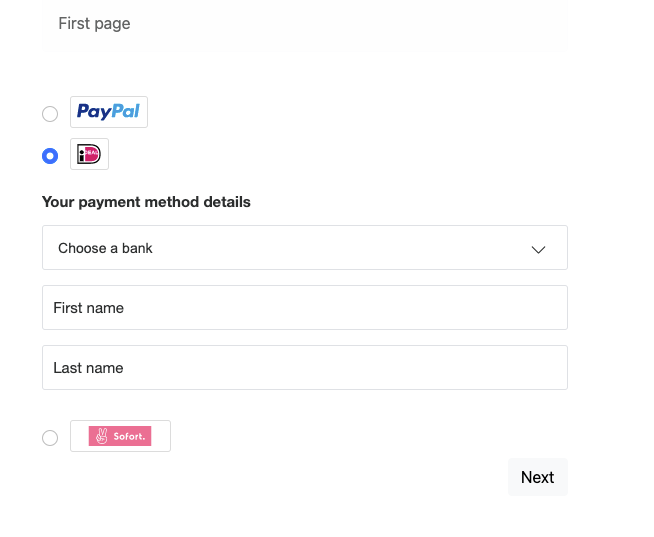
This example renders the mark and payment fields, but not the payment button, on your checkout page.
```javascript lineNumbers
paypal
.Marks({
fundingSource: paypal.FUNDING.IDEAL,
})
.render("#ideal-mark");
```
## 3. Render payment fields [#3-render-payment-fields]
Use payment fields to collect payment information from buyers. Fields dynamically render based on the selected funding source and you can customize the fields to align with your brand.
You can choose from the following checkout flows:
* [Single page](#single-page)
* [Multi-page](#multi-page)
### Single page [#single-page]
For iDEAL, payment fields collect first name and last name.
If there are validation errors in the input fields, they'll show on the click of the button.
```javascript lineNumbers
paypal
.PaymentFields({
fundingSource: paypal.FUNDING.IDEAL,
/* style object (optional) */
style: {
/* customize field attributes (optional) */
variables: {},
/* set custom rules to apply to fields classes (optional) */
rules: {},
},
fields: {
/* fields prefill info (optional) */
name: {
value: "Firstname Lastname",
},
},
})
.render("#ideal-container");
```
For `style` parameters, please reference this style page: [Custom style for payment fields](/platforms/checkout/apm/reference/style/)
### Multi-page [#multi-page]
A multi-page checkout flow spreads the checkout steps into two or more pages. This experience is applicable when an order details page needs to be shown to the buyer before an order is placed.
> **Note:** **Tip:** German merchants can leverage the multi-page flow to comply with local regulations.
#### First page of the checkout flow [#first-page-of-the-checkout-flow]
This example renders the mark and payment fields, but not the payment button, on your checkout page.
 #### Payment mark
```javascript lineNumbers
paypal
.Marks({
fundingSource: paypal.FUNDING.IDEAL,
})
.render("#ideal-mark");
```
#### Payment fields
```javascript lineNumbers
paypal
.PaymentFields({
fundingSource: paypal.FUNDING.IDEAL,
/* style object (optional) */
style: {
/* customize field attributes (optional) */
variables: {},
/* set custom rules to apply to fields classes (optional) */
rules: {},
},
onInit: (data, actions) => {
const form = document.querySelector("form.paypal-payment-form");
form.addEventListener("submit", (e) => {
const formData = new FormData(form);
const paymentSource = formData.get("payment-option");
if (paymentSource === paypal.FUNDING.IDEAL) {
e.preventDefault();
actions.validate().then((valid) => {
if (valid) {
window.location.href = `/second-page.html?payment-option=${paypal.FUNDING.IDEAL}`;
}
});
}
});
},
fields: {
/* fields prefill info (optional) */
name: {
value: "Firstname Lastname",
},
},
})
.render("#ideal-container");
```
#### Second page of the checkout flow [#second-page-of-the-checkout-flow]
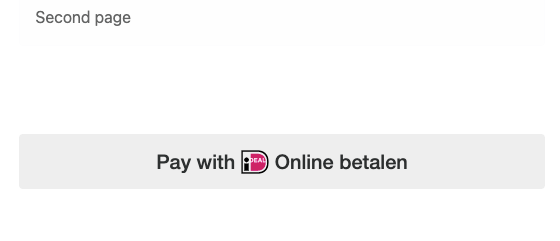
Based on the payment method selected on the first page, this example renders only the payment button along with the order details on the page. To complete checkout, the buyer clicks the payment button, authorizes, and confirms payment. You get the code to render the payment button in [step 4.](#4-render-payment-button)
#### Payment mark
```javascript lineNumbers
paypal
.Marks({
fundingSource: paypal.FUNDING.IDEAL,
})
.render("#ideal-mark");
```
#### Payment fields
```javascript lineNumbers
paypal
.PaymentFields({
fundingSource: paypal.FUNDING.IDEAL,
/* style object (optional) */
style: {
/* customize field attributes (optional) */
variables: {},
/* set custom rules to apply to fields classes (optional) */
rules: {},
},
onInit: (data, actions) => {
const form = document.querySelector("form.paypal-payment-form");
form.addEventListener("submit", (e) => {
const formData = new FormData(form);
const paymentSource = formData.get("payment-option");
if (paymentSource === paypal.FUNDING.IDEAL) {
e.preventDefault();
actions.validate().then((valid) => {
if (valid) {
window.location.href = `/second-page.html?payment-option=${paypal.FUNDING.IDEAL}`;
}
});
}
});
},
fields: {
/* fields prefill info (optional) */
name: {
value: "Firstname Lastname",
},
},
})
.render("#ideal-container");
```
#### Second page of the checkout flow [#second-page-of-the-checkout-flow]
Based on the payment method selected on the first page, this example renders only the payment button along with the order details on the page. To complete checkout, the buyer clicks the payment button, authorizes, and confirms payment. You get the code to render the payment button in [step 4.](#4-render-payment-button)
 For `style` parameters, please reference this style page: [Custom style for payment fields](/platforms/checkout/apm/reference/style/)
## 4. Render payment button [#4-render-payment-button]
```javascript lineNumbers
paypal
.Buttons({
fundingSource: paypal.FUNDING.IDEAL,
style: {
label: "pay",
},
createOrder() {
return fetch("/my-server/create-paypal-order", {
method: "POST",
headers: {
"Content-Type": "application/json",
},
// use the "body" param to optionally pass additional order information
// like product skus and quantities
body: JSON.stringify({
cart: [
{
sku: "YOUR_PRODUCT_STOCK_KEEPING_UNIT",
quantity: "YOUR_PRODUCT_QUANTITY",
},
],
}),
})
.then((response) => response.json())
.then((order) => order.id);
},
onApprove(data) {
return fetch("/my-server/capture-paypal-order", {
method: "POST",
headers: {
"Content-Type": "application/json",
},
body: JSON.stringify({
orderID: data.orderID,
}),
})
.then((response) => response.json())
.then((orderData) => {
// Successful capture! For dev/demo purposes:
console.log(
"Capture result",
orderData,
JSON.stringify(orderData, null, 2),
);
const transaction = orderData.purchase_units[0].payments.captures[0];
console.log("Transaction Status:", transaction.status);
console.log("Transaction ID:", transaction.id);
// When ready to go live, remove the alert and show a success message within this page. For example:
// const element = document.getElementById('paypal-button-container');
// element.innerHTML = '
For `style` parameters, please reference this style page: [Custom style for payment fields](/platforms/checkout/apm/reference/style/)
## 4. Render payment button [#4-render-payment-button]
```javascript lineNumbers
paypal
.Buttons({
fundingSource: paypal.FUNDING.IDEAL,
style: {
label: "pay",
},
createOrder() {
return fetch("/my-server/create-paypal-order", {
method: "POST",
headers: {
"Content-Type": "application/json",
},
// use the "body" param to optionally pass additional order information
// like product skus and quantities
body: JSON.stringify({
cart: [
{
sku: "YOUR_PRODUCT_STOCK_KEEPING_UNIT",
quantity: "YOUR_PRODUCT_QUANTITY",
},
],
}),
})
.then((response) => response.json())
.then((order) => order.id);
},
onApprove(data) {
return fetch("/my-server/capture-paypal-order", {
method: "POST",
headers: {
"Content-Type": "application/json",
},
body: JSON.stringify({
orderID: data.orderID,
}),
})
.then((response) => response.json())
.then((orderData) => {
// Successful capture! For dev/demo purposes:
console.log(
"Capture result",
orderData,
JSON.stringify(orderData, null, 2),
);
const transaction = orderData.purchase_units[0].payments.captures[0];
console.log("Transaction Status:", transaction.status);
console.log("Transaction ID:", transaction.id);
// When ready to go live, remove the alert and show a success message within this page. For example:
// const element = document.getElementById('paypal-button-container');
// element.innerHTML = 'Thank you for your payment!
';
// Or go to another URL: window.location.href = 'thank_you.html';
});
},
onCancel(data, actions) {
console.log(`Order Canceled - ID: ${data.orderID}`);
},
onError(err) {
console.error(err);
},
})
.render("#ideal-btn");
```
* `createOrder` Implement the `createOrder` function to allow the JavaScript SDK to submit buyer information and set up the transaction on the click of the button.
> **Note:** **Note:** iDEAL requires orders to be created in a currency of EUR.
Use your server-side [Create order](/api/orders/v2/orders-create) call to set up the details of a one-time transaction including the amount, line item detail, and more.
If order creation fails, the Orders API can [return an error](/api/orders/v2/error-messages) in the console.
After order creation, orders are confirmed with buyer-selected payment source. If the order cannot be processed with the selected payment source, the relevant errors are returned in the console.
* `onCancel` Implement the optional `onCancel()` function to show a cancellation page or return to the shopping cart.
* `onError` Implement the optional `onError()` function to handle errors and display generic error message or page to the buyers. This error handler is a catch-all. Errors at this point are not expected to be handled beyond showing a generic error message or page.
## 5. Capture the transaction [#5-capture-the-transaction]
Implement the `onApprove` function, which is called after the buyer approves the transaction.
The fuction captures the funds from the transaction and shows a message to the buyer to let them know the transaction is successful. The method is called after the buyer approves the transaction on paypal.com.
Because this is a client-side call, PayPal calls the [Orders API](/api/orders/v2/orders-capture) on your behalf, so you don't need to provide the headers and body.
`capture()` - Promise returning the [order details](/api/orders/v2#orders-capture-response).
```javascript lineNumbers
paypal
.Buttons({
fundingSource: paypal.FUNDING.IDEAL,
createOrder() {
return fetch("/my-server/create-paypal-order", {
method: "POST",
headers: {
"Content-Type": "application/json",
},
// use the "body" param to optionally pass additional order information
// like product skus and quantities
body: JSON.stringify({
cart: [
{
sku: "YOUR_PRODUCT_STOCK_KEEPING_UNIT",
quantity: "YOUR_PRODUCT_QUANTITY",
},
],
}),
})
.then((response) => response.json())
.then((order) => order.id);
},
onApprove(data) {
return fetch("/my-server/capture-paypal-order", {
method: "POST",
headers: {
"Content-Type": "application/json",
},
body: JSON.stringify({
orderID: data.orderID,
}),
})
.then((response) => response.json())
.then((orderData) => {
// Successful capture! For dev/demo purposes:
console.log(
"Capture result",
orderData,
JSON.stringify(orderData, null, 2),
);
const transaction = orderData.purchase_units[0].payments.captures[0];
console.log("Transaction Status:", transaction.status);
console.log("Transaction ID:", transaction.id);
// When ready to go live, remove the alert and show a success message within this page. For example:
// const element = document.getElementById('paypal-button-container');
// element.innerHTML = 'Thank you for your payment!
';
// Or go to another URL: window.location.href = 'thank_you.html';
});
},
})
.render("#ideal-button-container");
//This function displays payment buttons on your web page.
```
For the capture call details and example responses, see [Capture payment for order](/api/orders/v2/orders-capture) in the Orders API reference.
If order capture fails, the Orders API can [return an error](/api/orders/v2/error-messages) in the console.
## 6. Handle webhook events [#6-handle-webhook-events]
A webhook handler is a script you create on your server that completes specific actions on webhooks that hit your listener URL.
* We recommend subscribing to the `CHECKOUT.ORDER.APPROVED` webhook event in case a customer accidentally closes the browser and exits the checkout process after approving the transaction through their APM but before finalizing the transaction on your site.
* We also recommend subscribing to the `CHECKOUT.ORDER.DECLINED` webhook event to receive notifications of any other failure scenarios. This webhook event passes a failure reason code and error message to indicate what caused the error.
* Listen for the `CHECKOUT.PAYMENT-APPROVAL.REVERSED` webhook as an indication that an approved order wasn't captured within the capture window resulting in a cancellation of the order and a refund the buyer's account. Then notify your buyer of the problem and the reversed order.
* `PAYMENT.CAPTURE.PENDING`, `PAYMENT.CAPTURE.COMPLETED`, and `PAYMENT.CAPTURE.DENIED` webhooks indicate capture status.
See [Subscribe to checkout webhooks](/platforms/checkout/apm/reference/subscribe-to-webhooks/) for more information.
Here are some additional resources as you create webhook handler code:
* [Webhook Management API](/api/webhooks/v1/) - Manage webhooks, list event notifications, and more.
* Webhook event
* [Checkout webhook events](/api/rest/webhooks/event-names/#checkout-buyer-approval) - Checkout buyer approval-related webhooks.
* [Order webhook events](/api/rest/webhooks/event-names/) - Other order-related webhooks.
* [Show order details endpoint](/api/orders/v2/orders-get) - Determine the status of an order.
### Merchant onboarding payment error [#merchant-onboarding-payment-error]
Partners need to onboard merchants upfront [before they accept payments](/platforms/seller-onboarding/before-payment/). iDEAL doesn't support onboarding after making payments, specifically Progressive Onboarding. See the [Onboard a merchant](/platforms/checkout/apm/ideal/#onboard-a-merchant-for-ideal-payments) section for more details.
When you submit an order with `ideal` as the `payment_source`, and the merchant isn't onboarded, you get the following error message:
`The 'API caller' and/or 'payee' is not set up to be able to process the selected payment source. If you have already completed the required steps, please allow 2 business days for PayPal to complete the setup. If you continue to receive this error, please contact your Account Manager or check status at https://www.paypal.com/businessmanage/account/payments.`
## Sample integration [#sample-integration]
See a sample iDEAL integration in the [PayPal GitHub repository](https://github.com/paypal-examples/ideal-paypal-payment-js-sdk).
## Next Steps [#next-steps]
> **Info:** Test integration
>
> Test the integration in the PayPal sandbox environment.
> **Info:** Go live
>
> Take your application live in the PayPal production environment once testing is successful.