# Save PayPal for purchase later with the JavaScript SDK (/sdk/js/v5/save-without-purchase/paypal)
Save payment methods to charge payers after a set amount of time. For example, you can offer a free trial and charge payers after the trial expires. Payers don't need to be present when charged. No checkout required.
To save PayPal Wallets, payers need to log in to your site, make a purchase, and remain on your site when transactions take place.
Customers with a PayPal Wallet can:
* Review PayPal transactions and transaction history
* Review, add, or remove funding sources
* Review and cancel recurring payments
* Hold a balance in their PayPal account
* Use PayPal to send and receive money
* Withdraw money to a linked bank account
* Use PayPal to transact with merchants
## Availability [#availability]
#### See Supported Countries [#see-supported-countries]
* Australia
* Austria
* Belgium
* Bulgaria
* Canada
* China
* Cyprus
* Czech Republic
* Denmark
* Estonia
* Finland
* France
* Germany
* Hong Kong
* Hungary
* Ireland
* Italy
* Japan
* Latvia
* Liechtenstein
* Lithuania
* Luxembourg
* Malta
* Netherlands
* Norway
* Poland
* Portugal
* Romania
* Singapore
* Slovakia
* Slovenia
* Spain
* Sweden
* United Kingdom
* United States
## Use cases [#use-cases]
Businesses save payment methods if they want customers to:
* Check out without re-entering a payment method
* Pay after use, for example, ride-sharing and food delivery
## Know before you code [#know-before-you-code]
* To save payment methods, you must be able to identify payers uniquely. For example, payers create an account and log in to your site.
* Complete the steps in [Get started](/api/rest/) to get the following sandbox account information from the Developer Dashboard:
* Your sandbox account login information
* Your access token
* This integration requires a PayPal Developer account.
* This integration must include a server-side call to exchange a setup token for a payment method token.
## How it works [#how-it-works]
PayPal encrypts payment method information and stores it in a digital vault for that customer.
1. The payer saves their payment method.
2. For a first-time payer, PayPal creates a customer ID. Store this within your system for future use.
3. When the customer returns to your website and is ready to check out, pass their PayPal-generated customer ID to the JavaScript SDK. The customer ID tells the JavaScript SDK to save or reuse a saved payment method.
4. The payer completes a billing agreement.
5. The JavaScript SDK populates the checkout page with each saved payment method. Each payment method appears as a one-click button next to other ways to pay.
The checkout process is now shorter because it uses saved payment information.
## 1. Check eligibility [#1-check-eligibility]
1. Go to [paypal.com](https://www.paypal.com) and sign in with your business account.
2. Go to **Account Settings** > **Payment Preferences** > **Save PayPal and Venmo payment methods**.
3. In the Save PayPal and Venmo payment methods section, select **Get Started**.
4. When you submit profile details, PayPal reviews your eligibility to save PayPal Wallets and Venmo accounts.
5. After PayPal reviews your eligibility, you'll see a status of **Success**, **Need more information**, or **Denied**.
## 2. Set up your account to save payment methods [#2-set-up-your-account-to-save-payment-methods]
Enable the vaulting feature in the Developer Dashboard for both your sandbox and production apps before you integrate.
### Sandbox [#sandbox]
Set up your sandbox business account to save payment methods:
1. Log in to the Developer Dashboard.
2. Under **REST API apps**, select your app name.
3. Under **Sandbox App Settings** > **App Feature Options**, check **Accept payments**.
4. Expand **Advanced options**. Confirm that **Vault** is selected.
To go live, you'll need to be vetted to save PayPal Wallets. You can start the vetting process from the Developer Dashboard.
* Only your sandbox business account is enabled to save payment methods. Your developer account remains unaffected.
> **Note:** **Tip:** When prompted for data such as a phone number for a sandbox business request, enter any number that fits the required format. Since this is a sandbox request, the data doesn't have to be real.
### Production [#production]
Set up your live business account to save payment methods:
1. Log in to the [PayPal Developer Dashboard](https://developer.paypal.com/home/).
2. In the navigation menu, use the **Sandbox | Live** toggle to select **Live**.
3. Access **Apps & Credentials**.
4. Select the production REST API app name.
5. To enable vaulting for your account:
1. Go to **Features** > **Payment capabilities**.
2. In the **Payment capabilities** menu, select the **Save payment methods** toggle to enable vaulting.
6. To add the ability to save PayPal and Venmo payment methods:
1. Go to **Features** > **Payment methods**.
2. In the **Payment methods** menu, select the **PayPal and Venmo** toggle so you can save PayPal and Venmo payment options.
> **Warning:** PayPal requires Risk Data Acquisition (RDA) to reduce fraud. You must implement risk data collection for all customer-initiated transactions (CIT) that use PayPal and Venmo Payment Tokens. Payment attempts that are missing RDA data are likely to be declined due to insufficient risk identifiers. Use the PayPal
>
> [FraudNet](/ratepay/fraudnet)
>
> and
>
> [Magnes](/limited-release/magnes)
>
> libraries to collect and pass RDA data during payment processing.
## 3. Generate a user ID token for the payer [#3-generate-a-user-id-token-for-the-payer]
The PayPal OAuth 2.0 API has a `response_type` parameter. Set the `response_type` to `id_token` to retrieve a unique ID token for a payer.
#### First-time Payer
A payer wants to save a payment method for the first time. Modify the following code to generate an `id_token` for the payer:
### Sample server-side user ID token request [#sample-server-side-user-id-token-request]
```bash lineNumbers
curl -s -X POST 'https://api-m.sandbox.paypal.com/v1/oauth2/token' \
-u 'CLIENT-ID:CLIENT-SECRET' \
-H 'Content-Type: application/x-www-form-urlencoded' \
-d 'grant_type=client_credentials' \
-d 'response_type=id_token'
```
### Modify the code [#modify-the-code]
Copy the code sample and modify it as follows:
* Change `CLIENT-ID` to your client ID.
* Change `CLIENT-SECRET` to your client secret.
#### Returning Payer
A payer wants to use a saved payment method.
Use the saved PayPal-generated customer ID in the POST body parameter `target_customer_id`. The `target_customer_id` is a unique ID for a customer generated when the `payment_source` is saved to the vault. The `target_customer_id` is available when capturing the order or retrieving saved payment information.
> **Note:** **Note:** Use the customer identifier generated by PayPal, not the identifier that you use to identify the customer in your system.
### Sample server-side user ID token request with a customer ID [#sample-server-side-user-id-token-request-with-a-customer-id]
```bash lineNumbers
curl -s -X POST 'https://api-m.sandbox.paypal.com/v1/oauth2/token'\
-u 'CLIENT-ID:CLIENT-SECRET'\
-H 'Content-Type: application/x-www-form-urlencoded'\
-d 'grant_type=client_credentials'\
-d 'response_type=id_token'\
-d 'target_customer_id=CUSTOMER-ID'
```
### Modify the code [#modify-the-code-1]
Copy the code sample and modify it as follows:
* Change `CLIENT-ID` to your client ID.
* Change `CLIENT-SECRET` to your client secret.
* Change `CUSTOMER-ID` to the PayPal-generated customer ID.
A successful request returns fields including an `access_token`, `id_token`, and the number of seconds the `access_token` token is valid.
The `id_token`:
* Uniquely identifies each payer.
* Expires in a few minutes because it's meant to be used during checkout. Generate new tokens if the current tokens expire.
> **Note:** **Tip**: Each buyer session is unique. Set up your server to generate a new client token each time payment fields render on your page.
## 4. Pass user ID token to JavaScript SDK [#4-pass-user-id-token-to-javascript-sdk]
Pass the `id_token` into the JavaScript SDK through the `data-user-id-token`.
```javascript lineNumbers
```
### Modify the code [#modify-the-code-2]
Copy the code sample and modify it as follows:
* Change `CLIENT-ID` to your client ID.
* Change `ID-TOKEN` to the `id_token` from the previous step.
## 5. Add PayPal button [#5-add-paypal-button]
Include client-side callbacks to:
* Manage interactions with APIs
* Manage payer approval flows
* Handle any events that lead to cancellation or error during payer approval
```javascript lineNumbers
```
### Modify the code [#modify-the-code-3]
Copy the code sample and modify it as follows:
1. Replace `your-div-id` with a div id of your choice.
2. Replace `#your-div-id` with the div id you created.
## 6. Create a setup token [#6-create-a-setup-token]
> **Warning:** PayPal requires Risk Data Acquisition (RDA) to reduce fraud. You must implement risk data collection for all customer-initiated transactions (CIT) that use PayPal and Venmo Payment Tokens. Payment attempts that are missing RDA data are likely to be declined due to insufficient risk identifiers. Use the PayPal
>
> [FraudNet](/ratepay/fraudnet)
>
> and
>
> [Magnes](/limited-release/magnes)
>
> libraries to collect and pass RDA data during payment processing.
You request a setup token from your server. Pass the setup token from your server to the SDK with the `createVaultSetupToken` callback.
The `createVaultSetupToken` callback:
* Calls the server endpoint you created to generate and retrieve the setup token.
* Makes a request to your server endpoint.
Then, your server uses its access token to create and return the setup token to the client.
Any errors that occur while creating a setup token show up in the `onError` callback provided to the card fields component.
### Supported callback [#supported-callback]
| Callback | Returns | Description |
| ----------------------- | -------------------- | --------------------------------------------------------------------------------------------------------------------------------------------------------------------------------------------------------------------------------------------------------------------------------------------- |
| `createVaultSetupToken` | Setup token (string) | The merchant's server must receive this callback. [Create a setup token for cards from the merchant server](/platforms/checkout/save-payment-methods/purchase-later/payment-tokens-api/cards). The SDK then saves the payment method and updates the setup token with payment method details. |
### Client-side code sample [#client-side-code-sample]
```javascript lineNumbers
window.paypal.Buttons({
createVaultSetupToken: async () => {
// Call your server API to generate a setup token
// and return it here as a string
const result = await fetch("https://example.com/create/setup/token");
return result.token;
},
});
```
### Modify the code [#modify-the-code-4]
Copy the code sample and modify it as follows:
1. Change `ACCESS-TOKEN` to your sandbox app's access token.
2. Change `REQUEST-ID` to a set of unique alphanumeric characters such as a time stamp.
3. Set the `usage_type` under `payment_source.paypal` to be `PLATFORM`.
4. In the `createVaultSetupToken`, call the endpoint on your server to create a setup token with the [Payment Method Tokens API](/api/payment-tokens/v3). `createVaultSetupToken` returns the setup token as a string.
### Server-side code sample [#server-side-code-sample]
Set up your server to call the [Payment Method Tokens API](/api/payment-tokens/v3). The button that the payer selects determines the `payment_source` sent in the following sample.
This SDK uses the Payment Method Tokens API to save payment methods in the background. Use the following request to add attributes needed to save a PayPal Wallet:
> **Note:** **Note:** The `return_url` and `cancel_url` values are required, but can have filler values such as in the following sample.
```bash lineNumbers
curl -v -k -X POST 'https://api-m.sandbox.paypal.com/v3/vault/setup-tokens'\
-H 'Content-Type: application/json'\
-H 'Authorization: Bearer ACCESS-TOKEN'\
-H 'PayPal-Request-Id: REQUEST-ID'\
-d '{
"payment_source": {
"paypal": {
"usage_type": "MERCHANT",
"experience_context": {
"return_url": "https://example.com/returnUrl",
"cancel_url": "https://example.com/cancelUrl"
}
}
}
}'
```
### Response [#response]
Return the `id` to your client to call for the payer approval flow if the `payment_source` needs payer approval.
```json lineNumbers
{
"id": "4G4976650J0948357",
"customer": {
"id": "customer_4029352050"
},
"status": "PAYER_ACTION_REQUIRED",
"payment_source": {
"paypal": {
"description": "Description for PayPal to be shown to PayPal payer",
"usage_pattern": "IMMEDIATE",
"shipping": {
"name": {
"full_name": "Firstname Lastname"
},
"address": {
"address_line_1": "123 Main Street",
"address_line_2": "Unit A",
"admin_area_2": "Anytown",
"admin_area_1": "CA",
"postal_code": "12345",
"country_code": "US"
}
},
"permit_multiple_payment_tokens": false,
"usage_type": "MERCHANT",
"customer_type": "CONSUMER"
}
},
"links": [
{
"href": "https://api-m.sandbox.paypal.com/v3/vault/setup-tokens/4G4976650J0948357",
"rel": "self",
"method": "GET",
"encType": "application/json"
},
{
"href": "https://sandbox.paypal.com/agreements/approve?approval_session_id=4G4976650J0948357",
"rel": "approve",
"method": "GET",
"encType": "application/json"
}
]
}
```
> **Note:** **Note:** This setup token is generated with an empty `payment_source`. The `Buttons` script uses this token to securely update the setup token with payment details.
### Modify the code [#modify-the-code-5]
1. Change `ACCESS-TOKEN` to your sandbox app's access token.
2. Change `REQUEST-ID` to a set of unique alphanumeric characters such as a time stamp.
3. In the `createVaultSetupToken`, call the endpoint on your server to create a setup token with the [Payment Method Tokens API](/api/payment-tokens/v3). `createVaultSetupToken` returns the setup token as a string.
### Payer approval [#payer-approval]
If payer approval is required, the client SDK calls the payer approval flow. The approval flow takes the payer through PayPal Checkout.
## 7. Create payment token [#7-create-payment-token]
You can store a Merchant Customer ID aligned with your system to simplify the mapping of customer information within your system and PayPal when creating a payment token. This is an optional field that will return the value shared in the response.
Use an approved setup token to save the payer's payment method to the vault. Then, copy the sample request code to generate a payment token:
### Supported callback [#supported-callback-1]
| Callback | Returns | Description |
| ----------- | ----------------------------- | ------------------------------------------------------------------------------------------------------------------------------------------------------ |
| `onApprove` | `{ vaultSetupToken: string }` | The merchant gets the updated `vaultSetupToken` when the payment method is saved. The merchant must store the `vaultSetupToken` token in their system. |
### Client-side sample request [#client-side-sample-request]
Modify the following request to match your server endpoint and payload:
```javascript lineNumbers
window.paypal.Buttons({
onApprove: ({ vaultSetupToken }) => {
// Send the vaultSetupToken to your server
// for your server to generate a payment token
return fetch("example.com/create/payment/token", {
body: JSON.stringify({ vaultSetupToken }),
});
},
});
```
### Sample API request [#sample-api-request]
```bash lineNumbers
curl -v -k -X POST 'https://api-m.sandbox.paypal.com/v3/vault/payment-tokens'\
-H 'Content-Type: application/json'\
-H 'Authorization: Bearer ACCESS-TOKEN'\
-H 'PayPal-Request-Id: REQUEST-ID'\
-d '{
"payment_source": {
"token": {
"id": "4G4976650J0948357",
"type": "SETUP_TOKEN"
}
}
}'
```
#### Modify the code [#modify-the-code-6]
Copy the code sample and modify it as follows:
1. Change `ACCESS-TOKEN` to your sandbox access token.
2. Change `REQUEST-ID` to a unique alphanumeric set of characters such as a time stamp.
3. Use token as the payment source and complete the rest of the source object for your use case and business.
4. Use your setup token ID to pass in the payment source parameter and type as the `SETUP_TOKEN`.
#### Step result [#step-result]
A successful request results in the following:
* An HTTP response code of `200` or `201`. Returns `200` for an idempotent request.
* ID of the payment token and associated payment method information.
* HATEOAS links:
| Rel | Method | Description |
| -------- | -------- | -------------------------------------------------------------------------------- |
| `delete` | `DELETE` | Make a DELETE request to delete the payment token. |
| `self` | `GET` | Make a GET request to this link to retrieve data about the saved payment method. |
#### Sample API response [#sample-api-response]
```json lineNumbers
{
"id": "jwgvx42",
"customer": {
"id": "customer_4029352050"
},
"payment_source": {
"paypal": {
"description": "Description for PayPal to be shown to PayPal payer",
"usage_pattern": "IMMEDIATE",
"shipping": {
"name": {
"full_name": "Firstname Lastname"
},
"address": {
"address_line_1": "123 Main St",
"address_line_2": "Unit A",
"admin_area_2": "Anytown",
"admin_area_1": "CA",
"postal_code": "12345",
"country_code": "US"
}
},
"permit_multiple_payment_tokens": false,
"usage_type": "MERCHANT",
"customer_type": "CONSUMER",
"email_address": "payer@example.com",
"payer_id": "AJM9JTWQJCFTA"
}
},
"links": [
{
"rel": "self",
"href": "https://api-m.sandbox.paypal.com/v3/vault/payment-tokens/jwgvx42",
"method": "GET",
"encType": "application/json"
},
{
"rel": "delete",
"href": "https://api-m.sandbox.paypal.com/v3/vault/payment-tokens/jwgvx42",
"method": "DELETE",
"encType": "application/json"
}
]
}
```
## 8. Integrate back end [#8-integrate-back-end]
The following sample shows a complete back-end integration to save PayPal for purchase later:
```javascript lineNumbers
import "dotenv/config";
import express from "express";
const { PORT = 8888 } = process.env;
const app = express();
app.set("view engine", "ejs");
app.use(express.static("public"));
// Create setup token
app.post("/create/setup/token", async (req, res) => {
try {
// Use your access token to securely generate a setup token
// with an empty payment_source
const vaultResponse = await fetch("https://api-m.sandbox.paypal.com/v3/vault/setup-tokens", {
method: "POST",
body: JSON.stringify({ payment_source: { paypal: {}} }),
headers: {
Authorization: 'Bearer ${ACCESS-TOKEN}'',
"PayPal-Request-Id": Date.now(),
}
})
// Return the reponse to the client
res.json(vaultResponse);
} catch (err) {
res.status(500).send(err.message);
}
})
// Create payment token from a setup token
app.post("/create/payment/token/", async (req, res) => {
try {
const paymentTokenResult = await fetch(
"https://api-m.sandbox.paypal.com/v3/vault/payment-tokens",
{
method: "POST",
body: {
payment_source: {
token: {
id: req.body.vaultSetupToken,
type: "SETUP_TOKEN"
}
}
},
headers: {
Authorization: 'Bearer ${ACCESS-TOKEN}',
"PayPal-Request-Id": Date.now(),
}
})
const paymentMethodToken = paymentTokenResult.id
const customerId = paymentTokenResult.customer.id
await save(paymentMethodToken, customerId)
res.json(captureData);
} catch (err) {
res.status(500).send(err.message);
}
})
const save = async function(paymentMethodToken, customerId) {
// Specify where to save the payment method token
}
app.listen(PORT, () => {
console.log('Server listening at http://localhost:${PORT}/');
})
```
## 9. Integrate front end [#9-integrate-front-end]
The following sample shows how a full script to save PayPal might appear in HTML:
```javascript lineNumbers
```
## 10. Test your integration [#10-test-your-integration]
1. Render a PayPal Button with callbacks defined.
2. Select the button and complete the pop-up flow to approve saving the PayPal Wallet.
3. On your server, save the `vaultSetupToken` and the PayPal-generated `customer.id`. Associate these tokens with the designated payer.
4. Make a call on your server to swap your setup token for a payment token from the Payment Method Tokens API.
5. Save or use an existing `customer.id` depending on whether the payer is a first-time payer or returning payer:
1\. For a first-time payer, save the PayPal-generated `customer.id`. The `customer.id` identifies the payer and their saved payment methods.
2\. For a returning payer, use the PayPal-generated `customer.id` to swap the `setup-token` for a `payment-token`.
6. Save the `payment-token` for future use.
## Optional: Show saved payment methods [#optional-show-saved-payment-methods]
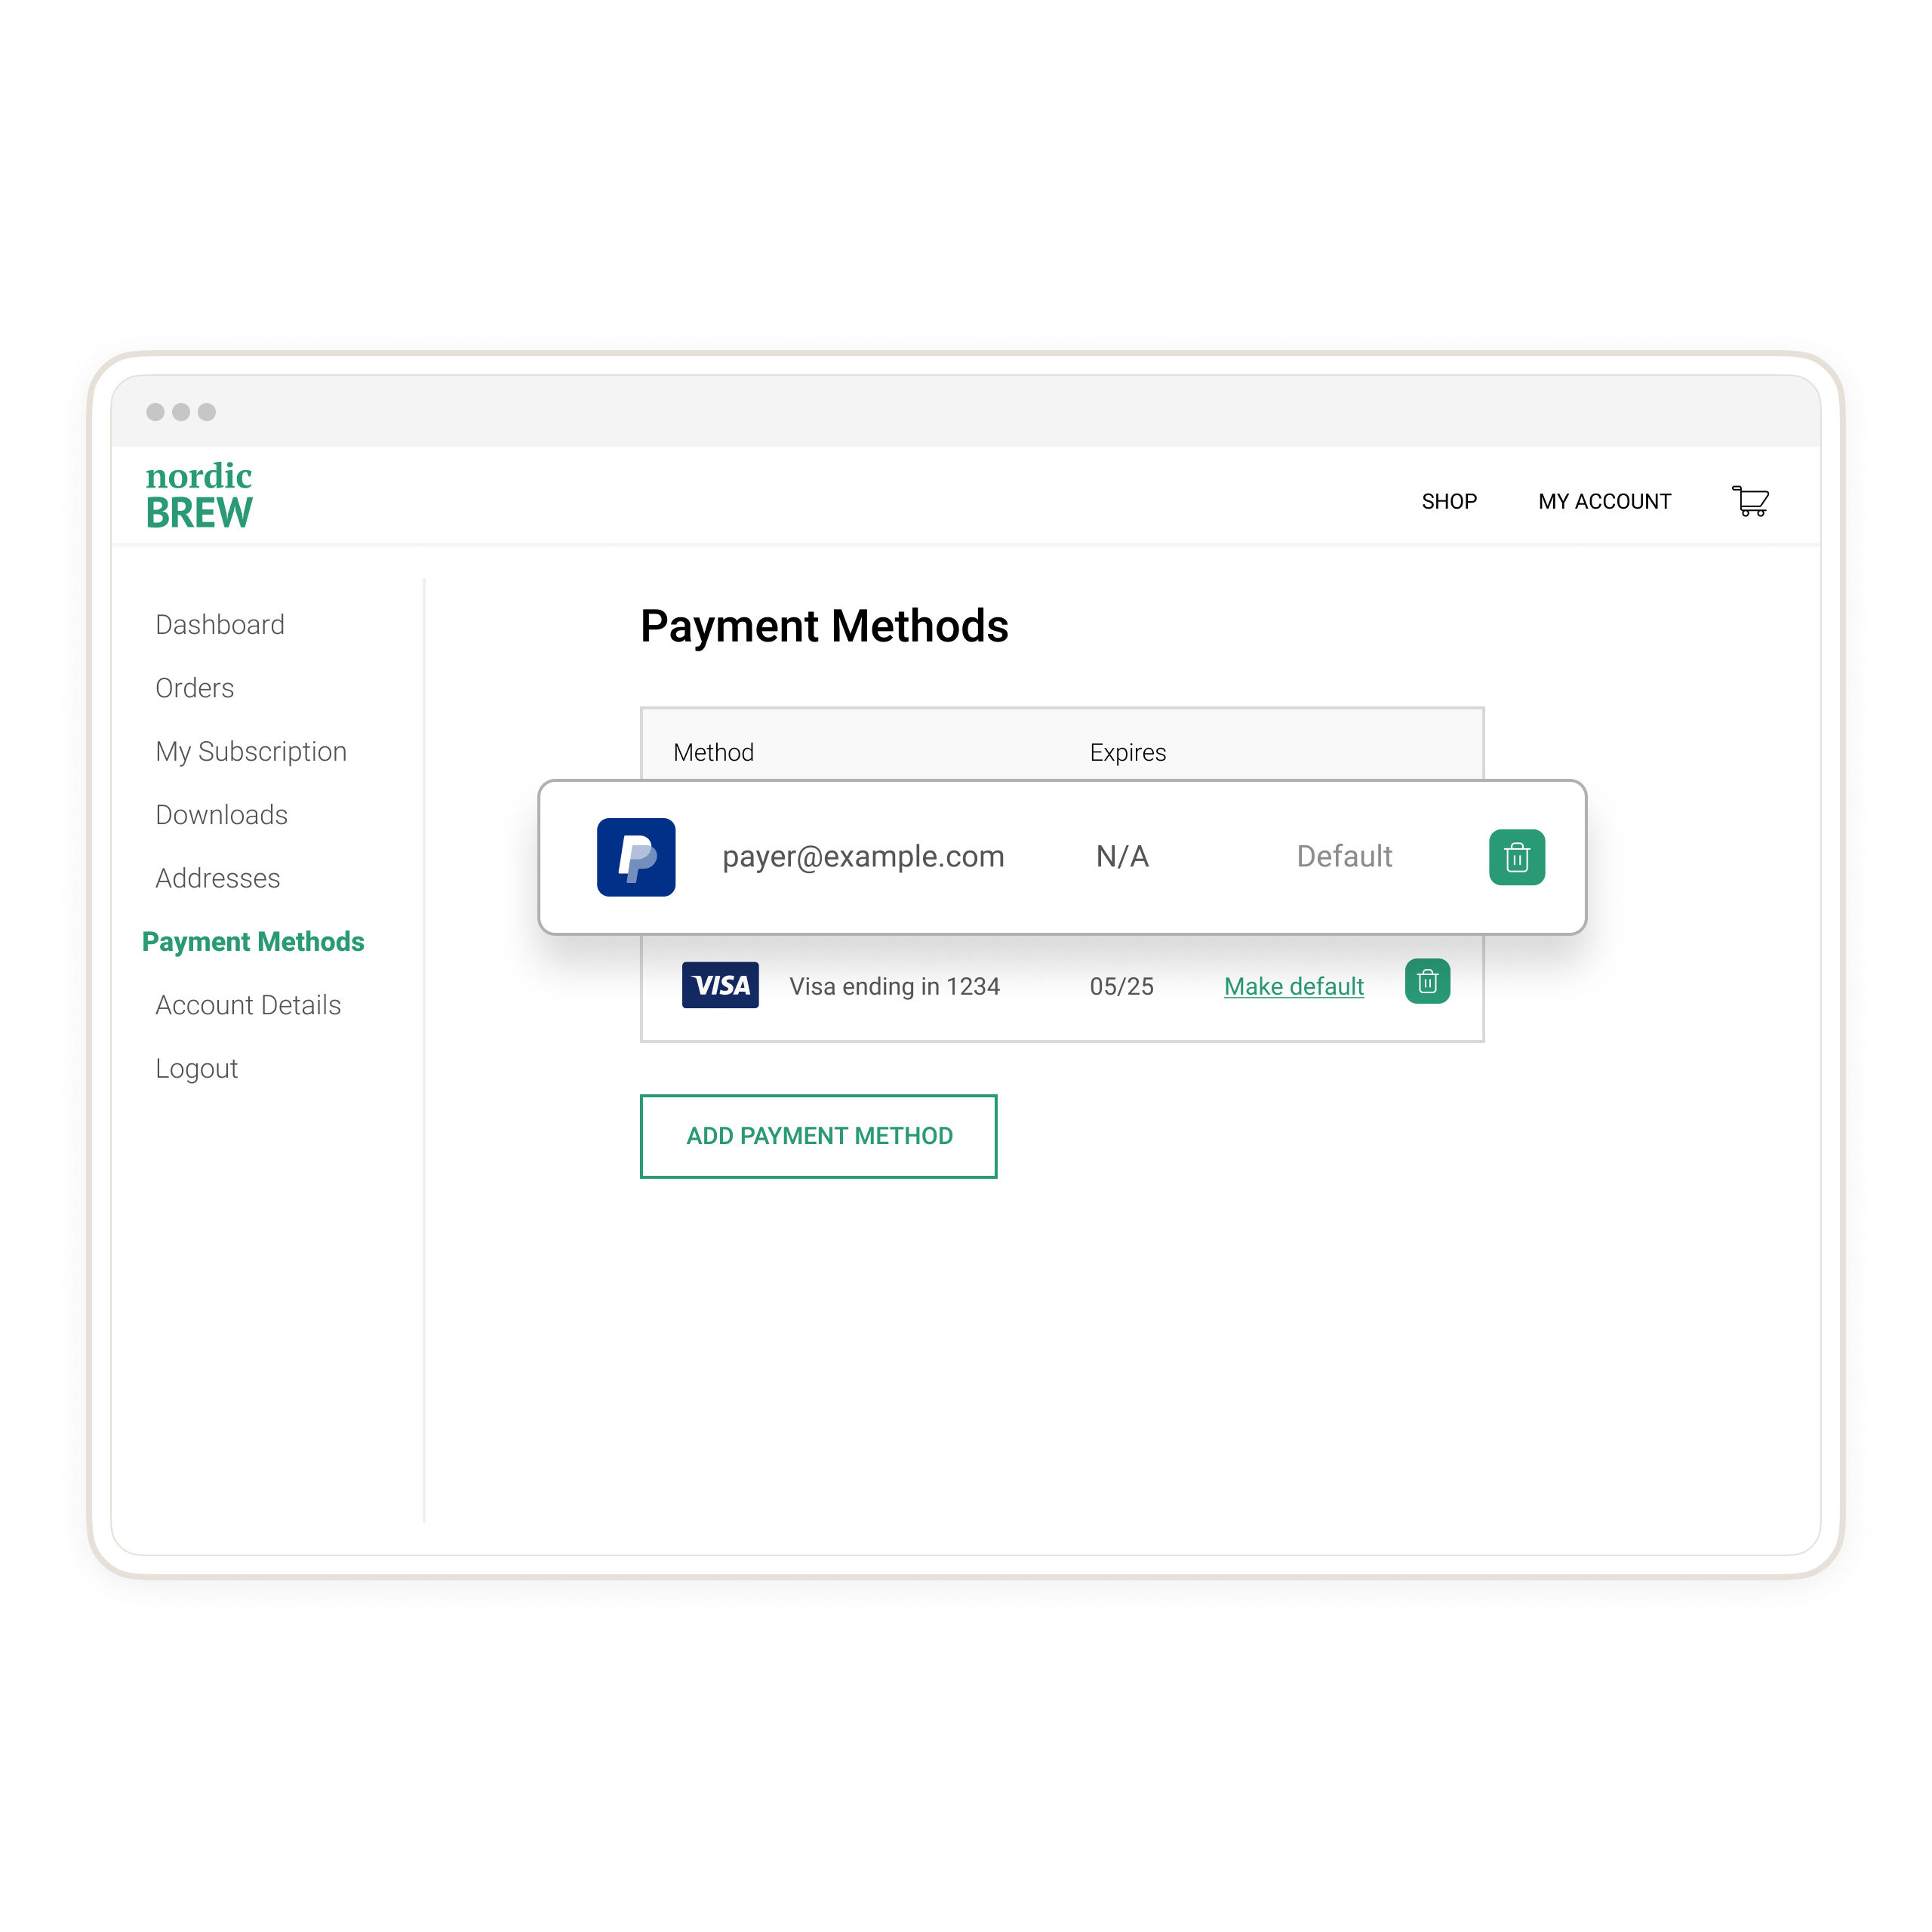
We recommend creating a page on your site where payers can see their saved payment methods as in the following example:
 ## Next step [#next-step]
[Go live](/api/rest/production/) with your integration.
## Next step [#next-step]
[Go live](/api/rest/production/) with your integration.