# Enable Pay Later messaging on Gene Commerce for Magento (Braintree) (/v5/platforms/pay-later/magento-2/genecommerce/es)
PayPal offers short-term, interest-free payments and installment payment options that buyers can use to buy now and pay later. You get paid up-front, and there are no additional costs.
Pay Later includes:
* Paga en 3 plazos, which eligible Spanish buyers can use to pay in three interest-free payments for purchases of €30 – €2,000.
* Paga en 6, 12 o 24 plazos, which eligible Spanish buyers can use to pay for purchases of €120 – €2,999, with terms of 6, 12, or 24 monthly payments.
## Know before you begin [#know-before-you-begin]
* Before you begin, learn more about [Pay Later offers](/pay-later/overview).
* The Gene Commerce for Magento plugin can only be used with Braintree. Before you enable Pay Later messaging, download the plugin from the [Magento Marketplace](https://marketplace.magento.com/paypal-module-braintree.html).
* Pay Later messaging is enabled for new merchants. If you're an existing merchant, enable the messaging.
* You are eligible to promote Pay in instalments if you are a PayPal merchant with a Spain-facing website and after making a one-time payment integration. Reference Transactions or Recurring Payment integrations are not eligible, as well as certain merchant categories (such as gambling or foreign exchange).
* While this option provides messaging that can be displayed on your website to help promote this feature to your customers, no additional content, wording, marketing, or other materials should be created by you to encourage use of this product.
## Enable the messaging and button [#enable-the-messaging-and-button]
To enable the Pay Later messaging and button, complete the following:
> **Note:** **Note:** Make sure you have the [Gene Commerce plugin](https://marketplace.magento.com/paypal-module-braintree.html) activated.
### Access the settings [#access-the-settings]
1. Login to the Magento admin portal.
2. Go to **Stores** > **Configuration**.
3. Go to **Sales** > **Payment Methods**.
4. Select **Configure** next to **Braintree Payments**.
### Configure the plugin [#configure-the-plugin]
1. Title: When buyers enter their payment information (credit/debit card), the title is how the payment method listed is featured.
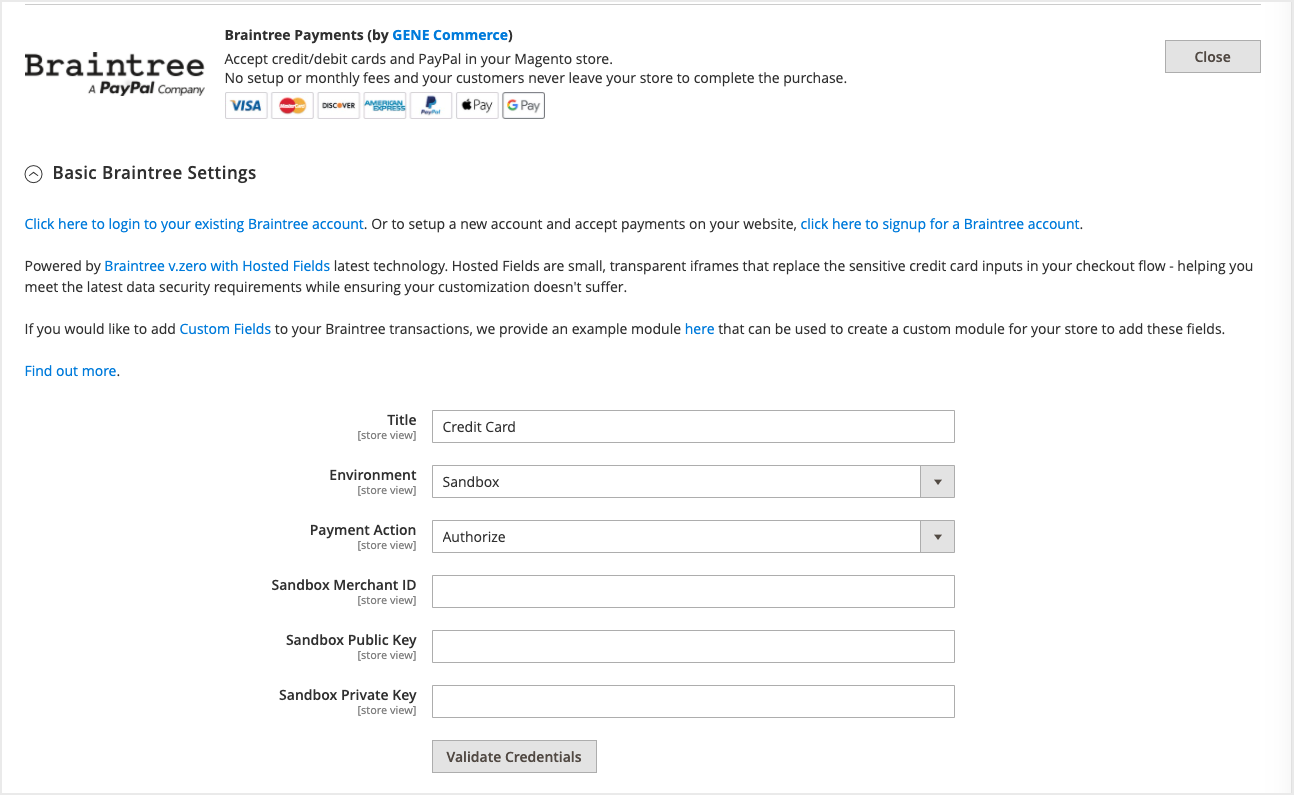 2. Environment: To test your plugin and settings, select **Sandbox**. To go live, select **Production**.
3. Payment Action: Choose between **Authorize** (authorize payment only, then delayed capture) or **Intent Sale** (immediate capture).
4. Enable **Card Payments**: Set to **Yes** to accept credit card payments through Braintree.
5. Enable **PayPal through Braintree**: Set to **Yes** to accept PayPal payments (including Pay Later) through Braintree.
6. Enable **PayPal Credit through Braintree**: Set to **Yes** to show the blue PayPal Credit button where eligible.
7. Enable **PayPal Pay Later through Braintree**: Set to **Yes** to accept Pay Later messaging in the UK.
8. Enable **Vault for Card Payments**: Set to **Yes** to vault credit card payment methods through Braintree.
2. Environment: To test your plugin and settings, select **Sandbox**. To go live, select **Production**.
3. Payment Action: Choose between **Authorize** (authorize payment only, then delayed capture) or **Intent Sale** (immediate capture).
4. Enable **Card Payments**: Set to **Yes** to accept credit card payments through Braintree.
5. Enable **PayPal through Braintree**: Set to **Yes** to accept PayPal payments (including Pay Later) through Braintree.
6. Enable **PayPal Credit through Braintree**: Set to **Yes** to show the blue PayPal Credit button where eligible.
7. Enable **PayPal Pay Later through Braintree**: Set to **Yes** to accept Pay Later messaging in the UK.
8. Enable **Vault for Card Payments**: Set to **Yes** to vault credit card payment methods through Braintree.
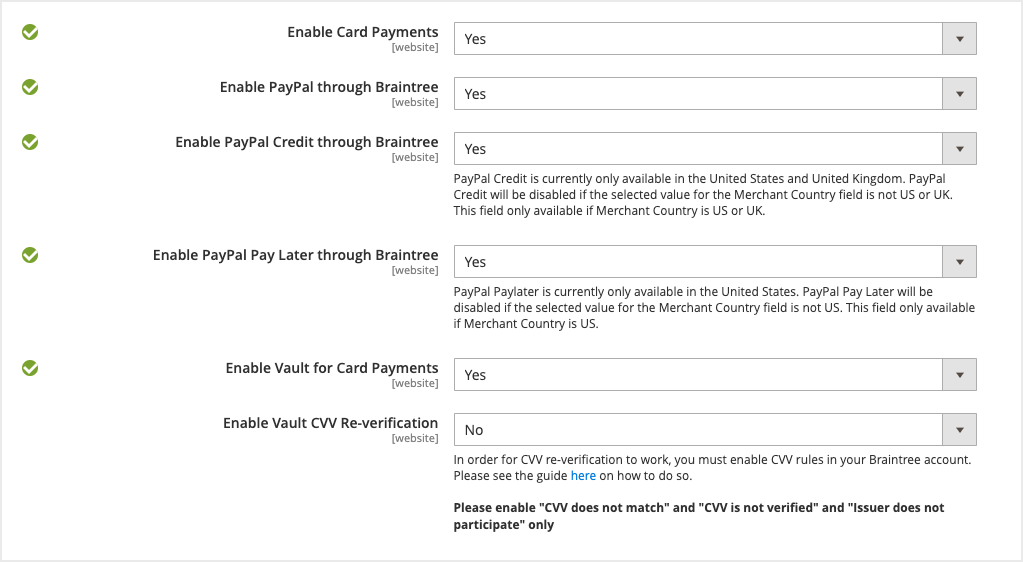 9. Enable **Vault CVV Re-verification**: When using a vaulted method, require usage of CVV.
> **Note:** **Note:** Do you have your [Braintree Credentials](https://articles.braintreepayments.com/control-panel/important-gateway-credentials)? Learn how to access your Merchant ID, public key, and private key.
## Advanced Braintree settings [#advanced-braintree-settings]
If you need to configure a Merchant Account ID, add that to **Merchant Account ID**.
## Configure PayPal buttons [#configure-paypal-buttons]
Go to **PayPal through Braintree** and change the **Customise** button to **Yes**. Customisable options include:
1. Shape and color
2. Location: Mini-cart and cart, checkout, or product page
## Pay Later messaging [#pay-later-messaging]
When **Pay Later** is set to **Yes**, messaging is enabled by default. It appears on the product pages, mini-cart and cart, and checkout pages.
9. Enable **Vault CVV Re-verification**: When using a vaulted method, require usage of CVV.
> **Note:** **Note:** Do you have your [Braintree Credentials](https://articles.braintreepayments.com/control-panel/important-gateway-credentials)? Learn how to access your Merchant ID, public key, and private key.
## Advanced Braintree settings [#advanced-braintree-settings]
If you need to configure a Merchant Account ID, add that to **Merchant Account ID**.
## Configure PayPal buttons [#configure-paypal-buttons]
Go to **PayPal through Braintree** and change the **Customise** button to **Yes**. Customisable options include:
1. Shape and color
2. Location: Mini-cart and cart, checkout, or product page
## Pay Later messaging [#pay-later-messaging]
When **Pay Later** is set to **Yes**, messaging is enabled by default. It appears on the product pages, mini-cart and cart, and checkout pages.
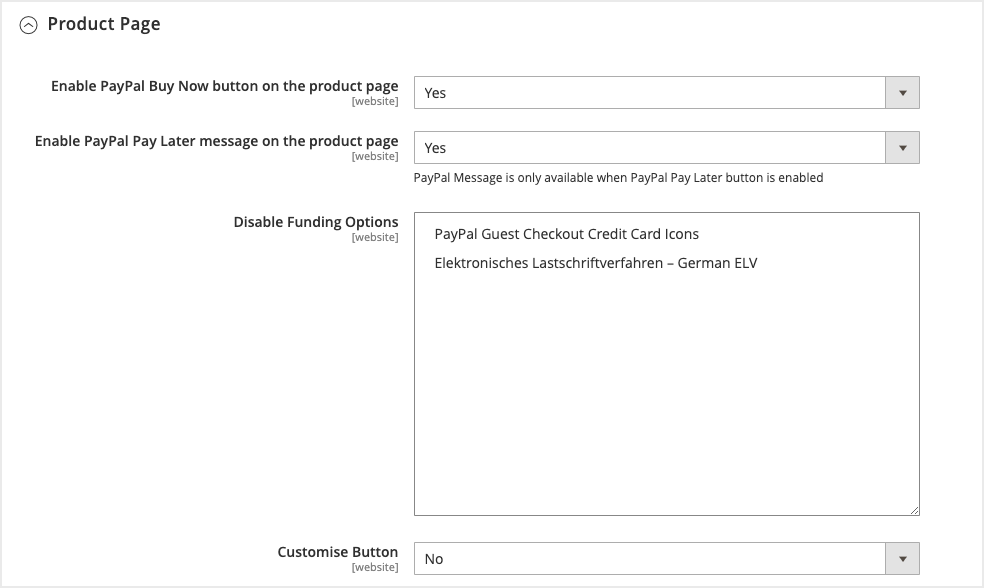 Messaging can be toggled on and off. To adjust this, go to **PayPal through Braintree** > **Product Page / Mini-Cart & Cart / Checkout Page** > **Enable PayPal Pay Later message on product page**.
## See also [#see-also]
[See the Magento documentation](https://marketplace.magento.com/paypal-module-braintree.html) to learn about eligibility and technical specifications for Pay Later offers through Braintree Payments.
[Return to Commerce Platforms](/v5/pay-later/commerce-platforms)
Messaging can be toggled on and off. To adjust this, go to **PayPal through Braintree** > **Product Page / Mini-Cart & Cart / Checkout Page** > **Enable PayPal Pay Later message on product page**.
## See also [#see-also]
[See the Magento documentation](https://marketplace.magento.com/paypal-module-braintree.html) to learn about eligibility and technical specifications for Pay Later offers through Braintree Payments.
[Return to Commerce Platforms](/v5/pay-later/commerce-platforms)