On this page
No Headings
Last updated: June 4, 2026
Note: Accelerated checkout is a limited release solution. Features may change between limited release and general availability.
This integration guide specifies how a partner or merchant can integrate accelerated checkout version 0.6 using the Braintree SDK into their site.
The following diagram depicts the integration changes required to enable the accelerated checkout experience.
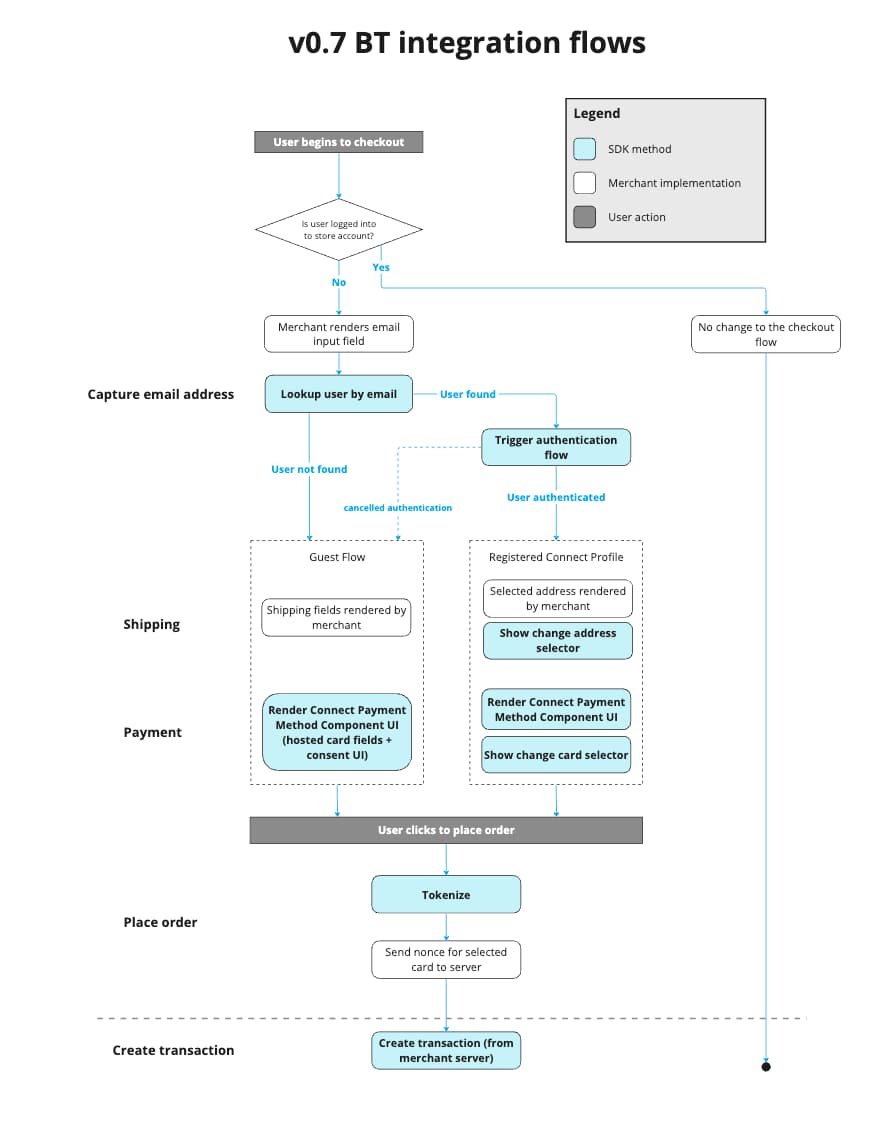
To instantiate the Braintree client SDK and the Connect components, generate an access token using a server-side call, then pass the token into the SDK.
For help on generating an access token, see Set Up Your Server.
Important: Skip this step if you are using hosted card fields.
A Content Security Policy mitigates cross-site scripting and other attacks in your web browser. By limiting the origins of resources that are loaded on your page, you can maintain tighter control over any potentially malicious code. While browser support is relatively limited, implement a CSP when available. For a list of supported browsers, see Can I use - Content Security Policy.
Add the following directive to your policy, in addition to Braintree's directives:
frame-src*.paypal.com*.paypal.comConnect is initialized by calling braintree.connect.create and by passing a configuration object. Pass the device data when initializing Connect to prevent fraudulent access to Connect profiles.
To collect device data, instantiate the Braintree client and the Braintree data collector, passing the results of those methods into the configuration object that is passed into braintree.connect.create.
Note: Update the script tags using Braintree SDK modules to use version 3.95.0-connect-alpha.11.
Sample code: HTML
<script src="https://assets.braintreegateway.com/web/3.95.0-connect-alpha.12/js/client.min.js"></script>
<script src="https://assets.braintreegateway.com/web/3.95.0-connect-alpha.12/js/connect.min.js"></script>
<script src="https://assets.braintreegateway.com/web/3.95.0-connect-alpha.12/js/data-collector.min.js"></script>
Sample code: JavaScript
const clientInstance = await braintree.client.create({
  authorization: "<YOUR CLIENT TOKEN>"
});
const dataCollectorInstance = await braintree.dataCollector.create({
  client,
  riskCorrelationId: "<SESSION ID>"
});
const deviceData = dataCollectorInstance.deviceData;
// See Reference Types > Style Options for a full set of supported styles
const styles = {
  input: {
    "borderRadius": "15px"
  },
  toggle: {
    colorPrimary: "darkorange",
    colorSecondary: "#222222"
  },
  text: {
    body: {
      color: "#222222",
      fontSize: "12px"
    }
  }
};
const connect = await braintree.connect.create({
  authorization: "<YOUR CLIENT TOKEN>",
  client: clientInstance,
  deviceData: deviceData,
  styles: styles
});
const identity = connect.identity;
const profile = connect.profile;
If you are adding Connect to your existing Braintree integration, and you are already initializing braintree.client and braintree.dataCollector, you can reuse the same instance of those objects.
If you are sending analytics events using the PayPal Analytics API, pass the same value to riskCorrelationId as the one you pass under tracking_visit_id so that the events across the API and SDK can be correlated.
The connect namespace contains a map of Connect features names to their corresponding UI Components and functions.
To set up your integration to work with the Braintree sandbox account, see Testing your integration.
Set the locale after initializing the Connect component to specify the locale in which the Connect components should be rendered. Connect supports the following languages:
en_us (default)es_usfr_uszh_usSample code - Specifying the locale
connect.setLocale("en_us");Collect the email address from the payer so that you can determine if the payer has a store account or is a PayPal or Connect member. Because you'll share the payer's email address with PayPal, inform the payer about it by displaying the Connect watermark below the email input field.
<input type="text" id="email" />
<!-- add a div where the watermark will be rendered -->
<div id="watermark-container"></div>const connectWatermark = ConnectWatermark({includeAdditionalInfo: true}).render('#watermark-container');After collecting the email address, call identity.lookupCustomerByEmail(PAYER_EMAIL) to determine whether the email is associated with a Connect profile or belongs to a PayPal member.
const {
  customerContextId
} = await identity.lookupCustomerByEmail(document.getElementById("email").value);
if (customerContextId) {
  // Email is associated with a Connect profile or a PayPal member
} else {
  // No profile found for this email address. This is a guest payer
}
If the payer is logged into a store account, continue to render the existing checkout flow for logged-in users. For store guest members, render the accelerated checkout flow.
The checkout flow varies based on whether the payer has a Connect profile. Guest users – those who do not have a Connect profile –can create a Connect profile as part of the checkout flow. Remembered users – those with a Connect profile – can select a card and address from their profile for faster checkout.
This section of the integration guide is split into guest payers and Connect payers.
For guest payers, collect shipping and payment information as part of the checkout flow.
The ConnectCardComponent is a ready-made payment UI that offers a quick and easy way to securely accept payments. The payer can choose to create a Connect profile after they complete the transaction. You can customize the styling of the component to match the style on your site.
<!-- Div container for the payment component -->
<div id="payment-container"></div>
<!-- Submit button -->
<button id="submit-button">Submit Order</button>const submitButton = document.getElementById("submit-button");
const fields = {
phoneNumber: {
prefill: "1234567890"
},
cardholderName: {} // optionally pass this to show the card holder name
};
const connectCardComponent = await connect
.ConnectCardComponent({ fields })
.render("#payment-container");
// event listener when the customer clicks to place the order
submitButton.addEventListener("click", async () => {
const { nonce } = await connectCardComponent.tokenize({
billingAddress: {
streetAddress: "2211 North 1st St",
locality: "San Jose",
region: "CA",
postalCode: "95131",
countryCodeAlpha2: "US" // you can also use the countryCodeAlpha3
// or countryCodeNumeric formats
}
});
// Send the nonce and previously captured device data to server
// to complete checkout
});To complete the transaction, send the nonce to your server and create a transaction with it.
Authenticate Connect payers to retrieve their profile information.
To trigger the authentication, you need to pass the customerContextId that is returned from the lookupCustomerByEmail(email) call to triggerAuthenticationFlow().
Triggering the authentication presents the payer with a screen to authenticate themselves by entering a one-time password that is sent to their registered mobile phone number.
Sample code: Authentication
const {
  authenticationState,
  profileData
} = await identity.triggerAuthenticationFlow(customerContextId);
if (authenticationState === "succeeded") {
  const name = profileData.name;
  const shippingAddress = profileData.shippingAddress;
  const card = profileData.card;
} else {
  // authentication failed or canceled by the customer
};
The triggerAuthenticationFlow() method returns AuthenticatedCustomerResult. You can use the authenticationState in the response to determine if the payer has successfully authenticated themselves. The returned object contains the payer's name, default shipping address and default card.
If the payer fails authentication or declines to authenticate, you render the guest flow instead. After the payer is authenticated, retrieve their shipping address and payment methods.
Shipping addresses
The merchant is expected to render the shipping address from the profile on the page. The payer may have more than one shipping address in their profile, or may want to enter a new one. Render a button to allow the payer to change the shippping address.
Call the profile.showShippingAddressSelector() method when the payer selects the 'Change Shipping Address' button. This presents the payer with a list of their addresses for them to pick from (and enables them to enter a new one). When the payer makes a selection, the method returns the selected address. If they cancel without changing the selection, selectionChanged is set to false, and selectedAddress is set to null.
Sample code: Change address
<!-- Change address button -->
<button id="change-address-button">Change Address</button>
const changeAddressButton = document.getElementById("change-address-button");
changeAddressButton.addEventListener("click", async () => {
const {
selectionChanged,
selectedAddress
} = await profile.showShippingAddressSelector();
if (selectionChanged) {
// selectedAddress contains the new address
} else {
// selection modal was dismissed without selection
}
});Payment
The merchant is expected to render the card from the profile on the page.
The payer may have more than one card on their profile, or may want to enter a new one. Render a button to allow the payer to change the card.
Call the profile.showCardSelector() method when the payer clicks on the changeCardButton. This presents the payer with a list of their cards for them to pick from (and enables them to enter a new one). When the payer makes a selection, the method returns the selected card. If they cancel without changing the selection, selectionChanged is set to false, and selectedCard is set to null.
Sample code: Change payment method
changeCardButton.addEventListener('click', async ()=> {
  const { selectionChanged, selectedCard } = await profile.showCardSelector();
  if (selectionChanged) {
    // selectedCard contains the new card
  } else {
    // selection modal was dismissed without selection
  }
})
The card object contains a nonce representing the card. To complete the order, send the nonce to your server and create an order with it.
On your server, you need to create a transaction using either the Braintree GraphQL API or one of the server-side SDKs. While creating the transaction, ensure to pass the device data to ensure higher authorization rates.
To test your integration in the sandbox environment, set the following local storage variable before initializing the Connect component:
changeCardButton.addEventListener('click', async ()=> {
window.localStorage.setItem("axoEnv", "sandbox");