Upgrade your Checkout integration
Upgrade your PayPal integration with the JavaScript SDK for dynamic payment buttons, pop-up flows, and better control over button styles.
Last updated: September 14, 2026
CURRENT
STANDARD
JavaScript SDK v5
Copy / Export
If you have previous checkout integrations, such as Express Checkout or checkout.js, PayPal recommends upgrading your integration with the JavaScript SDK.
The JavaScript SDK has the following benefits:
- Dynamically renders payment buttons instead of using static images.
- Launches payment flow in a pop-up window instead of redirecting to a new page.
- Supports greater control over payment button styles.
If you want to continue offering Pay Later at checkout, integrate Billing With Purchase, instead. It has the same features as Billing Agreement, but works with the payment options you already have.
Know before you code
Get sandbox account information
Complete the steps in Get started to get the following sandbox account information from the Developer Dashboard:
- Your client ID. Use your client ID when adding payment options to your website.
- Your personal and business sandbox accounts. Use sandbox accounts to test checkout options.
Explore PayPal APIs with Postman
You can use Postman to explore and test PayPal APIs. Learn more in our Postman guide.
Payer experience
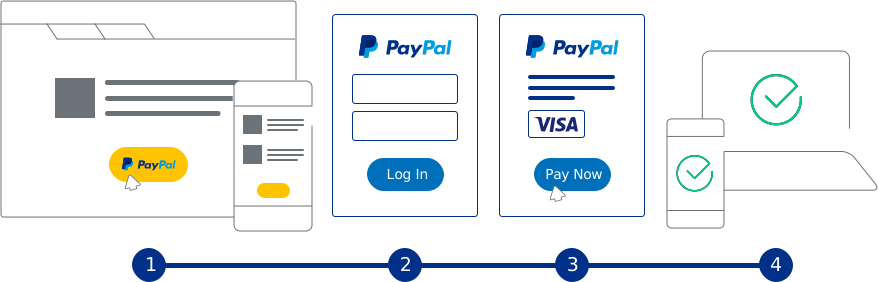
After the payer authorizes the transaction, the payment buttons call your JavaScript callback rather than redirecting the payer to a return URL.
The payer takes the following actions:
- Selects a payment button.
- Logs into PayPal.
- Approves the transaction on PayPal.
- Returns to your site where you show the payer a confirmation page.
1. Add payment buttons
Add the JavaScript SDK and payment buttons to your page.
<!DOCTYPE html>
<html>

<head>
    <meta name="viewport" content="width=device-width, initial-scale=1">
    <!-- Ensures optimal rendering on mobile devices. -->
</head>

<body>
    <script src="https://www.paypal.com/sdk/js?client-id=YOUR_CLIENT_ID">
        // Replace YOUR_CLIENT_ID with your sandbox client ID
    </script>
    <div id="paypal-button-container"></div>
</body>

</html>
Modify the code
- Copy the sample code and paste it into the code of your checkout page.
- Replace
YOUR_CLIENT_IDwith your client ID.
2. Update script
Update the script tag to pass the parameters you want for your integration, including:
- The currency of the transaction.
- The intent of the transaction.
- Whether the transaction has a Pay Now or a Continue button.
- Whether the transaction saves payment methods to the vault.
Example script:
<script src="https://www.paypal.com/sdk/js?client-id=YOUR_CLIENT_ID¤cy=EUR&intent=order&commit=false&vault=true">
</script>3. Set up transaction
When your payer selects the PayPal button, the script calls a createOrder() function that you define. In this function, return a promise for a token, payment ID, or order ID from the Orders v2 API.
Note: The createOrder() function in the JavaScript SDK integration replaces the payment() function in the checkout.js script.
Migrate the actions.payment.create() call to a server-side integration pattern with the create order endpoint.
API endpoint: Create order
<!DOCTYPE html>
<html>
<head>
<meta name="viewport" content="width=device-width, initial-scale=1">
</head>
<body>
<!-- Replace "TEST" with your own sandbox Business account app client ID -->
<script src="https://www.paypal.com/sdk/js?client-id=TEST¤cy=USD"></script>
<!-- Set up a container element for the button -->
<div id="paypal-button-container"></div>
<script>
paypal.Buttons({
// Order is created on the server and the order id is returned
createOrder() {
return fetch("/my-server/create-paypal-order", {
method: "POST",
headers: {
"Content-Type": "application/json",
},
// Use the "body" param to optionally pass additional order information
// such as product SKUs and quantities
body: JSON.stringify({
cart: [{
sku: "YOUR_PRODUCT_STOCK_KEEPING_UNIT",
quantity: "YOUR_PRODUCT_QUANTITY",
}, ],
}),
})
.then((response) => response.json())
.then((order) => order.id);
}
}).render('#paypal-button-container');
</script>
</body>
</html>4. Finalize payment
After your payer logs in to PayPal and approves the transaction, the script calls the onApprove() function to finalize the transaction.
Note: For server-side REST integrations, the onAuthorize() function from the checkout.js script is replaced by the onApprove() function in the JavaScript SDK integration.
Migrate the actions.payment.execute() to a server-side integration with the Orders Capture endpoint. For more information, see Set up standard payments.
API endpoint: Orders capture
<!DOCTYPE html>
<html>
<head>
<meta name="viewport" content="width=device-width, initial-scale=1">
</head>
<body>
<!-- Replace "TEST" with your own sandbox Business account app client ID -->
<script src="https://www.paypal.com/sdk/js?client-id=TEST¤cy=USD"></script>
<!-- Set up a container element for the button -->
<div id="paypal-button-container"></div>
<script>
paypal.Buttons({
// Finalize the transaction on the server after payer approval
onApprove(data) {
return fetch("/my-server/capture-paypal-order", {
method: "POST",
body: JSON.stringify({
orderID: data.orderID
})
})
.then((response) => response.json())
.then((orderData) => {
// Successful capture! For dev/demo purposes:
console.log('Capture result', orderData, JSON.stringify(orderData, null, 2));
const transaction = orderData.purchase_units[0].payments.captures[0];
alert(`Transaction ${transaction.status}: ${transaction.id}\n\nSee console for all available details`);
// When ready to go live, remove the alert and show a success message within this page. For example:
// const element = document.getElementById('paypal-button-container');
// element.innerHTML = '<h3>Thank you for your payment!</h3>';
// Or go to another URL: window.location.href = 'thank_you.html';
});
}
}).render('#paypal-button-container');
</script>
</body>
</html>5. Fix deprecations
For checkout.js integrations, upgrade the deprecated integration to the current integration. Check your browser's JavaScript console for errors to debug issues.
| Deprecated integration | Upgrade to integration |
|---|---|
Add a script that points to paypalobjects.com/api/checkout.js. | Add a script that points to paypalobjects.com/sdk/js.See Set up standard payments. |
Add a client-side call to paypal.Button.render({}, '#el');. | Add a client-side call to paypal.Buttons({}).render('#el');.See Set up standard payments. |
Add the payment() callback. | Add the createOrder() callback.See Set up standard payments. |
Add the actions.payment.create() call. | Add a server-side call to /v2/checkout/orders.See Set up standard payments. |
Add the onAuthorize() callback. | Add the onApprove() callback.See Set up standard payments. |
Add the actions.payment.execute() call. | Add a server-side call to /v2/checkout/orders/:id/capture.See Set up standard payments. |
Set style.size to small, medium, large, and responsive. | Set the container element to your preferred size. See Customize the payment buttons. |
Pass the client option in the paypal.Button.render() call. | Pass client-id=xyz to the /sdk/js script tag.See Set up standard payments. |
Pass the commit: true or commit: false option in the paypal.Button.render() call. | Pass commit=true or commit=false to the /sdk/js script tag.See Commit. |
Pass the env option in the paypal.Button.render() call. | Pass client-id=xyz to the /sdk/js script tag and auto-detect the environment.See Client ID. |
Pass the locale option in the paypal.Button.render() call. | Pass locale=xx_XX to the /sdk/js script tag.See Locale. |
Pass the style.fundingicons option in the paypal.Button.render() call. | The card buttons display automatically in the default integration. See Set up standard payments. |
Pass the funding.allowed option in the paypal.Button.render() call. | PayPal automatically decides on the optimal buttons to show to your buyers. See Set up standard payments. |
Pass the funding.disallowed option in the paypal.Button.render() call. | Pass disable-funding or disable-card to the /sdk/js script tag.See Disable Funding and Disable card. |
Use paypal.request, paypal.request.get, paypal.request.post. | Use the built-in browser fetch function, with a polyfill or your AJAX library of choice.See Fetch. |
Use paypal.Promise. | Use the built-in browser Promise, with a polyfill or your promise library of choice.See Promise. |
| When you set up transaction, pass return and cancel URLs. Call actions.redirect() in onAuthorize and onCancel. | When you set up transaction, do not pass return and cancel URLs. Call window.location.href = 'done_page.html' in onApprove.Call window.location.href = 'cancel_page.html' in onCancel.See Redirect. |
Go live
Go live
Move from PayPal's production environment to go live.