On this page
No Headings
Last updated: June 17, 2026
Follow these steps to add the PayPal Mobile Checkout SDK to your mobile app
Complete the steps in Get started to set up your PayPal account, client ID, and sandbox emails for testing.
To integrate the SDK, complete the steps on this page, then navigate to Server-side integration
The PayPal Mobile Checkout SDK uses scopes from the Identity API.
Note: Before going live, PayPal must review your app to approve the sharing of customer data. The review automatically starts once you select the Log in with PayPal checkbox on your Developer Dashboard (Step 3 of Enable the SDK).
The sandbox app reviews are typically complete within 2 hours. The live app reviews take 2 to 10 business days.
Log into your PayPal Developer Dashboard.
Select your app from the My Apps & Credentials page on the Developer Dashboard.
Under Sandbox App Setting, select the Log in with PayPal checkbox. Select the Log in with PayPal checkbox and the Full name and Email checkboxes found within the Advanced settings. These are the scopes of the Identity API.
The SDK is enabled.
Add the SDK to your app using your preferred installation method:
Note: For the easiest installation, we recommend using CocoaPods.
Add the following to your Podfile:
pod 'PayPalCheckout'
Run pod install or pod update.
Add the following to your Cartfile:
binary "https://github.com/paypal/paypalcheckout-ios/raw/main/Carthage/PayPalCheckout.json"
Download the binaries using the following command:
carthage update --platform iOS
Link the .framework file from the /Carthage/Build/iOS directory into your specified target:
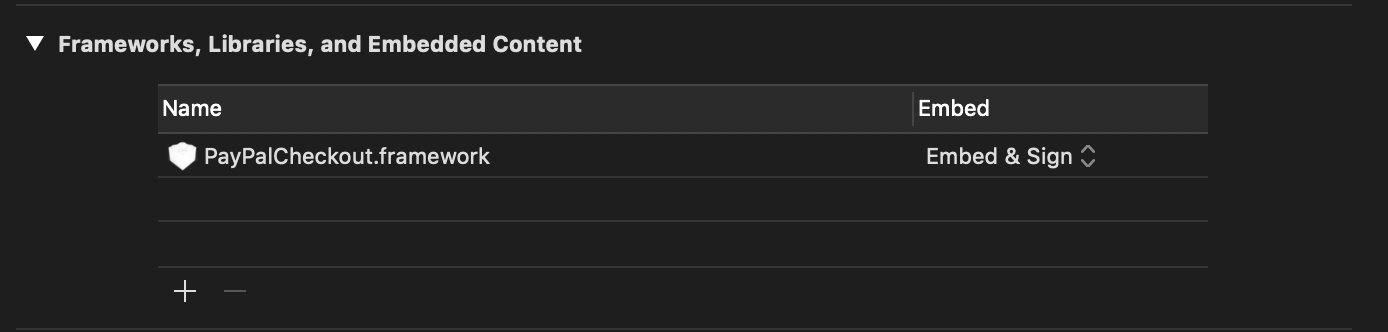
Note: This embeds
PayPalCheckout.
If you're working in the context of another package, add the latest SDK version: 
Package.swift file:
let package = Package(
    name: "MyPackage",
    dependencies: [
        .package(url: "https://github.com/paypal/paypalcheckout-ios.git", from: "x.x.x"),
    ],
    ...
)
If you're adding the SDK into a standalone project, follow Apple's package integration guide, while specifying https://github.com/paypal/paypalcheckout-ios.git as the source Git repository. The changelog provides details on the most recent versions.
If you prefer to install the SDK without using a package manager, retrieve the framework and xcframework binaries from the release tags in our GitHub repository.
Create an instance of CheckoutConfig, and pass it to the top level Checkout type of the SDK. Once that is completed, the SDK is configured and your app is ready to add payment buttons that will be displayed on your app.
Configures the PayPal Mobile Checkout SDK in your app. Once that is completed, the SDK is configured and your app is ready to add payment buttons that will be displayed on your app.
Providing applicationContext allows for customizing different properties, such as shipping preference, payment method preference, brand name, user action, and more.
Swift - /limited-release/paypal-mobile-checkout/initialize-sdk/
func configurePayPalCheckout() {
    let config = CheckoutConfig(
        clientID: "YOUR_CLIENT_ID",
        createOrder: { action in
        let orderRequest = OrderRequest.init(
          intent: .capture,
          purchaseUnits: [
            PurchaseUnit(
                amount: PurchaseUnit.Amount(
                    currencyCode: .usd, value: "10.00"
                    )
                )
          ],
          applicationContext: OrderApplicationContext(userAction: .payNow)
        )
        action.create(order: orderRequest)
        }
      },
        environment: .sandbox
    )
    Checkout.set(config: config)
}
Obj-C - /limited-release/paypal-mobile-checkout/initialize-sdk/
PPCheckoutConfig *config = [
    [PPCheckoutConfig alloc] initWithClientID:'Client-ID';
createOrder:^(PPCCreateOrderAction*action) {
          PPCPurchaseUnitAmount *purchaseUnitAmount = [
            [PPCPurchaseUnitAmount alloc] initWithCurrencyCode:PPCCurrencyCodeUsd
              value:@"5.00"
              breakdown:nil;
              value:@"2.00"
            ]
          ];
PPCPurchaseUnit*purchaseUnit = [
            [PPCPurchaseUnit alloc] initWithAmount:purchaseUnitAmount
            referenceId:nil
            payee:nil
            paymentInstruction:nil
            purchaseUnitDescription:nil
            customId:nil
            invoiceId:nil
            softDescriptor:nil
            items:nil
            shipping:shippingOptions
          ];
          PPCOrderRequest *order = [
            [PPCOrderRequest alloc] initWithIntent:PPCOrderIntentAuthorize
            purchaseUnits:@[purchaseUnit]
            payer:nil
            applicationContext:nil
          ];
          [action createWithOrder:order completion:nil];
        }
    [PPCheckoutConfig environment:PPCEnvironmentSandbox];
    [PPCheckout setConfig:config];
];
You have two options to complete your integration:
| Integration type | Use case |
|---|---|
| Client-side integration | If want the simplest integration, continue with the sample code below for a client-side integration. Client-side integrations don't require you to create your own backend infrastructure. |
| Server-side integration | Chose a server-side integration if you want more control over your integration. Server-side integrations require you to have your own backend infrastructure. |
This sample code creates an order of a single item for $10.00 USD. When the buyer selects Pay Nowon a payment sheet, the onApprove callback invokes.
Swift - /limited-release/paypal-mobile-checkout/initialize-sdk/
import PayPalCheckout
class ViewController: UIViewController {
    override func viewDidLoad() {
        super.viewDidLoad()
        configurePayPalCheckout()
        addPayPalButtons()
    }
    // MARK: PayPal Checkout
    private func configurePayPalCheckout() {
        Checkout.setCreateOrderCallback { action in
            let amount = PurchaseUnit.Amount(currencyCode: .usd, value: "10.00")
            let purchaseUnit = PurchaseUnit(amount: amount)
            let order = OrderRequest(intent: .capture, purchaseUnits: [purchaseUnit])
            action.create(order: order)
        }
        Checkout.setOnApproveCallback { approval in
              print("Order ID: (approval.data.orderId)")
            }
        }
    }
    private func addPayPalButtons() {
        let container = PaymentButtonContainer()
        view.addSubview(container)
        NSLayoutConstraint.activate(
            [
                container.centerYAnchor.constraint(equalTo: view.centerYAnchor),
                container.centerXAnchor.constraint(equalTo: view.centerXAnchor)
            ]
        )
    }
}
Obj-C - /limited-release/paypal-mobile-checkout/initialize-sdk/
PPCheckoutConfig *config = [
    [PPCheckoutConfig alloc] initWithClientID:'Client-ID';
createOrder:^(PPCCreateOrderAction*action) {
          PPCPurchaseUnitAmount *purchaseUnitAmount = [
            [PPCPurchaseUnitAmount alloc] initWithCurrencyCode:PPCCurrencyCodeUsd
              value:@"5.00"
              breakdown:nil;
              value:@"2.00"
            ]
          ];
          PPCPurchaseUnit*purchaseUnit = [
            [PPCPurchaseUnit alloc] initWithAmount:purchaseUnitAmount
            referenceId:nil
            payee:nil
            paymentInstruction:nil
            purchaseUnitDescription:nil
            customId:nil
            invoiceId:nil
            softDescriptor:nil
            items:nil
            shipping:shippingOptions
          ];
          PPCOrderRequest *order = [
            [PPCOrderRequest alloc] initWithIntent:PPCOrderIntentAuthorize
            purchaseUnits:@[purchaseUnit]
            payer:nil
            applicationContext:nil
          ];
          [action createWithOrder:order completion:nil];
        }
        onApprove:^(PPCApproval*approval) {
          NSLog(@"Order ID:" %@, approval.data.orderId);
    }
    [PPCheckoutConfig environment:PPCEnvironmentSandbox];
    [PPCheckout setConfig:config];
    // Display the container
[[self view] addSubview: container];
[NSLayoutConstraint activateConstraints: @[
    [[container centerYAnchor] constraintEqualToAnchor: self.view.centerYAnchor],
    [[container centerXAnchor] constraintEqualToAnchor: self.view.centerXAnchor],
]];
];
Note: For more information about creating orders, including additional parameters that can be submitted, view Orders REST API.
You can now test purchases.
111111 as the one-time passcode.You can use an Android App Link registered within the Developer Console to handle SDK redirects.
Alternatively, you can use your application ID (typically referenced via BuildConfig.APPLICATION_ID) and register your return URL with ://paypalpay as the suffix. For example, if your application ID is com.paypal.app, input com.paypal.app://paypalpay as the return URL.
The return URL in the Developer Dashboard and the SDK must match exactly.
The application ID and return URL must use lower case letters. The return URL is passed to the SDK via an intent filter and host name matching in the Android framework is case-sensitive
Note: If you change the return URL in the Developer Dashboard, PayPal must review your app again. The review period automatically begins any time the return URL changes.
Select the Full Name and Email checkboxes found within the Advanced Settings. These are scopes of the Identity API.
The SDK is enabled.
Prepare your app as follows:
android.permission.INTERNET permission in the AndroidManifest.xml file of your application as follows: <manifest xmlns:android="http://schemas.android.com/apk/res/android">
<uses-permission android:name="android.permission.INTERNET" />
...
</manifest>
Add the required repositories to the build.gradle file of your project root.
allprojects {
    repositories {
        mavenCentral()
        // This private repository is required to resolve the Cardinal SDK transitive dependency.
        maven {
            url  "https://cardinalcommerceprod.jfrog.io/artifactory/android"
            credentials {
                // Be sure to add these non-sensitive credentials in order to retrieve dependencies from
                // the private repository.
                username "paypal_sgerritz"
                password "REDACTED_SEE_PAYPAL_DOCS"
            }
        }
    }
}
Add Java 8 compatibility to the build.gradle file of your app module.
android {
    ...
    compileOptions {
        sourceCompatibility JavaVersion.VERSION_1_8
        targetCompatibility JavaVersion.VERSION_1_8
    }

    kotlinOptions {
        jvmTarget = "1.8"
    }
}
Add the most recent version of the PayPal Mobile Checkout SDK as a dependency to the
build.gradle file of your app module:
dependencies {
    implementation('com.paypal.checkout:android-sdk:X.X.X')
}
The changelog provides details on the most recent versions.
Configure the PayPal Mobile Checkout SDK in the onCreate function of your app. Once that is completed, the SDK is configured and your app is ready to add payment buttons that will be displayed on your app.
This sample code includes these optional properties:
currencyCodeuserActionsettingsConfigProviding currencyCode and userAction can help with funding eligibility for payment buttons. The settingsConfig provides additional properties that are useful for development builds. loggingEnabled can be set to true to enable logging from the SDK. showWebCheckout can also be set to true or false to control a buyer seeing the web or native experience.
Note: You must initialize the SDK by calling
PayPalCheckout.setConfig(config)in your application class'sonCreate(). Initializing it on other areas may lead to anIllegalStateException.
Kotlin - /limited-release/paypal-mobile-checkout/initialize-sdk/
class YourApp : Application() {
        override fun onCreate() {
            super.onCreate()
            val config = CheckoutConfig(
                application = this,
                clientId = YOUR_CLIENT_ID,
                environment = Environment.SANDBOX,
                returnUrl = "${BuildConfig.APPLICATION_ID}://paypalpay",
                currencyCode = CurrencyCode.USD,
                userAction = UserAction.PAY_NOW,
                settingsConfig = SettingsConfig(
                    loggingEnabled = true,
                    showWebCheckout = false
                )
            )
            PayPalCheckout.setConfig(config)
        }
      }
Java - /limited-release/paypal-mobile-checkout/initialize-sdk/
public class ExApplications extends Application {
    @Override
    public void onCreate() {
        super.onCreate();
        PayPalCheckout.setConfig(new CheckoutConfig(
                this,
                YOUR_CLIENT_ID,
                Environment.SANDBOX,
                CurrencyCode.USD,
                UserAction.PAY_NOW,
                PaymentButtonIntent.CAPTURE,
                new SettingsConfig(true, false),
                new UIConfig(true),
                BuildConfig.APPLICATION_ID + "://paypalpay"
));
    }
}
To render the payment buttons on your app, add the following code to your checkout page:
checkout page: - /limited-release/paypal-mobile-checkout/initialize-sdk/
<com.paypal.checkout.paymentbutton.PaymentButtonContainer
    android:id="@+id/payment_button_container"
    android:layout_width="match_parent"
    android:layout_height="wrap_content"
    app:paypal_button_color="silver"
    app:paypal_button_label="pay"
    app:paypal_button_shape="rectangle"
    app:paypal_button_size="large"
app:paypal_button_enabled="true" />Payment buttons display on your app.
You have two options to complete your integration:
| Integration type | Use case |
|---|---|
| Client-side integration | If want the simplest integration, continue with the sample code below for a client-side integration. Client-side integrations don't require you to create your own server infrastructure. |
| Server-side integration | Chose a server-side integration if you want more control over your integration. Server-side integrations require you to have your own server infrastructure. |
This sample code creates an order of a single item for $10.00 USD. When the buyer selects Pay Nowon a payment sheet, the OnApprove callback invokes.
Kotlin - /limited-release/paypal-mobile-checkout/initialize-sdk/
class CheckoutActivity : AppCompatActivity() {
    override fun onCreate(savedInstanceState: Bundle?) {
        super.onCreate(savedInstanceState)
        // ...
        paymentButtonContainer.setup(
            createOrder =
                CreateOrder { createOrderActions ->
                    val order =
                        OrderRequest(
                            intent = OrderIntent.CAPTURE,
                            appContext = AppContext(userAction = UserAction.PAY_NOW),
                            purchaseUnitList =
                                listOf(
                                    PurchaseUnit(
                                        amount =
                                            Amount(currencyCode = CurrencyCode.USD, value = "10.00")
                                    )
                                )
                        )
                    createOrderActions.create(order)
                },
            onApprove =
                OnApprove { approval ->
                    Log.i(TAG, "OrderId: ${approval.data.orderId}")
                }
        )
    }
}
Java - /limited-release/paypal-mobile-checkout/initialize-sdk/
public class CheckoutActivity extends AppCompatActivity {
    PaymentButtonContainer paymentButtonContainer;
    @Override
    protected void onCreate(@Nullable Bundle savedInstanceState) {
        super.onCreate(savedInstanceState);
        // ...
        paymentButtonContainer.setup(
            createOrderActions -> {
                ArrayList<PurchaseUnit> purchaseUnits = new ArrayList<>();
                purchaseUnits.add(
                    new PurchaseUnit.Builder()
                        .amount(
                            new Amount.Builder()
                                .currencyCode(CurrencyCode.USD)
                                .value("10.00")
                                .build()
                        ).build()
                );
                OrderRequest order = new OrderRequest(
                    OrderIntent.CAPTURE,
                    new AppContext.Builder()
                        .userAction(UserAction.PAY_NOW)
                        .build(),
                    purchaseUnits
                );
                createOrderActions.create(order, (CreateOrderActions.OnOrderCreated) null);
            },
            approval -> {
                Log.i(TAG, "OrderId: " + approval.getData().getOrderId());
            }
        );
    }
}
You can now test purchases.
111111 as the one-time passcode.