STEP 2 Provide wallet access
Last updated: Aug 15th, 6:07am
Before any mobile payments can happen, a user must first be able to register and access a wallet profile in the WLW platform that is uniquely associated with the device on which the app is installed.
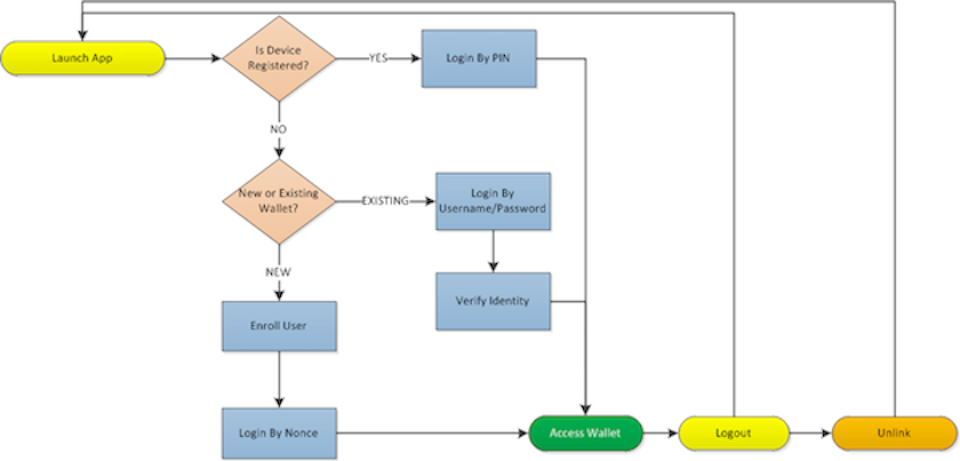
As the flow diagram illustrates, there are three possible paths of access to a wallet once the app launches. This section walks through the steps to implement each of these paths, which invoke endpoints exposed through the Device Coordinator, the User Enrollment Coordinator, and the Authentication Coordinator of the SDK.
Note: Mobile app screens shown in this guide are for functional demonstration only and not intended as design recommendations.
1. Check Device Status
The first step in providing wallet access through the app is to identify the device on which the app is installed and determine whether or not it is already associated with a wallet on the WLW platform.
Note: You should invoke the device status check every time the app launches, as well as when the app resumes to the foreground after having been in the background. Since it is possible for a device to be deactivated remotely in the case of loss, it is important to always verify that the device is registered and active at the time of use.
IMPLEMENTATION STEPS
Initialize the Device Management facade.
Invoke
isDeviceRegistered.1- (void)verifyDeviceIsRegistered {23 [CommonUtil showProgressindicatorOnView:self]45(1) PDDeviceCoordinator *deviceCoordinator = [PDDeviceCoordinator new];67(2) [deviceCoordinator isDeviceRegistered:^(BOOL isRegistered, BOOL isActive) {8 [CommonUtil hideProgressIndicatorOnView:self];9 [self updateViewAccordingToDeviceRegistrationStatus:isRegistered activationStatus:isActive];1011 // Device register status check successful.12 if (isRegistered == NO) {13 self.registerBTN.hidden = NO;14 self.loginBTN.hidden = NO;15 }1617 } failureBlock:^(PDPaydiantError *deviceManagementError) {18 [CommonUtil hideProgressIndicatorOnView:self];19 [CommonUtil displayError:deviceManagementError];20 self.isRegistered = NO;21 self.isActive = NO;22 }];23 }
Based on the results of the device check, display one of two screens:
Device is not registered: display the Welcome screen.
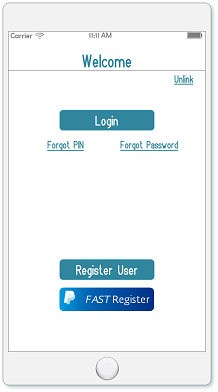
The Welcome screen gives the user the option to register a new wallet (Enroll a New Wallet) or to associate an existing wallet with the current device (Login By Username/Password). WLW advises also including operators to allow a user to reset forgotten credentials.
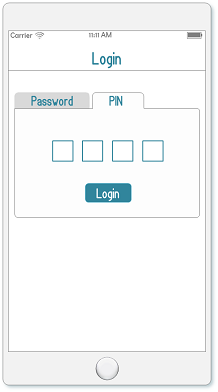
Device is registered: display the PIN Login screen (Login By PIN).
1- (void)updateViewAccordingToDeviceRegistrationStatus:(BOOL)deviceRegisterdStatus activationStatus:(BOOL)deviceActivationStatus {23 AppDelegate *appDelegate = (AppDelegate*) [[UIApplication sharedApplication] delegate];4 BOOL loginStatus = [appDelegate isLoggedIn];5 self.registrationButton.enabled = !deviceRegisterdStatus;6 self.deviceUnlinkButton.enabled = deviceRegisterdStatus && !loginStatus;7 if ((deviceRegisterdStatus == deviceActivationStatus) && !loginStatus) {8 self.loginButton.enabled = YES;9 }10 else if ((deviceRegisterdStatus && !deviceActivationStatus )|| loginStatus) {11 self.loginButton.enabled = NO;12 }13}
2. Enroll a new wallet
Once the app is identified as installed on an unregistered device and the user elects to register a new wallet, proceed with the new user enrollment flow.
IMPLEMENTATION STEPS
- Retrieve MFA security questions.
- Retrieve the password and PIN minimum requirements.
- Present the user with the enrollment form.
- Submit the registration profile.
- Authenticate the user and register the device.
1. Retrieve MFA Security Questions
As part of WLW's multi-factor authentication (MFA) protocol, the user must provide responses for a predefined number of security questions to be used for secondary identity verification when needed, such as in the case of a forgotten PIN or password.
The wallet issuer configures a pool of security questions from which the user may choose to provide responses for the issuer-designated required number. Retrieve these issuer configurations in order to present them to the user in the enrollment form.
Note: Be sure to initialize the User Enrollment facade before invoking the call to identify the calling service and ensure proper response handling.
1- (void)retreiveMFAQuestions {23 PDUserEnrollmentCoordinator *userEnrollmentCoordinator = [[PDUserEnrollmentCoordinator alloc] init];4 [userEnrollmentCoordinator retrieveMFAQuestionsWithMetadata:^(PDRetrieveMFAQuestionsWithMetadataResponse *response) {5 self.mfaQuestionsAndAnswers = [NSMutableDictionary dictionary];6 for (NSString *question in response.mfaQuestions) {7 [self.mfaQuestionsAndAnswers setObject:kMFA forKey:question];8 }9 } failureBlock:^(PDPaydiantError *userEnrollmentError) {10 [CommonUtil hideProgressIndicatorOnView:self];11 [CommonUtil displayError:userEnrollmentError];12 }];13}
The success response returns the pool of available questions and the number of questions for which the user must provide a response, as well as whether any of the questions is mandatory.
Use this returned data to facilitate collection of the user's security question responses for use in populating the userProfile.mfaQuestionAnswers value.
2. Retrieve PIN and password requirements
The user enrollment will fail if the PIN and password values submitted by the user do not meet the minimum requirements set by the issuer. Retrieving the set of requirements before you present the enrollment form to the user allows you to advise the user of the requirements beforehand, implement field validation in the app, and prevent such failure.
Note: Password and PIN requirements are retrieved independently using separate methods, as shown in the following sample.
1- (void)retrievePasswordConfigurations {23 PDUserEnrollmentCoordinator *userEnrollmentCoordinator = [PDUserEnrollmentCoordinator new];4 [userEnrollmentCoordinator retrievePasswordConfigurations:^(PDUserPasswordConfigurations *userPasswordConfigurations) {5 self.userPasswordConfigurations = userPasswordConfigurations;6 } failureBlock:^(PDPaydiantError *userEnrollmentError) {7 }];8 [userEnrollmentCoordinator retrievePasscodeConfigurations:^(PDUserPasscodeConfigurations *userPasscodeConfigurations) {9 self.userCodeConfigurations = userPasscodeConfigurations;10 } failureBlock:^(PDPaydiantError *userEnrollmentError) {11 }];12}
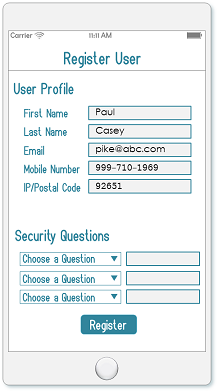
3. Present enrollment form to user
Once you have retrieved all the relevant data about required registration values and configuration settings, display a registration form to collect the corresponding input from the user.
4. Submit the registration profile
Once all the relevant profile data has been collected and mapped to the corresponding fields, build the userProfile object.
1- (IBAction)registerClicked:(id)sender {2 [CommonUtil showProgressIndicatorOnView:self];34 PDUserProfile *userProfile = [PDUserProfile new];5 userProfile.firstName = @"Paydiant";6 userProfile.lastName = @"User";7 userProfile.email = kUSER_NAME;8 userProfile.password = kPwd;9 userProfile.confirmPassword = kPwd;10 userProfile.passcode = kPin;11 userProfile.confirmPasscode = kPin;12 userProfile.phone = @"1234567890";13 userProfile.mfaQuestionAnswers = self.mfaQuestionsAndAnswers;
When the userProfile object is populated with the user's input values, invoke the registration call.
Note: Initialize the User Enrollment facade prior to invocation to ensure proper response handling.
1PDUserEnrollmentCoordinator *userEnrollment = [[PDUserEnrollmentCoordinator alloc] init];2userProfile.additionalCustomerInformation = [NSDictionary dictionaryWithObjectsAndKeys:@"key", @"value", nil];3PDRegisterUserRequest *request = [PDRegisterUserRequest new];4request.userProfile = userProfile;
5. Authenticate the user and register the device
Configure the registration completion block to invoke the loginByNonce method, using the temporary, one-time nonce value returned in the response to seamlessly authenticate the user and complete the device-walet association.
Note: You must initialize the Authentication facade before calling the login method.
1[userEnrollment registerNewUser:request2 completionBlock: ^(PDRegisterUserResponse *response) {3 [CommonUtil hideProgressIndicatorOnView:self];4 [CommonUtil displayMessageWithTitle:@"Success" andDescription:response.message];5 self.loginBTN.hidden = NO;6 self.forgotPasswordBTN.hidden = NO;7 self.forgotPasscodeBTN.hidden = NO;8 self.registerBTN.hidden = YES;9 self.registerPyPLBTN.hidden = YES;10 PDLoginByNonceRequest *request = [PDLoginByNonceRequest new];11 request.nonce = [NSString stringWithString:response.nonce];12 [self.authenticationCoordinator loginByNonce:request];13 } failureBlock: ^(PDPaydiantError *userEnrollmentError) {14 [CommonUtil hideProgressIndicatorOnView:self];15 [CommonUtil displayError:userEnrollmentError];16 }];17}
This completes the new wallet registration path for accessing a mobile wallet through the app.
Note: If email verification is enabled, you cannot use the login by nonce method. The user must complete the email verification and then login by username/password in order to complete the device-wallet link.
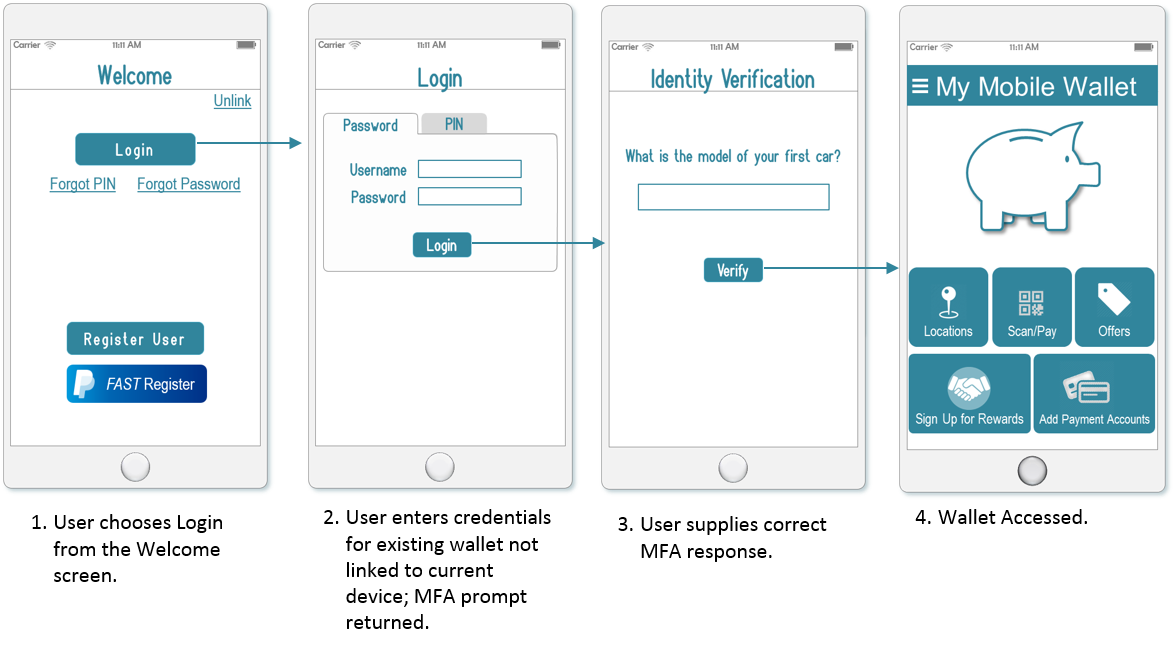
3. Login By Username/Password
Logging into the app with the username and password credentials is typically triggered in the following use cases:
- The user already has a wallet account, but is accessing it for the first time on a new (unregistered) device.
- The user has previously unlinked the existing wallet account from the current device and must re-associate the device with the wallet account.
- The device is already linked to an existing mobile wallet, but the wallet issuer does not support Login By PIN (this is not common).
In the first two use cases, the device does not have a recognized association with an existing account. Therefore, successful login will trigger the multi-factor authentication flow in order to verify the user's identity and associate the device with the wallet.
IMPLEMENTATION STEPS
1. Invoke Username & Password login
When the device status check reveals that the app is not registered with the device, and the user chooses Login from the Welcome screen, it is typically because the user already has a wallet, it is just not currently associated with the device. The user may have unlinked the wallet from the device or the user may have gotten a new phone.
In any case, display the Login By Username & Password screen and pass the user's input values in the loginByUsernamePassword call.
Note: Initialize the Authentication facade before calling the login method.
1- (IBAction)loginClicked:(id)sender {2 [CommonUtil showProgressIndicatorOnView:self];3 [self.authenticationCoordinator loginByUsernamePassword:kUSER_NAME4 password:kPwd];5 }6- (void)authenticationCoordinator:(PDAuthenticationCoordinator *)authenticationCoordinator authenticationDidSucceed:(PDLoginResponse *)loginResponse {7 [self authenticationDidSucceed:authenticationCoordinator];8}9- (void) authenticationDidSucceed:(PDAuthenticationCoordinator *)authenticationCoordinator {10 [CommonUtil hideProgressIndicatorOnView:self];11 self.loginBTN.hidden = YES;12 self.registerBTN.hidden = YES;13 self.UnlinkBarBTN.enabled = YES;14 self.logoutBarBTN.enabled = YES;15 self.walletBTN.hidden = NO;16 [self whatIsInMyWallet];17 [self loyalityProgram];18}19- (void)authenticationCoordinator:(PDAuthenticationCoordinator *)authenticationCoordinator authenticationInvocationDidFail:(PDPaydiantError *)authenticationError {20 [CommonUtil hideProgressIndicatorOnView:self];21 [CommonUtil displayError:authenticationError];22}23- (void)authenticationCoordinator:(PDAuthenticationCoordinator *)authenticationCoordinator authenticationDidFail:(PDPaydiantError *)authenticationError {24 [CommonUtil hideProgressIndicatorOnView:self];25 if (authenticationError.statusCode == 401) {26 [CommonUtil displayErrorMessageForCustomErrorCode:@"PASSCODE_401" usingError:authenticationError];27 }28 else {29 [CommonUtil displayError:authenticationError];30 }31}
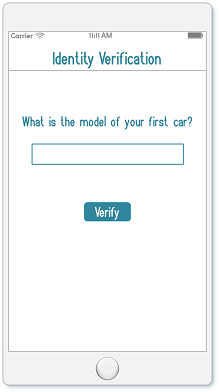
2. Invoke MFA authentication
When a user successfully logs into an existing wallet from an unregistered device, the platform returns the mfaQuestionDidPrompt delegate with the 412 status code.
Configure this Authentication delegate within the loginByUsernamePassword call to prompt the user to input a response to the randomly selected secret question passed in the delegate. This will be one of the questions to which the user provided answers during registration.
1- (void)authenticationCoordinator:(PDAuthenticationCoordinator *)authenticationCoordinator mfaQuestionDidPrompt:(PDMFAToken *)mfaQuestionToken {2 [CommonUtil hideProgressIndicatorOnView:self];3 [self promptMFAQuestionFromToken:mfaQuestionToken];4}
3. Register the device
Once the user has input the secret question answer, use it to populate the mfaSecretAnswer attribute of the mfaQuestionToken object originally passed with the MFA delegate. Invoke the registerWithMfa method, passing the populated mfaQuestionToken, to complete the device-wallet association.
1#pragma mark - Prompt MFA23- (void)promptMFAQuestionFromToken:(PDMFAToken *)mfaQuestionToken {4 mfaQuestionToken.mfaSecretAnswer = kMFA;5 [self.authenticationCoordinator registerWithMFA:mfaQuestionToken];6}
4. Login by PIN
Display the PIN login screen when the device is associated with an existing wallet account and PIN login is supported by the issuer. Pass the user's input values in the loginByPin call.
Note: Initialize the Authentication facade before calling the login method.
1- (IBAction)loginClicked:(id)sender {2 [CommonUtil showProgressIndicatorOnView:self];3 [self.authenticationCoordinator loginByPIN:kPin;4 }5- (void)authenticationCoordinator:(PDAuthenticationCoordinator *)authenticationCoordinator authenticationDidSucceed:(PDLoginResponse *)loginResponse {6 [self authenticationDidSucceed:authenticationCoordinator];7}8- (void)authenticationCoordinator:(PDAuthenticationCoordinator *)authenticationCoordinator authenticationInvocationDidFail:(PDPaydiantError *)authenticationError {9 [CommonUtil hideProgressIndicatorOnView:self];10 [CommonUtil displayError:authenticationError];11}12- (void)authenticationCoordinator:(PDAuthenticationCoordinator *)authenticationCoordinator authenticationDidFail:(PDPaydiantError *)authenticationError {13 [CommonUtil hideProgressIndicatorOnView:self];14 if (authenticationError.statusCode == 401) {15 [CommonUtil displayErrorMessageForCustomErrorCode:@"PASSCODE_401" usingError:authenticationError];16 }17 else {18 [CommonUtil displayError:authenticationError];19 }20}
5. Logout
It is important to provide a means for the user to explicitly logout, if desired.
The WLW platform automatically terminates an app session after a maximum duration of inactivity specified by the wallet issuer. Some apps allow the user to set a preference for session timeout that is less than the default issuer timeout. In such cases, the app must invoke the logout method upon expiration of the user-specified timeout. Otherwise, the session will remain active until the issuer-configured timeout expires.
Note: Initialize the Authentication facade before calling the logout method.
1PDAuthenticationCoordinator *authenticationCoordinator = [PDAuthenticationCoordinator new];2 authenticationCoordinator.delegate = (id)self;3 [self.authenticationCoordinator logout];45- (void)authenticationCoordinator:(PDAuthenticationCoordinator *)authenticationCoordinator authenticationInvocationDidFail:(PDPaydiantError *)authenticationError`67- (void) authenticationCoordinator:(PDAuthenticationCoordinator *)authenticationCoordinator logoutDidFail:(PDPaydiantError *)logoutError {8 [CommonUtil hideProgressIndicatorOnView:self];9 [CommonUtil displayError:logoutError];10}11- (void) finishedLogOut:(PDAuthenticationCoordinator *)authenticationCoordinator12{13 [CommonUtil hideProgressIndicatorOnView:self];14 self.scanBTN.hidden = YES;15 self.walletBTN.hidden = YES;16 self.loginBTN.hidden = NO;17 self.forgotPasswordBTN.hidden = NO;18 self.forgotPasscodeBTN.hidden = NO;19 self.UnlinkBarBTN.enabled = YES;20 self.logoutBarBTN.enabled = NO;21 [self authenticateByTouchID];22}
6. Unlink a device
Occasionally, users have reason to divorce a device's association with a particular mobile wallet account. Since a device can only be associated with one mobile wallet account (for a specific issuing partner), a user must disassociate a device from the wallet to which it is currently registered in order to link it to a different account.
Note: Initialize the Device facade before calling the unlink method.
1PDDeviceCoordinator *deviceCoordinator = [PDDeviceCoordinator new];2[deviceCoordinator removeDevice:^{3 [CommonUtil hideProgressIndicatorOnView:self];4 [self verifyDeviceIsRegistered];5 self.scanBTN.hidden = YES;6 self.walletBTN.hidden = YES;7 self.UnlinkBarBTN.enabled = YES;8 self.logoutBarBTN.enabled = NO;9} failureBlock:^(PDPaydiantError *deviceRemovalError) {10 [CommonUtil hideProgressIndicatorOnView:self];11 [CommonUtil displayError:deviceRemovalError];12}];