Third-party shopping carts — the Cart Upload command
Last updated: Jan 20th, 2:12pm
Third-party shopping carts integrate PayPal Payments Standard on behalf of PayPal merchants. The Cart Upload command passes the contents of a third-party shopping cart to PayPal for checkout and payment processing.
Note: Merchants can also create their own, PayPal-hosted
shopping cart. For more information, see
Create an Add to Cart button
or the BMCreateButton
NVP
|
SOAP
API call.
- The checkout experience
- Implement the Cart Upload command
- Implement the Instant Update API with Cart Upload
Important: This page contains unencrypted button code for illustrative purposes only. To prevent malicious tampering of buttons on your live website, always encrypt your manually created buttons.
The checkout experience
The PayPal checkout experience with the Cart Upload command begins on a merchant's shopping cart page, when someone clicks the check-out button. Alternatively, it begins when someone selects PayPal on the merchant's payment methods page.
The following example shows how a third-party shopping cart works with PayPal and PayPal Payments Standard. The example merchant has the following account profile settings:
-
PayPal Account Optional is turned on. Buyers can pay without an existing PayPal account and can sign up for one after they complete the payment.
For more information, see PayPal Account Optional.
-
Shipping Calculations have been set up. PayPal calculates the shipping charges automatically and adds them to the order.
For more information, see Auto-calculate shipping charges.
-
Auto Return is turned off. Buyers must click a Return to Merchant button to redirect their browsers to the merchant website after completing their payments with PayPal.
For more information, see Auto Return.
What buyers see with third-party shopping carts
Steve is shopping for photos on the Designer Fotos website. He selects several photos for purchase by clicking the Add to Cart button underneath each one.
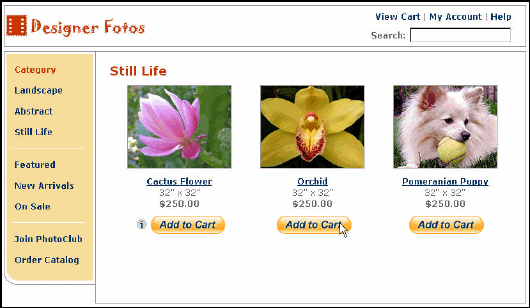
In this example integration, the third-party shopping cart is programmed by the vendor to display the contents of the cart each time Steve clicks an Add to Cart button. In addition, Steve can click the View Cart link at any time to review the items already in the cart and to begin the PayPal Payments Standard checkout experience.
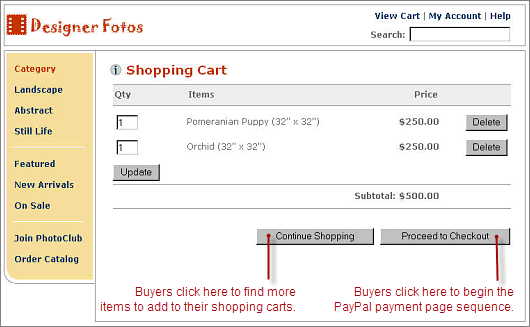
After selecting the items he wants to buy and specifying their quantities, Steve clicks the Proceed to Checkout button.
Steve's browser is redirected to the PayPal website. Buyers with PayPal accounts can enter their PayPal account credentials and click the Log In button to access information already on file with PayPal, such as shipping addresses.
Note: If your website gathers information about your buyer, you can define HTML code to pre-populate the corresponding billing information fields. The buyers see a collapsed version of the billing information section. For example, if you pre-filled the billing address, the address information displays on the page without the entry fields. Each pre-filled section of information is followed by a change link to let the buyers modify the information, if necessary. For more information, see Filling Out FORMs Automatically with HTML Variables.
Steve does not have a PayPal account, so he clicks Don't have a PayPal account? to enter his payment and billing information on the payment login page. He clicks the Agree and Continue button, and a review page displays the details of his payment.
Designer Fotos has set up Shipping Calculations in the account profile, so PayPal calculates shipping costs automatically and adds them to the order.
Steve clicks the Pay Now button to complete the payment, and in response, the browser takes Steve to a payment confirmation page.
Steve can:
- Click Print Receipt to view and print a PayPal payment receipt.
- Click Go to PayPal account overview to view his account.
- Click Link your bank account to your PayPal account now to add a bank account to his PayPal account.
PayPal sends Steve an email notice of his payment to Designer Fotos.
PayPal also sends Designer Fotos an email notice of Steve's payment.
Note: Designer Fotos (the user seller@designerfotos.com) can also see the payment in the PayPal account history.
Implement the Cart Upload command
Instead of relying on the PayPal Shopping Cart, many merchants use third-party shopping carts that are already integrated with PayPal. The section describes how you can use the Cart Upload command to integrate PayPal Payments Standard with your third-party cart.
Required third-party shopping cart variables
Your HTML code requires at least the following hidden HTML variables. For a complete list of variables, see HTML Variables for PayPal Payments Standard.
| Name | Description |
|---|---|
amount_1 |
Price of a single item or the total price of all items in the shopping cart |
business |
Email address of your PayPal account |
item_name_1 |
Name of the item or a name for the entire shopping cart |
upload |
Indicates the use of third-party shopping cart |
To integrate your third-party shopping cart with PayPal and PayPal Payments Standard, use one of these methods:
- Pass the details of the individual items.
- Pass the aggregate amount of the total cart payment rather than the individual item details.
Passing individual item details to PayPal
If you code your third-party shopping cart to pass individual items to PayPal, information about the items is included in buyers' and merchants' transaction histories and notifications.
-
Set the
cmdvariable to cart. -
Include the
uploadvariable:1<input type="hidden" name="upload" value="1"> -
Define item details for each item in the cart.
Specify the required variables and any optional variables listed in Technical HTML Variables.
Append _x to the variable name where x equals the
item number of the item in the cart starting from 1. Increase
x by one for each item that you add to the cart.
You must define the first item in the cart with x equal to
1, the second item with x equal to 2,
the third item with x equal to 3, and so on.
For example, name the variables for the first item item_name_1,
amount_1, and quantity_1.
Name the variables for the second item item_name_2,
amount_2, and quantity_2.
Name the variables for the third item item_name_3,
amount_3, and quantity_3.
Important: Sequentially increment the
x value by 1 to have PayPal recognize each item.
Skipping one or more numbers in the sequence causes PayPal to ignore items.
For example, if you skip item 1 to item 3 without defining item 2, PayPal
ignores the third item.
The following example shows the minimum required HTML for your post to PayPal.
Important: The following example button code is unencrypted for illustrative purposes only. In production, you must always use encrypted or hosted buttons in your web pages to prevent malicious users from tampering with the code.
HTML for passing individual item detail to PayPal
1<form action="https://www.paypal.com/cgi-bin/webscr" method="post">2<input type="hidden" name="cmd" value="_cart">3<input type="hidden" name="upload" value="1">4<input type="hidden" name="business" value="seller@dezignerfotos.com">5<input type="hidden" name="item_name_1" value="Item Name 1">6<input type="hidden" name="amount_1" value="1.00">7<input type="hidden" name="shipping_1" value="1.75">8<input type="hidden" name="item_name_2" value="Item Name 2">9<input type="hidden" name="amount_2" value="2.00">10<input type="hidden" name="shipping_2" value="2.50">11<input type="submit" value="PayPal">12</form>
Setting currency in the cart
PayPal uses the currency value of the currency_code variable that
accompanies the payment to interpret all variables that contain monetary
amounts, such as amount_x, shipping_x,
shipping2_x, handling_x, tax_x, and
tax_cart. Because currency_code is not
item-specific, do not append x to the
currency_code variable name. If you do not post a
currency_code variable value, all monetary values default to U.S.
dollars.
Setting tax on individual items
Use the tax_x variable to specify the tax for a particular item
in the cart. For example, the following line specifies that the tax on item 2
in the cart is 15 cents:
1<input type="hidden" name="tax_2" value=".15">
Setting profile-based shipping charges by weight on individual items
Use the weight_x and weight_unit variables to
specify item weights if the merchant uses weight-based shipping rates. For
example, the following lines specify the weight of item 3 in the cart as 1.5
kg:
1<input type="hidden" name="weight_3" value="1.5">2<input type="hidden" name="weight_unit" value="kgs">
Use the quantity_x variable if the merchant uses quantity-based
shipping rates. For example, the following line specifies that the quantity
for item 3 in the cart is 6:
1<input type="hidden" name="quantity_3" value="6">
For information on how merchants set up weight-based shipping rates, see the Auto calculate shipping charges (U.S. Merchants Only).
Setting the tax for the entire cart
Use the tax_cart variable to specify a tax amount that applies to
the entire transaction rather than to individual items. The
tax_cart variable overrides any per-item tax amount specified
with tax_x.
Setting the weight for the entire cart
Use the weight_cart and weight_unit variables to
specify the total weight of the cart, if the merchant uses weight-based
shipping rates. The weight_cart variable overrides any per-item
weights specified with weight_x.
Setting discounts for the cart
Use the discount variables to specify discount amount or percentages.
-
Use
discount_amount_cartto charge a single discount amount for the entire cart. -
Use
discount_amount_xto set a discount amount associated with itemx. -
Use
discount_rate_cartto charge a single discount percentage for the entire cart. -
Use
discount_rate_xto set a discount percentage associated with itemx.
The discount amount displays on all pages, email messages, and reports that show payment information.
Default tax and discount processing
Item-specific discounts apply before tax calculation for items in the third-party cart. Discounts and tax apply to each item based on the discounts and tax rate specified. However, your buyer sees only a total discount amount for the cart and one entry for any applicable sales tax.
Setting consolidated discount amounts
Consolidated discounts apply to the entire cart. PayPal calculates the tax on the total of all items after applying the consolidated discount value. Your buyer sees a total discount amount for the cart and one entry for any applicable sales tax.
When you use consolidated discount amounts, you should specify a consolidated
tax value in tax_cart. If you do not specify a tax value and your
profile specifies a tax rate, PayPal applies your profile tax rate after
applying the consolidated discount value.
PayPal ignores consolidated discount amounts if your third-party cart contains
any item with an individual tax amount or rate specified using
tax_x or tax_rate_x.
Passing the aggregate shopping cart amount to PayPal
You can aggregate your entire shopping cart and pass the total amount to
PayPal. You must post a single item_name_1 for the entire cart
and the total price of the cart contents in amount_1 as though it
were a purchase of a single item.
Note: One drawback to passing aggregate cart information is that buyers do not see the individual items in their order on the PayPal payment pages.
The following HTML code shown is identical to the Passing individual item details to PayPal example except here the example aggregates the individual item amounts and item names into a single amount and a single item.
Important: The following example button code is unencrypted for illustrative purposes only. In reality, you must always use encrypted or hosted buttons in your web pages to prevent malicious users from tampering with the code.
HTML for aggregate cart detail to PayPal
1<form action="https://www.paypal.com/cgi-bin/webscr" method="post">2<input type="hidden" name="cmd" value="_cart">3<input type="hidden" name="upload" value="1">4<input type="hidden" name="business" value="seller@designerfotos.com">5<input type="hidden" name="item_name_1" value="Aggregated items">6<input type="hidden" name="amount_1" value="3.00">7<input type="submit" value="PayPal">8</form>
Implement the Instant Update API with the Cart Upload command
The Instant Update API is a callback API that lets you update PayPal in real time with shipping, insurance, and tax amounts when buyers change their shipping address on the PayPal Review Your Payment page.
- About the Instant Update API and the Cart Upload Command
- Best practices for implementing Instant Update
- Other considerations for implementing Instant Update
- Setting up the callback for Instant Update
- Responding to the callback for Instant Update
About the Instant Update API and the Cart Upload command
The Instant Update API is a server call to your callback server that instantly updates PayPal pages and enhances the Express Checkout experience on the Review your information page.
Here is how the Instant Update API works:
- When a buyer logs in to PayPal, the PayPal server calls your callback server with the buyer's default shipping address, which is stored in the PayPal system.
- Your callback server responds with the shipping options available for that address, along with any insurance options and tax adjustments on the order.
- PayPal displays this information on the Review your information page so buyers can choose from the options.
How Instant Update works with the Cart Upload command
The following figure shows how the Instant Update callback works in the Cart Upload checkout experience.
The checkout experience proceeds from left to right. Numbered events in the previous illustration above are described, as follows.
-
The checkout experience begins when a buyer clicks the checkout button on the Shopping Cart page of your third-party cart.
In the HTML code of the checkout button, provide the URL where PayPal can call your callback server, as well as fallback tax, shipping and insurance amounts. If you or your carrier base shipping rates on shipment size, include the shipping dimension HTML variables on individual items in the cart.
-
The buyer is redirected to PayPal to enter billing information or to log in to PayPal.
-
Before displaying the PayPal Review page, PayPal sends the buyer's shipping address to your callback server.
Every time the buyer changes the shipping address, PayPal calls your callback server.
-
Your callback server calculates tax, shipping, and insurance, based on the address in the callback request.
Calculate the amounts in your own code, or request the shipping and insurance amounts from your preferred carrier. If the address in the request is outside of the areas where you ship, respond with
NO_SHIPPING_OPTION_DETAILSset to1. -
PayPal updates the Review Your Payment page to show the options and rates that you sent back in the callback response from your callback server.
-
The buyer makes final selections and clicks the Pay button.
-
PayPal displays a confirmation page, from which the buyer can click a link to print a receipt.
Implementing Instant Update with the Cart Upload command
You need a callback server to respond to Instant Update requests from PayPal. Also, you need to add Instant Update HTML variables to your Cart Upload command to set up the checkout for Instant Update.
- Set up a secure server as your Instant Update callback server to accept Instant Update requests from PayPal.
- Develop you callback server to process Instant Update requests and respond with tax, shipping, and insurance amounts.
- Modify the HTML code of your Cart Upload commands by adding Instant Update HTML variables:* The URL of your callback server and the timeout duration * Fallback tax, shipping options, and an insurance amount. You must specify at least 1 shipping option * Dimensions for all individual items, if you base shipping rates on shipping dimensions
- Eliminate your shipping options page.
- Test your implementation of the callback and your fallback options.
The Review Your Payment page after implementing Instant Update
After you integrate the Instant Update API, you can display the shipping options, related insurance options, and the tax amount. You control what to display, which is instantly updated on the page.
The shipping options, related insurance options, and the tax amount appear on the page, as follows:
Best practices for implementing Instant Update
PayPal recommends its list of best practices as a checklist for completing your implementation of the Instant Update API.
- Meet the pre-requisites — Provide individual item details instead of aggregate order amounts to take advantage of the Instant Update API.
- Streamline the checkout experience — Eliminate the shipping options page in your standard checkout experience.
- Use the default callback timeout — Use the recommended 3-second callback response timeout.
- Follow PayPal-defined semantics and syntax — Adhere to well-formed variable names and syntax rules in the callback response to PayPal. If errors occur in the response, PayPal uses the fallback options.
- Ensure a consistent and good buyer experience — When fallback shipping options are used, you should honor the rates to ensure a consistent and good buyer experience.
- Localize shipping options — Return localized shipping options, based on the buyer's country and locale, which PayPal sends in the callback request.
Other considerations for implementing Instant Update
When you implement the callback, you must consider callback response errors, .timeouts, and shipping options.
Callback response errors
If there are any callback response errors, PayPal responds by displaying the fallback options on the PayPal Review Your Payment page. To obtain the richer set of options available through the callback, exercise care in the syntax and values you specify and test the callback integration.
Minimum and maximum shipping options
You can specify up to 10 shipping options for the fallback options in the HTML code for the Cart Upload command and for the detailed options based on shipping address in the callback response. You must specify at least 1 shipping option.
Callback timeouts
If the callback does not return within the timeout period, PayPal displays the fallback shipping options you specified in the HTML code for the Cart Upload command in the drop-down menu on the PayPal Review Your Payment page.
The PayPal Review your information page in the following figure shows two shipping options from which the buyer can choose if the callback times out. An amount of $1.00 is offered for insurance:
Shipping to an alternate address
If you do not ship to the buyer's shipping address that PayPal sends in the
callback request, set NO_SHIPPING_OPTION_DETAILS to
1 in the callback response.
The following sample code illustrates the callback response when you do not ship to the buyer's address.
1METHOD=CallbackResponse2NO_SHIPPING_OPTION_DETAILS =13CALLBACKVERSION= <61.0 or greater >
When your callback server sends the previous response, the Review your information page has these features:
- A message at the top of the page indicates that your business does not ship to this location.
- The shipping and handling section and the insurance section are dimmed.
- The buyer can change the shipping address.
- A new callback request is sent if the buyer changes the shipping address.
Setting up callback for Instant Update
To set up the callback, establish a connection with PayPal by providing the location where PayPal calls your callback server, along with your shipping options.
There are two sides to setting up the Instant Update callback:
- Establishing your Instant Update callback server
- Passing Instant Update callback information to PayPal
Establishing your instant update callback server
To start, you must build and operate a secure, reliable, and fast callback server that computes shipping options, corresponding insurance options, and tax, based on your business rules. To verify that callback requests originate from PayPal.
The HTTP protocol to specify in your callback URL depends on the integration environment you are using:
- The callback URL must start with HTTPS for production integration.
- The callback URL must start with HTTP or HTTPS for PayPal sandbox integration.
Passing Instant Update callback information to PayPal
You pass Instant Update callback information in the HTML code of the Cart Upload command. The Instant Update HTML variables let you specify the URL of you callback server and the fallback values for shipping, insurance, and tax amounts.
To set up the Cart Upload command for Instant Update during the checkout experience, use at a minimum the following Instant Update HTML variables:
callback_url. The URL of your callback server.-
callback_timeout. Always use the value3, unless instructed otherwise by PayPal. -
fallback_shipping_option_x. One or more sets of shipping option variables. You must include one instance of this variable with itsxindex set to0. If you include just one instance, you must includefallback_shipping_option_is_default_xwith itsxindex set to0and its value set to1.
The following sample code illustrates a basic setup for the Instant Update callback, which you include in the HTML Form variables for the Cart Upload command.
1...2<input type="hidden" name="callback_url" value="your_callback_server_URL">3<input type="hidden" name="callback_timeout" value="3">4<input type="hidden" name="callback_version" value="61"><!--Required! -->56<input type="hidden" name="fallback_shipping_option_name_0" value="Option 1">7<input type="hidden" name="fallback_shipping_option_amount_0" value="1">8<input type="hidden" name="fallback_shipping_option_is_default_0" value="1">910<input type="hidden" name="fallback_shipping_option_name_1" value="Option 2">11<input type="hidden" name="fallback_shipping_option_amount_1" value="3">12<input type="hidden" name="fallback_shipping_option_is_default_1" value="0">13<input type="hidden" name="fallback_insurance_option_offered" value="0">14...
Responding to the callback for Instant Update
PayPal sends your callback server an Instant Update request whenever buyers enter billing information or log in to PayPal to make payments. Your callback server calculates shipping options and rates and sends them back to PayPal, in Name-Value pair (NVP) format.
PayPal sends Instant Update callback requests to the location that you
specified with the callback_url HTML variable. The fields in the
callback request include:
- Individual item details that you included in the Cart Upload command.
- Shipping address of the buyer.
Using the information in the callback request, calculate the rates and options yourself or send the information in an API call to your carrier to perform the calculations for you. Then send the shipping options, insurance amounts, and taxes to PayPal in the callback response.
The callback request for Instant Update with the Cart Upload command
Callback requests specify the shipping addresses that buyers want to use when they are about to complete a payment. Also, callback requests include individual item details for the payments that buyers want to complete.
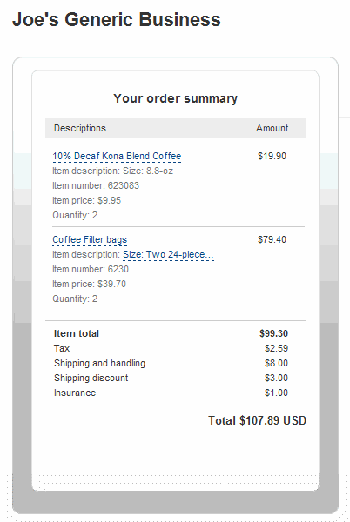
The following sample code illustrates an Instant Update callback request, with these features:
- 2 individual item details, which can be used to calculate taxes
- Weight information with one line item, which can be used to calculate shipping charges
- A shipping address
METHOD=CallbackRequest &CALLBACKVERSION=57.0 &CURRENCYCODE=USD &LOCALECODE=en_US &L_NAME0=10% Decaf Kona Blend Coffee&L_NUMBER0=623083 &L_DESC0=Size: 8-oz &L_AMT0=9.95 &L_QTY0=2 &L_NAME1=Coffee Filter bags&L_NUMBER1=6230 &L_DESC1=Size: Two 24-piece boxes &L_AMT1=39.70 &L_QTY1=2 &L_ITEMWEIGHTUNIT1=lbs&L_ITEMWEIGHTVALUE1=0.5&SHIPTOSTREET=1 Main St&SHIPTOCITY=San Jose&SHIPTOSTATE=CA&SHIPTOCOUNTRY=US&SHIPTOZIP=95131&SHIPTOSTREET2
Callback response for Instant Update
Callback responses let you specify one or more shipping options, with unique shipping, insurance, and tax amounts. Your callback server calculates the amounts based on shipping addresses that buyers provide during the PayPal checkout experience.
The following sample code illustrates an Instant Update callback response, with these features:
- Shipping insurance, with a different amount for each shipping option
- Three shipping methods, with different shipping amounts
- Taxes, with different amounts for each shipping method
- The UPS Expedited shipping method is the default method
METHOD=CallbackResponse &OFFERINSURANCEOPTION=true&L_SHIPPINGOPTIONNAME0=UPS Air&L_SHIPPINGOPTIONLABEL0=UPS Next Day Air Freight &L_SHIPPINGOPTIONAMOUNT0=20.00 &L_TAXAMT0=2.20 &L_INSURANCEAMOUNT0=1.51 &L_SHIPPINGOPTIONISDEFAULT0=false &L_SHIPPINGOPTIONNAME1=UPS Expedited&L_SHIPPINGOPTIONLABEL1=UPS Express 2 Days &L_SHIPPINGOPTIONAMOUNT1=10.00 &L_TAXAMT1=2.00 &L_INSURANCEAMOUNT1=1.35 &L_SHIPPINGOPTIONISDEFAULT1=true&L_SHIPPINGOPTIONNAME2=UPS Ground&L_SHIPPINGOPTIONLABEL2=UPS Ground 2 to 7 Days &L_SHIPPINGOPTIONAMOUNT2=5.99 &L_TAXAMT2=1.99 &L_INSURANCEAMOUNT2=1.28 &L_SHIPPINGOPTIONISDEFAULT2=false