A Deep Dive into PYUSD and Solana Token Extensions
Jun 16, 2025
15 min read

Over $300 million of PayPal USD (PYUSD)—the open, fully backed, US dollar-denominated stablecoin—has been minted on Solana since July 2024. And as this number continues to rise, more and more developers are looking to integrate PYUSD into their Solana apps.
If you’re looking to integrate PYUSD, you’ll want to understand one of the new technologies integrated with PYUSD—Solana’s token extensions.
In this article, we’ll look at what Solana’s token extensions are, their benefits, and how developers can use them. Then, we’ll walk through a tutorial on how to implement token extensions and PYUSD in your apps.
What Are Solana’s Token Extensions?
The PayPal stablecoin, PYUSD, was created to provide users with a reliable, and trusted way to make digital payments. To help achieve these goals, PYUSD on Solana was built using Solana’s token extensions (TEs)—a program on the Solana blockchain that enables a set of modular extensions that can be programmed directly into a token’s code to provide additional features.
With TEs, developers can use more than a dozen proven, audited extensions to quickly add advanced functionality to their tokens. These features include confidential transfers, new compliance frameworks such as transfer hooks, and the ability to charge fees on transfers, all through the reusability of token extensions.
You can think of TEs as a series of options, features, and capabilities built for Solana tokens. Developers can enable any combination of extensions on their token, instantly adding advanced capabilities.
Note: Blockchain tokens are digital assets recorded on a blockchain. In this case, PYUSD is a fungible token recorded on Solana. Solana programs are sets of executable logic, also known as smart contracts.
Benefits of Token Extensions
Using TEs offers many benefits to developers, including:
- Flexibility: By using TEs, you can customize the behavior of your token for your specific use case.
- No additional programs needed: Since the extensions are built into the core protocol layer of Solana, you can easily create tokens with advanced functionality—without the need for additional libraries. These extensions don’t impact compatibility with wallets and other protocols - ensuring support for the token.
- Reduced risk: Using audited and well-tested extensions helps reduces attack vectors and helps to protect protocols and funds. With TEs, you get enterprise-grade security and reliability.
- Reduced testing costs: Because TEs are added by simply specifying the extensions in your code, this greatlyreduces the risks of defects and human error, saving testing time and costs.
- Reduced development time: Because TEs are uniform and reusable, the time required to develop applications using the extensions is significantly less than conventional app development. This allows you to use your time and resources on the business problems your team is uniquely built to solve. With TEs, you don’t face the complexity of developing, auditing, and deploying your own custom token contracts.
- Fast pilots: Fast testing and development drastically reduces the time your team needs to create blockchain-powered projects. This means faster pilots, faster user feedback, and a faster path to product/market fit.
- Enterprise ready: For enterprises exploring blockchain, TEs offer fast and reliable path to implementing the advances of blockchain.

PYUSD Logo
Token Extensions and PYUSD
PYUSD was the first to use using TEs. When you integrate PYUSD into Solana apps, you automatically receive many of these advantages:
- The time required to develop and test apps that use PYUSD (and the chances of those apps having defects) is significantly reduced.
- PYUSD can be added quickly and reliably to your apps.
- ince TEs are an open standard, PYUSD can be integrated and used in the PayPal ecosystem as well as outside of PayPal with any compatible wallet, exchange, or library.
- PYUSD inherits TEs enterprise-grade security and reliability.
Token Extensions used by PYUSD
TEs include over a dozen extensions, but PYUSD only uses a subset. Let’s look at the TEs initialized by PYUSD in detail.
Note: Since it’s nearly impossible to predict all features that developers may need in the future, having the flexibility to evolve using TEs is important. By design, Solana’s mint extensions must be initialized upon token creation. The token creator can configure extensions after token creation, but new extensions cannot be added. Because of this requirement, several extensions have been initialized. However, just because a TE has been initialized for PYUSD does not suggest that it will necessarily be used.
Confidential Transfers
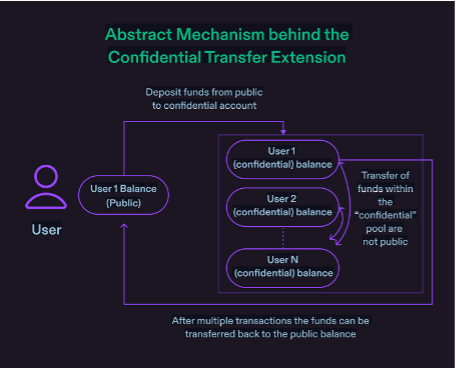
The confidential transfer extension allows users to transact without revealing the transfer amounts.
With the extension, an account owner can configure their account for confidential transfers, then deposit tokens from their nonconfidential holdings to the new confidential balance. Once complete, all transfers from the confidential balance to another account configured for confidential transfers are private. Only the source, the destination, and an optional third-party auditor can see transfer balances.

This allows businesses to keep transaction amounts confidential for their consumers while maintaining visibility for regulatory purposes. This is not dissimilar from today’s commerce. For example, you cannot see the financial statements of your neighborhood coffee shop just because you buy from the shop daily.
Transfer Hook
The transfer hook extension calls a piece of custom logic when a token is transferred.
Implementing transfer hook is straightforward, as developers simply develop and deploy a separate program that implements the required interface and executes their business logic. Then, developers configure their token mint to use this new program.
It’s also possible to implement more complex control-based logic, such as an exchange taking a specific action if a large amount of tokens is transferred between parties or the account is on a compliance-related list.
Transfer hook is initialized for PYUSD for potential future use only, and is currently initialized with a null program ID.
Permanent Delegate
The permanent delegate extension allows developers to specify a permanent delegate for a mint.
This delegate has unlimited delegate privileges over any account for that mint, meaning it can burn or transfer any amount of tokens.This extension is critical for regulatory purposes, as it allows for seizing funds as required by law enforcement.
Metadata and Metadata Pointer
With the metadata extension, modular metadata can be incorporated natively into tokens.
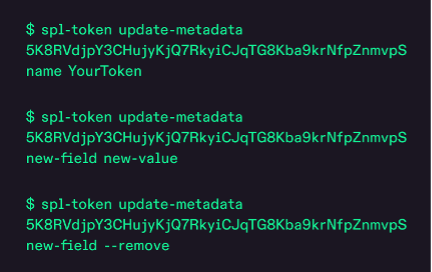
The ability to have native, canonical (official), on-chain metadata definitions and storage gives teams a new level of flexibility. Developers can now add, update, and remove custom fields as needed, tailoring the metadata to fit the specific requirements of their projects. With TEs, this metadata travels with the token and is portable across all apps for seamless operability.
With PYUSD, this is used to store the name, ticker, and image of PYUSD in a standard manner.

Updating, adding, and removing custom metadata fields through the CLI
The metadata pointer extension simply allows token creators to designate the address that describes the metadata for the token. We’ll cover more details about metadata and metadata pointer in the tutorial below.
Mint Close Authority
The mint close authority extension allows owners to close mint accounts and reclaim the lamports on the mint account. Although this may never be needed, it has been initialized in case it is needed in the future.
Transfer Fees
The transfer fees extension allows the token minter to assess a fee on every token transfer.
In the previous token model, projects that wanted to charge fees typically were required to freeze the account, work through a third party to get the transfer fees, then unfreeze the account. But with the extension, projects can now create an automated transfer of fees without any additional work.
This extension is included in PYUSD as a fail-safe and initialized to 0.
Tutorial: Using Token Extensions and PYUSD Programmatically
Now let’s see how easy it is to programmatically work with PYUSD on the Solana blockchain using TEs. We’ll do this by building a simple utility known as a DeFi keeper.
Decentralized finance (DeFi) keepers are programs that automatically perform certain operations to ensure a DeFi protocol or ecosystem is running smoothly. Some examples of tasks that DeFi keepers can perform include:
- Transferring money among various parties when triggered
- Rebalancing automated market maker pools
The DeFi keeper we’ll build will transfer money and present metadata about the token we’re transacting (in our case, PYUSD). In building this keeper, we’ll also look at several foundational concepts, such as setting up a Solana wallet, airdropping test tokens, and installing the necessary packages and tools to work with blockchain.
Step 1: Install Rust and Solana CLI
In order to work with the Solana blockchain locally, we will have to install the Rust programming language, Solana CLI, and the Anchor CLI. For the sake of brevity, we’ll stick to commands you can run on a Mac. However, the steps for Linux and Windows are nearly identical.
To install Rust, open a terminal and run the following commands:
$ curl --proto '=https' --tlsv1.2 -sSf \
https://sh.rustup.rs | sh -s -- -y
$ . "$HOME/.cargo/env"
$ rustc --version
If all goes well, running the last command will print the version of Rust you’re working with (for instance, 1.80.2).
The Solana CLI provides all the tools and packages necessary to create and run Solana programs. Installing the Solana CLI is simple; just run the following commands:
$ sh -c "$(curl -sSfL https://release.anza.xyz/stable/install)"
$ echo 'export PATH="$HOME/.local/share/solana/install/active_release/bin:$PATH"' >> ~/.zshrc
$ source ~/.zshrc
$ solana --version
Again, if all goes well, you should be able to see the version of Solana installed on your local machine (for instance, 1.18.22).
Finally, let’s install the Anchor CLI. This is an optional step: We don’t require Anchor for this tutorial as we won’t be writing Solana Rust programs. However, if you plan on doing any Solana development in the future, then this is an optimal time to install Anchor.
Run this set of commands in sequence:
$ cargo install --git https://github.com/coral-xyz/anchor avm --force
If you’re running Linux, and you hit an error with the above command, you can install the necessary dependencies with this command, and then rerun the cargo install command above.
$ sudo apt-get update && \
sudo apt-get upgrade && \
sudo apt-get install -y \
pkg-config build-essential libudev-dev libssl-dev
Assuming the above installation succeeds, you can now run these version checks:
$ avm --version
$ avm use latest
$ anchor --version
Successful installation will display the version of AVM and Anchor that your machine is using.
Step 2: Create a Node Project
Client development (such as running Solana programs and interacting with the Solana blockchain) involves using Solana SDKs, which are available in a wide variety of programming languages.
We’ll use the JavaScript SDK, one of the most stable and popular options.
After installing Node and npm, set up a Node project and install the Solana web3.js package using the following commands:
$ mkdir defi-keeper && cd defi-keeper
$ npm init -y
$ npm install @solana/web3.js @solana/spl-token
Step 3: Set Up and Fund Solana Wallet with PYUSD
After setting up our project and the necessary tools and installing packages, we can now create our Solana wallet. Solana wallets are user accounts that hold PYUSD (and other digital assets) and that can send and receive blockchain transactions.
For this tutorial, we don’t want to use production (real) SOL or PYUSD. Instead, we will use the Solana devnet, which mimics the Solana blockchain but uses test tokens.
Note: SOL is the native token of the Solana blockchain. Among other uses, it’s used to pay the transaction fees (the cost of submitting a transaction) on the Solana blockchain. You’ll need test SOL to test your apps.
To set up your environment to work with devnet, run the following commands:
$ solana config set --url devnet
$ solana config get
The last command should produce output that looks something like this:
Config File: /Users/johndoe/.config/solana/cli/config.yml
RPC URL: https://api.devnet.solana.com
WebSocket URL: wss://api.devnet.solana.com/ (computed)
Keypair Path: /Users/johndoe/.config/solana/devnet.json
Commitment: confirmed
After confirming that you’re on devnet, let’s create a new wallet, using the following command:
$ solana-keygen new
Every wallet has a private key and public key. Think of them as the password and username for any of your accounts. To view the public key or address of your wallet, run the following command:
$ solana address
Our wallet is now ready to go. Next, we need to add funds. We’ll top up our wallet with both SOL and PYUSD. The SOL will be used to pay for transaction costs on Solana devnet.
To get SOL, simply run:
$ solana airdrop 5
When running the above command, you might encounter an error like this:

Enter your wallet address, which was the public key displayed when you ran solana address above. Then, select the amount (5 SOL) and click Confirm Airdrop.
Finally, run this command to confirm how much SOL you have in your wallet:
$ solana balance
For the purposes of this tutorial, 1 SOL is more than enough.
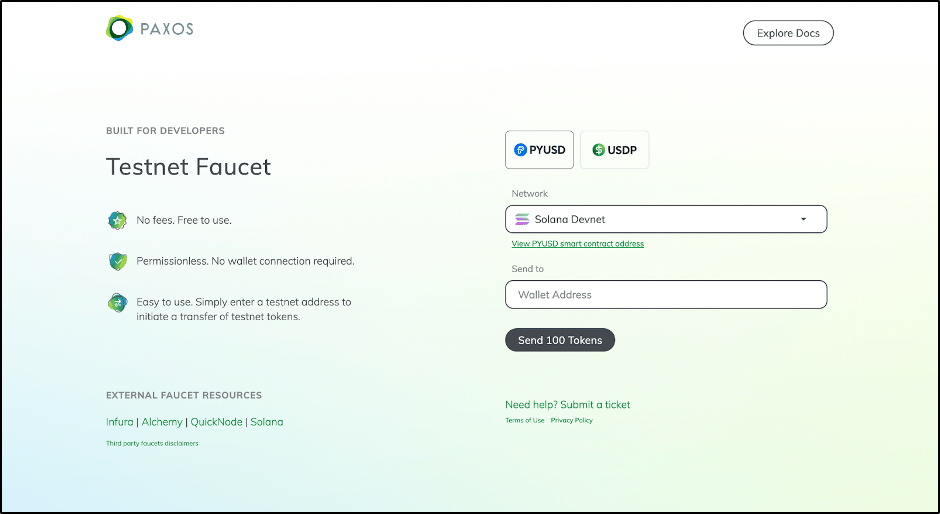
To get PYUSD, we’ll use the Testnet Faucet from Paxos.

Simply enter the address of your wallet and ask the faucet to send you 100 PYUSD.
There are two ways to check your PYUSD balance. The first step is to check it on Solana Explorer, which will show you the balances of all the tokens a particular wallet holds.

The second way is from your terminal. You’ll need the PYUSD devnet contract address for this option—CXk2AMBfi3TwaEL2468s6zP8xq9NxTXjp9gjMgzeUynM.
$ spl-token balance CXk2AMBfi3TwaEL2468s6zP8xq9NxTXjp9gjMgzeUynM \
--owner <WALLET_ADDRESS> \
--url https://api.devnet.solana.com
Step 4: Get PYUSD Metadata
Let’s now implement the first feature of our DeFi keeper. We’ll write a function that extracts the metadata of PYUSD. Create a new file called main.js and add the following code:
const { Connection, PublicKey, clusterApiUrl } = require('@solana/web3.js');
const { getTokenMetadata } = require('@solana/spl-token');
async function getPYUSDMetadata() {
// Connect to the Solana network (devnet)
const connection = new Connection(clusterApiUrl('devnet'), 'confirmed');
const mint = new PublicKey("CXk2AMBfi3TwaEL2468s6zP8xq9NxTXjp9gjMgzeUynM")
const metadata = await getTokenMetadata(
connection,
mint, // Mint Account address
);
console.log("\nMetadata:", JSON.stringify(metadata, null, 2));
}
// Get Metadata
getPYUSDMetadata();
Running this code (with node main.js) will produce the following output:
Metadata: {
"updateAuthority": "G8ENSYKVGPbRTbcN1BxXuRMYeCq13271UjCUrrpZTJ4X",
"mint": "CXk2AMBfi3TwaEL2468s6zP8xq9NxTXjp9gjMgzeUynM",
"name": "PayPal USD",
"symbol": "PYUSD",
"uri": "https://token-metadata.paxos.com/pyusd_metadata/sandbox/solana/pyusd_metadata.json",
"additionalMetadata": []
}
Since we’re using TEs with PYUSD, extracting the metadata is easy.
Step 5: Transfer PYUSD to Another Wallet
Let’s write another function that transfers PYUSD from our wallet to another wallet.
In order to use our wallet programmatically, we’ll need the wallet’s private key. You can obtain this from the .config/solana/id.json file in your user folder (see the result of solana config get). It will be an array of 64 numbers.
Note: In a production environment, be sure to guard this private key very closely. Anyone with this private key has full access to the wallet and can access all funds.
Let’s create a new file called transfer.js and add the following code:
// Import necessary packages
const {
Connection,
Keypair,
clusterApiUrl,
PublicKey,
} = require('@solana/web3.js');
const {
getOrCreateAssociatedTokenAccount,
transferChecked,
TOKEN_2022_PROGRAM_ID,
} = require('@solana/spl-token');
// Initialize a connection to the Solana devnet
const connection = new Connection(clusterApiUrl('devnet'), 'confirmed');
// Function to transfer PYUSD from one wallet to another
async function transferPYUSD(amountToTransfer = 1) {
// Source wallet (pre-existing, assumed to have enough SOL and PYUSD)
const sourceWallet = Keypair.fromSecretKey(new Uint8Array(
<INSERT_WALLET_SECRET_KEY_HERE>
));
// Create a destination wallet
const destinationWallet = Keypair.generate();
console.log('Created destination wallet:', destinationWallet.publicKey.toBase58());
// Mint address of PYUSD
const PYUSD_MINT_ADDRESS = new PublicKey('CXk2AMBfi3TwaEL2468s6zP8xq9NxTXjp9gjMgzeUynM');
try {
// Get or create the associated token account for the source wallet
const sourceTokenAccount = await getOrCreateAssociatedTokenAccount(
connection,
sourceWallet,
PYUSD_MINT_ADDRESS,
sourceWallet.publicKey,
true,
"finalized",
{ commitment: "finalized" },
TOKEN_2022_PROGRAM_ID,
);
console.log('Source token account:', sourceTokenAccount.address.toBase58());
// Get or create the associated token account for the destination wallet
const destinationTokenAccount = await getOrCreateAssociatedTokenAccount(
connection,
sourceWallet,
PYUSD_MINT_ADDRESS,
destinationWallet.publicKey,
true,
"finalized",
{ commitment: "finalized" },
TOKEN_2022_PROGRAM_ID,
);
console.log('Destination token account:', destinationTokenAccount.address.toBase58());
// Transfer 1 PYUSD (1 * 10^6 units) from source to destination
console.log(`Transferring 1 PYUSD to destination wallet...`);
// Call the transfer function
const transactionSignature = await transferChecked(
connection,
sourceWallet,
sourceTokenAccount.address,
PYUSD_MINT_ADDRESS,
destinationTokenAccount.address,
sourceWallet.publicKey,
amountToTransfer * Math.pow(10, 6),
6,
[sourceWallet],
{ commitment: "finalized" },
TOKEN_2022_PROGRAM_ID,
);
console.log('Transfer transaction signature:', transactionSignature);
console.log('Transfer successful!');
} catch (err) {
console.error('Error in transferring PYUSD:', err);
}
}
transferPYUSD().catch(err => {
console.error('Unhandled error in transferring PYUSD:', err);
});
A lot is happening here, so let’s unpack it a little:
- We establish a connection with Solana devnet.
- Next, we obtain the keypair of our source wallet using the private key obtained from id.json. Make sure to paste in the array of 64 numbers where the above code says <WALLET_SECRET_CODE_HERE>.
- We then create a new destination wallet. If you already have a wallet you know you want to send PYUSD to, feel free to hardcode this.
- We obtain the PYUSD token account address for the source and destination wallet. If it doesn’t exist, we create a new one.
- We transfer the requisite amount from the source token account to the destination token account.
Some functions, such as transferChecked, have many arguments being passed in. Although the list is large, the arguments should be fairly simple to understand. You can find more details on these arguments in the documentation.
Running this script (node transfer.js) results in 1 PYUSD being transferred. You can verify this by checking the token holdings of the destination wallet.
Conclusion
Solana's token extensions are a core part of the implementation of PYUSD on Solana. Taking the time to understand how TEs work, how PYUSD impelemnts them, and how to programaticaly call the extensions is a great step towards using PYUSD to the fullst both inside and outside of the PayPal ecosystem.
Keep Up with PYUSD here!
Recommended

How to use ENS Names for Easy PYUSD Payments
7 min read

Breaking New Ground: Winning Solutions from the PYUSD Portal Hackathon on Solana
5 min read

