PayPal Checkout with Node.js and Express
Add PayPal Checkout to a plain Node.js and Express app from scratch, using the Server SDK and PayPal JS SDK v6.
Last updated: August 24, 2026
Estimated time: 20 minutes
NodeJS
Express
Copy / Export
Adding PayPal to a plain Node.js server doesn't need a framework or a bundler. In this guide you build a small Express app from scratch; one server file and one HTML page. We'll create a PayPal order, let the buyer approve it, and capture the payment. The @paypal/paypal-server-sdk handles the PayPal side on the backend, and the PayPal JavaScript SDK v6 drives checkout in the browser.
Orders are created and captured on the server, with the price held server-side so the browser can never set its own amount. You'll build the client and server sides in step, seeing exactly where each piece plugs in, rather than starting from a finished file.
Want to skip the setup?
Use the Open in GitHub Codespaces button at the top of this page to launch the finished project in your browser, or clone the companion repo on GitHub to follow along locally.
What you'll build
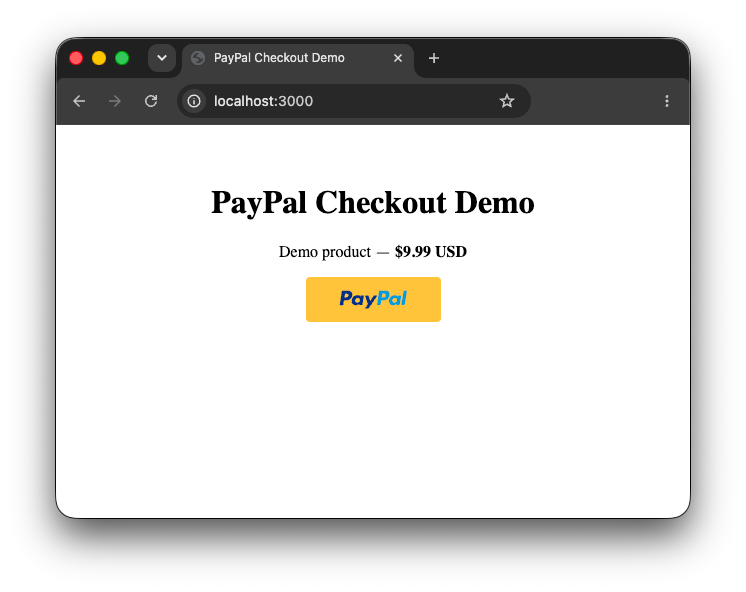
A minimal Express + TypeScript server with one demo product, $9.99 USD, sold through the native <paypal-button> web component on a plain HTML page. By the end, clicking the button creates a Sandbox order, walks the buyer through approval, and captures the payment, with a status message on the page confirming it.
Other PayPal features
PayPal and Pay Later work out of the box, with Venmo, Apple Pay, and cards available via extra components, across 200+ countries and 23+ currencies.
What you'll learn
By the end of this guide you'll know how to:
- Configure a PayPal
ClientandOrdersControllerfrom@paypal/paypal-server-sdkon a plain Express server - Create and capture PayPal orders from Express route handlers, with prices held server-side so the browser can never set its own price
- Load the PayPal JS SDK v6 at runtime and drive checkout with the
<paypal-button>web component, building the click-to-capture flow one piece at a time
Tech stack
| Layer | Technology |
|---|---|
| Frontend | Plain HTML and JavaScript, PayPal JS SDK v6 (loaded at runtime) |
| Backend | Express, TypeScript, @paypal/paypal-server-sdk |
Prerequisites
Project structure
Once you've finished this guide, the project will look like this:
paypal-integration/
├── src/
│   └── index.ts       # Express app: settings, PayPal client, routes
├── public/
│   └── index.html     # Loads the PayPal SDK, renders <paypal-button>, drives checkout
├── package.json
├── tsconfig.json
└── .env                # Your credentials (never commit this)
How the payment flow works
- The buyer clicks the
<paypal-button>web component. - The click handler starts a PayPal payment session, which calls your client-side
createOrder(). createOrder()calls your/api/ordersendpoint, which usesOrdersControllerto create the order with PayPal and returns the order ID.- The buyer approves the payment in the PayPal popup or redirect.
- The session's
onApprovecallback calls your/api/orders/:orderId/captureendpoint, which captures the order and finalizes the payment.
Build the checkout
Install the PayPal server SDK
npm install @paypal/paypal-server-sdkThis is the only extra dependency on the server. It wraps the PayPal REST API with types and handles OAuth for you.
Add your Sandbox credentials
PAYPAL_CLIENT_ID=your_sandbox_client_id
PAYPAL_CLIENT_SECRET=your_sandbox_secret
PAYPAL_ENV=sandbox
PORT=3000
PAYPAL_ENV toggles between Sandbox and live, and PORT is optional if you're happy with 3000.
Warning
If you are using a version control system like Git, add .env to your .gitignore before you go any further.
PAYPAL_CLIENT_SECRET stays server-side for the life of the app and should never be committed or sent to the browser.
Load your settings in Express
import dotenv from "dotenv";

dotenv.config();

const paypalSettings = {
  clientId: process.env.PAYPAL_CLIENT_ID,
  clientSecret: process.env.PAYPAL_CLIENT_SECRET,
  env: process.env.PAYPAL_ENV as "sandbox" | "live",
};
Add this above the line where you create the Express app, const app = express();.
Stub the API routes
Add three routes you'll fill in as you go:
app.get("/api/config", (_req, res) => {
  res.status(500).send();
});

app.post("/api/orders", async (_req, res) => {
  res.status(500).send();
});

app.post("/api/orders/:orderId/capture", async (req, res) => {
  res.status(500).send();
});
Implement /api/config
app.get("/api/config", (_req, res) => {
  res.json({
    clientId: paypalSettings.clientId,
    env: paypalSettings.env,
    sdkUrl:
      paypalSettings.env === "live"
        ? "https://www.paypal.com/web-sdk/v6/core"
        : "https://www.sandbox.paypal.com/web-sdk/v6/core",
  });
});
Replace the stubbed handler with this. It hands the browser the public Client ID, the environment, and the matching SDK URL, so switching Sandbox and live is a single environment variable, with no client-side change.
Load the PayPal SDK in the browser
<script>
  async function loadPayPalConfig() {
    const response = await fetch("/api/config");
    return response.json();
  }

  loadPayPalConfig().then((config) => {
    const script = document.createElement("script");
    script.src = config.sdkUrl;
    script.onload = () => {
      // Initialize PayPal buttons here
    };
    document.head.appendChild(script);
  });
</script>
Add this inside <body>. It fetches your config, then loads the PayPal SDK script it points to.
Add the button markup
<div id="paypal-button-container">
  <paypal-button hidden></paypal-button>
</div>
<div id="result"></div>
<paypal-button> is a web component the PayPal SDK provides. It starts hidden so buyers never see a button before it's ready to handle a click.
Initialize the SDK and show the button
script.onload = async () => {
  const sdkInstance = await window.paypal.createInstance({
    clientId: config.clientId,
    components: ["paypal-payments"],
    pageType: "checkout",
  });

  const paypalButton = document.querySelector("paypal-button");
  paypalButton.removeAttribute("hidden");
};
createInstance takes your Client ID and the components you want, paypal-payments here. Reload http://localhost:3000 and you should see the button. Clicking it won't do anything yet.
Add a click handler
const paypalButton = document.querySelector("paypal-button");

paypalButton.addEventListener("click", async () => {
  alert("make paypal work");
});

paypalButton.removeAttribute("hidden");
Wire up the click handler before you reveal the button, so it's never clickable without one attached. Click the button now, you should see the alert, confirming the handler is live before you build the real payment flow on top of it.
Start a PayPal payment session
paypalButton.addEventListener("click", async () => {
  const paypalPaymentSession = sdkInstance.createPayPalOneTimePaymentSession({
    onApprove(data) {
      console.log("Payment approved:", data);
    },
  });

  await paypalPaymentSession.start(
    { presentationMode: "auto" }, // Auto-detects best presentation mode
    createOrder(),
  );
});
Replace the alert with this. start() takes a presentation option and a call to createOrder(), which must resolve to an object with an orderId property. That's what kicks off the checkout. Click the button now and check your console: you'll see an error that createOrder is not defined, which the next step fixes.
Implement createOrder on the client
async function createOrder() {
  const response = await fetch("/api/orders", {
    method: "POST",
    headers: { "Content-Type": "application/json" },
    body: JSON.stringify({ itemId: "demo-product" }),
  });
  return response.json(); // Must resolve to { orderId: "..." }
}
Add this next to loadPayPalConfig(). It's hardcoded to demo-product here; in a real app you'd pass whichever item the buyer is checking out with.
Configure the server-side SDK
import { CheckoutPaymentIntent, Client, Environment, OrdersController } from "@paypal/paypal-server-sdk";Add that import alongside your others, then add the stub catalogue and the OrdersController above where you create the Express app:
// A simple in-memory catalogue of items that can be purchased.
const items = new Map([
  ["demo-product", { amount: { currencyCode: "GBP", value: "9.99" }, description: "Demo product" }],
]);

const ordersController = new OrdersController(
  new Client({
    clientCredentialsAuthCredentials: {
      oAuthClientId: process.env.PAYPAL_CLIENT_ID!,
      oAuthClientSecret: process.env.PAYPAL_CLIENT_SECRET!,
    },
    environment: process.env.PAYPAL_ENV === "live" ? Environment.Production : Environment.Sandbox,
  }),
);
Prices live in items, not in anything the browser sends, so a buyer can never pay less than the real price.
Create the order on the server
app.post("/api/orders", async (req, res) => {
  const { itemId } = req.body;
  const item = items.get(itemId);

  if (!item) {
    return res.status(400).json({ error: "Invalid item ID" });
  }

  try {
    const { result } = await ordersController.createOrder({
      body: {
        intent: CheckoutPaymentIntent.Capture,
        purchaseUnits: [item],
      },
    });

    res.json({ orderId: result.id });
  } catch (err) {
    res.status(500).json({ error: "Failed to create order" });
  }
});
Replace the stubbed handler with this. It looks the item up by itemId, asks PayPal to create the order, and returns the order id the client is waiting for.
Refresh the page and click the button. You can now complete a Sandbox payment using a PayPal test card or your Sandbox buyer account, though the payment won't be captured until the next two steps.
Capture the order on the server
app.post("/api/orders/:orderId/capture", async (req, res) => {
  try {
    const { orderId } = req.params;
    const { result } = await ordersController.captureOrder({ id: orderId });
    res.status(200).json(result);
  } catch (err) {
    res.status(500).json({ error: "Failed to capture order" });
  }
});
Replace the stubbed capture handler with this. Approving an order doesn't move any money on its own, capturing it does.
Capture the order on the client
const paypalPaymentSession = sdkInstance.createPayPalOneTimePaymentSession({
  onApprove: async (data) => {
    const response = await fetch(`/api/orders/${data.orderId}/capture`, {
      method: "POST",
      headers: { "Content-Type": "application/json" },
    });
    const responseData = await response.json();

    document.getElementById("result").textContent =
      responseData.status === "COMPLETED"
        ? "Payment completed successfully!"
        : `Payment status: ${responseData.status}`;
  },
});
Replace the onApprove you added earlier with this. Now, when a buyer approves the payment, the client calls your capture endpoint and shows the result on the page.
Test the full flow
Refresh http://localhost:3000, click the PayPal button, and complete a payment with your Sandbox buyer account, found in the PayPal Developer Dashboard under Sandbox → Accounts. To pay by card instead, use one of the test card numbers listed under Sandbox → Cards in the Developer Dashboard. Any future expiry date and a matching-length CVV are accepted in Sandbox.
You should see "Payment completed successfully!" once the capture finishes.
Tip
Use the Sandbox buyer email and password from the Developer Dashboard to complete a test transaction. Never enter real card details in Sandbox mode.
Before you ship
Being production ready
This is a demo, built step by step for clarity. Before using anything like it in production:
- Handle buyer cancellations and SDK errors with the session's
onCancelandonErrorcallbacks, not justonApprove. - Track order and capture status in your own database instead of relying on the PayPal dashboard to know what happened.
- Return meaningful HTTP status codes and error messages from
/api/ordersand/api/orders/:orderId/capture, instead of a bare 500. - Refactor out of the single-file, nested-callback structure used here for teaching, into whatever shape fits your app.
Troubleshooting
Still stuck?
Ask in the PayPal Developer Community, or open an issue on the companion GitHub repo.
Full project
The complete project is in the companion GitHub repo, or launch it instantly with the Open in GitHub Codespaces button at the top of this page.
Frequently asked questions
Can I use plain JavaScript instead of TypeScript?
Yes. Rename src/index.ts to src/index.js, remove the type annotations, and drop the tsc build step. Everything else works the same way.
Where do I find my Sandbox buyer credentials?
Log in to the PayPal Developer Dashboard, go to Sandbox → Accounts, and use the default personal (buyer) account's generated email and password to complete a test transaction.
Can I change the hardcoded $9.99 amount?
Yes. Add more entries to the items map, or look the amount up from a real cart or database before calling createOrder. Never accept the amount from the browser.
What happens if the buyer closes the PayPal popup without paying?
Nothing. onApprove only fires after the buyer approves the payment. If they cancel or close the popup, the order stays created but uncaptured, and no money moves.
Is it safe to expose the Client ID through /api/config?
Yes. The Client ID is a public identifier the PayPal JS SDK needs to initialize, and it's safe to send to the browser. PAYPAL_CLIENT_SECRET is different: it never leaves src/index.ts.
How do I add Venmo, Pay Later, or card fields?
Those are additional components layered on top of this one-time-payment button. Start from the JavaScript SDK reference to see which components to load for each method.