Customize PayPal Ratenzahlung messaging layout on WooCommerce (Germany-Based Merchants)
Last updated: Dec 16th, 11:55am
Promote PayPal Ratenzahlung offers using messaging on your WooCommerce store.
PayPal offers short-term, interest-free payments and other special financing options that buyers can use to buy now and pay later. You get paid up-front, and there are no additional costs.
Know before you begin
- Before you begin, learn more about PayPal Ratenzahlung offers.
- PayPal Ratenzahlung messaging is enabled for new merchants. If you're an existing merchant, enable the messaging.
- You are eligible for PayPal Ratenzahlung if you are a DE-based merchant that sells in Euros. You must have an eligible PayPal payment solution integrated with your website to offer PayPal Ratenzahlung. Merchants who have integrated Ratenzahlung Powered by PayPal for their online store are not eligible. Get help removing Ratenzahlung Powered by PayPal integration.
- You are eligible to promote PayPal Ratenzahlung on your online store if you have a One-Time payment integration. Merchants with only Reference Transaction or Recurring Payment integrations are not eligible.
- Additionally, PayPal Ratenzahlung follows the PayPal Acceptable Use Policy, which governs the usage of PayPal and prohibits the use of PayPal and/or PayPal Ratensahlung for certain types of transactions (e.g. real money gaming, firearms, etc.)
How it works
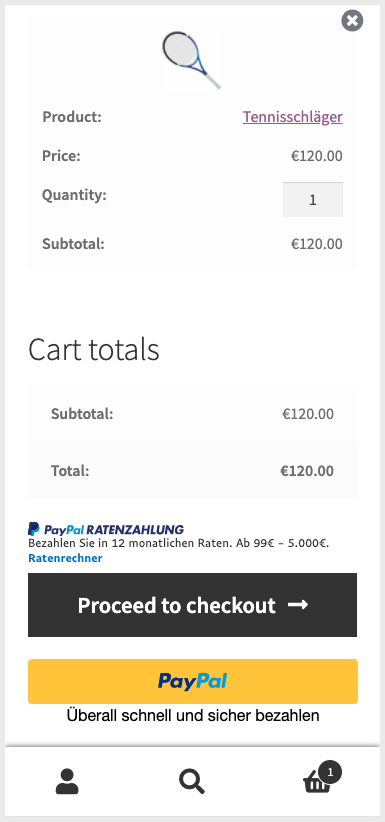
These are sample pages that have PayPal Ratenzahlung messaging enabled for webpages and mobile devices.
PayPal Ratenzahlung messaging on a webpage

PayPal Ratenzahlung messaging on a mobile device
Choose your workflow
PayPal Ratenzahlung is supported for WooCommerce PayPal Payments. When you enable this module and connect a PayPal account, PayPal Ratenzahlung messaging is enabled by default. Ensure that PayPal Payments is on version 1.1.0.
WooCommerce PayPal Payments
Before you can install WooCommerce PayPal Payments, install the following:
- WordPress version 5.3 or higher.
- WooCommerce version 3.9 or higher. Activate WooCommerce after the installation.
- PHP version 7.0 or higher.
Install WooCommerce PayPal Payments
- Log in to your WordPress installation.
- Select Plugins > Add new.
- Search for the WooCommerce PayPal Payments plugin.
- Select Install Now and wait until the plugin is installed successfully.
- You can activate the plugin by selecting Activate now on the success page. If you want to activate it later, select Plugins > Installed Plugins.
Set up WooCommerce PayPal Payments
Complete the following steps to connect the plugin to your PayPal account.
- Log in to your WooCommerce admin panel.
- Select WooCommerce > Settings.
- Select the Payments tab.
- Select Set Up (or Manage if it’s already active) next to PayPal.
- Select the check box next to Enable/Disable.
- To enable PayPal Payments, select Connect to PayPal.
- Follow the prompts to connect your existing PayPal account or create a new account.
Note Ensure that PayPal Payments is on version 1.1.0.
Update the plugin
- Log in to the WooCommerce admin panel.
- On the left side of the page, select Plugins.
- Select update now.
Customize the messaging layout
After you set up WooCommerce PayPal Payments, you can customize the messaging layout at the following locations:
- Checkout
- Product pages
- Shopping cart
- In the WooCommerce admin panel, select the Payments tab.
- Select Manage next to your module.
- Scroll down to Advanced Settings.
- Navigate to Credit Messaging on Checkout or Credit Messaging on a Single Product.
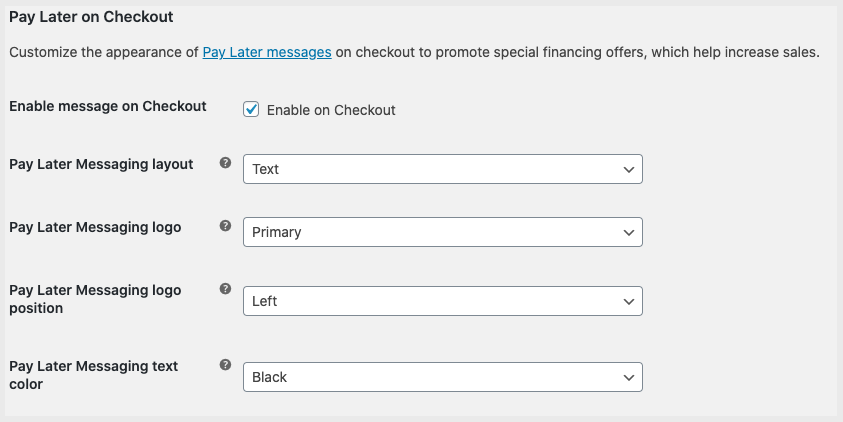
- If you're an existing user, select the check box with the words Enable message. This enables Pay Later messaging.
- From the dropdown lists, customize the messaging layout by changing the layout, logo, position, and text color.
See also
See the WooCommerce documentation page for WooCommerce PayPal Payments to learn more about WooCommerce PayPal Payments.