STEP 2 Provide wallet access
Last updated: Aug 15th, 7:16am
The first thing a mobile payments app must do is allow a user to register and access a wallet profile in the WLW platform that is uniquely associated with the device on which the app is installed.
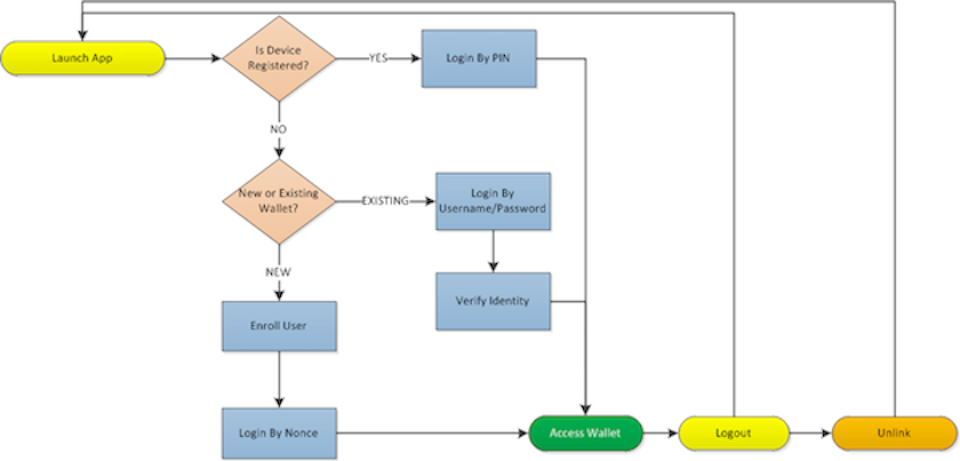
As the flow diagram illustrates, there are three possible paths of access to a wallet once the app launches. This section walks through the steps to implement each of these paths, which invoke endpoints exposed through the security and userregistration packages of the Android SDK.
Note: Mobile app screens shown in this guide are for functional demonstration only and not intended as design recommendations.
1. Validate device status
The first step in providing wallet access through the app is to identify the device on which the app is installed and determine whether or not it is already associated with a wallet on the WLW platform.
Note: You should invoke the device status check every time the app launches, as well as when the app resumes to the foreground after having been in the background. Since it is possible for a device to be deactivated remotely in the case of loss, it is important to always verify that the device is registered and active at the time of use.
IMPLEMENTATION STEPS
- Bind to the UserManagementService.
- Set the UserManagementService listener.
- Invoke
validateDeviceStatus. - Configure callbacks to handle responses and display appropriate next screens.
1(1) public ServiceConnection userManagementServiceConnection = new ServiceConnection()2 {3 @Override4 public void onServiceConnected(ComponentName name, IBinder service)5 {6 userManagementService = ((LocalBinder <IUserManagementService>) service).getService();7 (2) if (userManagementService != null)8 {9 userManagementService.setUserManagementServiceListener(userAdapter);10 (3) DeviceInfo deviceInfo = new DeviceInfo();11 deviceInfo.setDeviceId(DevicePropertyUtil.retrieveDeviceProperties(getActivity()).get(IDevicePropertyCodes.DEVICE_ID));12 deviceInfo.setDeviceTypeName(AppConstants.DEVICE_TYPE);13 userManagementService.validateDeviceStatus(deviceInfo);14 }15 }
Based on the results of the device check, display one of two screens:
Device is not registered: display the Welcome screen.
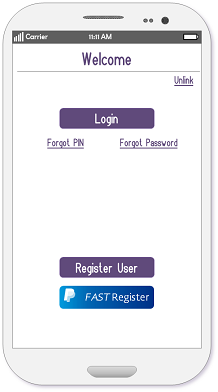
The Welcome screen gives the user the option to register a new wallet (Enroll a New Wallet) or to associate an existing wallet with the current device (Login With Username/Password). WLW advises also including operators to allow a user to reset forgotten credentials.
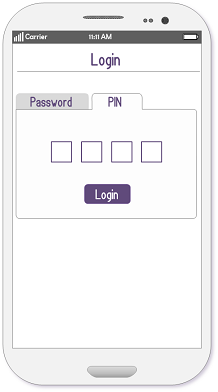
Device is registered: display the PIN Login screen (Login With PIN).
1(4) protected UserManagementListenerAdapter userAdapter = new UserManagementListenerAdapter()2 {3 @Override4 public void onValidateDeviceStatusSuccess(DeviceState deviceState)5 {6 Log.v(TAG, "" + deviceState.isRegistered());7 if (deviceState.isRegistered())8 {9 deviceLinked = true;10 }11 else12 {13 disableActionItem(getActionItem(R.id.left_button));14 disableActionItem(getActionItem(R.id.right_button));15 registerPaypalTextView.setVisibility(View.VISIBLE);16 registerNewTextView.setVisibility(View.VISIBLE);17 forgotPasswordTextView.setVisibility(View.VISIBLE);18 forgotPasscodeTextView.setVisibility(View.VISIBLE);19 }20 }
2. Enroll a new wallet
Once the app is determined to be installed on an unregistered device and the user elects to register a new wallet, proceed with the new user enrollment flow.
IMPLEMENTATION STEPS
- Retrieve MFA security questions.
- Retrieve the password and PIN minimum requirements.
- Present the user with the enrollment form.
- Submit the registration profile.
- Authenticate the user and register the device.
1. Retrieve MFA security questions
As part of WLW's multi-factor authentication (MFA) protocol, user must provide responses for a predefined number of security questions to be used for secondary identity verification when needed, such as in the case of a forgotten PIN or password.
The wallet issuer configures a pool of security questions from which the user may choose to provide responses for the issuer-designated required number. Retrieve these issuer configurations in order to present them to the user in the enrollment form.
1userManagementService.retrieveMfaQuestions();
The success response returns the pool of available questions and the number of questions for which the user must provide a response, as well as whether any of the questions is mandatory.
1@Override2 public void onRetrieveMfaQuestionsSuccess(MFAQuestionList mfaQuestionList)3 {4 super.onRetrieveMfaQuestionsSuccess(mfaQuestionList);5 mfaList = mfaQuestionList;6 isMFARetrieved = true;7 registerNewUser();8 }
Use this returned data to facilitate collection of the user's security question responses for use in populating the MfaQuestionAnswers attribute of the createCustomer instance.
2. Retrieve password and PIN requirements
The user enrollment will fail if the PIN and password values submitted by the user do not meet the minimum requirements set by the issuer. Retrieving the set of requirements before you present the enrollment form to the user allows you to advise the user of the requirements beforehand, implement field validation in the app, and preempt such failure.
Note: Password and PIN requirements are retrieved independently using separate methods, as shown in the following sample.
1userManagementService.retrievePasswordPolicyConfiguration();2userManagementService.retrievePasscodeConfiguration();3@Override4public void onRetrievePasscodeConfiguration(PasscodeConfiguration passcodeConfiguration)5{6 super.onRetrievePasscodeConfiguration(passcodeConfiguration);7 /*validate user passcode against policy configuration*/8}9@Override10public void onRetrievePasswordPolicyConfigurationSuccess(PasswordConfiguration passwordConfiguration)11{12 super.onRetrievePasswordPolicyConfigurationSuccess(passwordConfiguration);13 Log.v(TAG, "min length" + passwordConfiguration.getPasswordMinLength() + " " + "max length" + passwordConfiguration.getPasswordMaxLength());14 /*validate user password against policy configuration*/15}
3. Present enrollment form to user
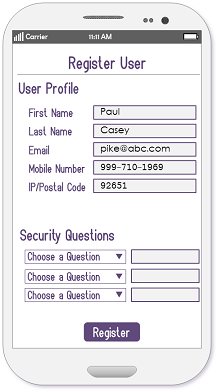
Once you have retrieved all the relevant data about required registration values and configuration settings, display a registration form to collect the corresponding input from the user.
4. Submit the registration profile
Once all the relevant profile data has been collected and mapped to the corresponding fields, build the CreateCustomer class.
1CreateCustomer createCustomer = new CreateCustomer();2createCustomer.setFirstName(AppConstants.USER_FIRST_NAME);3createCustomer.setLastName(AppConstants.USER_LAST_NAME);4createCustomer.setEmail(AppConstants.EMAIL);5createCustomer.setPassword(AppConstants.PASSWORD);6createCustomer.setConfirmPassword(AppConstants.PASSWORD);7createCustomer.setPasscode(AppConstants.PASSCODE);8createCustomer.setConfirmPasscode(AppConstants.PASSCODE);9createCustomer.setPhone(AppConstants.PHONE);10createCustomer.setMfaQuestionAnswers(getMfaAnswers(mfaList));
When the CreateCustomer object is populated with the user's input values, invoke the registration call.
1userManagementService.registerUser(createCustomer);
5. Authenticate the user and register the device
The registration success response returns the CreatedCustomer object containing a temporary, one-time nonce value. Configure the callback to invoke loginByNonce using that value to seamlessly authenticate the user and complete the device-wallet association.
Note: The nonce value specifies a time-to-live property. If the loginByNonce call is not invoked within that limit, the call will fail.
1public void onRegisterUserSuccess(final CreatedCustomer createdCustomer)2 {3 super.onRegisterUserSuccess(createdCustomer);4 Log.v(TAG, "User register Success");5 AlertDialog.Builder alert = new AlertDialog.Builder(LoginActivity.this);6 alert.setMessage(getString(R.string.register_success));7 alert.setPositiveButton(getString(R.string.button_label_ok), new DialogInterface.OnClickListener()8 {9 @Override10 public void onClick(DialogInterface dialog, int which)11 {12 loginByNonce(createdCustomer.getNonce());13 Log.v(TAG, "Nonce=" + createdCustomer.getNonce());14 }15 });16 alert.show();17 }18 private void loginByNonce(String nonce)19 {20 DeviceSecurityProfile deviceSecurityProfile = new DeviceSecurityProfile();21 deviceSecurityProfile.setNonce(nonce);22 /*use this constructor for Device : Device(final ContextWrapper contextWrapper)*/23 device = new Device(this);24 deviceSecurityProfile.setDevice(device);25 userLoginService.loginByNonce(deviceSecurityProfile);26 }
This completes the new wallet registration path for accessing a mobile wallet through the app.
Note: If email verification is enabled, you cannot use the login by nonce method. The user must complete the email verification and then login by username/password in order to complete the device-wallet link.
3. Login with Username/Password
Logging into the app with the username and password credentials is typically triggered in the following use cases:
- The user already has a wallet account, but is accessing it for the first time on a new (unregistered) device.
- The user has previously unlinked the existing wallet account from the current device and must re-associate the device with the wallet account.
- the user just completed a new registration that required email verification and therefore could not invoke loginByNonce for the first authentication.
- The device is already linked to an existing mobile wallet, but the wallet issuer does not support Login By PIN (this is not common).
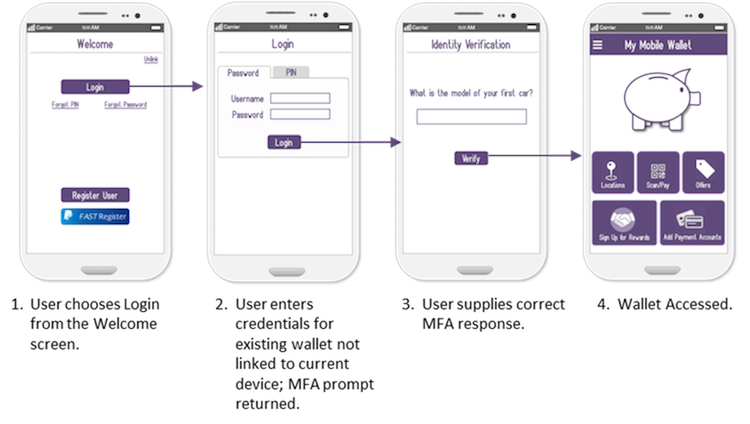
In the first three use cases, the device does not yet have a recognized association with an existing account. Therefore, successful login will trigger the multi-factor authentication flow in order to verify the user's identity and associate the device with the wallet.
IMPLEMENTATION STEPS
1. Invoke Username & Password login
When the device status check reveals that the app is not registered with the device, and the user chooses Login from the Welcome screen, it is typically because the user already has a wallet, it is just not currently associated with the device. The user may have unlinked the wallet from the device or may have gotten a new phone.
In any case, display the Username & Password Login screen and pass the user's input values in the loginWithUsernamePassword call.
First, define the service connection and configure the onServiceConnected callback to initialize the UserLoginService.
1private UserLoginService userLoginService;2public ServiceConnection userLoginServiceConnection = new ServiceConnection()3{4 @Override5 public void onServiceDisconnected(ComponentName name)6 {7 userLoginService = null;8 }9 @Override10 public void onServiceConnected(ComponentName name, IBinder service)11 {12 userLoginService =13 ((LocalBinder <UserLoginService> ) service).getService();14 if (userLoginService != null)15 {16 userLoginService.setUserLoginListener(loginAdapter);17 }18 }19};
Next, bind the service connection.
1Intent serviceIntent = new Intent(this, UserLoginService.class);2bindService(serviceIntent, userLoginServiceConnection, BIND_AUTO_CREATE);
Finally, collect the users' input credentials and build a deviceSecurityProfile instance and pass it with the login request.
1UserCredentials userCredentials = new UserCredentials(email, AppConstants.PASSWORD);2DeviceSecurityProfile deviceSecurityProfile = new DeviceSecurityProfile();3deviceSecurityProfile.setUserCredentials(userCredentials);4Device device=new Device();5deviceSecurityProfile.setDevice(device);6userLoginService.loginWithUsernamePassword(deviceSecurityProfile);
2. Invoke MFA authentication
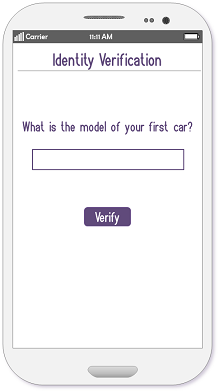
When a user successfully logs into an existing wallet from an unregistered device, the platform returns the onPromptMfa callback with the 412 status code and a randomly selected question from the set of security questions for which the user has previously provided responses.
Configure this callback to prompt the user to input the answer to the question and then populate the question and response values in an instance of the deviceSecurityProfile object. Then re-call loginWithUsernamePassword, passing the updated device profile instance.
1@Override2 public void onPromptMFA(String question)3 {4 super.onPromptMFA(question);5 Log.v(TAG, "MFA Prompt");6 submitMFA(question, AppConstants.MFA_ANSWER);7 }8 private void submitMFA(String mfaQuestion, String mfaAnswer)9 {10 DeviceSecurityProfile deviceSecurityProfile = new11 DeviceSecurityProfile();12 QuestionAndAnswer questionAndAnswer = new QuestionAndAnswer();13 questionAndAnswer.setSecurityQuestion(mfaQuestion);14 questionAndAnswer.setSecurityAnswer(mfaAnswer);15 deviceSecurityProfile.setUserCredentials(userCredentials);16 deviceSecurityProfile.setQuestionAndAnswer(questionAndAnswer);17 deviceSecurityProfile.setDevice(device);18 userLoginService.loginWithUsernamePassword(deviceSecurityProfile);19 }
4. Login with PIN
Display the PIN login screen when the device is associated with an existing wallet account and PIN login is supported by the issuer. Pass the user's input values in the loginWithPin call.
1UserCredentials userCredentials = new UserCredentials(AppConstants.PASSCODE);2DeviceSecurityProfile deviceSecurityProfile = new DeviceSecurityProfile();3deviceSecurityProfile.setUserCredentials(userCredentials);4Device device=new Device();5deviceSecurityProfile.setDevice(device);6userLoginService.loginWithPin(deviceSecurityProfile);
5. Logout
It is important to provide a means for the user to explicitly logout, if desired.
The WLW platform automatically terminates an app session after a maximum duration of inactivity specified by the wallet issuer. Some apps allow the user to set a preference for session timeout that is less than the default issuer timeout. In such cases, the app must invoke the logout method upon expiration of the user-specified timeout. Otherwise, the session will remain active until the issuer-configured timeout expires.
- Define a Logout operator on the app Home screen.
- Instantiate the userLogoutService.
- Invoke the SDK logout method upon activation of operator.
- Configure Success and Failure callbacks to handle server response.
1(1) @Override2 protected void onCreate(Bundle savedInstanceState)3 {4 super.onCreate(savedInstanceState);5 setContentView(R.layout.activity_home);6 setUpActionBar();7 setLeftButtonText(getString(R.string.action_unlink));8 setRightButtonText(getString(R.string.text_logout));9 progressBar = (ProressBar) findViewById(R.id.progressBar);10 View.OnClickListener onClickListener = new View.OnClickListener()11 {12 @Override13 public void onClick(View v)14 {15 Intent intent;16 if (v.getId() == R.id.wallet_btn)17 {18 intent = new Intent(HomeActivity.this, MyWalletActivity.class);19 startActivity(intent);20 ...21 }22 else23 if (v.getId() == R.id.right_button)24 {25(2) userLogoutService.setLogoutListener(userLogoutListener);26(3) userLogoutService.logout();27 progressBar.setVisibility(View.VISIBLE);28 disableActionItem(getActionItem(R.id.right_button));29 }30 }31(4) IUserLogoutListener userLogoutListener = new IUserLogoutListener()32 {33 @Override34 public void onLogoutSuccess()35 {36 Log.v(TAG, "USER LOGGED OUT SUCCESSFULLY ");37 progressBar.setVisibility(View.INVISIBLE);38 Intent intent = new Intent(HomeActivity.this, LoginActivity.class);39 startActivity(intent);40 HomeActivity.this.finish();41 }42 @Override43 public void onLogoutError(PaydiantException e)44 {45 Log.v(TAG, "USER LOGGED OUT ERROR ");46 progressBar.setVisibility(View.INVISIBLE);47 }48 };
Tip: Ensure that any sensitive data retrieved by the app is cleared from the app’s memory cache when the logout method is invoked.
6. Unlink a device
Occasionally, users have reason to divorce a device's association with a particular mobile wallet account. Since a device can only be associated with one mobile wallet account (for a specific issuing partner), a user must disassociate a device from the wallet to which it is currently registered in order to link it to a different account.
1private void unLinkDevice()2{3 if (unlinkDeviceService != null)4 {5 DeleteDevice deleteDevice = new DeleteDevice();6 deleteDevice.setDeviceId(DevicePropertyUtil.retrieveDeviceProperties(this).get(IDevicePropertyCodes.DEVICE_ID));7 deleteDevice.setDeviceTypeName(ApplicationProperties.DEVICE_TYPE);8 unlinkDeviceService.unlinkDevice(deleteDevice);9 progressBar.setVisibility(View.VISIBLE);10 }11}