STEP 3 Enroll payment methods
Last updated: Aug 15th, 6:07am
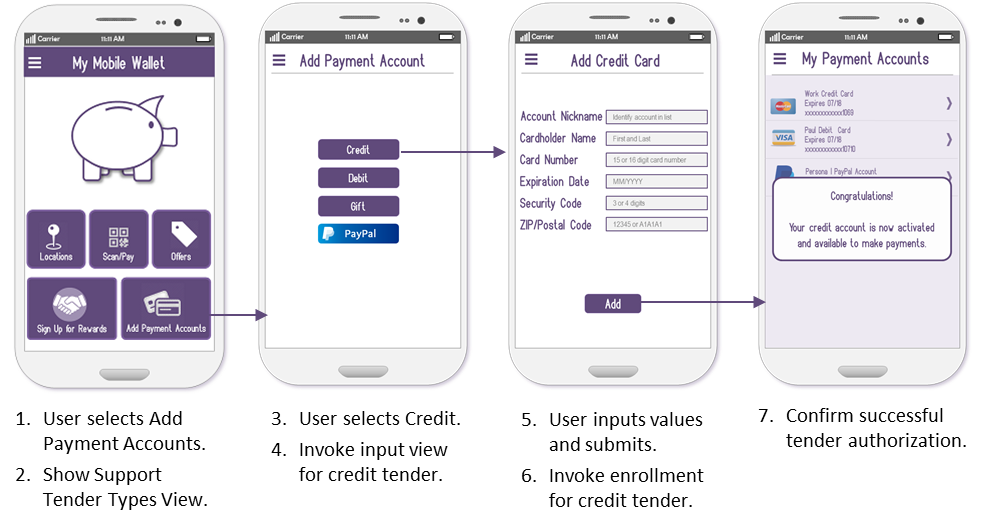
Once a user has an active wallet account and login credentials set up, the next necessary component is at least one method of payment. One of the strongest aspects of WLW's security is the fact that a user's payment information is not stored on the phone and is not passed to the POS during a transaction. WLW facilitates payment authorization through a secure, tokenized transmission directly from WLW's platform to the processor's server. WLW can interface with virtually any payment processor, so whether the tender is based on a credit card, debit card, store credit, gift card, loyalty reward, PayPal account, or other type of payment, WLW's mobile wallet can support it.
The payment account enrollment steps are:
1. Get Issuer tender types
While WLW supports virtually any type of payment method, each mobile wallet issuer can specify which payment types it will support. Some issuers may only allow gift cards, while others may support major credit cards and their own private label card.
Additionally, each different instrument of payment can have a distinct set of data that is required to both authenticate it for use in the wallet and use it as the source of payment in a transaction. For example, many credit cards require the billing zip code and security code for verification and use, while a gift card may only require the card number.
Consequently, it is important to retrieve the set of supported tenders so the app can prevent users from enrolling payment methods that are prohibited and collect the right data for each form of payment the user wishes to enroll.
IMPLEMENTATION STEPS
- Define Payment Account Manager (PAM) service connection.
- Set the service listeners to handle callbacks.
- Invoke
retrieveAllTenderTypes. - Disconnect the service connection and remove the listeners.
- Bind the service connection.
1private final ServiceConnection paymentAccountManagementServiceConnection = new ServiceConnection()2{3 @Override4 @SuppressWarnings("unchecked")5 public void onServiceConnected(final ComponentName arg0, final IBinder binder) {6 paymentAccountManagementService = ((LocalBinder <PaymentAccountManagementService> ) binder).getService();7 paymentAccountManagementService.setPaymentAccountRetrieveListener(paymentListenerAdapter);8 paymentAccountManagementService.retrieveAllTenderTypes();9 progressBar.setVisibility(View.VISIBLE);10 }11 @Override12 public void onServiceDisconnected(final ComponentName arg0)13 {14 paymentAccountManagementService = null;15 paymentAccountManagementService.removeListener();16 }17};18Intent paymentAccountMgmtIntent = new Intent(this, PaymentAccountManagementService.class);19bindService(paymentAccountMgmtIntent, paymentAccountManagementServiceConnection, BIND_AUTO_CREATE);20}
2. Evaluate supported tender types
The retrieval of supported tender types returns a set of tender type objects, each of which defines the set of data properties that are required or relevant for that particular tender type.
Before allowing a user to enroll a payment account of a particular type, first evaluate the attributes of that tender type in order to:
- present only supported tenders to the user for election
- invoke the appropriate enrollment process
- collect the right data from the user
Once the user elects to add a payment account of a particular supported type, evaluate the
attributes of the tenderType instance corresponding to the user's selection to determine which process to invoke. For example, if the value of the supportsMultiStepEnrollment attribute is YES, only processes initiated by startPaymentAccountEnrollment are valid. If multi-step is not supported, check to see whether provisioning is supported, etc., and proceed accordingly with either the addPaymentAccount or provisionAccount calls, as appropriate.
Note: Within each standard enrollment type, the process for any supported tender often varies slightly depending on the specific configuration of that tender and what the network processor requires. For example, PayPal requires a client token to call it's vZero SDK to facilitate user login, while some debit networks require double deposit verification. Therefore, most apps configure each tender enrollment as a separate segment that can be called when the corresponding dependencies are met.
Create a PaymentAccountData Instance
The PaymentAccountData instance is the repository for the relevant payment account properties you will populate with the user's input and submit with the appropriate enrollment method.
1PaymentAccountData paymentAccountData = new PaymentAccountData();2paymentAccountData.setAdditionalData(getAdditionalDataList());3if (selectedTender != null)4{5 paymentAccountData.setPaymentAccountNetworkTypeUri(selectedTender.getNetworkType().getPaymentAccountNetworkTypeUri());6 paymentAccountData.setPaymentAccountTypeUri(selectedTender.getAccountType().getPaymentAccountTypeUri());7}
Compile the Relevant Data
1List <PaymentAccountMetaData> currentPaymentAccountMetaData = selectedTender.getMetaData();2for (PaymentAccountMetaData paymentAccountMetaData: currentPaymentAccountMetaData)3{4 AdditionalData additionalData = new AdditionalData();5 currentViewText = null;6 if (paymentAccountMetaData.getDataGroup().equalsIgnoreCase(getResources().getResourceEntryName(R.id.ISSUER_PROVIDED)))7 {8 additionalData.setKey(paymentAccountMetaData.getKey());9 additionalData.setValue(paymentAccountMetaData.getDefaultValue());10 additionalDataList.add(additionalData);11 continue;12 }13 if (paymentAccountMetaData.getDataGroup().equalsIgnoreCase(getResources().getResourceEntryName(R.id.PAYDIANT_GENERATED)))14 {15 continue;16 }17 key = paymentAccountMetaData.getKey();18 if (key.equalsIgnoreCase(getResources().getResourceEntryName(R.id.STATE)))19 {20 additionalData.setKey(key);21 additionalData.setValue(AppConstants.STATE);22 additionalDataList.add(additionalData);23 }24 else if (key.equalsIgnoreCase(getResources().getResourceEntryName(R.id.COUNTRY)))25 {26 additionalData.setKey(key);27 additionalData.setValue(AppConstants.COUNTRY);28 additionalDataList.add(additionalData);29 }30 else if (key.equalsIgnoreCase(getResources().getResourceEntryName(R.id.EXPIRY_DATE)))31 {32 additionalData.setKey(key);33 additionalData.setValue("12-" + (Calendar.getInstance().get(Calendar.YEAR) + 1));34 additionalDataList.add(additionalData);35 }36 else if (key.equalsIgnoreCase(getResources().getResourceEntryName(R.id.CARD_NUMBER)))37 {38 additionalData.setKey(key);39 additionalData.setValue(AppConstants.VISA_CREDIT_CARD_NO);40 additionalDataList.add(additionalData);41 }42 else if (key.equalsIgnoreCase(getResources().getResourceEntryName(R.id.NICK_NAME)))43 {44 additionalData.setKey(key);45 additionalData.setValue(AppConstants.NICK_NAME);46 additionalDataList.add(additionalData);47 }48 else if (key.equalsIgnoreCase(getResources().getResourceEntryName(R.id.HOLDER_NAME)))49 {50 additionalData.setKey(key);51 additionalData.setValue(AppConstants.USER_FIRST_NAME + " " + AppConstants.USER_LAST_NAME);52 additionalDataList.add(additionalData);53 }54 else if (key.equalsIgnoreCase(getResources().getResourceEntryName(R.id.ADDRESS_LINE1)))55 {56 additionalData.setKey(key);57 additionalData.setValue(AppConstants.ADDRESS1);58 additionalDataList.add(additionalData);59 }60 else if (key.equalsIgnoreCase(getResources().getResourceEntryName(R.id.ADDRESS_LINE2)))61 {62 additionalData.setKey(key);63 additionalData.setValue(AppConstants.ADDRESS2);64 additionalDataList.add(additionalData);65 }66 else if (key.equalsIgnoreCase(getResources().getResourceEntryName(R.id.ZIP_CODE)))67 {68 additionalData.setKey(key);69 additionalData.setValue(AppConstants.ZIP_CODE);70 additionalDataList.add(additionalData);71 }72 else if (key.equalsIgnoreCase(getResources().getResourceEntryName(R.id.EMAIL)))73 {74 additionalData.setKey(key);75 additionalData.setValue(AppConstants.EMAIL);76 additionalDataList.add(additionalData);77 }78 else if (key.equalsIgnoreCase(getResources().getResourceEntryName(R.id.SECURITY_CODE)))79 {80 additionalData.setKey(key);81 additionalData.setValue(AppConstants.CVV);82 additionalDataList.add(additionalData);83 }84 else if (key.equalsIgnoreCase(getResources().getResourceEntryName(R.id.CITY)))85 {86 additionalData.setKey(key);87 additionalData.setValue(AppConstants.CITY);88 additionalDataList.add(additionalData);89 }90}
Note: WLW recommends implementing field-level validation in the app to ensure that the user's input complies with the data specifications for each field, such as whether a value is required and what format is expected, etc. This will ensure that the enrollment call does not fail due to invalid input and also allows the app to provide specific feedback about what is expected. If validation is not implemented and the enrollment call fails, the failure response will not indicate which field(s) contained invalid or missing values, possibly resulting in a poor user experience.
3. Submit enrollment request
Based on the requirements of the specific tender being added, configure the corresponding enrollment method and submit the compiled data instance.
startPaymentAccountEnrollment
This call is used to initiate a payment tender enrollment process that may take one or more steps to complete. Some external authorizing entities need to evaluate the first set of passed data in order to determine whether more information is required. If so, the call returns an enrollmentState of MORE_INFO and typically includes additional data related to the requirements. Otherwise, the call returns an enrollmentState of END and the enrollment is complete.
The PayPal tender is one such tender that requires multiple steps, and is therefore used as the code sample for multi-step tender enrollment.
Note: The sample excerpts shown are for demonstration purposes and do not represent the entire body of code associated with PayPal tender enrollment. Refer to the PayPal Integration Solution Guide for more comprehensive information.
Call the startPaymentAccountEnrollment, passing the data relevant to the PayPal tender.
1StartPaymentAccountEnrollment startPaymentAccountEnrollment = new2StartPaymentAccountEnrollment();3startPaymentAccountEnrollment.setEnrollmentType(EnrollmentType.PROVISION);4startPaymentAccountEnrollment.setPaymentAccountNetworkTypeUri(paypalTender.getNetworkType().getPaymentAccountNetworkTypeUri());5startPaymentAccountEnrollment.setPaymentAccountTypeUri(paypalTender.getAccountType().getPaymentAccountTypeUri());6com.paydiant.android.core.domain.transactionflow.AdditionalData additionalData = new7com.paydiant.android.core.domain.transactionflow.AdditionalData();8additionalData.setKey("NICK_NAME");9additionalData.setValue("PayPal");10List <com.paydiant.android.core.domain.transactionflow.AdditionalData> additionalDataList = new ArrayList <> ();11additionalDataList.add(additionalData);12startPaymentAccountEnrollment.setAdditionalData(additionalDataList);13paymentAccountManagementService.startPaymentAccountEnrollment(startPaymentAccountEnrollment);If the success callback indicates an enrollmentState of MORE_INFO, configure the app to provide the additionally requested info (in this case, the PayPal Billing Agreement).
1String authToken = paymentAccountEnrollment.getAdditionalEnrollmentData().get(0).getValue();23if (authToken != null) {4 try {5 // Authenticate BraintreeFragment with user token6 BraintreeFragment mBraintreeFragment = BraintreeFragment.newInstance(SelectAccountTypeActivity.this, authToken);7 if (mBraintreeFragment != null) {8 // set listeners9 mBraintreeFragment.addListener(SelectAccountTypeActivity.this);10 mBraintreeFragment.addListener(SelectAccountTypeActivity.this);11 mBraintreeFragment.addListener(SelectAccountTypeActivity.this);12 // Request billing agreement13 PayPalRequest payPalRequest = new PayPalRequest();14 PayPal.requestBillingAgreement(mBraintreeFragment, payPalRequest);15 }16} catch (InvalidArgumentException e) {17 e.printStackTrace();18}19List<AdditionalEnrollmentData> additionalEnrollmentDataList = new ArrayList<>();20// set nonce as AdditionalEnrollmentData21AdditionalEnrollmentData paymentNonceEnrollmentData = new AdditionalEnrollmentData();22paymentNonceEnrollmentData.setKey("PAYMENT_METHOD_NONCE"));23paymentNonceEnrollmentData.setValue(nonce);24additionalEnrollmentDataList.add(paymentNonceEnrollmentData);25// Create ContinuePaymentAccountEnrollment instance with correlation ids and additional data26ContinuePaymentAccountEnrollment continuePaymentAccountEnrollment = new27ContinuePaymentAccountEnrollment();28continuePaymentAccountEnrollment.setAdditionalEnrollmentData(additionalEnrollmentDataList);29continuePaymentAccountEnrollment.setPaydiantCorrelationId(PayPalEnrollmentCorrelationID);30continuePaymentAccountEnrollment.setExternalCorrelationId(ExternalCorrelationId);31// Trigger continuePaymentAccountEnrollment32paymentAccountManagementService.continuePaymentAccountEnrollment(continuePaymentAccountEnrollment);Configure the secondary response in the same way as the starting response; if the enrollmentState is END, complete the enrollment.
1onContinuePaymentAccountEnrollmentSuccess(PaymentAccountEnrollment paymentAccountEnrollment)
addPaymentAccount
Use this method to register a payment account as a valid tender in the wallet where, once verified, WLW becomes the system of record for the account, storing the PAN data within the secure platform Payment Account Manager database and managing payment authorization. This process is typically used for open-loop style tenders, such as credit and debit cards.
1paymentAccountManagementService.addPaymentAccount(paymentAccountData);2@Override3public void onAddPaymentAccountSuccess(DetailedPaymentAccount detailedPaymentAccount)4{5 super.onAddPaymentAccountSuccess(detailedPaymentAccount););6}
provisionPaymentAccount
Use this method to create a new payment account in the wallet user's name and add it as a valid tender in the wallet. This method is most often used to issue a new loyalty card to the wallet user, which can be used as tender once enough rewards points have been earned.
Refer to the WLW Android SDK Guide for implementation documentation for the provisionAccount method.