On this page
No Headings
Last updated: July 10, 2026
* Important: Sofort will be sunset on April 18, 2024. PayPal will not support Sofort payments starting April 19, 2024. Offer your users PayPal wallet and other alternative payment methods. Learn more.
Sofort is a payment method in Europe.
| Countries | Payment type | Payment flow | Currencies | Minimum amount | Maximum amount | Refunds |
|---|---|---|---|---|---|---|
Austria (AT) Belgium ( BE) Germany ( DE) Spain ( ES) Netherlands ( NL) | bank redirect | redirect | EUR | 1 EUR | 5000 EUR | Within 180 days |
United Kingdom (GB only) | GBP | 5000 GB |

There are 2 integration paths you can take:
Use the JavaScript SDK to render payment fields and buttons and process payments with Orders API.
Note: The payment button is disabled in the buyer experience demo. On button click, the user is redirected to their bank to authorize the transaction.
CHECKOUT.ORDER.APPROVED - Listen for this webhook and then capture the payment.CHECKOUT.PAYMENT-APPROVAL.REVERSED - This webhook tells you when an approved order is cancelled and refunded because it wasn't captured within the capture window. Let the payer know about the problem and the reversed order.MERCHANT-COUNTRY in the URL with the 2-character country code for the merchant's country of operation:
https://www.sandbox.paypal.com/bizsignup/entry?product=ideal&capabilities=IDEAL&country.x=MERCHANT-COUNTRYhttps://www.paypal.com/bizsignup/entry?product=ideal&capabilities=IDEAL&country.x=MERCHANT-COUNTRYNote: The integration steps for implementing alternative payment methods are similar. If you've integrated another alternative payment method before, you can likely reuse that code with adjustments for this payment method.
Use Postman to explore and test PayPal APIs.
Get up and running in GitHub Codespaces
GitHub Codespaces are cloud-based development environments where you can code and test your PayPal integrations. Learn more
Add or update the JavaScript SDK script on your web page.
<script src="https://www.paypal.com/sdk/js?client-id=YOUR_CLIENT_ID&components=buttons,payment-fields,marks,funding-eligibility&enable-funding=sofort¤cy=EUR"></script>See the JS SDK reference for a list of parameters you pass to the JavaScript SDK.
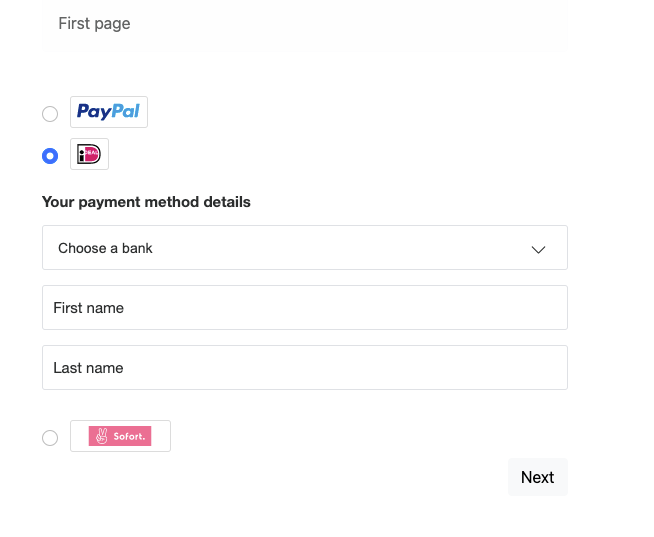
You can use a mark integration for payment fields components to present the payment method options to the buyer as radio buttons.

const sofortButton = paypal.Buttons({
  fundingSource: paypal.FUNDING.SOFORT
});
You can also render a set of eligible payment methods.
Use payment fields to collect payment information from buyers. Fields dynamically render based on the selected funding source and you can customize the fields to align with your brand.
Choose from a single page checkout flow or a multi-page checkout flow.
For Sofort, payment fields country, first name, and last name.
If there are validation errors in the input fields, they'll show on the click of the button.
paypal.PaymentFields({
  fundingSource: paypal.FUNDING.SOFORT,
  /* style object (optional) */
  style: {
    /* customize field attributes (optional) */
    variables: {},
    /* set custom rules to apply to fields classes (optional) */
    rules: {},
  },
  fields: {
    /* fields prefill info (optional) */
    name: {
      value: "John Doe",
    },
  }
})
.render("#sofort-container");A multi-page checkout flow spreads the checkout steps into two or more pages. This experience is applicable when an order details page needs to be shown to the buyer before an order is placed.
Tip: German merchants can leverage the multi-page flow to comply with local regulations.
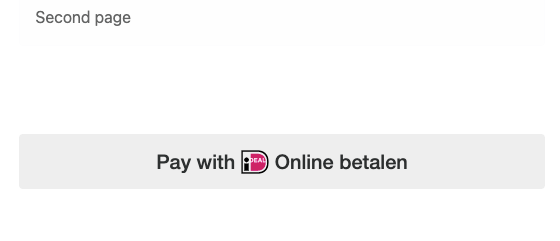
This example renders the mark and payment fields, but not the payment button, on your checkout page.
paypal.Marks({
    fundingSource: paypal.FUNDING.SOFORT
}).render('#sofort-mark')
paypal.PaymentFields({
fundingSource: paypal.FUNDING.SOFORT,
/* style object (optional) */
style: {
/* customize field attributes (optional) */
variables: {},
/* set custom rules to apply to fields classes (optional) */
rules: {},
},
onInit: (data, actions) => {
const form = document.querySelector("form.paypal-payment-form");
form.addEventListener("submit", (e) => {
const formData = new FormData(form);
const paymentSource = formData.get("payment-option");
if (paymentSource === paypal.FUNDING.SOFORT) {
e.preventDefault();
actions.validate().then((valid) => {
if (valid) {
window.location.href = `/second-page.html?payment-option=${paypal.FUNDING.SOFORT}`;
}
});
}
});
},
fields: {
/* fields prefill info (optional) */
name: {
value: "John Doe",
},
},
})
.render("#sofort-container");Based on the payment method selected on the first page, this example renders only the payment button along with the order details on the page. To complete checkout, the buyer clicks the payment button, authorizes, and confirms payment. You get the code to render the payment button in step 4.
For style parameters, please reference this style page: Custom style for payment fields
paypal.Buttons({
fundingSource: paypal.FUNDING.SOFORT,
  style: {
    label: "pay",
  },
  createOrder() {
    return fetch("/my-server/create-paypal-order", {
      method: "POST",
      headers: {
        "Content-Type": "application/json",
      },
      // use the "body" param to optionally pass additional order information
      // like product skus and quantities
      body: JSON.stringify({
        cart: [
          {
            sku: "YOUR_PRODUCT_STOCK_KEEPING_UNIT",
            quantity: "YOUR_PRODUCT_QUANTITY",
          },
        ],
      }),
    })
    .then((response) => response.json())
    .then((order) => order.id);
  },
   onApprove(data) {
    return fetch("/my-server/capture-paypal-order", {
      method: "POST",
      headers: {
        "Content-Type": "application/json",
      },
      body: JSON.stringify({
        orderID: data.orderID
      })
    })
    .then((response) => response.json())
    .then((orderData) => {
      // Successful capture! For dev/demo purposes:
      console.log('Capture result', orderData, JSON.stringify(orderData, null, 2));
      const transaction = orderData.purchase_units[0].payments.captures[0];
      console.log('Transaction Status:',  transaction.status);
      console.log('Transaction ID:', transaction.id);
      // When ready to go live, remove the alert and show a success message within this page. For example:
      // const element = document.getElementById('paypal-button-container');
      // element.innerHTML = '<h3>Thank you for your payment!</h3>';
      // Or go to another URL:  window.location.href = 'thank_you.html';
    });
  },
  onCancel(data, actions) {
    console.log(`Order Canceled - ID: ${data.orderID}`);
  },
  onError(err) {
    console.error(err);
  }
})
.render("#sofort-btn");
createOrder
Implement the createOrder function to allow the JavaScript SDK to submit buyer information and set up the transaction on the click of the button.
Note: Create Sofort orders in EUR/GBP currency.
Use your server-side Create order call to set up the details of a one-time transaction including the amount, line item detail, and more.
If order creation fails, the Orders API can return an error in the console.
After order creation, orders are confirmed with buyer selected payment source. If the order cannot be processed with the selected payment source, the relevant errors are returned in the console.
onCancel
Implement the optional onCancel() function to show a cancellation page or return to the shopping cart.
onError
Implement the optional onError() function to handle errors and display generic error message or page to the buyers. This error handler is a catch-all. Errors at this point are not expected to be handled beyond showing a generic error message or page.
Implement the onApprove function, which is called after the buyer approves the transaction.
Captures the funds from the transaction and shows a message to the buyer to let them know the transaction is successful. The method is called after the buyer approves the transaction on paypal.com.
Because this is a client-side call, PayPal calls the Orders API on your behalf, so you don't need to provide the headers and body.
capture() - Promise returning the order details.
paypal.Buttons({
  fundingSource: paypal.FUNDING.SOFORT,
 createOrder() {
    return fetch("/my-server/create-paypal-order", {
      method: "POST",
      headers: {
        "Content-Type": "application/json",
      },
      // use the "body" param to optionally pass additional order information
      // like product skus and quantities
      body: JSON.stringify({
        cart: [
          {
            sku: "YOUR_PRODUCT_STOCK_KEEPING_UNIT",
            quantity: "YOUR_PRODUCT_QUANTITY",
          },
        ],
      }),
    })
    .then((response) => response.json())
    .then((order) => order.id);
  },
  onApprove(data) {
    return fetch("/my-server/capture-paypal-order", {
      method: "POST",
      headers: {
        "Content-Type": "application/json",
      },
      body: JSON.stringify({
        orderID: data.orderID
      })
    })
    .then((response) => response.json())
    .then((orderData) => {
      // Successful capture! For dev/demo purposes:
      console.log('Capture result', orderData, JSON.stringify(orderData, null, 2));
      const transaction = orderData.purchase_units[0].payments.captures[0];
      console.log('Transaction Status:',  transaction.status);
      console.log('Transaction ID:', transaction.id);
      // When ready to go live, remove the alert and show a success message within this page. For example:
      // const element = document.getElementById('paypal-button-container');
      // element.innerHTML = '<h3>Thank you for your payment!</h3>';
      // Or go to another URL:  window.location.href = 'thank_you.html';
    });
  },
  onCancel(data, actions) {
    console.log(`Order Canceled - ID: ${data.orderID}`);
  },
  onError(err) {
    console.error(err);
  }
})
.render('#sofort-button-container');
//This function displays payment buttons on your web page.
For the capture call details and example responses, see Capture payment for order in the Orders API reference.
If order capture fails, the Orders API can return an error in the console.
A webhook handler is a script you create on your server that completes specific actions on webhooks that hit your listener URL.
CHECKOUT.ORDER.APPROVED webhook event in case a customer accidentally closes the browser and exits the checkout process after approving the transaction through their APM but before finalizing the transaction on your site.CHECKOUT.PAYMENT-APPROVAL.REVERSED webhook as an indication that an approved order wasn't captured within the capture window resulting in a cancellation of the order and a refund the buyer's account. Then notify your buyer of the problem and the reversed order.PAYMENT.CAPTURE.PENDING, PAYMENT.CAPTURE.COMPLETED, and PAYMENT.CAPTURE.DENIED webhooks indicate capture status.See Subscribe to checkout webhooks for more information.
Here are some additional resources as you create webhook handler code:
See a sample Sofort integration in the PayPal GitHub repository.