Payment Lifecycle
Last updated: Sept 19th, 3:16am
A payment made using an Alternative Payment Method (APM) goes through several status changes during its lifecycle. The full lifecycle of an APM payment can be more complex than other payment methods. For example, some APMs require payer interaction outside of your checkout process.
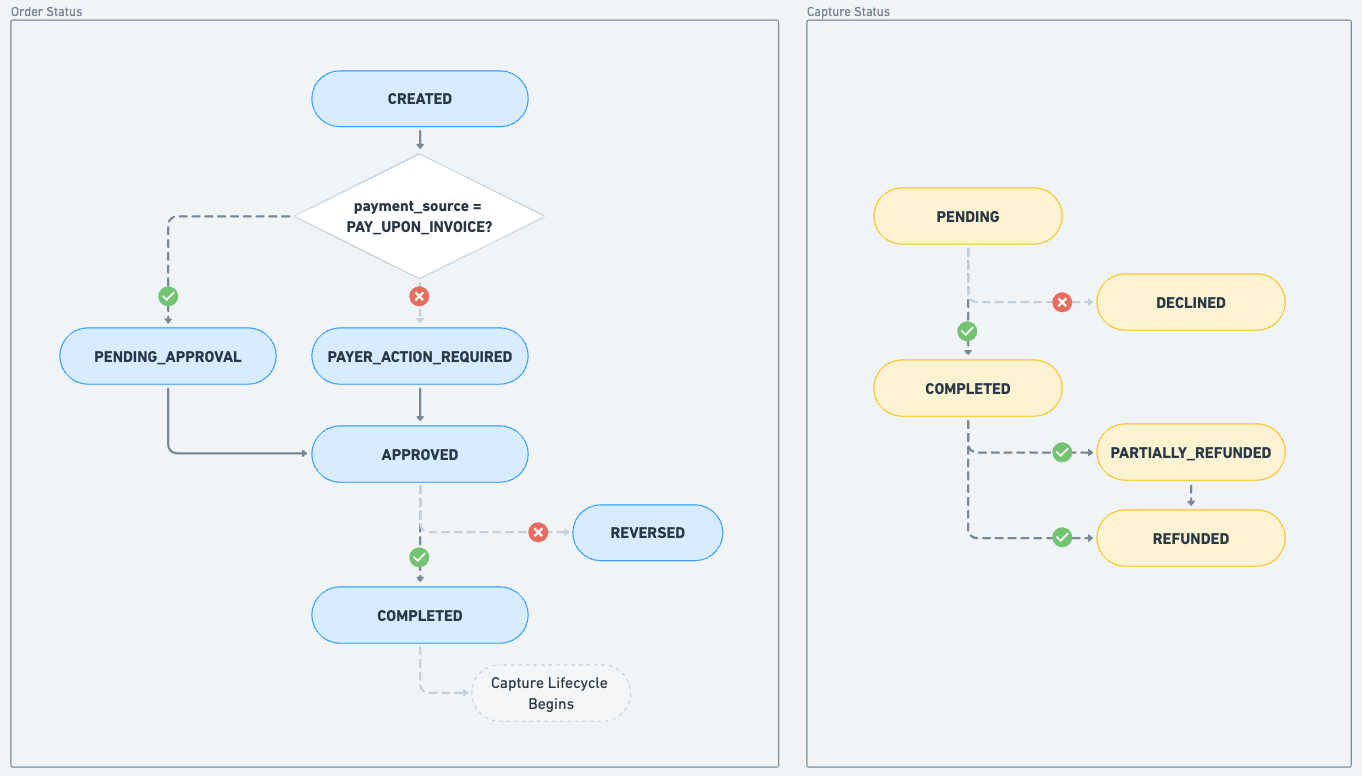
There are 2 objects in PayPal's payment lifecycle:
- Order: An object representing the transaction between you and the payer.
- Capture: An individual payment object in the Order object.
The Order and Capture objects have separate lifecycles. Track the status of each lifecycle in your integration.
This flowchart shows the status lifecycle for each object. When an Order status moves to COMPLETED, the Capture lifecycle begins.

Understanding the status codes
Design your integration to follow the appropriate Next steps for each status.
Order status
This section explains the status changes for each step in the Order part of the APM lifecycle and what to do next.
CREATED
The Order lifecycle begins with this status. Orders have a status of CREATED until you attach a payment method to the order.
We recommend that you immediately attach a payment method when you create an Order so you don't need to handle this status.
Next steps:
- If you include the
payment_sourcein the Create Order API request, the API skips theCREATEDstatus and returnsPAYER_ACTION_REQUIRED. - If you didn't include a
payment_source, the API returns theCREATEDstatus. Use the Confirm Order API (v2/orders/confirm-payment-source) to add the payment source and move toPAYER_ACTION_REQUIRED.
PAYER_ACTION_REQUIRED
This status indicates that the order requires additional action. For many APMs, the payer authorizes the payment through the APM's website or mobile app during checkout.
Next steps:
- If your integration uses the JavaScript SDK, the SDK redirects the payer to the APM experience.
- If your integration only uses the Order API, redirect the payer from your checkout to the APM flow using the
payer-actionHATEOAS link in the Order API response.
PENDING_APPROVAL
This status indicates that the payer action is complete. Wait until PayPal confirms the payment before you confirm order approval to the payer on your checkout.
Next steps:
- Listen for the
CHECKOUT.ORDER.APPROVEDwebhook event to confirm PayPal approved the payment. The status can take up to several hours to change fromPENDING_APPROVALtoAPPROVED.
APPROVED
This status indicates that PayPal has approved the payment. Show the payer that the transaction has been approved and that their payment is now processing.
The next step depends on whether your integration uses auto-complete. When you set processing_instruction to ORDER_COMPLETE_ON_PAYMENT_APPROVAL in the Create Order API, PayPal automatically attempts to capture the payment on your behalf. We recommend this integration choice.
Next steps:
- For auto-complete integrations, PayPal automatically captures the payment.
- For manual integrations, set up your integration to capture the order using the Order Capture API (
v2/checkout/orders/capture).
COMPLETED
This status indicates that the order is complete. The Capture object's lifecycle begins at this stage.
Next steps:
- Review the outcome of this payment by checking the Capture object status in the Order API response or
PAYMENT.CAPTURE.*webhook. - Use the Capture status descriptions in the Capture status section to handle the transaction.
REVERSED
This status indicates that PayPal has reversed the order. PayPal automatically reverses an order when you don't capture an approved order within 3 hours.
The CHECKOUT.PAYMENT-APPROVAL.REVERSED webhook is the only one that sends this status. GET requests on reversed orders return an HTTP 404 status code.
Next steps:
- Clean up the order in your system.
- Notify the payer that the order was cancelled and that their payment will be reversed. The exact reversal timeframe depends on the payment method used for the transaction.
Capture status
This section explains the status changes for each step in the Capture part of the APM lifecycle and what to do next.
PENDING
This status indicates that the capture is pending. Wait until the status changes to a COMPLETED or DECLINED state before fulfilling the order.
Inspect the status_details field if you want further information.
Next steps:
Wait until the transaction changes state by listening to the PAYMENT.CAPTURE.COMPLETED and PAYMENT.CAPTURE.DENIED webhooks.
COMPLETED
This status indicates that the capture is complete and the money is now available. You can fulfill the order.
Next steps:
- Fulfill the order.
- Optionally, notify the payer that the transaction is complete and their order is on the way.
DECLINED
This status indicates that the capture was declined, and the money couldn't be captured.
Next steps:
- Clean up the order in your systems to reflect that the money couldn't be captured.
- Notify the payer that their payment was declined. PayPal automatically reverses money to payers in the limited cases where the payer's money has moved from their funding source.
PARTIALLY_REFUNDED
This status indicates that an amount less than the captured payment amount was partially refunded to the payer.
Next steps:
Notify the payer that their payment was partially refunded and that the money will be returned to them shortly. The exact timeframe is dependent on the payment method used for the transaction.
REFUNDED
This status indicates that an amount equal to or greater than the captured payment amount was refunded to the payer.
Next steps:
Notify the payer that their payment was fully refunded and that the money will be returned to them shortly. The exact timeframe is dependent on the payment method used for the transaction.Â