Integrate Subscriptions

DocsCurrentLast updated: December 4th 2023, @ 6:51:35 am


Integrate subscriptions to bill customers at regular intervals.

Note: You can also create and manage subscriptions directly in your PayPal business account.

Know before you code

  • Complete the steps in Get Started to get the following sandbox account information from the Developer Dashboard:
    • Client ID
    • Access token
    • Business account credentials
    • Personal account credentials
  • This client-side and server-side integration uses the following:
  • Use Postman to explore and test PayPal APIs.

1. Create product

To create a product for your subscription plan, copy and modify the following code:

Sample request

API endpoint used: Create product

1curl -v -X POST https://api-m.sandbox.paypal.com/v1/catalogs/products
2 -H "Content-Type: application/json" -H "Authorization: Bearer ACCESS-TOKEN" -H "PayPal-Request-Id: REQUEST-ID" -d '{
3 "name": "Video Streaming Service",
4 "description": "A video streaming service",
5 "type": "SERVICE",
6 "category": "SOFTWARE",
7 "image_url": "https://example.com/streaming.jpg",
8 "home_url": "https://example.com/home"
9}'

Modify the code

After you copy the code in the sample request, modify the following:

  • Change ACCESS-TOKEN to your access token.
  • Replace REQUEST-ID with a unique ID that you generate. This ID helps prevent duplicate requests if the API call is disrupted.

  • Optional: Change parameters such as the name and description to represent your product.

Step result

A successful request results in the following:

  • The HTTP status code 201 Created.

  • A JSON response body that contains an id for the product. Use this ID to complete other actions through the REST API, such as creating a subscription plan.

Sample response

1{
2 "id": "PROD-5FD60555F23244316",
3 "name": "Video Streaming Service",
4 "description": "A video streaming service",
5 "create_time": "2023-01-21T16:04:39Z",
6 "links": [
7 {
8 "href": "https://api-m.sandbox.paypal.com/v1/catalogs/products/PROD-5FD60555F23244316",
9 "rel": "self",
10 "method": "GET"
11 },
12 {
13 "href": "https://api-m.sandbox.paypal.com/v1/catalogs/products/PROD-5FD60555F23244316",
14 "rel": "edit",
15 "method": "PATCH"
16 }
17 ]
18}

2. Create subscription plan

The following sample request is an example of a subscription plan. Modify the code to fit your subscription model.

Review the following topics to help understand how to modify the code for your use case:

Sample request

This sample request creates a subscription plan that:

  • Has a 1-month free trial and continues as a 12-month, fixed-price subscription
  • Includes a $10 USD setup fee
  • Bills any outstanding balance at the next billing cycle
  • Allows the subscription to continue if the initial payment for the setup fails
  • Suspends the subscription after 3 consecutive payment failures
  • Includes a 10% tax in the billing amount

Important: Only one currency_code is allowed per subscription plan. Make a new subscription plan to offer a subscription in another currency.

API endpoint used: Create plan

1curl -v -k -X POST https://api-m.sandbox.paypal.com/v1/billing/plans -H "Accept: application/json" -H "Authorization: Bearer ACCESS-TOKEN" -H "Content-Type: application/json" -H "PayPal-Request-Id: REQUEST-ID" -d '{
2 "product_id": "PROD-5FD60555F23244316",
3 "name": "Basic Plan",
4 "description": "Basic plan",
5 "billing_cycles": [
6 {
7 "frequency": {
8 "interval_unit": "MONTH",
9 "interval_count": 1
10 },
11 "tenure_type": "TRIAL",
12 "sequence": 1,
13 "total_cycles": 1
14 },
15 {
16 "frequency": {
17 "interval_unit": "MONTH",
18 "interval_count": 1
19 },
20 "tenure_type": "REGULAR",
21 "sequence": 2,
22 "total_cycles": 12,
23 "pricing_scheme": {
24 "fixed_price": {
25 "value": "10",
26 "currency_code": "USD"
27 }
28 }
29 }
30 ],
31 "payment_preferences": {
32 "auto_bill_outstanding": true,
33 "setup_fee": {
34 "value": "10",
35 "currency_code": "USD"
36 },
37 "setup_fee_failure_action": "CONTINUE",
38 "payment_failure_threshold": 3
39 },
40 "taxes": {
41 "percentage": "10",
42 "inclusive": false
43 }
44 }'

Modify the code

After you copy the code in the sample request, modify the following:

  • Change ACCESS-TOKEN to your access token.
  • Replace REQUEST-ID with a unique ID that you generate. This ID helps prevent duplicate requests if the API call is disrupted.
  • Change the value of the product_id parameter to the ID returned when you created the product.
  • (Optional) Change or add parameters in the Create plan request body to create a plan that meets your business needs. Some examples:
    • Fixed pricing plans
    • User or seat-based pricing plans
    • Free or discounted trials

Step result

A successful request results in the following:

  • The HTTP status code 201 Created.

  • A JSON response body containing an id for the subscription plan. Use the subscription plan ID to complete other actions through the REST API, such as editing or deactivating the plan.
  • A subscription plan in the seller's PayPal account in the On status.

Sample response

To see how this API call looks in the seller's account, use your sandbox business account credentials to log in to https://www.sandbox.paypal.com/billing/plans. The subscription plan reflects the plan number from the REST API call you made.

1{
2 "id": "P-17M15335A8501272JLXLLNKI",
3 "product_id": "PROD-5FD60555F23244316",
4 "name": "Basic Plan",
5 "status": "ACTIVE",
6 "description": "Basic plan",
7 "create_time": "2023-01-21T16:09:13Z",
8 "links": [
9 {
10 "href": "https://api-m.sandbox.paypal.com/v1/billing/plans/P-17M15335A8501272JLXLLNKI",
11 "rel": "self",
12 "method": "GET"
13 },
14 {
15 "href": "https://api-m.sandbox.paypal.com/v1/billing/plans/P-17M15335A8501272JLXLLNKI",
16 "rel": "edit",
17 "method": "PATCH"
18 },
19 {
20 "href": "https://api-m.sandbox.paypal.com/v1/billing/plans/P-17M15335A8501272JLXLLNKI/deactivate",
21 "rel": "self",
22 "method": "POST"
23 }
24 ]
25}

3. Create payment button

To start a subscription from your website, add the PayPal JavaScript SDK code and modify it. This code adds buttons to your website so your buyers can use PayPal or a debit or credit card.

Add and modify the code

  1. Copy and paste this code into webpage to create the buttons. When your buyer selects a button, they are directed to PayPal to complete subscription agreement and payment.

<!DOCTYPE html>
<head>
   <meta name="viewport" content="width=device-width, initial-scale=1"> <!-- Ensures optimal rendering on mobile devices. -->
</head>
<body>
  <script src="https://www.paypal.com/sdk/js?client-id=YOUR_CLIENT_ID&vault=true&intent=subscription">
  </script> // Add your client_id
     <div id="paypal-button-container"></div>
      <script>
       paypal.Buttons({
        createSubscription: function(data, actions) {
          return actions.subscription.create({
           'plan_id': 'YOUR_PLAN_ID' // Creates the subscription
           });
         },
         onApprove: function(data, actions) {
           alert('You have successfully subscribed to ' + data.subscriptionID); // Optional message given to subscriber
         }
       }).render('#paypal-button-container'); // Renders the PayPal button
      </script>
  </body>
</html>

  1. Modify the code as follows:

    • Change YOUR_CLIENT_ID to your client ID.
    • Change YOUR_PLAN_ID to the plan ID returned from the Create Plan API call.
  2. Load the webpage to see the payment buttons: PayPal and Debit or Credit Card buttons integrated in a webpage

Tip: To render more than one button on a single webpage, see Multiple subscribe buttons for your website.

4. Test flow

Test a transaction to see the subscription created in the merchant account:

Test the transaction as a buyer

  1. Select the PayPal button on the page.

  2. Use the sandbox personal login information from the Developer Dashboard to log in and simulate the buyer making a purchase.

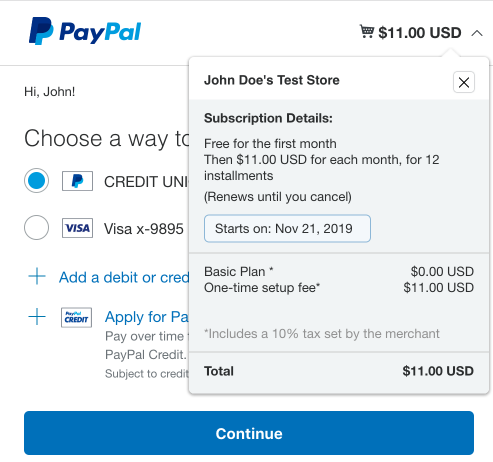
  3. In the Checkout window, make a note of the purchase amount in the upper right corner. USD is the default currency. You can customize the JavaScript SDK by adding a different currency code.

    Availability: The JavaScript SDK onShippingChange, onShippingAddressChange, and onShippingOptionsChange functions are not compatible with Subscriptions.

  4. Select the arrow next to the purchase amount to view the subscription details: The subscription details popup, which shows a breakdown of the subscription cost, when the subscription starts, and the total amount due.

  5. Select the test credit card as the payment method and select Continue.

  6. Select Agree & Subscribe to agree to the terms of the subscription.

Confirm the movement of funds from the buyer account

  1. Use the sandbox personal account you used to complete the purchase to log in to https://www.sandbox.paypal.com/myaccount/autopay/connect/.
  2. Confirm the subscription appears in the active automatic payment list. Select the active automatic payment to see the details of the subscription.
  3. Log out of the account.

Confirm the movement of funds to the merchant account

  1. Use the sandbox business account information from the Developer Dashboard to log in to https://www.sandbox.paypal.com/billing/subscriptions.
  2. Confirm the subscription made by the test buyer appears on the Subscriptions tab. Select the subscription to see the details of the subscription.
  3. Log out of the account.

Next steps

See also