Google Pay using SDK
Last updated: Feb 27th, 10:54am
Integrate Google Pay with the JavaScript SDK
Important: PayPal’s Google Pay integration is in beta and is only available in the US. Send feedback to [email protected].
Google Pay integration
Google Pay is a mobile payment and digital wallet service provided by Alphabet Inc.
Buyers can use Google Pay on PayPal to make payments on the web using a web browser.
Sellers can use PayPal with Google Pay to sell physical goods, such as clothes and electronics, digital goods, such as software, and intangible professional services, such as concerts or gym memberships.
Note: If you want to integrate additional methods of accepting payment beyond Google Pay, visit our Advanced Checkout guide for additional integration choices.
Keep reading to learn more about how Google Pay functions, or select the Jump to Integration button to begin integrating Google Pay on PayPal.
How it works
The Google Pay button shows up on your website when a customer uses a web browser. When your payer selects the Google Pay button, they confirm purchase details and authorize the payment.
Mobile experience
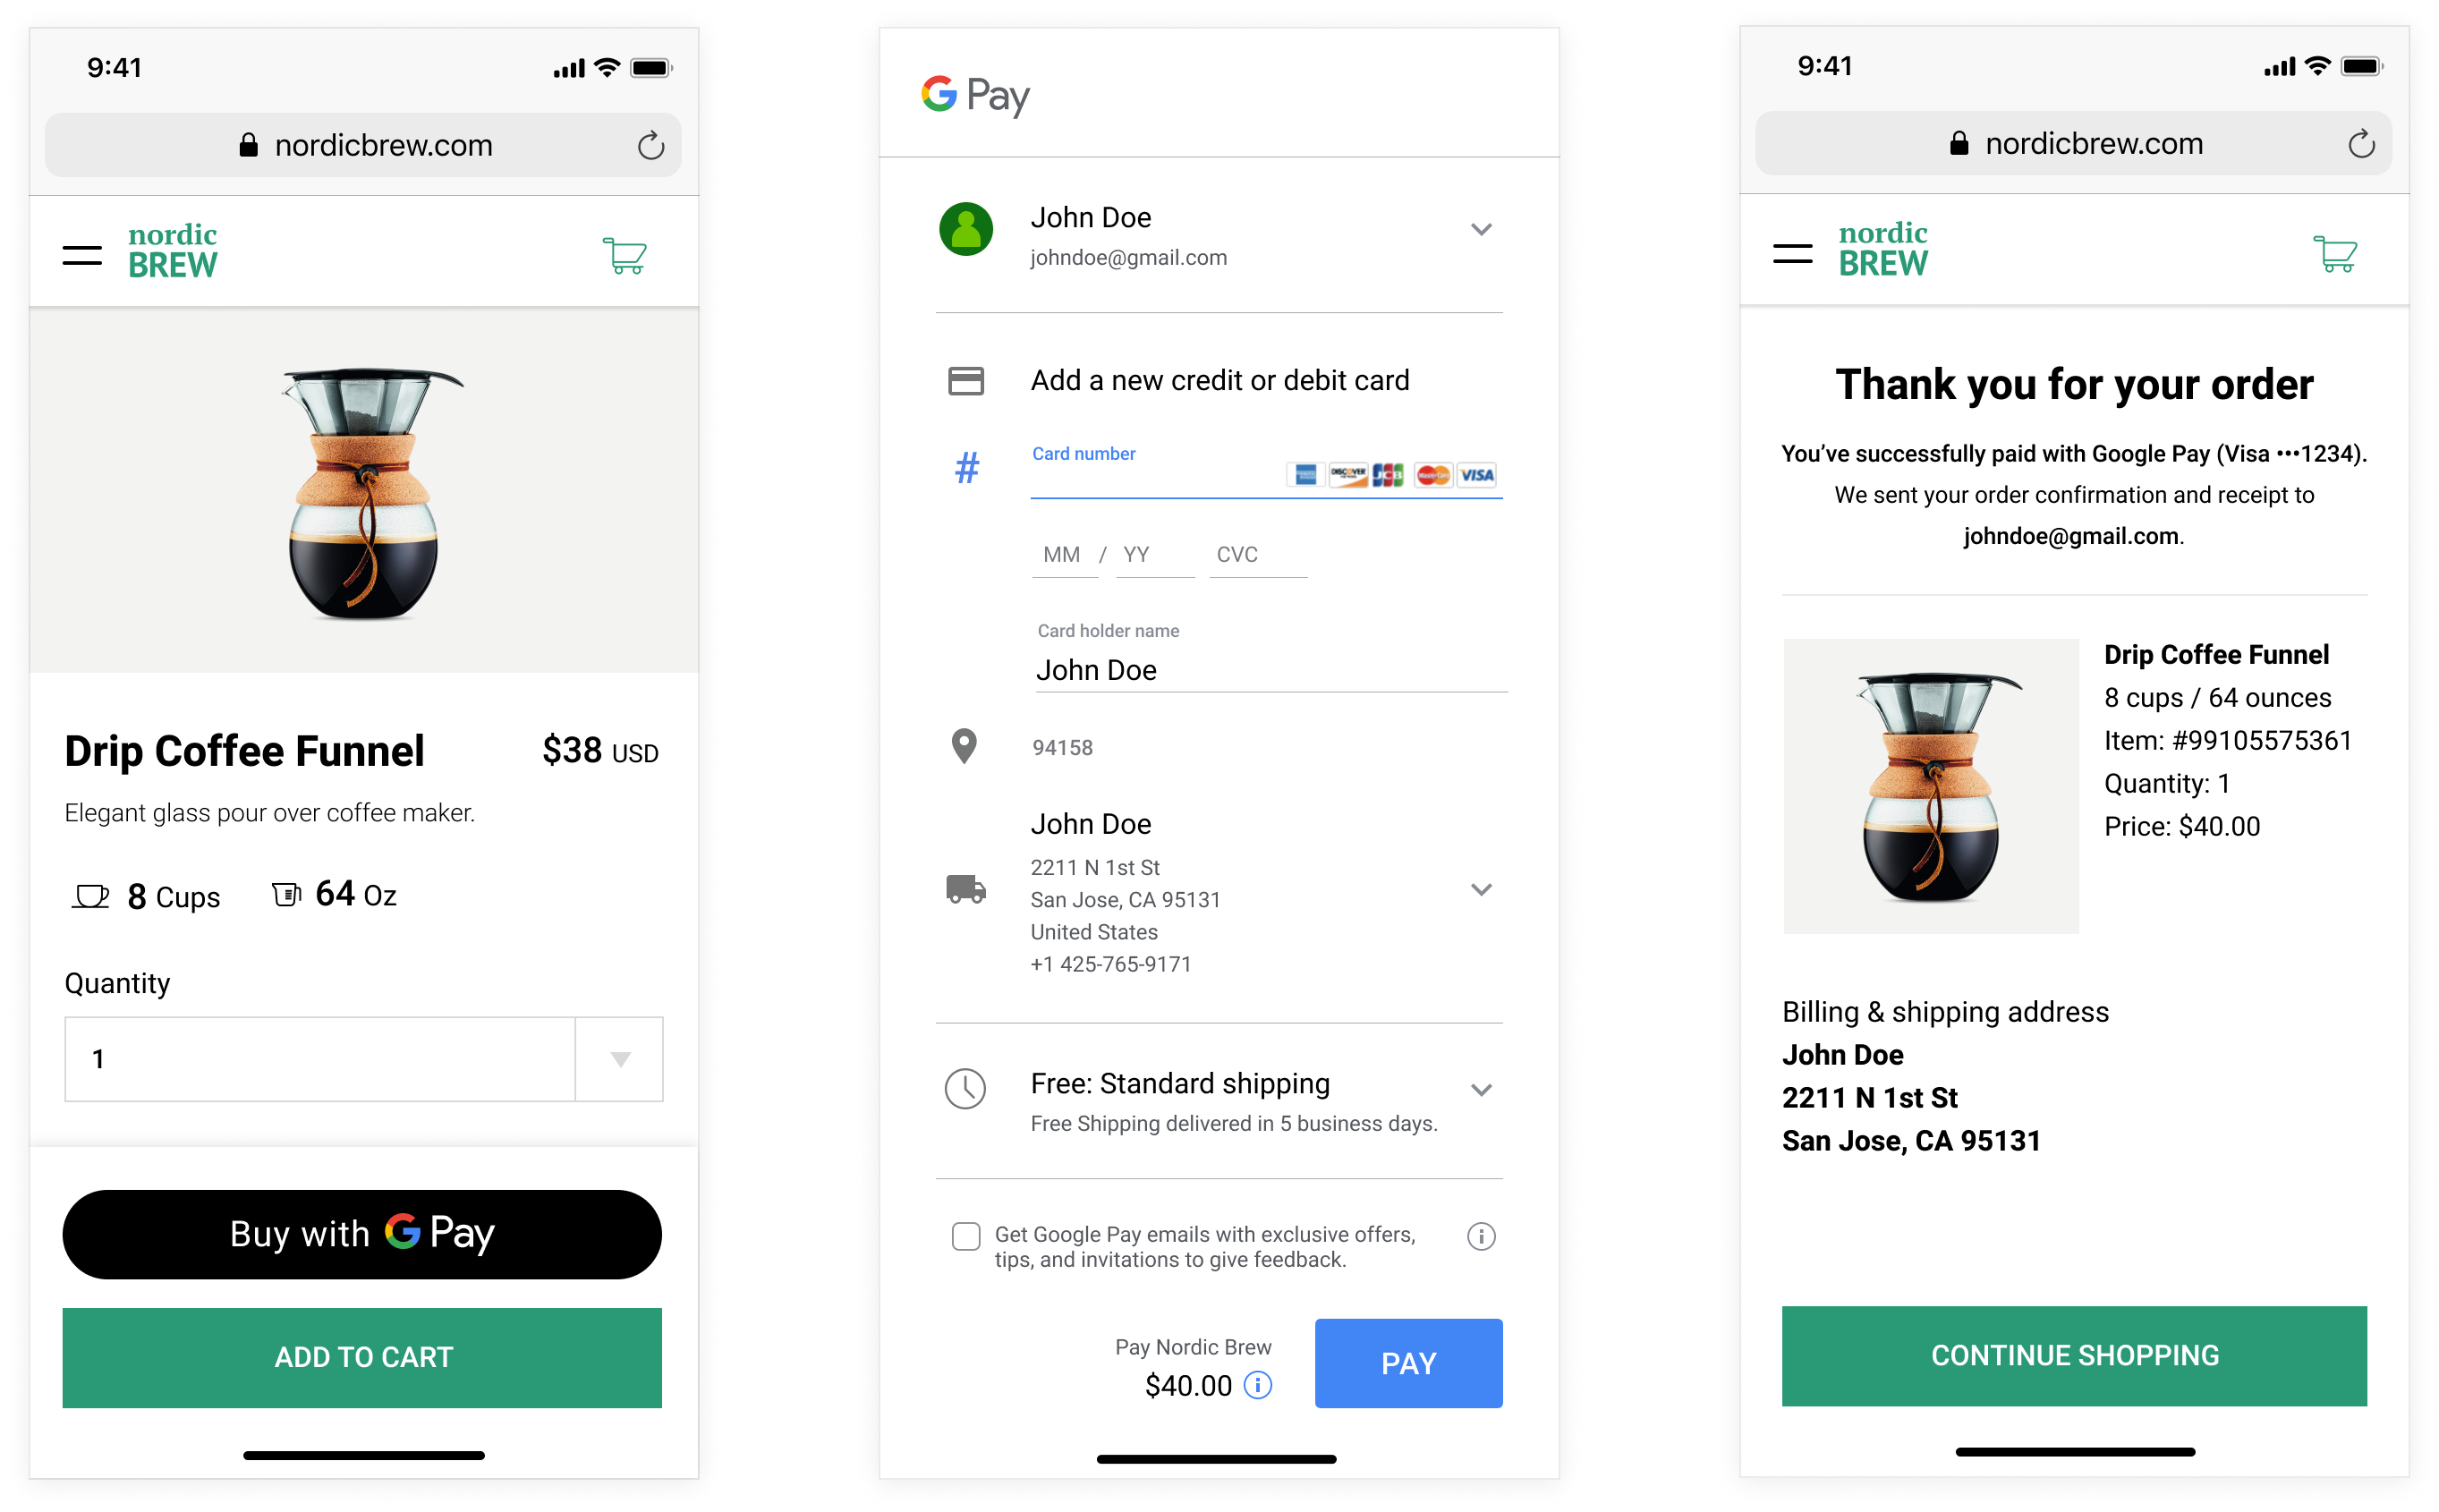
- The payer taps the Google Pay button on your website.
- The browser presents the payer with a payment sheet.
- The payer can choose a different shipping address and payment method.
- The payer authorizes the payment.
Know before you code
- Google Pay works on Google Chrome, Mozilla Firefox, Apple Safari, Microsoft Edge, Opera, and UCWeb UC Browser.
- Review Google's Google Pay API Terms of Service and Acceptable Use Policy for more information.
1. Set up your sandbox account to accept Google Pay
Before you can accept Google Pay on your website, verify that your sandbox business account supports Google Pay. Select your role to see instructions for setting up your sandbox account to accept Google Pay.
- Merchants sell directly to customers and integrate directly with PayPal.
- Partners provide merchants with access to PayPal products using their platform or service, such as Marketplaces.
- Merchant
- Partner
Merchant
Direct merchants can use the PayPal Developer Dashboard to set up their sandbox accounts to accept Google Pay.
- Log into the PayPal Developer Dashboard and go to your sandbox account.
- Go to My Apps & Credentials.
- Make sure you are in the PayPal sandbox environment by selecting Sandbox at the top.
- Select or create an app.
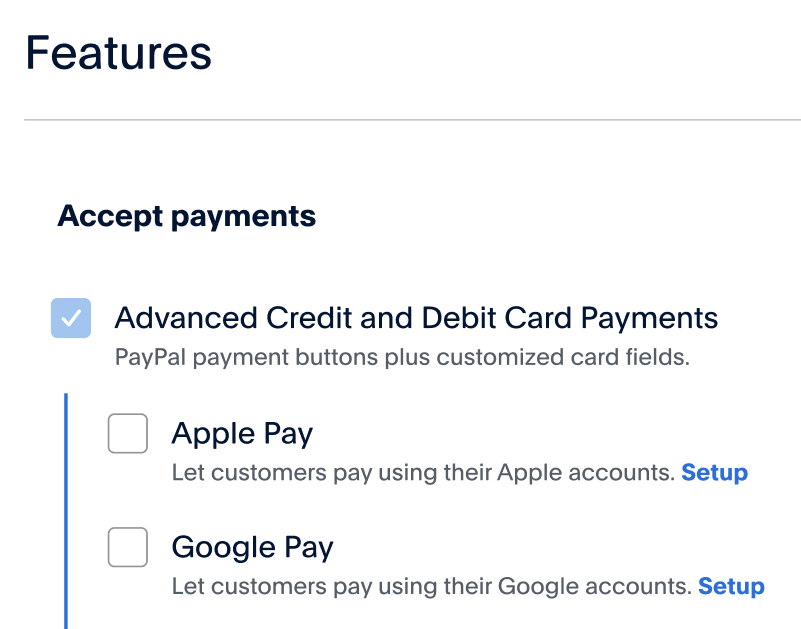
- Scroll down to Mobile and digital payments and check if Google Pay is enabled. If Google Pay isn't enabled, select the Google Pay checkbox and select the "Save" link to enable Google Pay.
If you created a sandbox business account through sandbox.paypal.com, and the Google Pay status for the account shows as disabled, complete the sandbox onboarding steps to enable Google Pay.
Partner
The integration for partner accounts includes creating a sandbox business account through sandbox.paypal.com.
If the Google Pay status for the account shows as disabled, complete the sandbox onboarding steps to enable Google Pay.
Note: When your integration is ready to go live, read the Go live section for details about the additional steps needed for Google Pay onboarding.
This screenshot shows the Google Pay sandbox settings in the mobile and digital payments section of the PayPal Developer Dashboard. This only applies to direct merchant integrations:
2. Getting started in your testing environment
Before you develop your Google Pay on the Web integration, you need to complete Get started to set up your PayPal account, client ID, and sandbox emails for testing.
3. Integrate Google Pay checkout
Follow this integration process to add Google Pay as a checkout option, customize the payment experience, and process payments.
Call the Orders API
To accept Google Pay directly on your website, create API endpoints on your server that communicate with the PayPal Orders V2 API. These endpoints can create an order, authorize payment, and capture payment for an order.
Server-side example (Node.js)
This code demonstrates using the PayPal Orders V2 API to add routes to an Express server for creating orders and capturing payments.
Find the complete sample code in the GitHub repo.
server.js
1import * as PayPal from "./paypal-api.js";2/* Create Order route Handler */3app.post("/api/orders", async (req, res) => {4 const order = await paypal.createOrder();5 res.json(order);6});7/* Capture Order route Handler */8app.post("/api/orders/:orderID/capture", async (req, res) => {9 const {10 orderID11 } = req.params;12 const captureData = await paypal.capturePayment(orderID);13 res.json(captureData);14});
paypal-api.js
1/* Create Order */2export async function createOrder() {3 const purchaseAmount = "100.00";4 const accessToken = await generateAccessToken();5 const url = \`${base}/v2/checkout/orders\`;6 const response = await fetch(url, {7 method: "post",8 headers: {9 "Content=Type": "application/json",10 Authorization: \`Bearer ${accessToken}\`,11 },12 body: JSON.stringify({13 intent: "CAPTURE",14 puchase_units: [15 {16 amount: {17 currency_code: "USD",18 value: purchaseAmount,19 },20 },21 ],22 }),23 });24 const data = await response.json();25 return data;26}27/* Capture Order */28export async function capturePayment(orderId) {29 const accessToken = await generateAccessToken();30 const url = \`${base}/v2/checkout/orders/${orderId}/capture\`;31 const response = await fetch(url, {32 method: "post",33 headers: {34 "Content-Type": "application/json",35 Authorization: \`Bearer ${accessToken}\`,36 },37 });38 const data = await response.json();39 return data;40}
4. Set up your Google Pay button
You need to integrate with the Google Pay JavaScript SDK and PayPal JavaScript SDK to add Google Pay to your site.
Integrate PayPal JavaScript SDK
Use this script to integrate with the PayPal JavaScript SDK:
1<script src="https://www.paypal.com/sdk/js?client-id=YOUR_CLIENT_ID¤cy=USD&buyer-country=US&merchant-id=SUB_MERCHANT_ID&components=googlepay"></script>\n
Include googlepay in the components list.
Integrate Google JavaScript SDK
Use this script to integrate with the Google Pay JavaScript SDK:
1<script async\n src="https://pay.google.com/gp/p/js/pay.js"\n onload="onGooglePayLoaded()"></script>\n
PayPal's Google Pay component interacts with your Javascript code in 2 areas:
- Checking merchant eligibility and providing
PaymentDataRequestparameters for Google Pay:paypal.Googlepay().config() - Handling the
onPaymentAuthorized()callback:paypal.Googlepay().confirmOrder()
Check for device and merchant eligibility before setting up the GooglePay Button.
The PayPal JavaScript SDK API paypal.Googlepay().config() response object provides the
allowedPaymentMethods parameter, which is part of the Google API's isReadyToPayRequest
object.
Check whether the Google Pay API supports a device, browser, and payment method:
- Add
allowedPaymentMethodsto theisReadyToPayRequest. - Call the
isReadyToPay()method to check compatibility and render the Google Pay Button.
1/**2 * Initialize Google PaymentsClient after Google-hosted JavaScript has loaded3 *4 * Display a Google Pay payment button after confirmation of the viewer's5 * ability to pay.6 */7function onGooglePayLoaded() {8 const paymentsClient = getGooglePaymentsClient();9 paymentsClient.isReadyToPay(isReadyToPayRequest)10 .then(function(response) {11 if (response.result) {12 addGooglePayButton();13 }14 })15 .catch(function(err) {16 console.error(err);17 });18}19/**20 * Add a Google Pay purchase button21 */22function addGooglePayButton() {23 const paymentsClient = getGooglePaymentsClient();24 const button =25 paymentsClient.createButton({26 onClick: onGooglePaymentButtonClicked /* To be defined later */,27 allowedPaymentMethods: [baseCardPaymentMethod]28 });29 document.getElementById('container').appendChild(button);30}
Note: For more information refer to steps 6 and 7 in Google's developer documentation.
5. Create PaymentDataRequest
The PaymentDataRequest object manages the Google Pay payment process on the web. Create a new
PaymentDataRequest each time a payer explicitly requests a payment, such as inside the
onclick handler for the Google Pay Button.
For each checkout session, create a PaymentDataRequest object, which includes information about payment
processing capabilities, the payment amount, and shipping information.
The response object of PayPal JavaScript SDK API paypal.Googlepay().config() provides the following
parameters in the PaymentDataRequest object:
allowedPaymentMethodsmerchantInfo
1/* Note: the `googlePayConfig` object in this request is the response from `paypal.Googlepay().config()` */2async function getGooglePaymentDataRequest() {3 const googlePayConfig = await paypal.Googlepay().config();4 const paymentDataRequest = Object.assign({}, baseRequest);5 paymentDataRequest.allowedPaymentMethods = googlePayConfig.allowedPaymentMethods;6 paymentDataRequest.transactionInfo = getGoogleTransactionInfo();7 paymentDataRequest.merchantInfo = googlePayConfig.merchantInfo;8 paymentDataRequest.callbackIntents = ["PAYMENT_AUTHORIZATION"];9 return paymentDataRequest;10}11function getGoogleTransactionInfo(){12 return {13 currencyCode: 'USD',14 totalPriceStatus: 'FINAL',15 totalPrice: '100.00' // Your amount16 }17}
For more details about the response parameters, see the ConfigResponse section.
For more details about how Google Pay handles paymentDataRequest, refer to steps 8, 9, and 10 in Google's developer
documentation.
Note: See the Google Pay
PaymentDataRequest Object API reference for the complete list of properties available for the
PaymentDataRequest object.
Register click handler
Register a click event handler for the Google Pay purchase button. Call loadPaymentData() in the event
handler when the user interacts with the purchase button and pass the PaymentDataRequest Object.
1/**2 * Show Google Pay payment sheet when Google Pay payment button is clicked3 */4async function onGooglePaymentButtonClicked() {5 const paymentDataRequest = await getGooglePaymentDataRequest();6 const paymentsClient = getGooglePaymentsClient();7 paymentsClient.loadPaymentData(paymentDataRequest);8}
Add the click handler onGooglePaymentButtonClicked to the Button defined in Set up your Google Pay button.
For more details about paymentDataRequest refer to step 9 in Google's developer
documentation.
onPaymentAuthorized callback
Google calls the onPaymentAuthorized() callback with a PaymentData
object when a customer consents to your site collecting their payment information and optional contact details.
Register the onPaymentAuthorized() callback as part of the PaymentClient initialization as
shown in Google Pay's Client
Reference page.
Create an order by using the PayPal Orders V2 API. Use
paypal.Googlepay().confirmOrder() to send the orderID, the Google Pay Payment Data, and
optional contact details, and confirm the order.
Confirm the order using the paypal.Googlepay().confirmOrder() method in the
API SDK Reference.
If the order confirmation status is APPROVED, capture the order using the Capture payment for order endpoint of the PayPal Orders
V2 API.
For more details, see step 11 of Google's developer documentation.
Note: You can see an example of an Authorize Payments call in the Put it all together section of Google's developer documentation.
1async function processPayment(paymentData) {2 return new Promise(function async (resolve, reject) {3 try {4 // Create the order on your server5 const {id} = await fetch(`/orders`, {6 method: "POST",7 body:8 // You can use the "body" parameter to pass optional, additional order information, such as:9 // amount, and amount breakdown elements like tax, shipping, and handling10 // item data, such as sku, name, unit_amount, and quantity11 // shipping information, like name, address, and address type12 });13 const confirmOrderResponse = await paypal.Googlepay().confirmOrder({14 orderId: id,15 paymentMethodData: paymentData.paymentMethodData16 });17 /** Capture the Order on your Server */18 if(confirmOrderResponse.status === "APPROVED"){19 const response = await fetch(`/capture/${id}`, {20 method: 'POST',21 }).then(res => res.json());22 if(response.capture.status === "COMPLETED")23 resolve({transactionState: 'SUCCESS'});24 else25 resolve({26 transactionState: 'ERROR',27 error: {28 intent: 'PAYMENT_AUTHORIZATION',29 message: 'TRANSACTION FAILED',30 }31 })32 } else {33 resolve({34 transactionState: 'ERROR',35 error: {36 intent: 'PAYMENT_AUTHORIZATION',37 message: 'TRANSACTION FAILED',38 }39 })40 }41 } catch(err) {42 resolve({43 transactionState: 'ERROR',44 error: {45 intent: 'PAYMENT_AUTHORIZATION',46 message: err.message,47 }48 })49 }50 });51}
Customize payment experience
Use the Google Pay JavaScript SDK to customize the payer experience. The following table shows the 2 most popular Google Pay customizations:
| Customization | Details |
|---|---|
PaymentDataChange
|
This method is used to handle payment data changes in the payment sheet such as shipping address and shipping options. |
PaymentDataRequest
|
Provides optional properties to collect details, such as shipping address and email. |
6. Put it all together
The following code samples show a Google Pay integration:
HTML
1<!DOCTYPE html>2 <html lang="en">3 <head>4 <meta charset="UTF-8" />5 <meta name="viewport" content="width=device-width, initial-scale=1.0" />6 <meta http-equiv="X-UA-Compatible" content="ie=edge" />7 <title>Googlepay Example</title>8 <script src="./script.js"></script>9 <script src="https://www.paypal.com/sdk/js?client-id=<client_id>&components=googlepay"></script>10 <link rel="stylesheet" type="text/css" href="styles.css" />11 </head>12 <body>13 <main>14 <section>15 <div id="button-container"></div>16 </section>17 </main>18 <script src="https://pay.google.com/gp/p/js/pay.js"></script>19 <script>20 document.addEventListener("DOMContentLoaded", (event) => {21 if (google && paypal.Googlepay) {22 onGooglePayLoaded().catch(console.log);23 }24 });25 </script>26 </body>27 </html>
Javascript
1/*2 * Define the version of the Google Pay API referenced when creating your3 * configuration4 */5const baseRequest = {6 apiVersion: 2,7 apiVersionMinor: 0,8};9let paymentsClient = null,10 allowedPaymentMethods = null,11 merchantInfo = null;12/* Configure your site's support for payment methods supported by the Google Pay */13function getGoogleIsReadyToPayRequest(allowedPaymentMethods) {14 return Object.assign({}, baseRequest, {15 allowedPaymentMethods: allowedPaymentMethods,16 });17}18/* Fetch Default Config from PayPal via PayPal SDK */19async function getGooglePayConfig() {20 if (allowedPaymentMethods == null || merchantInfo == null) {21 const googlePayConfig = await paypal.Googlepay().config();22 allowedPaymentMethods = googlePayConfig.allowedPaymentMethods;23 merchantInfo = googlePayConfig.merchantInfo;24 }25 return {26 allowedPaymentMethods,27 merchantInfo,28 };29}30/* Configure support for the Google Pay API */31async function getGooglePaymentDataRequest() {32 const paymentDataRequest = Object.assign({}, baseRequest);33 const { allowedPaymentMethods, merchantInfo } = await getGooglePayConfig();34 paymentDataRequest.allowedPaymentMethods = allowedPaymentMethods;35 paymentDataRequest.transactionInfo = getGoogleTransactionInfo();36 paymentDataRequest.merchantInfo = merchantInfo;37 paymentDataRequest.callbackIntents = ["PAYMENT_AUTHORIZATION"];38 return paymentDataRequest;39}40function onPaymentAuthorized(paymentData) {41 return new Promise(function (resolve, reject) {42 processPayment(paymentData)43 .then(function (data) {44 resolve({ transactionState: "SUCCESS" });45 })46 .catch(function (errDetails) {47 resolve({ transactionState: "ERROR" });48 });49 });50}51function getGooglePaymentsClient() {52 if (paymentsClient === null) {53 paymentsClient = new google.payments.api.PaymentsClient({54 environment: "TEST",55 paymentDataCallbacks: {56 onPaymentAuthorized: onPaymentAuthorized,57 },58 });59 }60 return paymentsClient;61}62async function onGooglePayLoaded() {63 const paymentsClient = getGooglePaymentsClient();64 const { allowedPaymentMethods } = await getGooglePayConfig();65 paymentsClient66 .isReadyToPay(getGoogleIsReadyToPayRequest(allowedPaymentMethods))67 .then(function (response) {68 if (response.result) {69 addGooglePayButton();70 }71 })72 .catch(function (err) {73 console.error(err);74 });75}76function addGooglePayButton() {77 const paymentsClient = getGooglePaymentsClient();78 const button = paymentsClient.createButton({79 onClick: onGooglePaymentButtonClicked,80 });81 document.getElementById("container").appendChild(button);82}83function getGoogleTransactionInfo() {84 return {85 displayItems: [86 {87 label: "Subtotal",88 type: "SUBTOTAL",89 price: "100.00",90 },91 {92 label: "Tax",93 type: "TAX",94 price: "10.00",95 },96 ],97 countryCode: "US",98 currencyCode: "USD",99 totalPriceStatus: "FINAL",100 totalPrice: "110.00",101 totalPriceLabel: "Total",102 };103}104async function onGooglePaymentButtonClicked() {105 const paymentDataRequest = await getGooglePaymentDataRequest();106 paymentDataRequest.transactionInfo = getGoogleTransactionInfo();107 const paymentsClient = getGooglePaymentsClient();108 paymentsClient.loadPaymentData(paymentDataRequest);109}110async function processPayment(paymentData) {111 try {112 const { currencyCode, totalPrice } = getGoogleTransactionInfo();113 const order = {114 intent: "CAPTURE",115 purchase_units: [116 {117 amount: {118 currency_code: currencyCode,119 value: totalPrice,120 },121 },122 ],123 };124 /* Create Order */125 const { id } = await fetch(\`/orders\`, {126 method: "POST",127 headers: {128 "Content-Type": "application/json",129 },130 body: JSON.stringify(order),131 }).then((res) => res.json());132 const { status } = await paypal.Googlepay().confirmOrder({133 orderId: id,134 paymentMethodData: paymentData.paymentMethodData,135 });136 if (status === "APPROVED") {137 /* Capture the Order */138 const captureResponse = await fetch(\`/orders/${id}/capture\`, {139 method: "POST",140 }).then((res) => res.json());141 return { transactionState: "SUCCESS" };142 } else {143 return { transactionState: "ERROR" };144 }145 } catch (err) {146 return {147 transactionState: "ERROR",148 error: {149 message: err.message,150 },151 };152 }153}
Strong Customer Authentication (SCA)
When the ConfirmOrder status is
PAYER_ACTION_REQUIRED, the order requires additional authentication from the payer, such as 3D Secure.
The PayPal JavaScript SDK Client provides an API to handle 3DS Secure authentication. Pass the orderId
to initiatePayerAction.
Note: Refer to initiatePayerAction
for more details.
When the payer completes authentication, confirm that the liability_shift status has shifted:
- Make a call to the Show order details endpoint of the
Orders v2 API, using the
idof the order. - Check the
liability_shiftstatus in theauthentication_response.
1...2const { status } = await paypal.Googlepay().confirmOrder({3 orderId: id,4 paymentMethodData: paymentData.paymentMethodData,5});6if (status === "PAYER_ACTION_REQUIRED") {7 console.log("==== Confirm Payment Completed Payer Action Required =====");8 paypal9 .Googlepay()10 .initiatePayerAction({ orderId: id })11 .then(async () => {12 console.log("===== Payer Action Completed =====");13 /** GET Order */14 const orderResponse = await fetch(`/orders/${id}`, {15 method: "GET",16 }).then((res) => res.json());17 console.log("===== 3DS Contingency Result Fetched =====");18 console.log(19 orderResponse?.payment_source?.google_pay?.card?.authentication_result20 );21 /* CAPTURE THE ORDER*/22 const captureResponse = await fetch(`/orders/${id}/capture`, {23 method: "POST",24 }).then((res) => res.json());25 console.log(" ===== Order Capture Completed ===== ");26 });27}28...
Test integration
Test your Google Pay integration in the PayPal sandbox and production environments to ensure that your app works correctly.
Sandbox
Use your personal sandbox login information during checkout to complete a payment using Google Pay. Then, log into
the sandbox site sandbox.paypal.com to see that the money has moved into your account.
- Open your test page with a supported web browser on any supported device.
- Add a test card to your Google Wallet on your device. Google provides test cards through their Test card suite.
- Tap the Google Pay button to open a pop-up with the Google Pay payment sheet.
- Make a payment using the Google Pay payment sheet.
- If you have an additional confirmation page on your merchant website, continue to confirm the payment.
- Log in to your merchant account and continue to your confirmation page to confirm that the money you used for payment showed up in the account.
Go live
Make Google Pay available to buyers using your website or app.
Note: Before going live, complete production onboarding to process Google Pay payments with your live PayPal account.
Live environment
If you're a new merchant, sign up for a PayPal business account.
Use your personal production login information during the checkout to complete a Google Pay transaction. Then log
into paypal.com to see the money move out of your account.
Use the Partners onboarding path to provide Google Pay to sellers on your platform. Your sellers complete the onboarding process, and PayPal automatically handles Know Your Customer (KYC) verification and other checks for you.
Partners need to do the following to complete onboarding:
-
You need your API credentials and sandbox account information to integrate the PayPal Commerce Platform. Get more details about onboarding a partner account.
-
Your sellers complete their own onboarding to accept PayPal payments on your platform. Learn about onboarding a merchant account.
You can onboard your sellers before they accept PayPal payments from buyers on your platform. Read about onboarding using the Partner Referrals API.
Testing in your live environment
When testing a purchase in production, consider:
- The business account receiving money can’t also make the purchase.
- If you create a personal account with the same information as the business account, those accounts might experience restrictions.
How to test Google Pay payments in a live environment:
- Open your test page with a supported browser.
- Select the Google Pay button to open a pop-up with the Google Pay payment sheet.
- Proceed with the Google Pay checkout transaction.
- If you have an additional confirmation page on your merchant website, continue to confirm the payment.
- Log in to your merchant account and confirm that the money has moved into that account.
Troubleshoot your integration
Make sure that there are no browser console warnings or errors. The JavaScript SDK configuration attributes have distinct validation checks for input formatting and values.
If the validation fails, the web browser’s developer console shows warning messages that say which property is incorrect and what you need to do to address the issue. The library generally attempts to revert to the safe default values if missing or incorrect inputs exist.
Troubleshooting authorization issues
Consider adding a section about the errors and other issues related to the Auth JWT.
SDK API reference
This section provides details about functions, objects, and parameters in the SDK API.
Initialize payment with paypal.Googlepay()
Creates an instance of a PayPal Google Pay SDK Client.
Arguments
None
Returns
JavaScript SDK client methods
Use the JavaScript SDK client methods to start a Google Pay payment and confirm an order.
config()
Use config() to fetch the PaymentMethod data needed to start the payment.
Arguments
None
Returns
| Type | Description |
|---|---|
Promise
|
Resolved: An object that contains the payment data needed to create a
Rejected: An error object that passes information about why the call wasn't successful. |
confirmOrder(confirmOrderParams)
Use confirmOrder() to confirm that the payer intends to pay for the order using the payment source.
Arguments
| Name | Description |
|---|---|
confirmOrderParams |
For details on the different properties you can configure, see ConfirmOrderParams. |
Returns
| Type | Description |
|---|---|
Promise
|
Resolved: An object that returns the response of a successful
Rejected: An error object that passes information about why the call wasn't successful. |
initiatePayerAction(initiatePayerActionParams)
Arguments
| Name | Description |
|---|---|
initiatePayerActionParams |
For details on the different properties you can configure, see InitiatePayerActionParams. |
Returns
| Type | Description |
|---|---|
Promise
|
Resolved: An object that passes information about 3D Secure liability shift. See Rejected: An error object that passes information about why the call wasn't successful. |
Objects
Request objects
ConfirmOrderParams
| Property | Type | Required | Description |
|---|---|---|---|
paymentMethodData |
object | Yes |
Details about a selected payment method. When a payer approves payment, the For more details about this object, see the Google Pay documentation. |
orderId |
string | Yes | The PayPal order ID. |
shippingAddress |
object | No |
Passes the shipping address when For more details about this object, see the Google Pay documentation. |
billingAddress |
object | No |
The default billing address is part of the For more details about this object, see the Google Pay documentation. |
email |
string | No | Passes the email address when emailRequired in the PaymentDataRequest is set
to true. |
InitiatePayerActionParams
| Property | Type | Required | Description |
|---|---|---|---|
orderId |
string | Yes | PayPal OrderID |
Response objects
JSSDKClientObject
| Property | Type | Always exists | Description |
|---|---|---|---|
config |
function | Yes | API for PaymentData. |
confirmOrder |
function | Yes | API for confirmOrder. |
initiatePayerAction |
function | Yes | API for 3D Secure handling. |
ConfigResponse
| Property | Type | Always exists | Description |
|---|---|---|---|
allowedPaymentMethods |
object | Yes |
Passes the payment methods supported by the Google Pay API. For more details about this object, see the Google Pay documentation. |
merchantInfo |
object | Yes |
Passes information about the seller requesting payment data. For more details about this object, see the Google Pay documentation. |
ConfirmOrderResponse
| Property | Type | Always exists | Description |
|---|---|---|---|
id |
string | Yes | The ID of the order. |
status |
string | Yes |
The order status. For a list of supported values for this property, see the Orders API documentation. |
payment_source |
object | Yes |
The payment source used to fund the payment. For more details about this object, see the Orders API documentation. |
links |
array of objects | Yes |
The request-related HATEOAS link information. For more details about this property, see the Orders API documentation. |
InitiatePayerActionResponse
| Property | Type | Always exists | Description |
|---|---|---|---|
liabilityShift |
string | Yes |
The liability shift indicator shows the outcome of the issuer's authentication. For a list of supported values for this property, see the Orders API documentation. |