
Testing and Go Live
You can test your PayPal integration in the Braintree sandbox environment in 2 ways:
- Mocked PayPal testing (default)
- Behaves similarly to production but does not allow for end-to-end testing
- Uses Braintree sandbox test values to simulate PayPal responses in your Braintree sandbox
- You can confirm that your client-side and server-side configurations are correct and that you are receiving the appropriate responses for your requests
- Does not return data to your PayPal sandbox account
- Does not work with the PayPal Checkout component of the JavaScript v3 SDK
- Linked PayPal testing
- Requires additional setup
- Directly connects your Braintree sandbox account to your PayPal sandbox account
- Returns data to both sandbox accounts
- You can test the full functionality of your PayPal integration, such as transaction reporting and email receipts
Do not use your PayPal business account as the PayPal customer account when paying for test transactions in the linked PayPal flow or in production. Doing so results in declines.
Mocked PayPal testing
Use your Braintree sandbox API credentials and the test values on our Testing page to ensure your client and server integrations with Braintree are working as expected.
Any testing you do in the mocked PayPal flow only appears in your Braintree sandbox. PayPal does not send data to your PayPal sandbox. If you want to do complete end-to-end testing, see linked PayPal testing.
Linked PayPal testing
To link a PayPal sandbox test account to your Braintree sandbox account, you need the API credentials for that PayPal sandbox test account.
If you don't already have a PayPal sandbox test account for testing your Braintree integration, create a new one by following these steps:
-
Create a PayPal business sandbox account:
- Log into the PayPal Developer Dashboard
- Navigate to Sandbox > Accounts
- Select the account type as Business
- Select the same Country as your Braintree sandbox account
- Select Create Account
-
Go to the
Create New App page
- Create an app to get sandbox API credentials
- Select the same sandbox developer account as the test account created in step 1
-
Note the following Sandbox API Credentials for the new app you created:
- Email address associated with this app
- Client ID
- Secret
After you successfully link your PayPal account with your Braintree account, some fake
nonces, such as fake-paypal-one-time-nonce, might stop working.
Once you have those PayPal sandbox API credentials, enter them in your Braintree sandbox:
- Log into your Braintree sandbox Control Panel
- Navigate to Settings > Account Settings > Payment Methods > PayPal
- Select Link Sandbox
- Enter the Email address, Client ID, and Client Secret for your PayPal sandbox test account
- Select Link PayPal Sandbox
Test App Switch
PayPal customers who have the PayPal app installed can use App Switch to complete their transaction in the PayPal app, streamlining checkout with strong multi-factor authentication. You can test this feature in both the PayPal production app and sandbox environments. Before you test App Switch, be sure your integration:
- Is App Switch eligible
- Has completed the PayPal App Switch integration
Test your integration using PayPal's sandbox
PayPal's sandbox application lets PayPal users, both inside and outside the United States, test the App Switch consumer experience. Because App Switch redirects buyers to the PayPal mobile app, you need the PayPal sandbox app installed on a test device.
Install the PayPal sandbox app
For the best experience, delete all existing PayPal apps before installing the sandbox build. The sandbox app might override the existing production app.
iOS:
- Open the Firebase App Distribution link to join the tester program.
- Enter your email address to receive an invite.
-
Open the invite email on your device and select Get Started.
If you already accepted the invite, go directly to the Firebase App Distribution page and skip to step 5. - Select Download against the latest build in the list.
- Trust the enterprise developer certificate: go to Settings → General → VPN & Device Management, find the PayPal certificate, and select Trust.
- Select Install to download the app.
- Select Open to launch the app.
Android:
- Open the Firebase App Distribution link to join the tester program.
- Enter your email address to receive an invite.
- Open the invite email on your device and select Get Started.
- Accept the tester invitation and consent to Firebase testing.
- Select Download against the latest build (version 8.102.0 or higher).
- Open the downloaded build and select Install.
- Select Open to launch the app.
App switch compatibility
Review the following table to see how App Switch works in different environments. Use this information to check if things are working during testing and to spot any situations where you might need to set up fallback handling.
| Platform | Browser | Mode | Availability | Notes |
|---|---|---|---|---|
| iOS | Safari | Default browser | Yes | None |
| iOS | Safari | Private | Yes | None |
| iOS | Safari | Not default | Yes | App Switch redirects to the default browser. |
| iOS | Chrome | Default browser | Yes | App Switch redirects to a new tab in the same browser. |
| Android | Chrome | Default browser | Yes | None |
| Android | Chrome | Incognito | No | Fallback experience. |
| Android | Chrome | Not default | Yes | App Switch redirects in the default browser. |
| Android | Firefox or other | Default | Yes | App Switch redirects to a new tab in the same browser. |
Best practices
- Non-default browser behavior: If the buyer starts checkout from a non-default browser, the return from App Switch might open in the buyer's default browser. Use the return URL to restore the buyer session and repaint the checkout page to avoid errors.
- Not eligible for iframe integrations: App Switch does not support iframes. If your checkout page is embedded in an iframe, do not integrate App Switch.
Use cases that can be tested
| Scenario | Expected behavior |
|---|---|
| The user starts from a native default browser, such as Safari on an iOS device or Chrome on an Android device (happy path). | The user switches to the PayPal app and, after successfully completing the checkout flow, switches back to the same merchant browser tab they started from. |
| The user starts from a non-native default browser, such as Chrome on iOS or Firefox on Android. | The user App switches to the PayPal app and, after successfully completing the checkout flow, switches back to the user's default browser. |
| The user changes the payment method on the pay sheet after App Switch and completes the flow. | The checkout flow completes with the successful creation of a BA token or payment token. |
| The user cancels the operation on the pay sheet screen in the PayPal app after login. | The user switches back to the merchant browser after canceling out of the checkout flow. |
| The user adds a new card. | When the user selects Add Card, PayPal prompts them to log in again. After logging in, the new card form appears. After the user adds the new card, they can proceed with checkout. |
Preconditions
To go through the App Switch experience, enable the following login methods in the PayPal sandbox app:
- Long-lived session or remember me flow
- Face ID or biometric login
To enable these, open the PayPal app, select the avatar icon, select Login and security, and toggle on Face ID/fingerprint and Extend your login session.
Use cases that cannot be tested
- System errors
- App launch failure
- Activity feed updates
- Non-App Switch flow screens
Test PayPal disputes in the Braintree sandbox
| Requirement | Status/notes |
|---|---|
| Braintree sandbox account | Active and verified |
| PayPal sandbox (business and personal) | Accounts created and operational |
| Linked PayPal and Braintree accounts | Verified through Braintree Gateway > Account Settings > PayPal |
| At least one transaction exists | Verified through PayPal buyer history |
| Familiarity with the disputes lifecycle | PayPal Disputes docs |
Step 1: Create the dispute
- Log in to PayPal Personal Sandbox
- Locate the completed transaction
- Select Report a Problem to start the dispute
- Choose a reason, such as Item Not Received
- Submit the dispute and record the case ID, such as PP-R-NBM-10123874
Expected result: The dispute is created, and you receive confirmation and a case ID.
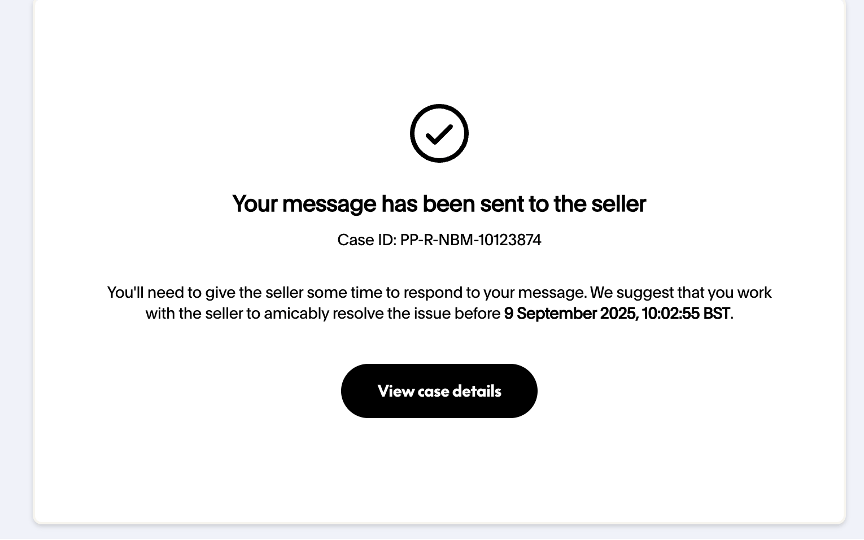
The following dispute types were verified and confirmed to appear and behave consistently in Braintree:
- I haven't received the item or service
- I received an item or service that was different or not as described
- I wasn't satisfied with the seller's offer
- The seller's website or product listing is incorrect or doesn't exist anymore
Other dispute categories, such as billing or subscription issues and unauthorized activity, are managed solely within PayPal and do not create Braintree dispute records, because they are not linked to merchant transactions.
No behavioral differences were observed across dispute types. All cases followed the same flow, response handling, and synchronization pattern between the PayPal sandbox and the Braintree sandbox dashboard.
Step 2: Confirm the dispute is reflected in Braintree
- Wait 5 to 10 minutes for sync
- Navigate to Disputes in the Braintree Control Panel
- Confirm the case is listed under Open
- Verify the PayPal case ID matches the Braintree transaction ID
Expected result: The dispute is visible in the dashboard, and the IDs align.

Step 3: Handle the response
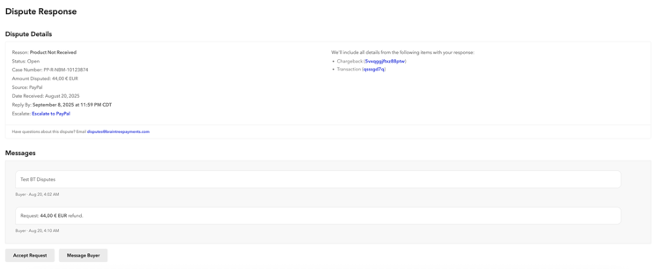
- Open the dispute in Braintree
-
Validate the available actions:
- Escalate to PayPal
- Respond to buyer
- Accept the dispute
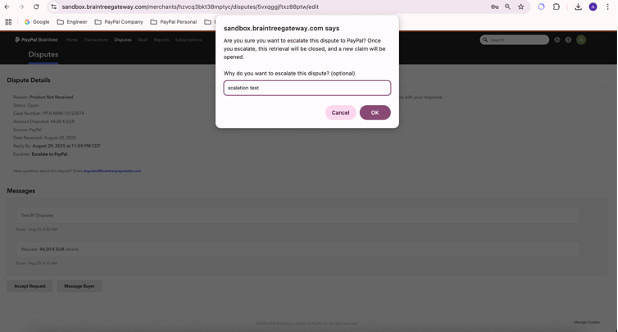
Simulate an escalation scenario
Expected result: The dispute status updates and the escalation is reflected.
Step 4: Handle the escalation or chargeback
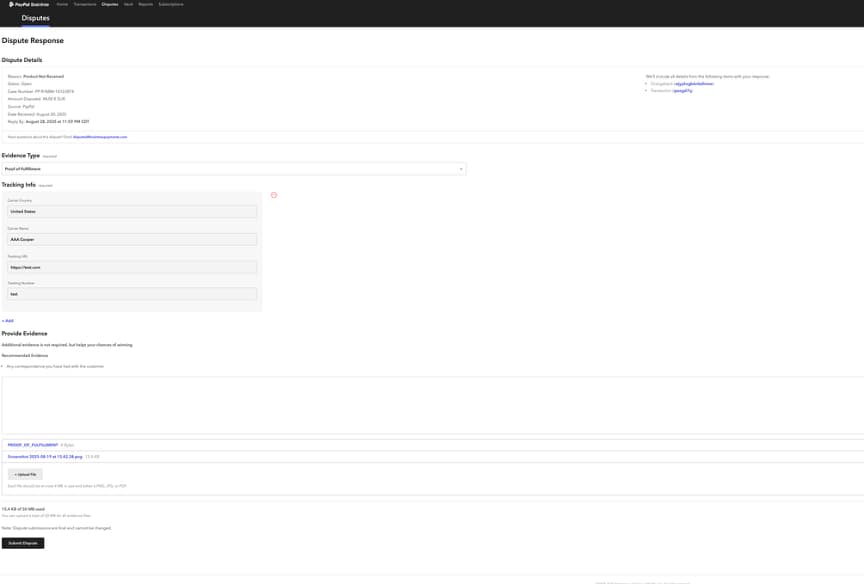
- Open the dispute and go to the chargeback detail page
-
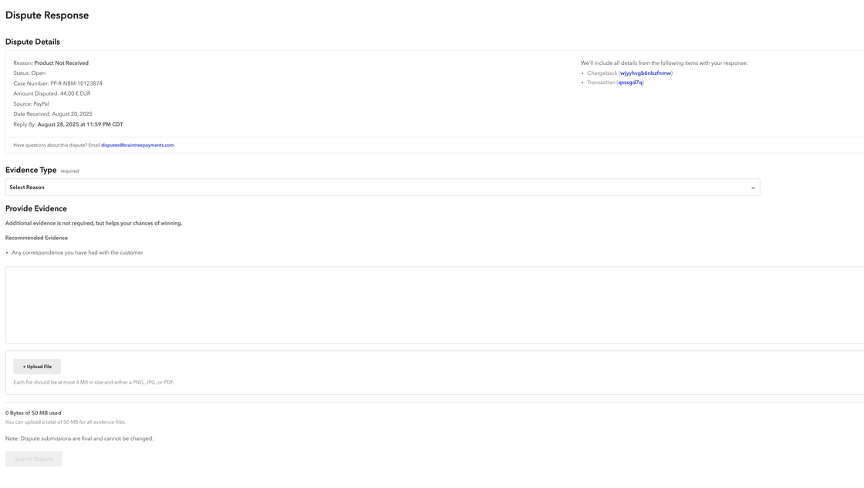
Validate the response options:
- Proof of Fulfillment
- Proof of Refund
- Other
- Upload mock evidence, such as a PDF receipt or tracking ID
- Confirm the system updates the buyer
Expected result: Braintree accepts the evidence and updates the dispute.
Observations
- Disputes appear in Braintree within about 5 minutes of creation.
- The case number format follows the PayPal convention: PP-R-XXX-########.
- Buyer sandbox account updates might take up to 24 hours to reflect.
- Dispute reports support precise mapping of Braintree and PayPal identifiers.
-
In Braintree's dispute reporting (CSV export or API), the following columns are key for
linking PayPal and Braintree dispute records:
- Dispute ID: the unique Braintree identifier for the dispute
- Case Number: mirrors the PayPal case ID, such as PP-R-NBM-10123874
- Transaction ID: corresponds to the Braintree transaction involved in the dispute
- PayPal Payer Email: matches the buyer's PayPal account email used in the original transaction
This field combination supports one-to-one reconciliation between Braintree disputes and their PayPal counterparts.
During QA validation, all sandbox disputes displayed consistent case number values across the Braintree dashboard, CSV report, and API responses. No mismatches were detected.
The mapping also supports downstream reconciliation for merchant reporting, because both the case number and transaction ID are included in the export schema.
-
In Braintree's dispute reporting (CSV export or API), the following columns are key for
linking PayPal and Braintree dispute records:
The dispute response interface accepts both documents and typed responses.
Reference: key fields in Braintree dispute reporting
| Field | Source | Description/use |
| Dispute ID | Braintree | Internal Braintree identifier for the dispute |
| Case Number | PayPal | PayPal case ID mirrored in Braintree |
| Transaction ID | Braintree | Transaction reference linked to the dispute |
| PayPal Payer Email | PayPal | Buyer email linked to the PayPal account |
| Amount Disputed/Amount Won | Braintree | Used to track the financial outcome of the dispute |
| Status/Reason | Both | Displays the current dispute state and reason category |
| Received Date/Last Updated | Braintree | Useful for timing and synchronization checks |
| Protection Level | Braintree | Indicates eligibility for PayPal Seller Protection |
Go live
Your sandbox account is not linked to your production account in any way. Nothing created in the sandbox transfers to production. This includes processing options and recurring billing settings. Your login information, merchant ID, and API keys are also different.
After you complete the integration, contact your PayPal support team to enable App Switch for production traffic.
Create an API user
You must enter production API credentials, including your API keys, into your server-side code to connect API calls to the Braintree gateway. While each user in your gateway has their own unique set of API keys, only one set can be included in your integration.
We do not recommend including an individual user's API credentials. If you ever need to delete or suspend that user, this could break your connection to Braintree and result in failed transactions.
Get production credentials
Log into your production account as the API user to obtain your API credentials. You need the:
- Production merchant ID
- Production public key
- Production private key
Keep in mind that public and private keys are both environment-specific and user-specific.
Update production account settings
Make sure your production account settings mirror the ones in your tested sandbox configuration. Be sure to recreate any recurring billing plans or settings if you plan to use recurring billing in production.
Update live server configuration
In your server code, update your configuration to production values:
- Ruby
gateway = Braintree::Gateway.new(
  :environment => :production,
  :merchant_id => "use_your_merchant_id",
  :public_key => "use_your_public_key",
  :private_key => "use_your_private_key",
)- C#
var gateway = new BraintreeGateway
{
    Environment = Braintree.Environment.PRODUCTION,
    MerchantId = "YOUR_PRODUCTION_MERCHANT_ID",
    PublicKey = "YOUR_PRODUCTION_PUBLIC_KEY",
    PrivateKey = "YOUR_PRODUCTION_PRIVATE_KEY"
};- Python
gateway = braintree.BraintreeGateway(
    braintree.Configuration(
        braintree.Environment.Production,
        merchant_id="use_your_merchant_id",
        public_key="use_your_public_key",
        private_key="use_your_private_key"
    )
)- PHP
$gateway = new Braintree\Gateway([
    'environment' => 'production',
    'merchantId' => 'use_your_merchant_id',
    'publicKey' => 'use_your_public_key',
    'privateKey' => 'use_your_private_key'
]);- Node
const gateway = new braintree.BraintreeGateway({
  environment: braintree.Environment.Production,
  merchantId: "YOUR_PRODUCTION_MERCHANT_ID",
  publicKey: "YOUR_PRODUCTION_PUBLIC_KEY",
  privateKey: "YOUR_PRODUCTION_PRIVATE_KEY"
});- Java
BraintreeGateway gateway = new BraintreeGateway(
  Environment.PRODUCTION,
  "YOUR_PRODUCTION_MERCHANT_ID",
  "YOUR_PRODUCTION_PUBLIC_KEY",
  "YOUR_PRODUCTION_PRIVATE_KEY"
);
Once you have updated these values and configured your preferred processing settings, the live production environment functions similarly to the sandbox environment you've been using for development. Learn more about the differences between production and the sandbox.
On the client side, no configuration updates are needed when you make the switch to production. Your client obtains its client token from your server, which is all the configuration it needs.
Test transactions in production
You need to use real payment methods in the production environment. Test values from the sandbox testing page do not work. This means that every test transaction you allow to settle in your production account debits funds from the associated payment method, and fees are assessed. Be sure to test with reasonable amounts and only run a limited number of transactions.