Apple Pay
Configuration
Apple Pay leverages a sophisticated cryptographic scheme for passing payment data securely from the Secure Element on the device to Braintree's Vault.
Before you can use Apple Pay, you'll need to coordinate a number of identifiers and certificates.
Apple Pay certificate request and provisioning
In order to use Apple Pay on a real device, you must configure an Apple Pay Merchant ID and an Apple Pay payment processing certificate in Apple's Developer Center.
Provisioning
Because our sandbox and production environments are separate, you'll need to complete these steps twice: once for each environment.
Step 1
Sign in to your Developer Center in Safari
Step 2
Create an Apple Pay Merchant ID
Step 3
Download your CSR (certificate signing request) from the Control Panel
- Click the gear icon in the top right corner, select Processing from the drop-down menu
- Scroll to Apple Pay, and click the toggle to enable this payment method
- Select the Options link and click the +Add link to download the CSR from the certificate management page
Step 4
Generate a new Apple Pay payment processing certificate in Apple's developer portal
- Select Apple Pay Payment Processing Certificate and click Continue
- In the dropdown, choose the Merchant ID you created earlier and click Continue
- Under Payment Processing Certificate, click Create Certificate
- Answer the prompted question and click Continue
- Upload the CSR that you downloaded from the Control Panel in step 3
Step 5
Download the new Apple Pay payment processing certificate and upload it in the Control Panel
- Click the gear icon in the top right corner
- Click Processing from the drop-down menu
- Scroll to the Payment Methods section
- Next to Apple Pay, click the Options link
- Next to Apple Merchant Certificates (iOS), click the +Add link
Step 6
Repeat for your production account.
Certificate renewal
Apple Pay certificates expire after 25 months. To avoid any disruptions in processing, you'll need to generate a new certificate before your current one expires, and upload it to the Control Panel. As with the original request and provisioning, you'll need to complete this process for both sandbox and production.
Step 1
Download a new Certificate Signing Request (CSR) from the Control Panel
- Log into the Control Panel
- Click on the gear icon in the top right corner
- Click Processing from the drop-down menu
- Scroll to the Payment Methods section
- Next to Apple Pay, click the Options link
- Next to Apple Merchant Certificates (iOS), click the +Add link
- Click the Certificate Signing Request link to download the CSR file
Step 2
Generate a new certificate from Apple
- Log into the Apple Developer Portal
- Click on Certificates, Identifiers & Profiles, then Identifiers, then select Merchant IDs in the drop-down
- Select the appropriate Merchant ID
- Under Payment Processing Certificate, click Create Certificate, then click Continue
- Upload the CSR file you downloaded from the Control Panel in step 1, and click Continue
- Download the new certificate
Step 3
Upload the new certificate to your Control Panel
- Return to the tab with your Control Panel
- Under the Upload Certificate section, click the Choose File button
- Select the new certificate, and click Upload
Step 4
Activate the new certificate with Apple
- Return to the Apple developer portal and click Edit under the same Merchant ID as before
- Click Activate next to the new certificate
Step 5
Repeat for your production account
Xcode setup
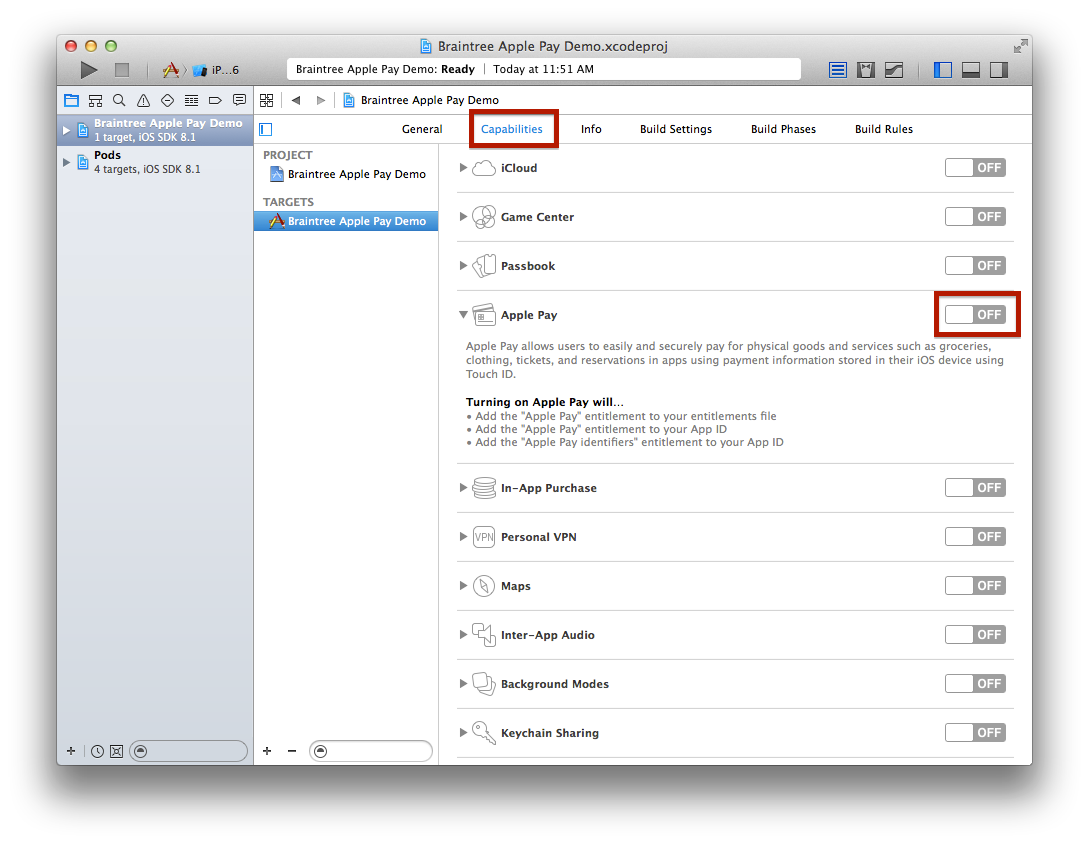
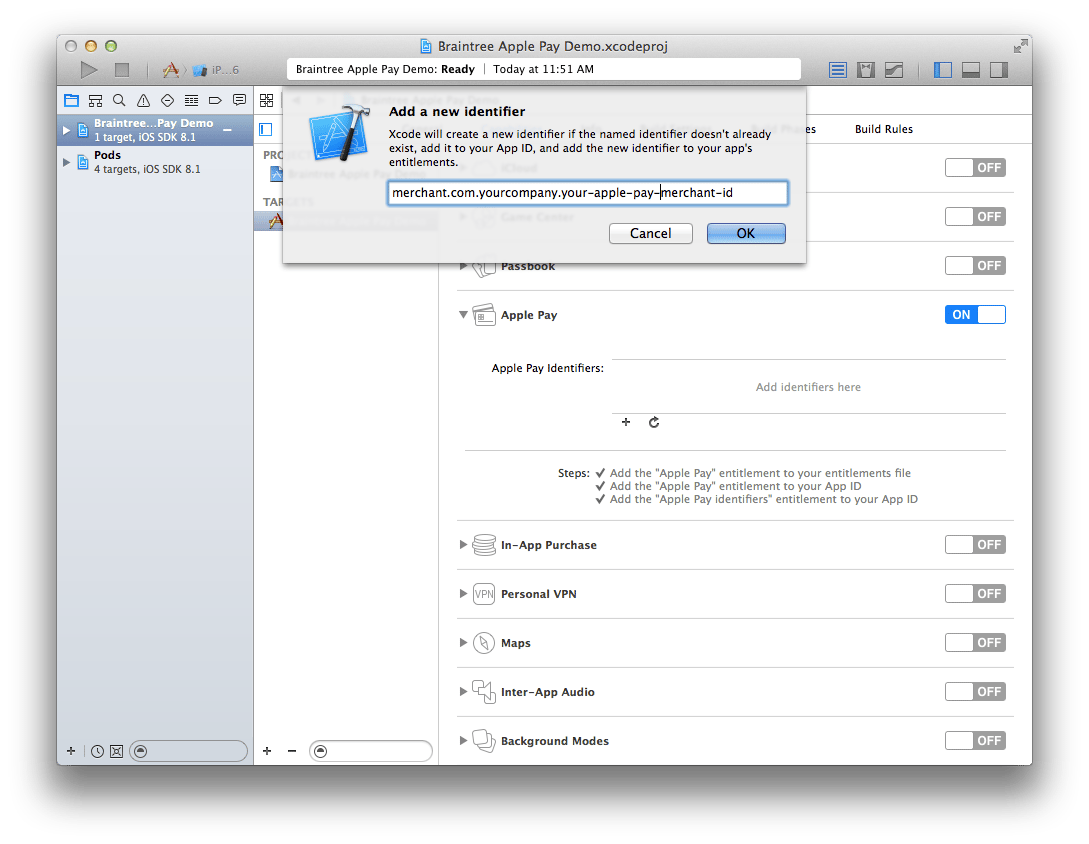
In Xcode, enable Apple Pay under Capabilities in your Project Settings.

Then enable both Apple Pay Merchant IDs.

It is important that you compile your app with a provisioning profile for the Apple development team with an Apple Pay Merchant ID. Apple Pay does not support enterprise provisioning.
Next Page: Client-side →