
Standard Client-Side Implementation
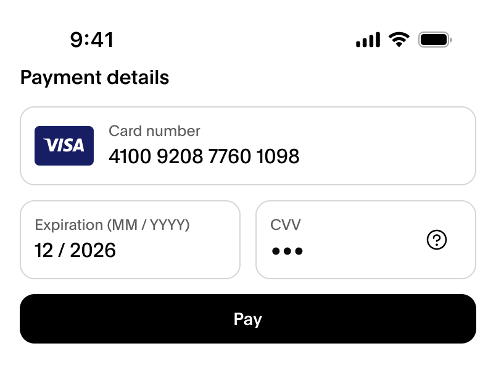
Add the Card Fields component to your Android checkout screen to collect card number, expiration date, and CVV input with built-in formatting, validation, brand detection, and tokenization. This guide covers two implementation approaches: XML views and Jetpack Compose. When you finish this guide, your app renders the 3 card fields, enables your pay button once the form is valid, and returns a nonce you can send to your server to complete a transaction.
If you need more direct control over card tokenization, see Advanced client-side for Android v5.
Before you begin
Before you add Card Fields, complete the following:
- Set up the Braintree Android SDK. See Setup for the base SDK installation.
- Generate a tokenization key or client token. See Client Authorization for the available authorization types.
- Decide where Card Fields fits in your checkout screen. Card Fields renders the card number, expiration date, and CVV fields. You provide everything else, including any non-card fields, such as name or billing address, and your pay button.
- Decide whether you'll implement Card Fields with XML views or Jetpack Compose. This guide covers both.
Add the Card Fields dependency
In your build.gradle file, add the ui-components dependency. This dependency supports both the XML views and Jetpack Compose implementations covered later in this guide. You need to use Braintree Android SDK 5.29.0 or higher, the first release that includes ui-components. Use the latest available version.
- Kotlin
- Groovy
dependencies {
    implementation("com.braintreepayments.api:ui-components:LATEST-VERSION")
}
We recommend using the latest versions of our SDKs. See the Braintree Android changelog for the current release.
Verify: Sync your project. The build completes without dependency resolution errors.
Implement with XML views
Add the CardFields view to your checkout screen if your app builds its UI with XML views instead of Jetpack Compose.
Add the Card Fields view to your layout
Add the CardFields view and your own pay button to your layout file. The pay button starts disabled until the form is valid.
- XML
<com.braintreepayments.api.uicomponents.cardfields.CardFields
    android:id="@+id/cardFields"
    android:layout_width="match_parent"
    android:layout_height="wrap_content" />

<Button
    android:id="@+id/payButton"
    android:layout_width="match_parent"
    android:layout_height="wrap_content"
    android:text="Pay"
    android:enabled="false" />
Verify: Render the layout. You see the card number, expiration date, and CVV fields, and a disabled pay button.
Initialize Card Fields
In your fragment or activity, get a reference to the CardFields view you added to your layout. Then call initialize on that reference, passing in the tokenization key or client token. This authorizes Card Fields to communicate with Braintree on your behalf and prepares the view to accept card input.
- Kotlin
class CheckoutFragment : Fragment() {
    private lateinit var cardFields: CardFields

    override fun onViewCreated(view: View, savedInstanceState: Bundle?) {
        super.onViewCreated(view, savedInstanceState)

        cardFields = view.findViewById(R.id.cardFields)
        val authorization = "YOUR-TOKENIZATION-KEY"

        cardFields.initialize(authorization)
    }
}
Replace YOUR-TOKENIZATION-KEY with the tokenization key or client token you generated in Before you begin.
Verify: Run your app. Card Fields loads without throwing an authorization error.
Enable your pay button when the form is valid
Card Fields reports form validity through a listener. Use it to enable your pay button only when the customer enters a valid card number, expiration date, and CVV.
- Kotlin
val payButton = view.findViewById<Button>(R.id.payButton)

cardFields.setOnValidationChangedListener { isFormValid ->
    payButton.isEnabled = isFormValid
}
Verify: Enter an incomplete or invalid card number. The pay button stays disabled. Enter a valid card number, expiration date, and CVV. The pay button becomes enabled.
Handle the tokenization result
Register a result callback before you call submit. Card Fields returns a nonce on success, or an error on failure.
- Kotlin
cardFields.setCardFieldsResultCallback { result ->
    when (result) {
        is CardFieldsResult.Success -> {
            val nonce = result.nonce
            // Send the nonce to your server. See Server-Side to create the transaction.
        }
        is CardFieldsResult.Failure -> {
            val error = result.error
            // Handle the error
        }
    }
}
Verify: Trigger a test submission after completing the next step. Your callback receives either a CardFieldsResult.Success with a nonce, or a CardFieldsResult.Failure with an error.
Trigger submission from your pay button
Card Fields doesn't include a pay button. Call submit from your own button's click handler.
- Kotlin
payButton.setOnClickListener {
    cardFields.submit()
}
Verify: Select the pay button with a valid form. The result callback from the previous step runs.
Optional: Add supplemental card data
Use setPaymentRequest to merge non-card data, such as the cardholder name or postal code, into the tokenization request. Card Fields fills in the card number, expiration date, and CVV from the form.
- Kotlin
cardFields.setPaymentRequest(
    Card(
        cardholderName = "Firstname Lastname",
        postalCode = "12345"
    )
)
Verify: Complete a submission. The tokenization request includes the cardholder name and postal code you set, along with the card data from the form.
Implement with Jetpack Compose
Add the CardFields composable to your checkout screen if your app builds its UI with Jetpack Compose instead of XML views.
Create the card fields controller
Create a card fields controller with rememberCardFieldsController. This keeps the controller's state across recompositions, so Compose doesn't recreate it every time the screen redraws.
Replace YOUR-TOKENIZATION-KEY with the tokenization key or client token you generated in Before you begin. This controller manages validation for each field and reports form validity. This validity is used to enable the payment button to submit the card details.
- Kotlin
val cardFieldsController = rememberCardFieldsController(
    authorization = "YOUR-TOKENIZATION-KEY",
)
val isFormValid by cardFieldsController.isFormValid.collectAsState()
Verify: Run your app. Everything builds without throwing an authorization error.
Add a card fields composable
Add the CardFields composable element to your page and pass in the cardFieldsController you created. This is the card fields UI form, including card number, expiration date, and CVV.
- Kotlin
CardFields(controller = cardFieldsController)Verify: Render the screen. You see the card number, expiration date, and CVV fields.
Add a payment button
Add a new composable button element and use the isFormValid value from the previous step to enable payment when the form is valid. Add an onClick handler for that button to submit the form and handle the result. The controller returns a nonce on success, or an error on failure.
- Kotlin
Button(
    enabled = isFormValid,
    onClick = {
        cardFieldsController.submit { result ->
            when (result) {
                is CardFieldsResult.Success -> {
                    // Send result.nonce.string to your server to complete the transaction
                }
                is CardFieldsResult.Failure -> {
                    // Handle card tokenization error
                }
            }
        }
    }
) {
    Text("Pay")
}
Verify: Enter an incomplete or invalid card number. The pay button stays disabled. Enter a valid card number, expiration date, and CVV. The pay button becomes enabled. Select it. Your onClick callback receives either a CardFieldsResult.Success with a nonce, or a CardFieldsResult.Failure with an error.
Optional: Add supplemental card data
Use the request parameter of the controller to add non-card data, such as the cardholder name or postal code, into the tokenization request. CardFields fills in the card number, expiration date, and CVV from the form.
- Kotlin
val cardFieldsController = rememberCardFieldsController(
    authorization = "YOUR-TOKENIZATION-KEY",
    // Optionally attach additional data, such as cardholder name or billing address
    request = Card(
        cardholderName = "Firstname Lastname",
        postalCode = "12345"
    )
)
Verify: Complete a submission. The tokenization request includes the cardholder name and postal code you set, along with the card data from the form.
Complete compose example
See the previous steps combined into one complete example.
- Kotlin
@Composable
fun ExampleCardFieldsScreen() {
    val cardFieldsController = rememberCardFieldsController(
        authorization = "YOUR-TOKENIZATION-KEY",
        // Optionally attach additional data, such as cardholder name or billing address
        request = Card(
            cardholderName = "Firstname Lastname",
            postalCode = "12345"
        )
    )
    val isFormValid by cardFieldsController.isFormValid.collectAsState()

    Column {
        CardFields(controller = cardFieldsController)

        Button(
            enabled = isFormValid,
            onClick = {
                cardFieldsController.submit { result ->
                    when (result) {
                        is CardFieldsResult.Success -> {
                            // Send result.nonce.string to your server to complete the transaction
                        }
                        is CardFieldsResult.Failure -> {
                            // Handle card tokenization error
                        }
                    }
                }
            }
        ) {
            Text("Pay")
        }
    }
}
Verify: Run the full example and complete a test submission. Your app renders the card fields and pay button, enables the button once the form is valid, and returns a nonce on success or an error on failure.
Test your integration
Test your integration in sandbox before you go live. See Testing and Go Live for sandbox test values and steps to confirm a successful transaction.
Next steps
- See Overview for what Card Fields is and what it replaces.
- See Advanced client-side: Android v5 for more direct control over card tokenization without Card Fields.
- See Server-side to create the transaction using the payment method nonce.