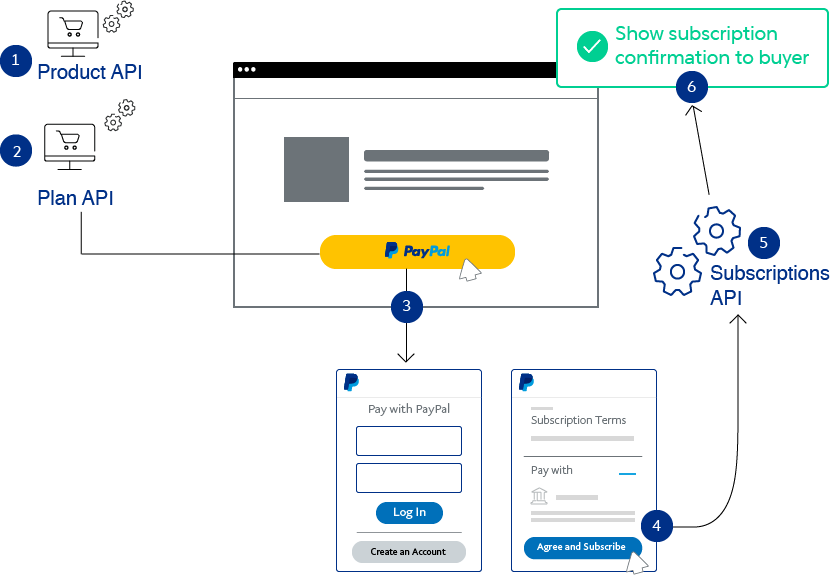
Subscriptions
Create subscriptions so your sellers can bill their buyers at regular intervals.
Know before you code
- Complete Onboarding before you begin this integration.
- The instructions in Get started will help you get your access token.
- You'll need your build notation (BN) code. If you don't have it, contact your PayPal account manager.
-
This server-side integration uses the following:
- PayPal Subscriptions doesn't support Indian Rupees (INR).
How it works
- Create a product to represent your goods or services.
- Create a plan to represent the payment cycles for your subscription.
- Create a subscription button. When the buyer selects the button, the subscription experience begins.
- The buyer agrees and subscribes.
- The button calls the PayPal Subscriptions API to create the subscription.
- The buyer sees the subscription confirmation.
1. Create product
To create a product for your subscription plan, copy the following code and modify it.
Sample request
API endpoint used: Create product
curl -v -X POST https://api-m.sandbox.paypal.com/v1/catalogs/products \
-H "Content-Type: application/json" \
-H "Authorization: Bearer <Access-Token>" \
-H "PayPal-Request-Id: 123e4567-e89b-12d3-a456-426655440020" \
-H "PayPal-Auth-Assertion: eyJhbGciOiJub25lIn0.eyJpc3MiOiJjbGllbnRfaWQiLCJlbWFpbCI6Im15LWVtYWlsQGV4YW1wbGUuY29tIn0." \
-d '{
"name": "Video Streaming Service",
"description": "A video streaming service",
"type": "SERVICE",
"category": "SOFTWARE",
"image_url": "https://example.com/streaming.jpg",
"home_url": "https://example.com/home"
}'
Modify the code
After you copy the code in the sample request, modify the following:
- Change
Access-Token
to your access token. - Replace the sample ID for
PayPal-Request-Id
with a unique ID you generate. This ID helps prevent creating duplicate products in the event that the API call is disrupted. See also: API Idempotency. - Replace the
PayPal-Auth-Assertion
header with your own JSON Web Token (JWT) assertion that identifies your seller. For more information on how to create a JWT, seePayPal-Auth-Assertion
. - Optional: Change the name, description, and more to represent your actual product.
Step result
A successful request results in the following:
- A return status code of HTTP
201 Created
. - A JSON response body that contains an ID for the product. You can use this ID to complete other actions through the REST API, such as creating a subscription plan.
Sample response
{
"id": "PROD-5FD60555F23244316",
"name": "Video Streaming Service",
"description": "A video streaming service",
"create_time": "2020-01-21T16:04:39Z",
"links": [
{
"href": "https://api-m.sandbox.paypal.com/v1/catalogs/products/PROD-5FD60555F23244316",
"rel": "self",
"method": "GET"
},
{
"href": "https://api-m.sandbox.paypal.com/v1/catalogs/products/PROD-5FD60555F23244316",
"rel": "edit",
"method": "PATCH"
}
]
}
2. Create plan
Because PayPal's Subscriptions API is flexible, you can create a highly customized subscription plan to fit your business' needs. The following sample request is only one example of a subscription plan. You will have to modify the code to fit your subscription's model.
Copy the code and try it out, but also review the subscription capabilities and the Create plan endpoint to determine how you might want to adjust this code for your use case.
Sample request
This sample request creates a subscription plan that:
- Has a one-month free trial and continues as a 12-month, fixed-price subscription
- Includes a $10 USD set up fee
- Bills any outstanding balance at the next billing cycle
- Allows the subscription to continue if the initial payment for the setup fails
- Suspends the subscription after three consecutive payment failures
- Includes a 10% tax in the billing amount
API endpoint used: Create plan
curl -v -k -X POST https://api-m.sandbox.paypal.com/v1/billing/plans \
-H "Accept: application/json" \
-H "Authorization: Bearer <Access-Token>" \
-H "PayPal-Request-Id: 123e4567-e89b-12d3-a456-426655440020" \
-H "PayPal-Auth-Assertion: eyJhbGciOiJub25lIn0.eyJpc3MiOiJjbGllbnRfaWQiLCJlbWFpbCI6Im15LWVtYWlsQGV4YW1wbGUuY29tIn0." \
-d '{
"product_id": "PROD-5FD60555F23244316",
"name": "Basic Plan",
"description": "Basic plan",
"billing_cycles": [
{
"frequency": {
"interval_unit": "MONTH",
"interval_count": 1
},
"tenure_type": "TRIAL",
"sequence": 1,
"total_cycles": 1
},
{
"frequency": {
"interval_unit": "MONTH",
"interval_count": 1
},
"tenure_type": "REGULAR",
"sequence": 2,
"total_cycles": 12,
"pricing_scheme": {
"fixed_price": {
"value": "10",
"currency_code": "USD"
}
}
}
],
"payment_preferences": {
"auto_bill_outstanding": true,
"setup_fee": {
"value": "10",
"currency_code": "USD"
},
"setup_fee_failure_action": "CONTINUE",
"payment_failure_threshold": 3
},
"taxes": {
"percentage": "10",
"inclusive": false
}
}'
Modify the code
After you copy the code in the sample request, modify the following:
- Change
Access-Token
to your access token. - Change the value of the
product_id
parameter to the ID returned when you created the product. - Replace the sample ID for
PayPal-Request-Id
with a unique ID you generate. This ID helps prevent creating duplicate plans in the event that the API call is disrupted. See also: API Idempotency. - Replace the
PayPal-Auth-Assertion
header with your own JSON Web Token (JWT) assertion that identifies your seller. For more information on how to create a JWT, seePayPal-Auth-Assertion
. -
(Optional) Change or add parameters in the Create plan request body to create a plan that meets your business needs. Some examples:
- Fixed vs. quantity (user or seat) pricing plans
- Free or discounted trials
Step result
A successful request results in the following:
- A return status code of HTTP
201 Created
. - A JSON response body containing a plan ID. Use the plan ID to complete other actions through the REST API, such as editing or deactivating the plan and creating a subscription.
- A subscription plan in the seller's PayPal account in the
On
status.
Sample response
{
"id": "P-17M15335A8501272JLXLLNKI",
"product_id": "PROD-5FD60555F23244316",
"name": "Basic Plan",
"status": "ACTIVE",
"description": "Basic plan",
"create_time": "2020-01-21T16:09:13Z",
"links": [
{
"href": "https://api-m.sandbox.paypal.com/v1/billing/plans/P-17M15335A8501272JLXLLNKI",
"rel": "self",
"method": "GET"
},
{
"href": "https://api-m.sandbox.paypal.com/v1/billing/plans/P-17M15335A8501272JLXLLNKI",
"rel": "edit",
"method": "PATCH"
},
{
"href": "https://api-m.sandbox.paypal.com/v1/billing/plans/P-17M15335A8501272JLXLLNKI/deactivate",
"rel": "self",
"method": "POST"
}
]
}
To see how the result of this API call looks in the seller's account, use your sandbox business account credentials to log in to https://www.sandbox.paypal.com/billing/plans. The subscription plan reflects the plan number from the REST API call you made:
3. Create subscription
Create a subscription for your plan.
API endpoint used: Create subscription
curl -v -X POST https://api-m.sandbox.paypal.com/v1/billing/subscriptions \
-H "Content-Type: application/json" \
-H "Authorization: Bearer <Access-Token>" \
-H "PayPal-Partner-Attribution-Id: Example_Marketplace" \
-H "PayPal-Request-Id: 123e4567-e89b-12d3-a456-426655440020" \
-H "PayPal-Auth-Assertion: eyJhbGciOiJub25lIn0.eyJpc3MiOiJjbGllbnRfaWQiLCJlbWFpbCI6Im15LWVtYWlsQGV4YW1wbGUuY29tIn0." \
-d '{
"plan_id": "P-17M15335A8501272JLXLLNKI",
"start_time": "2020-01-22T00:00:00Z",
"quantity": "20",
"shipping_amount": {
"currency_code": "USD",
"value": "10.00"
},
"subscriber": {
"name": {
"given_name": "John",
"surname": "Doe"
},
"email_address": "customer@example.com",
"shipping_address": {
"name": {
"full_name": "John Doe"
},
"address": {
"address_line_1": "2211 N First Street",
"address_line_2": "Building 17",
"admin_area_2": "San Jose",
"admin_area_1": "CA",
"postal_code": "95131",
"country_code": "US"
}
}
},
"application_context": {
"brand_name": "example-retail",
"locale": "en-US",
"shipping_preference": "SET_PROVIDED_ADDRESS",
"user_action": "SUBSCRIBE_NOW",
"payment_method": {
"payer_selected": "PAYPAL",
"payee_preferred": "IMMEDIATE_PAYMENT_REQUIRED"
},
"return_url": "https://example.com/returnUrl",
"cancel_url": "https://example.com/cancelUrl"
}
}'
Modify the code
After you copy the code in the sample request, modify the following:
- Change
Access-Token
to your access token. - Replace the value for the
PayPal-Partner-Attribution-Id
to your BN code. - Replace the sample ID for
PayPal-Request-Id
with a unique ID you generate. This ID helps prevent creating duplicate products in the event that the API call is disrupted. See also: API Idempotency. - Replace the
PayPal-Auth-Assertion
header with your own JSON Web Token (JWT) assertion that identifies your seller. For more information on how to create a JWT, seePayPal-Auth-Assertion
. -
Determine the value for
subscriber/shipping_address
:- If you don't need to ship your services, set
application_context/shipping_preference
toNO_SHIPPING
. This hides shipping information fields on the PayPal Review page. - If the buyer entered a shipping address on the seller's site, pass the shipping address to PayPal here.
- If the buyer didn't enter a shipping address on the seller's site, you can edit the shipping address on the PayPal Review page. Leave
application_context/shipping preference
blank or set it toGET_FROM_FILE
.
- If you don't need to ship your services, set
- (Optional) Use the
application_context/user_action
field to automatically activate subscriptions. Set the field toSUBSCRIBE_NOW
or send it empty. The default value isSUBSCRIBE_NOW
. Otherwise, you need to make aPOST v1/billing/subscriptions/{ID}/activate
call to activate the subscription.
Sample response
{
"id": "I-BW452GLLEP1G",
"status": "APPROVAL_PENDING",
"status_update_time": "2018-12-10T21:20:49Z",
"plan_id": "P-17M15335A8501272JLXLLNKI",
"start_time": "2020-01-22T00:00:00Z",
"quantity": "20",
"shipping_amount": {
"currency_code": "USD",
"value": "10.00"
},
"subscriber": {
"name": {
"given_name": "John",
"surname": "Doe"
},
"email_address": "customer@example.com",
"payer_id": "2J6QB8YJQSJRJ",
"shipping_address": {
"name": {
"full_name": "John Doe"
},
"address": {
"address_line_1": "2211 N First Street",
"address_line_2": "Building 17",
"admin_area_2": "San Jose",
"admin_area_1": "CA",
"postal_code": "95131",
"country_code": "US"
}
}
},
"create_time": "2018-12-10T21:20:49Z",
"links": [
{
"href": "https://www.paypal.com/webapps/billing/subscriptions?ba_token=BA-2M539689T3856352J",
"rel": "approve",
"method": "GET"
},
{
"href": "https://api-m.paypal.com/v1/billing/subscriptions/I-BW452GLLEP1G",
"rel": "edit",
"method": "PATCH"
},
{
"href": "https://api-m.paypal.com/v1/billing/subscriptions/I-BW452GLLEP1G",
"rel": "self",
"method": "GET"
}
]
}
Step result
- A return status code of HTTP
201 Created
. - A JSON response body that contains an ID for the subscription. You can use this ID to complete other actions through the REST API, such as updating the subscription.
- Save the Subscription ID returned in the
id
field of the API response. - (Optional) Change or add other parameters to customize the subscription plan. Refer to Capabilities to learn more about how you can customize the plan.
4. Create button
Create a subscription button and add it to your seller's site. The design of the button is up to you.
When the button is selected, use the approve
HATEOS link returned in the Create subscription response. This redirects the buyer to a PayPal-hosted payment page. From there, they can choose to pay through PayPal, a credit card, or a debit card.
Next steps
Test and go live with this subscription integration.
See also
- Configure webhooks for REST APIs - Use webhooks for event notification.
- Subscriptions events - See a list of Subscriptions webhook events.