Integrate card payments in Android
Last updated: Jul 31st, 7:18am
Accept PayPal, credit, and debit card payments in a web or native experience using the PayPal Mobile Android SDK. Use customizable PayPal buttons with your custom checkout UI to align with your business branding. For more implementation details, see the PayPal GitHub repository.
Know before you code
You need a developer account to get sandbox credentials:
- PayPal uses REST API credentials which you can get from the developer dashboard.
- Client ID: Authenticates your account with PayPal and identifies an app in your sandbox.
- Client secret: Authorizes an app in your sandbox. Keep this secret safe and don’t share it.
Read Get started with PayPal APIs for more information.
You need a combination of PayPal and third-party tools:
- Android SDK: Adds PayPal-supported payment methods for Android.
- Orders REST API: Create, update, retrieve, authorize, and capture orders.
Use Postman to explore and test PayPal APIs.
Before you begin your integration
Check your account setup for advanced card payments
This integration requires a sandbox business account with the Advanced Credit and Debit Card Payments capability. Your account should automatically have this capability.
To confirm that Advanced Credit and Debit Card Payments are enabled for you, check your sandbox business account as follows:
- Log into the PayPal Developer Dashboard, toggle Sandbox, and go to Apps & Credentials.
- In REST API apps, select the name of your app.
- Go to Features > Accept payments.
- Select the Advanced Credit and Debit Card Payments checkbox and select Save Changes.
Note: If you created a sandbox business account through sandbox.paypal.com, and the advanced credit and debit card payments status for the account is disabled, complete the sandbox onboarding steps.
Check 3D Secure requirements
Add 3D Secure to reduce the chance of fraud and improve the payment experience by authenticating a cardholder through their card issuer.
Visit our 3D Secure page to see if 3D Secure is required in your region and learn more about implementing 3DS in your app.
Integrate the SDK into your app
The PayPal Mobile SDK is available through Maven Central. Add the mavenCentral repository to the build.gradle file of your project root:
1allprojects {2 repositories {3 mavenCentral()4 }5}
Snapshot builds
You can also use snapshot builds to test upcoming features before release. To include a snapshot build:
1. Add snapshots repository
Add the snapshots repository to the build.gradle file of your project root.
1allprojects {2 repositories {3 mavenCentral()4 maven {5 url 'https://oss.sonatype.org/content/repositories/snapshots/'6 }7 }8}
2. Add snapshot to dependencies
Then, add a snapshot build by adding -SNAPSHOT to the current dependency version. For example, if you want to add a snapshot build for CardPayments, add the following:
1dependencies {2 implementation 'com.paypal.android:card-payments:CURRENT-VERSION-SNAPSHOT'3}
Payment integrations
Integrate 3 different types of payments using the PayPal Mobile SDK:
- Card payments: Add card fields that align with your branding.
- PayPal native payments: Launch a checkout page within your app, instead of a popup.
- PayPal web payments: A lighter integration that launches a checkout page in a browser within your app.
Card
Integrate with card payments
Build and customize the card fields to align with your branding.
1. Add card payments module to your app
Add the card-payments package dependency in your app's build.gradle file:
1dependencies {2 implementation "com.paypal.android:card-payments:CURRENT-VERSION"3}
2. Create CardClient
A CardClient helps you attach a card to a payment.
In your Android app:
- Use the
CLIENT_IDto construct aCoreConfig. - Construct a
CardClientusing yourCoreConfigobject.
1val config = CoreConfig("CLIENT_ID", environment = Environment.SANDBOX)23val cardClient = CardClient(config)
3. Get Order ID
On your server:
- Create an
ORDER_IDby using the Orders v2 API. - Pass your
ACCESS_TOKENin theAuthorizationheader. To get anACCESS_TOKEN, use the Authentication API.Note: This access token is only for the sandbox environment. When you're ready to go live, request a live access token by changing the request sandbox endpoint to https://api-m.paypal.com/v1/oauth2/token.
- Pass the
intent. You'll need to pass eitherAUTHORIZEorCAPTUREas theintenttype. This type must match the/authorizeor/captureendpoint you use to process your order.
- Sample request
- Sample response
1curl --location --request POST 'https://api-m.sandbox.paypal.com/v2/checkout/orders/' \2 -H 'Content-Type: application/json' \3 -H 'Authorization: Bearer ACCESS_TOKEN' \4 --data-raw '{5 "intent": "CAPTURE|AUTHORIZE",6 "purchase_units": [7 {8 "amount": {9 "currency_code": "USD",10 "value": "5.00"11 }12 }13 ]14 }'
When a buyer starts a payment, send the ORDER_ID from your server to your client app.
4. Create card request
A CardRequest object:
- Attaches a card to an
ORDER_ID. - Launches 3D Secure when a payment requires additional authentication.
1. Collect card payment details
Build a card object with the buyer's card details:
1val card = Card(2 number = "4005519200000004",3 expirationMonth = "01",4 expirationYear = "2025",5 securityCode = "123",6 billingAddress = Address(7 streetAddress = "123 Main St.",8 extendedAddress = "Apt. 1A",9 locality = "Anytown",10 region = "CA",11 postalCode = "12345",12 countryCode = "US"13 )14)
Collecting a billing address can reduce the number of authentication challenges to customers.
2. Build CardRequest
Build a CardRequest with the card object and your ORDER_ID:
1val cardRequest = CardRequest(2 orderID = "ORDER_ID",3 card = card,4 returnUrl = "myapp://return_url", // custom URL scheme needs to be configured in AndroidManifest.xml5 sca = SCA.SCA_ALWAYS // default value is SCA.SCA_WHEN_REQUIRED6)
3D Secure is supported for all card payments to comply with the Second Payment Services Directive (PSD2). PSD2 is a European Union regulation that introduces Strong Customer Authentication (SCA) and other security requirements.
Select your SCA launch option type using the sca parameter in the CardRequest initializer:
SCA.SCA_WHEN_REQUIREDlaunches an SCA challenge when applicable. This is enabled by default.SCA.SCA_ALWAYSrequires an SCA challenge for all card transactions.
3. Set up your app for browser switching
The sca challenge launches in a browser within your application. Your app needs to handle the browser switch between the sca challenge and the checkout page. Set up a return URL that returns to your app from the browser.
4. Create a return URL
Provide a returnUrl so the browser returns to your application after the sca challenge finishes.
The returnUrl should have the following format:
1myapp://return_url
The myapp:// portion of the returnUrl is a custom URL scheme that you need to register in your app's AndroidManifest.xml.
5. Add card payment activity to the Android manifest
Update your app's AndroidManifest.xml with details about the card payment activity that will return the user to your app after completing the SCA check. Include the following elements:
- Set the activity
launchModetosingleTop. - Set the
android:schemeon the Activity that will be responsible for handling the deep link back into the app. - Add an
intent-filter. - Register the
myapp://custom URL scheme in theintent-filter.
Note: android:exported is required if your app compile SDK version is API 31 (Android 12) or later.
1<activity2 android:name=".MyCardPaymentActivity"3 android:launchMode="singleTop"4 android:exported="true">56 <intent-filter&g;78 &l;action android:name="android.intent.action.VIEW" />910 <data android:scheme="myapp" />1112 <category android:name="android.intent.category.DEFAULT" />;1314 <category android:name="android.intent.category.BROWSABLE" />1516 </intent-filter>1718</activity>
6. Connect the card payment activity
Add onNewIntent to your activity:
1override fun onNewIntent(newIntent: Intent?) {2 super.onNewIntent(intent)3 intent = newIntent4}
5. Approve order
After your CardRequest has the card details, call cardClient.approveOrder() to process the payment.
1class MyCardPaymentActivity: FragmentActivity {2 fun cardCheckoutTapped(cardRequest: CardRequest) {3 cardClient.approveOrder(this, cardRequest)4 }5}
6. Handle payment result scenarios
Set up your ApproveOrderListener to handle successful payments, errors, cancellations, and 3D Secure transaction flows.
1class MyCardPaymentActivity: FragmentActivity, ApproveOrderListener {2 fun cardCheckoutTapped(cardRequest: CardRequest) {3 val result = cardClient.approveOrder(this, cardRequest)4 }5 fun setupCardClient() {6 cardClient.listener = this7 }8 fun onApproveOrderSuccess(result: CardResult) {9 // order was approved and is ready to be captured/authorized (see step 6)10 }11 fun onApproveOrderFailure(error: PayPalSDKError) {12 // inspect 'error' for more information13 }14 fun onApproveOrderCanceled() {15 // 3D Secure flow was canceled16 }17 fun onApproveOrderThreeDSecureWillLaunch() {18 // 3D Secure flow will launch19 }20 fun onApproveOrderThreeDSecureDidFinish() {21 // 3D Secure auth did finish successfully22 }23}
7. Authorize and capture order
Submit your ORDER_ID for authorization or capture when the PayPal Android SDK calls the onApproveOrderSuccess method.
Call the authorize endpoint of the Orders V2 API to place the money on hold:
Sample request: Authorize order
1curl --location --request POST 'https://api-m.sandbox.paypal.com/v2/checkout/orders/ORDER_ID/authorize' \2 -H 'Content-Type: application/json' \3 -H 'Authorization: Bearer ACCESS_TOKEN' \4 --data-raw ''
Call the capture endpoint of the Orders V2 API to capture the money immediately:
Sample request: Capture order
1curl --location --request POST 'https://api-m.sandbox.paypal.com/v2/checkout/orders/ORDER_ID/capture' \2 -H 'Content-Type: application/json' \3 -H 'Authorization: Bearer ACCESS_TOKEN' \4 --data-raw ''
8. Test integration
Before going live, test your integration in the sandbox environment.
Learn more about the following resources on the Card Testing page:
- Use test card numbers to simulate successful payments for Expanded Checkout integrations.
- Use rejection triggers to simulate card error scenarios.
- Test 3D Secure authentication scenarios.
- Test your integration by following these recommended use cases. See the Orders v2 API for details about billing address fields and other parameters. For example, use the 2-character country code to test the billing address.
Note: Use the credit card generator to generate additional test credit cards for sandbox testing.
When prompted for required data for the sandbox business request, such as a phone number, enter any number that fits the required format. Because this is a sandbox request, the data doesn't have to be factual.
Before you go live, you'll need to complete live onboarding to be eligible to process cards with your live PayPal account.
Native Payments
Deprecation notice: The PayPalNativePayments module is deprecated since July 2024. Updates and bug fixes end in July 2025. We recommend to use the PayPalWebPayments module instead. To migrate from PayPalNativePayments to PayPalWebPayments, follow the steps in Web payments.
Use PayPal native payments
Use PayPalNativePayments to add a PayPal paysheet to your app. The paysheet is a checkout page that the client launches within your app, instead of showing up as a pop-up. The paysheet shows all the PayPal payment methods available and helps the payer complete their payment.
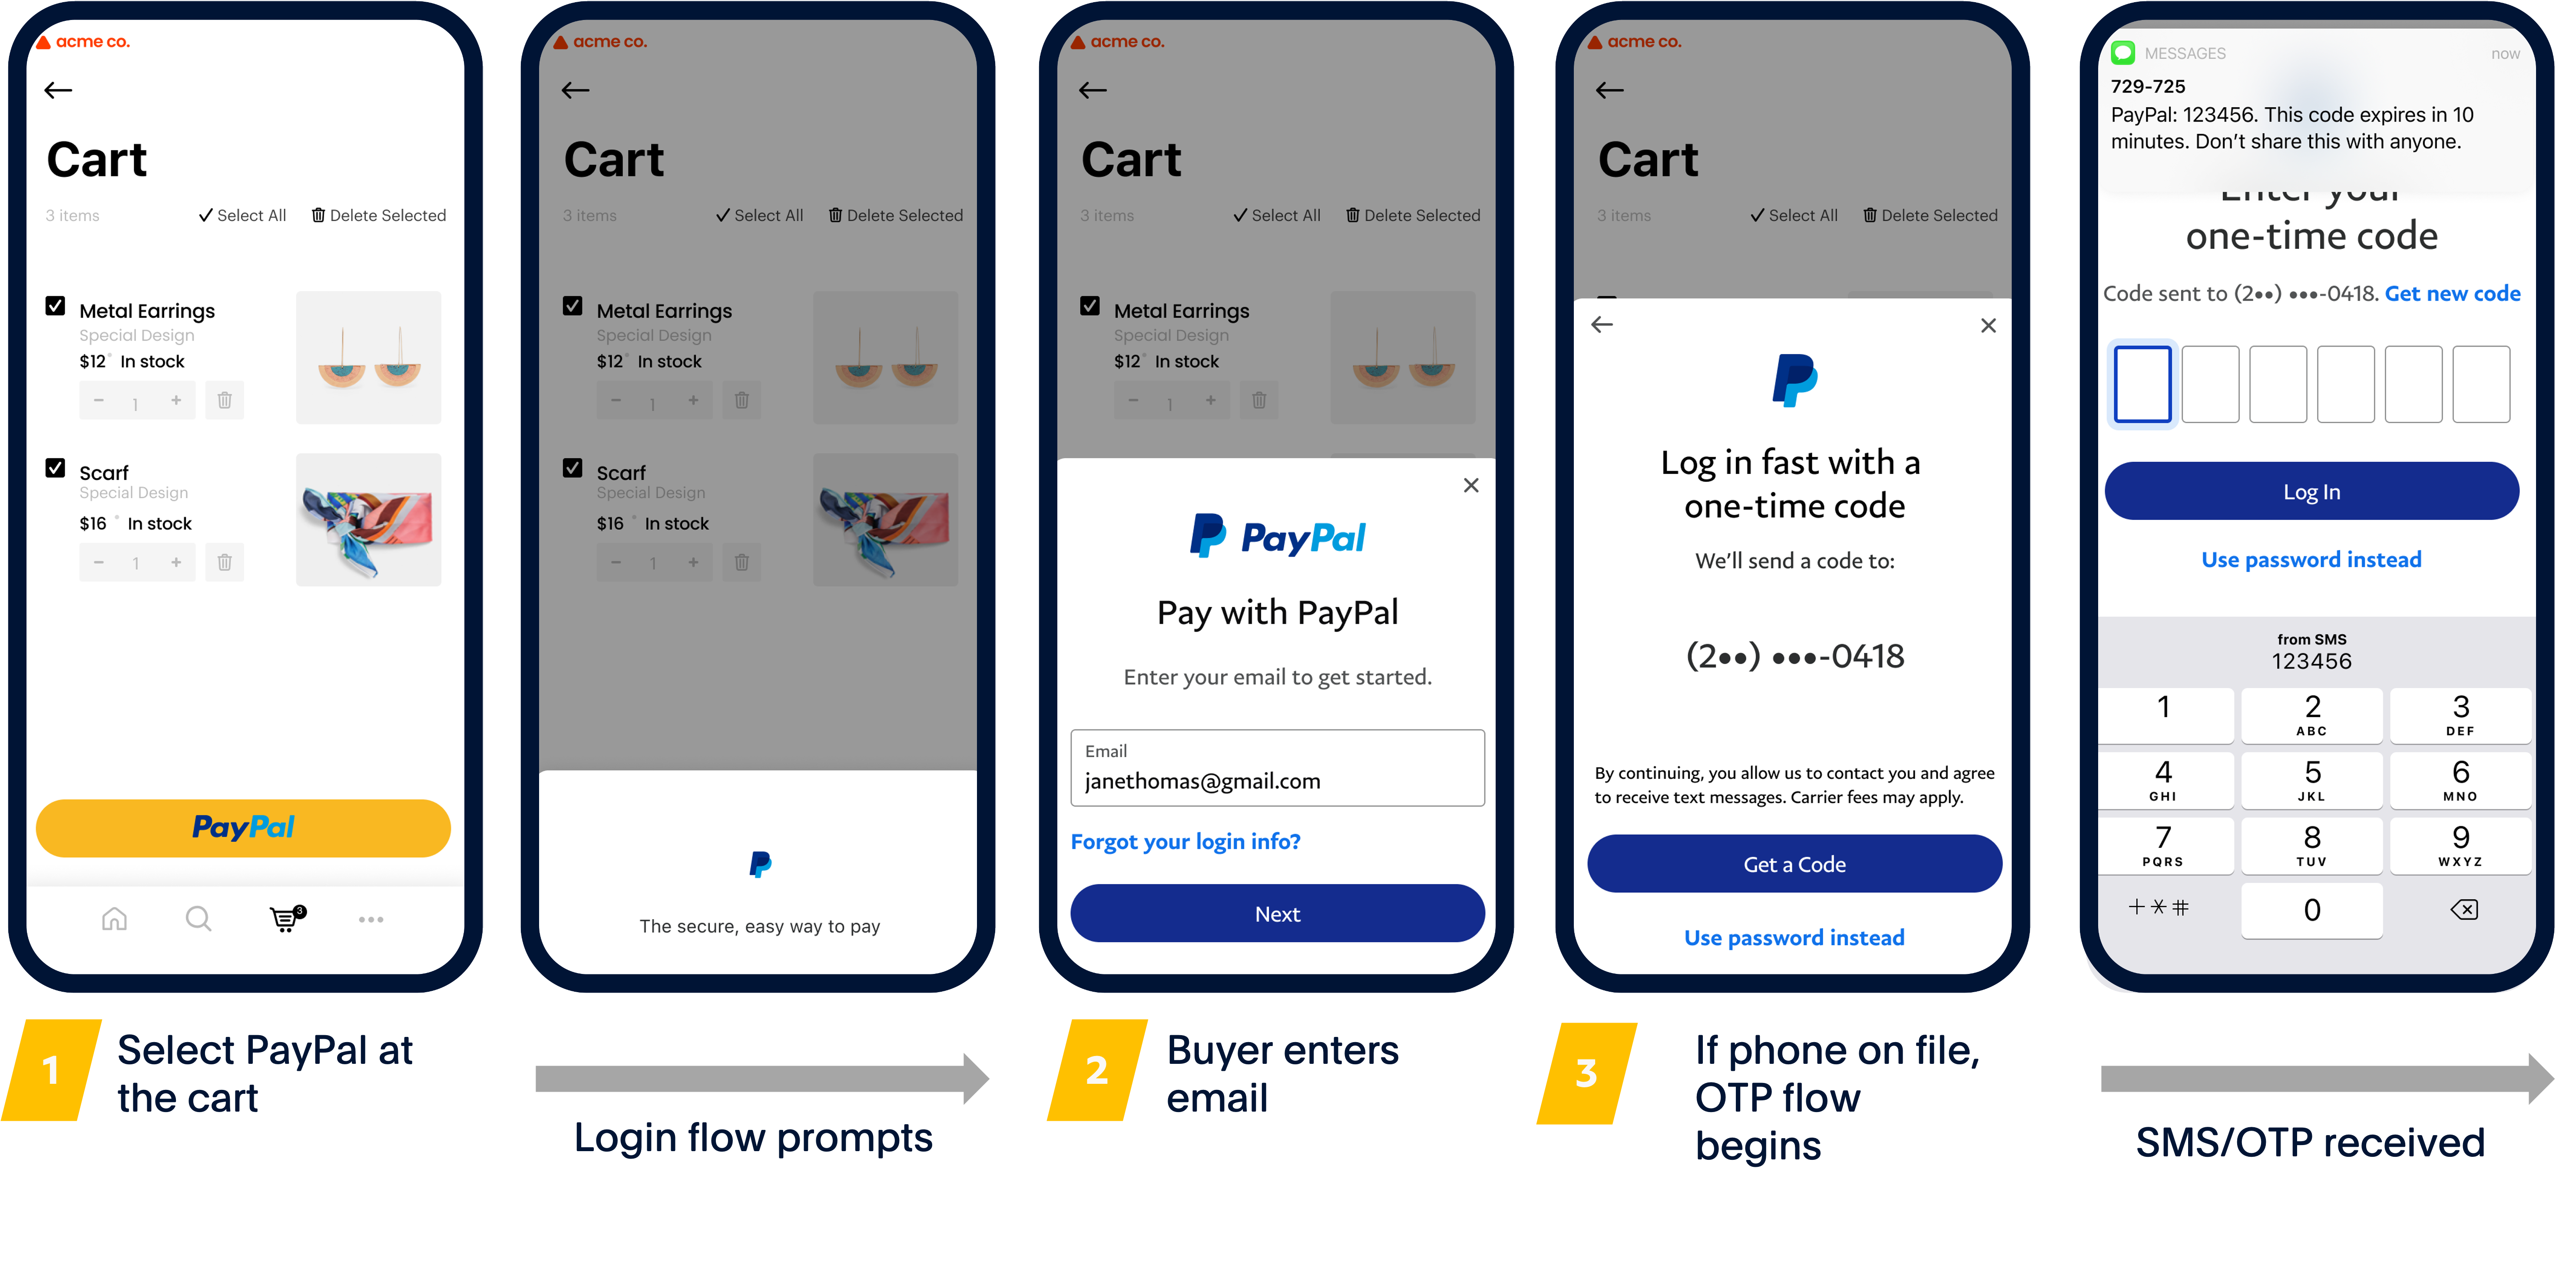
Native checkout for a first-time customer
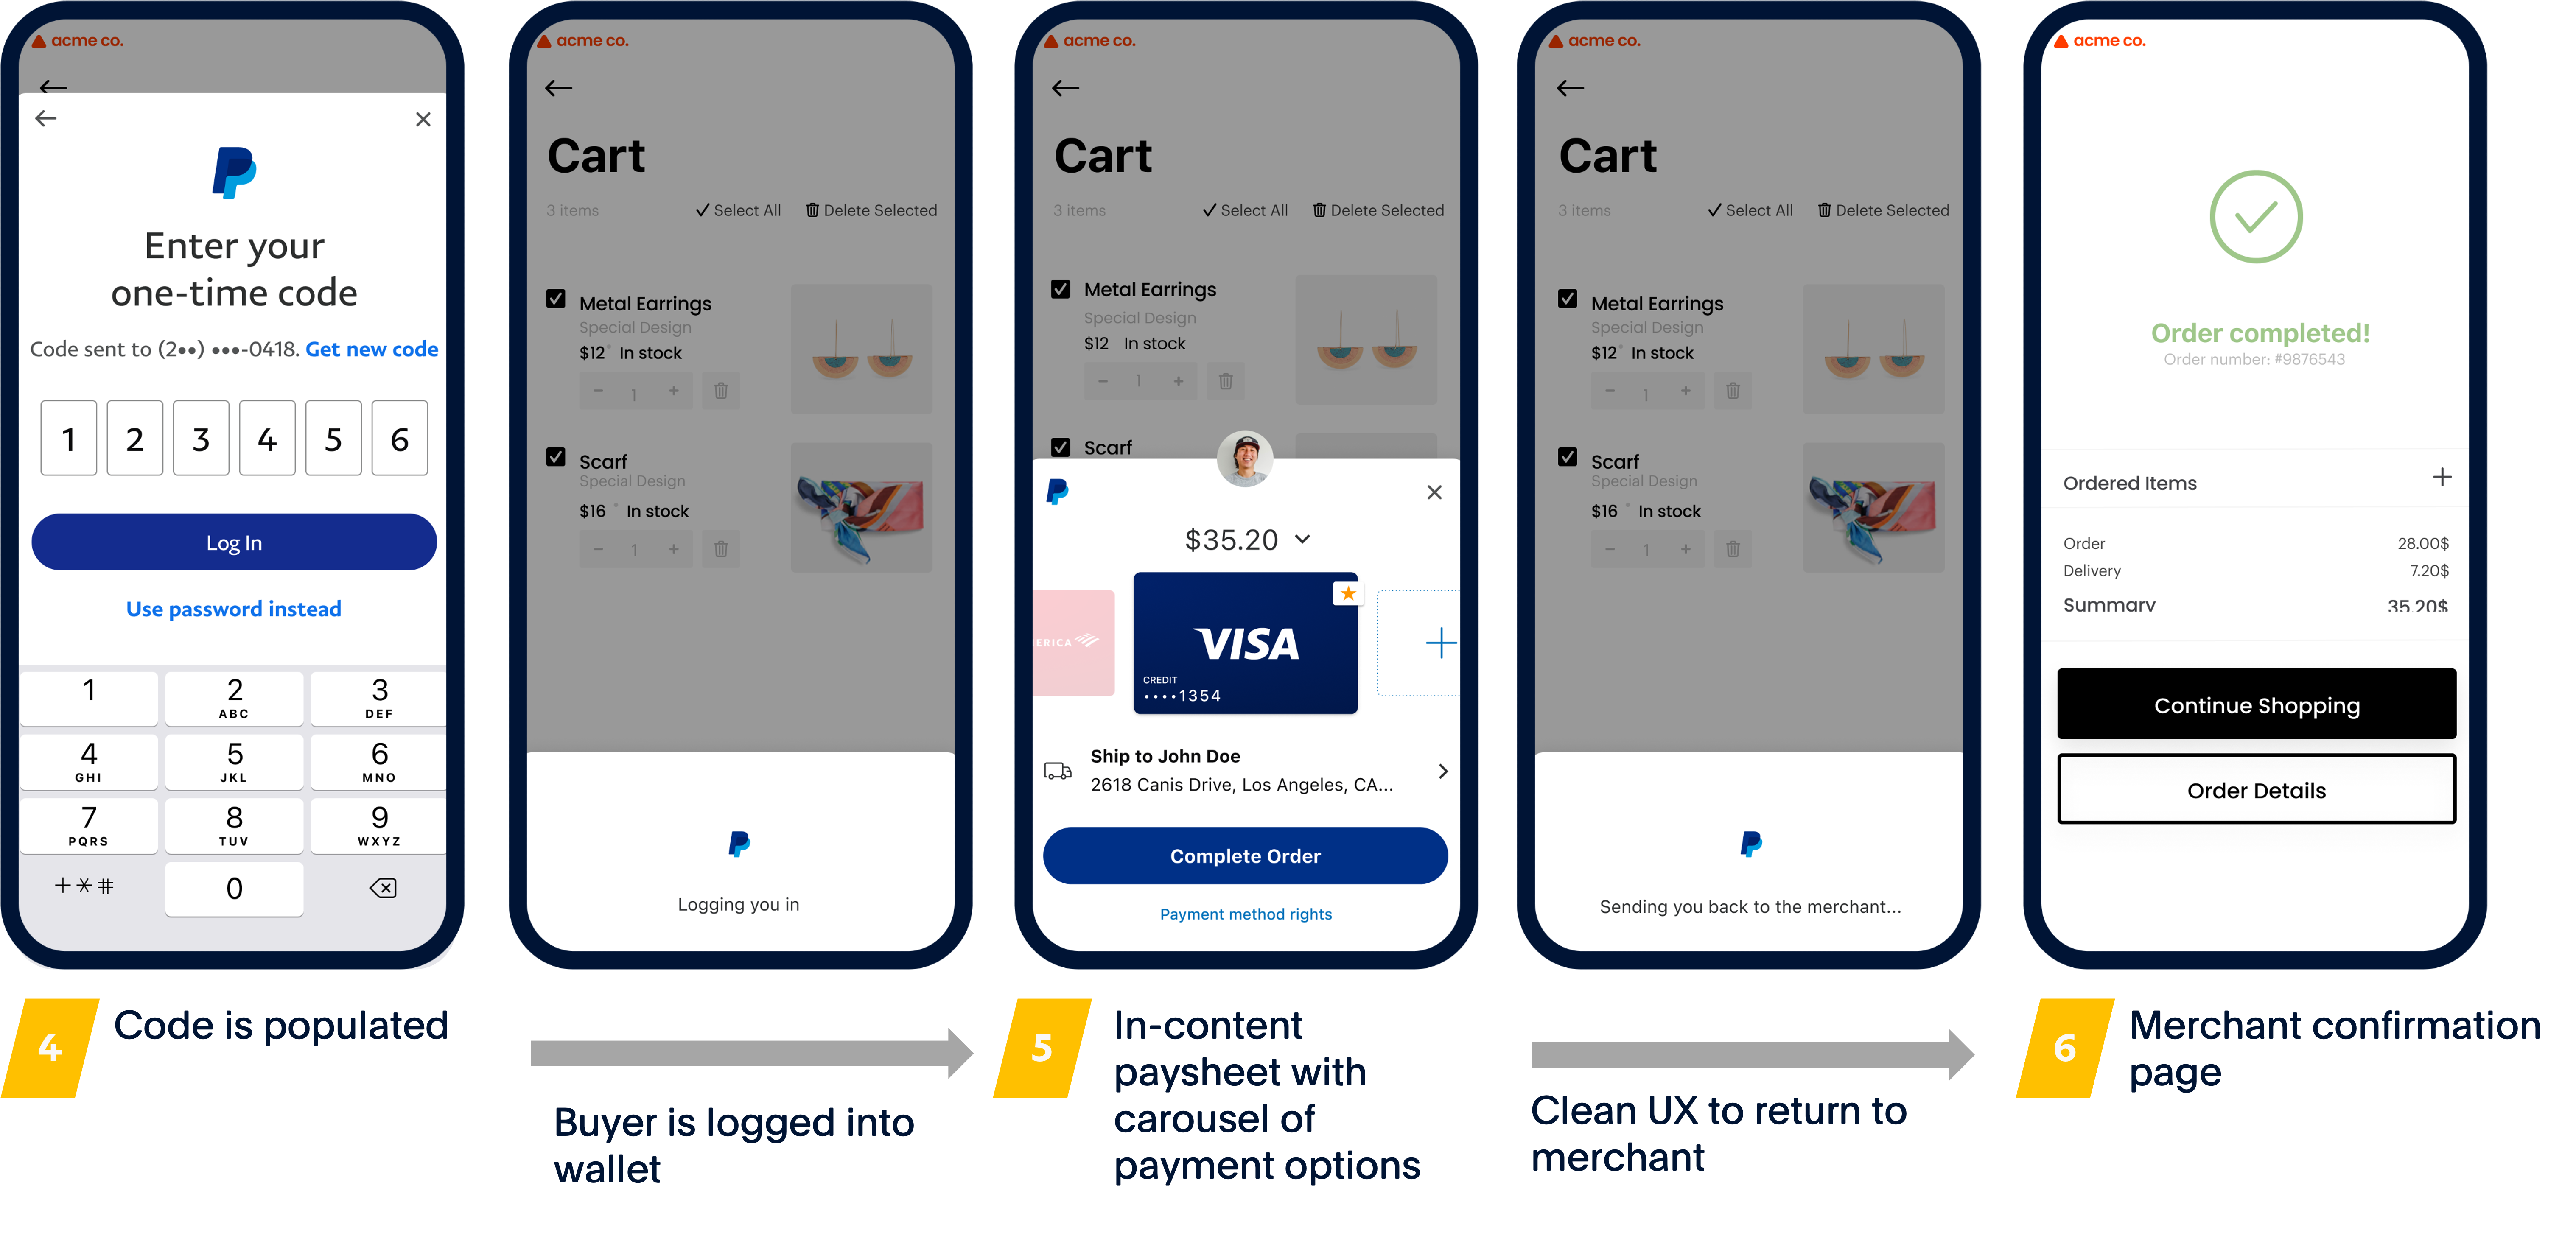
Native checkout for a returning customer

Follow these steps to add PayPalNativePayments:
1. Add PayPalNativePayments module to your app
Add the paypal-native-payments package dependency in your app's build.gradle file:
1dependencies {2 implementation "com.paypal.android:paypal-native-payments:CURRENT-VERSION"3}
Add the following Cardinal SDK Maven repository to your project’s top-level build.gradle file to pass credentials to Gradle:
1allprojects {2 repositories {3 maven {4 url "https://cardinalcommerceprod.jfrog.io/artifactory/android"5 credentials {6 username "paypal_sgerritz"7 password "AKCp8jQ8tAahqpT5JjZ4FRP2mW7GMoFZ674kGqHmupTesKeAY2G8NcmPKLuTxTGkKjDLRzDUQ"8 }9 }10 }11}
2. Enable Native Checkout SDK
You'll need to set up authorization to use the Native Checkout SDK. To create a client ID and secret, follow the steps in Get Started. You need these values to generate an ACCESS_TOKEN.
Sandbox business account
Set up your sandbox business account to use native checkout as follows:
- Log into the PayPal Developer Dashboard, toggle Sandbox, and go to Apps & Credentials.
- In REST API apps, select the name of your app.
- Go to Features > Accept payments and select *Native Checkout SDK.
- Select Save Changes.
Add return URL
A return URL redirects users to the app after authenticating. Use the following steps to create a return URL:
- Select your app from the My Apps & Credentials page on the Developer Dashboard.
- Go to Features > Other features. Select the Log in with PayPal checkbox. Click on Advanced Settings. A pop-up window will open, and you'll see the Return URL field in the new window.
- You can use an Android App Link registered within the Developer Console to handle SDK redirects.
- Alternatively, you can use your application ID (typically referenced via
BuildConfig.APPLICATION_ID) and register your return URL with://paypalpayas the suffix. For example, if your application ID iscom.paypal.app, inputcom.paypal.app://paypalpayas the return URL. - The return URL in the Developer Dashboard and the SDK must match exactly.
- The application ID and return URL must use lower case letters. The return URL is passed to the SDK via an intent filter and host name matching in the Android framework is case-sensitive
Note: If you change the return URL in the Developer Dashboard, PayPal must review your app again. The review period automatically begins any time the return URL changes.
- Select the Full Name and Email checkboxes found within the Advanced Settings. These are scopes of the Identity API.
3. Create PayPalNativeCheckoutClient
Use the following steps to set up the PayPal Native Checkout client for your app:
1. Construct CoreConfig
In your Android app, use the CLIENT_ID to construct a CoreConfig.
1val coreConfig = CoreConfig("CLIENT_ID", environment = Environment.SANDBOX)
2. Create native checkout request
Create a PayPalNativeCheckoutClient request to approve an order with a PayPal payment method and include the RETURN_URL:
1val payPalNativeClient = PayPalNativeCheckoutClient(2 application = requireActvitiy().application,3 coreConfig = coreConfig,4 returnUrl = "RETURN_URL"5)
3. Set up payment listener
Implement the PayPalNativeCheckoutListener on the PayPalNativeCheckoutClient to listen for result notifications from the SDK.
1payPalNativeClient.listener = object : PayPalNativeCheckoutListener {2 override fun onPayPalCheckoutStart() {3 // the PayPal paysheet is about to show up4 }5 override fun onPayPalCheckoutSuccess(result: PayPalNativeCheckoutResult) {6 // order was approved and is ready to be captured/authorized7 }8 override fun onPayPalCheckoutFailure(error: PayPalSDKError) {9 // handle the error10 }11 override fun onPayPalCheckoutCanceled() {12 // the user canceled the flow13 }14}
4. Listen for shipping details
When a payer chooses to use shipping details from their PayPal profile, use PayPalNativeShippingListener to listen for changes to their shipping address or shipping method.
You can only implement PayPalNativeShippingListener if the shipping_preference in the order ID is set to GET_FROM_FILE.
Note: Skip this step if you created your order ID with the shipping_preference set to NO_SHIPPING or SET_PROVIDED_ADDRESS.
Set a shippingListener on the PayPalNativeCheckoutClient to send notifications to your app when the user updates their shipping address or shipping method.
This code sample uses a try…catch function to handle the response:
1payPalNativeClient.shippingListener = object : PayPalNativeShippingListener {2 override fun onPayPalNativeShippingAddressChange(3 actions: PayPalNativePaysheetActions,4 shippingAddress: PayPalNativeShippingAddress5 ) {6 // called when the user updates their chosen shipping address7 // you must call actions.approve() or actions.reject() in this callback8 actions.approve()9 // OPTIONAL: you can optionally patch your order. Once complete, call actions.approve() if successful or actions.reject() if not.10 }11 override fun onPayPalNativeShippingMethodChange(12 actions: PayPalNativePaysheetActions,13 shippingMethod: PayPalNativeShippingMethod14 ) {15 // called when the user updates their chosen shipping method16 // patch your order server-side with the updated shipping amount.17 // Once complete, call `actions.approve()` or `actions.reject()`18 try {19 // TODO: patch order on server side, notify SDK of success by calling actions.approve()20 actions.approve()21 } catch (e: Exception) {22 // catch any errors from patching the order e.g. network unavailable23 // and notify SDK that the update was unsuccessful24 actions.reject()25 }26 }27}
5. Modify shipping details
When the shipping method changes, update the order details on your server by sending a PATCH request to the Update order endpoint of the Orders API.
Approve or reject changes to the shipping information to see changes appear in the paysheet UI by calling either PayPalNativePaysheetActions.approve() or PayPalNativePaysheetActions.reject().
To update the paysheet with a new shipping method, or when onPayPalNativeShippingMethodChange is called:
- Patch the order on your server using the
replaceoperation with all shipping methods.- Mark the new shipping method as selected.
- Optional: Update the amount to reflect the new shipping cost.
- Call
approve()orreject()to accept or reject the changes and continue the payment flow.
For more information, visit the Update order endpoint of the Orders v2 API.
4. Get Order ID
On your server:
- Create an
ORDER_IDby using the Orders v2 API. - Pass your
ACCESS_TOKENin theAuthorizationheader. To get anACCESS_TOKEN, use the Authentication API.Note: This access token is only for the sandbox environment. When you're ready to go live, request a live access token by changing the request sandbox endpoint to https://api-m.paypal.com/v1/oauth2/token.
- Pass the
intent. You'll need to pass eitherAUTHORIZEorCAPTUREas theintenttype. This type must match the/authorizeor/captureendpoint you use to process your order.
- Sample request
- Sample response
1curl --location --request POST 'https://api-m.sandbox.paypal.com/v2/checkout/orders/' \2 -H 'Content-Type: application/json' \3 -H 'Authorization: Bearer ACCESS_TOKEN' \4 --data-raw '{5 "intent": "CAPTURE|AUTHORIZE",6 "purchase_units": [7 {8 "amount": {9 "currency_code": "USD",10 "value": "5.00"11 }12 }13 ]14 }'
When a buyer starts a payment, send the ORDER_ID from your server to your client app.
5. Start PayPal Native Payments flow
To start the PayPal Native Payments flow, call the startCheckout function in PayPalNativeCheckoutClient, with a PayPalNativeCheckoutRequest:
1val request = PayPalNativeCheckoutRequest("ORDER_ID")2paypalNativeClient.startCheckout(request)
6. Authorize and capture order
Submit your ORDER_ID for authorization or capture when the PayPal Android SDK calls the onPayPalSuccess method.
Call the authorize endpoint of the Orders V2 API to place the money on hold:
Sample request: Authorize order
1curl --location --request POST 'https://api-m.sandbox.paypal.com/v2/checkout/orders/ORDER_ID/authorize' \2 -H 'Content-Type: application/json' \3 -H 'Authorization: Bearer ACCESS_TOKEN' \4 --data-raw ''
Call the capture endpoint of the Orders V2 API to capture the money immediately:
Sample request: Capture order
1curl --location --request POST 'https://api-m.sandbox.paypal.com/v2/checkout/orders/ORDER_ID/capture' \2 -H 'Content-Type: application/json' \3 -H 'Authorization: Bearer ACCESS_TOKEN' \4 --data-raw ''
Web payments
PayPal Web Payments
Integrate PayPalWebPayments to add a lighter checkout integration to your app. The checkout experience is launched in a browser within your application, reducing the size of the SDK.
Follow these steps to integrate PayPalWebPayments:
1. Add PayPalWebPayments to your app
Add the paypal-web-payments package dependency in your app's build.gradle file:
1dependencies {2 implementation "com.paypal.android:paypal-web-payments:CURRENT-VERSION"3 }
2. Set up your app for browser switching
PayPalWebPayments launches a checkout page in a browser within your application. Your app needs to handle the browser switch between the checkout page and your app. Set up a return URL that returns to your app from the browser.
Update your app's AndroidManifest.xml with details about the card payment activity that will return the user to your app after completing the payment. Include the following elements:
- Set the activity
launchModetosingleTop. - Set the
android:schemeon the Activity that will be responsible for handling the deep link back into the app. - Add an
intent-filter. - Register the
myapp://custom URL scheme in theintent-filter.
Note: android:exported is required if your app compile SDK version is API 31 (Android 12) or later.
1<activity android:name="com.company.app.MyPaymentsActivity" android:exported="true" android:launchmode="singleTop">2 ...3 <intent-filter>4 <action android:name="android.intent.action.VIEW">5 <data android:scheme="custom-url-scheme">6 <category android:name="android.intent.category.DEFAULT">7 <category android:name="android.intent.category.BROWSABLE">8 </category></category></data></action></intent-filter>9 </activity>
Also, add onNewIntent to the host activity in your app:
1override fun onNewIntent(newIntent: Intent?) {2 super.onNewIntent(intent)3 intent = newIntent4 }
3. Create PayPalWebCheckoutClient
Use the following steps to set up the PayPal Native Checkout client for your app:
1. Construct CoreConfig
In your Android app, use the CLIENT_ID to construct a CoreConfig.
1val config = CoreConfig("CLIENT_ID", environment = Environment.SANDBOX)
2. Create return URL
Set a return URL using the custom scheme you configured in the ActivityManifest.xml:
1val returnUrl = "custom-url-scheme"
3. Create web checkout request
Create a PayPalWebCheckoutClient to approve an order with a PayPal payment method:
1val payPalWebCheckoutClient = PayPalWebCheckoutClient(requireActivity(), config, returnUrl)
4. Set up payment listener
Set a PayPalWebCheckoutListener on the client to receive payment flow callbacks:
1payPalWebCheckoutClient.listener = object : PayPalWebCheckoutListener {2 override fun onPayPalWebSuccess(result: PayPalWebCheckoutResult) {3 // order was approved and is ready to be captured/authorized (see step 7)4 }5 override fun onPayPalWebFailure(error: PayPalSDKError) {6 // handle the error7 }8 override fun onPayPalWebCanceled() {9 // the user canceled the flow10 }11 }
Note: Collecting a billing address can reduce the number of authentication challenges to customers.
4. Get Order ID
On your server:
- Create an
ORDER_IDby using the Orders v2 API. - Pass your
ACCESS_TOKENin theAuthorizationheader. To get anACCESS_TOKEN, use the Authentication API.Note: This access token is only for the sandbox environment. When you're ready to go live, request a live access token by changing the request sandbox endpoint to https://api-m.paypal.com/v1/oauth2/token.
- Pass the
intent. You'll need to pass eitherAUTHORIZEorCAPTUREas theintenttype. This type must match the/authorizeor/captureendpoint you use to process your order.
- Sample request
- Sample response
1curl --location --request POST 'https://api-m.sandbox.paypal.com/v2/checkout/orders/' \2 -H 'Content-Type: application/json' \3 -H 'Authorization: Bearer ACCESS_TOKEN' \4 --data-raw '{5 "intent": "CAPTURE|AUTHORIZE",6 "purchase_units": [7 {8 "amount": {9 "currency_code": "USD",10 "value": "5.00"11 }12 }13 ]14 }'
When a buyer starts a payment, send the ORDER_ID from your server to your client app.
5. Create web checkout request
Configure your PayPalWebCheckoutRequest with the ORDER_ID. You can also specify one of the following funding sources for your order: PayPal (default), PayLater, or PayPalCredit.
1val payPalWebCheckoutRequest = PayPalWebCheckoutRequest("ORDER_ID", fundingSource = PayPalWebCheckoutFundingSource.PAYPAL)
6. Approve order
Call payPalWebCheckoutClient.start() to process the payment.
1class MyCardPaymentActivity: FragmentActivity {2 fun payPalWebCheckoutTapped(payPalWebCheckoutRequest: PayPalWebCheckoutRequest) {3 payPalWebCheckoutClient.start(payPalWebCheckoutRequest)4 }5 }
7. Authorize and capture order
Submit your ORDER_ID for authorization or capture when the PayPal Android SDK calls the onPayPalWebSuccess method on PayPalWebCheckoutListener.
Call the authorize endpoint of the Orders V2 API to place the money on hold:
Sample request: Authorize order
1curl --location --request POST 'https://api-m.sandbox.paypal.com/v2/checkout/orders/ORDER_ID/authorize' \2 -H 'Content-Type: application/json' \3 -H 'Authorization: Bearer ACCESS_TOKEN' \4 --data-raw ''
Call the capture endpoint of the Orders V2 API to capture the money immediately:
Sample request: Capture order
1curl --location --request POST 'https://api-m.sandbox.paypal.com/v2/checkout/orders/ORDER_ID/capture' \2 -H 'Content-Type: application/json' \3 -H 'Authorization: Bearer ACCESS_TOKEN' \4 --data-raw ''
Go live
If you have fulfilled the requirements for accepting Advanced Credit and Debit Card Payments for your business account, review the Move your app to production page to learn how to test and go live. If this is your first time testing in a live environment, follow these steps:
- Log into the PayPal Developer Dashboard with your PayPal business account.
- Complete production onboarding so you can process card payments with your live PayPal business account.
- Request Advanced Credit and Debit Card Payments for your business account.
Important: The code for the integration checks eligibility requirements, so the payment card fields only display when the production request is successful.