PayPal Payments Advanced: Getting Started with Hosted Pages
Last updated: Nov 27th, 10:14pm
This guide contains the following sections:
Overview
PayPal Payments Advanced (PPA) enables merchants to accept PayPal and credit cards. PPA provides merchants with a PayPal merchant account. Integration with PPA is similar to integration with the PayPal Payflow Gateway.
This document shows how to get a secure token from the Payflow pilot endpoint and then submit the token in a test call. For a more comprehensive document that shows you how to set up, customize, and test hosted pages, see Set up and test hosted pages.
Key concepts
PayPal's hosted checkout pages (also called hosted checkout templates) enable you to pass transaction data securely to the server and collect credit card information. Although the Make your first call section, below, describes an initial customization of hosted pages, please refer to the Payflow Gateway Developer Guide and Reference after your initial test calls.
PPA requires use of PayPal's hosted checkout templates for submitting data for sales and authorizations. The templates enable merchants to avoid the PCI burden of having credit card details pass through their servers.
The secure token, utilized as part of a PPA integration, helps protect transaction data. You must use a secure token with hosted checkout pages. The token is good for one transaction and is valid for 30 minutes. The token and its token ID are used by the server to retrieve and display the transaction data for customer approval.
Make your first call
Before making an initial call to the Payflow pilot endpoint (https://pilot-payflowpro.paypal.com), sign up for a PayPal Payments Advanced (PPA) account at
PayPal Payments Advanced. Also see the steps below for adding a user to the account, to utilize for
API calls. A merchant should create a user account for transactions.
Otherwise, if the password for merchant login ID changes, API calls fail.
Therefore, after you have signed up for your PPA account at PayPal Payments Advanced, add a user to the account:
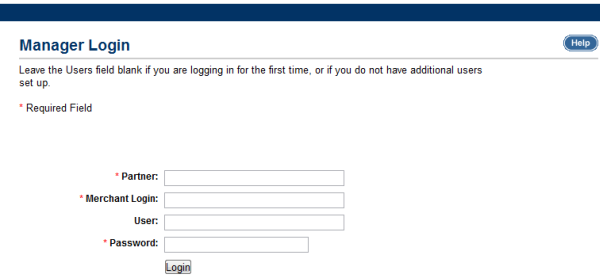
- Using the merchant login and password of the PayPal Payments Advanced account, log in to PayPal Manager.
- Click Account Administration.
- Under Manage Users, click Add User.
- Fill in the fields under Admin Configuration, User Information, and User Login Information.
- Under Assign Privilege to User, in the Select a Predefined Role field, you can select FULL_TRANSACTIONS. Leave User Status as Active.
- Click the Update button.
For more information about the fields, click the Help button.
Set up hosted checkout pages
-
Using the PayPal Payments Advanced account that you obtained above, log in to PayPal Manager.
-
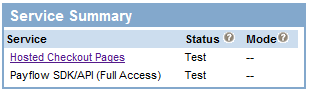
In the Service Summary section of the page, under Service, click Hosted Checkout Pages.
-
On the landing page titled Hosted Checkout Pages, click Set Up.
-
Initially, for test purposes, we'll leave most fields on this Set Up page blank. When you later fill out more Set Up page fields, be sure to click the Help button on this same page for extensive information. Also see the Payflow Gateway Developer Guide and Reference.
-
On this Set Up page, enter the following values. (Other values on the Set Up page are unnecessary for your initial test call.)
- PayPal sandbox email address. The email you used for your PayPal sandbox account, which is part of your profile at PayPal Developer Experience.
- Return URL. In the Payment Confirmation section of the page, enter a return URL (for use if the consumer proceeds with payment). For the return URL method, specify POST.
- Enable Secure Token. Set to Yes.
-
On this Set Up page, click Save Changes.
-
Click Customize, choose Layout C, and click Save and Publish.
Get a secure token from the pilot URL
As described in the
Payflow Gateway Developer Guide and Reference, you can send test data, e.g. as name-value pairs, to the Payflow pilot
endpoint (https://pilot-payflowpro.paypal.com).
Note Since Payflow is operating out of multiple data centers we highly suggest that all API calls are done using the host URLs above. Should you hard code the IP addresses to send transactions via the Payflow API, PayPal cannot be responsible should your transactions fail should a data center be offline due to any issues or any scheduled maintenances.
The following table contains parameters for a test call to obtain a secure token:
| Name | Description |
|---|---|
| PARTNER | The Payflow partner. The following example uses PayPal since PayPal Payments Advanced includes a PayPal merchant account. |
| VENDOR | The Merchant Login ID that you use to log into PayPal Manager. |
| USER | The name of the user whom you added to your account using PayPal Manager, above. |
| PWD | The password of the user whom you added to your account using PayPal Manager, above. |
| TRXTYPE | The type of the transaction, e.g. S for sale. |
| AMT | The amount of the sale. |
| CREATESECURETOKEN |
Specify a value of Y to request a secure token for
completing the transaction.
|
| SECURETOKENID |
An ID that you create for the token that will be returned from the
Payflow pilot endpoint (https://pilot-payflowpro.paypal.com). Use a
unique alphanumeric value, up to 36 characters long. For example, you
could specify
SECURETOKENID=9a9ea8208de1413abc3d60c86cb1f4c5.
|
For demonstration purposes, the following example uses cURL to obtain a secure token that you will use in a subsequent test call.
See the parameter descriptions in the table above for the values to
substitute in the following example for PARTNER,
VENDOR, USER, and PWD.
1curl https://pilot-payflowpro.paypal.com \ -s \ --insecure \ -d PARTNER= \ -d VENDOR= \ -d USER= \ -d PWD= \ -d TRXTYPE=S \ -d AMT=40 \ -d CREATESECURETOKEN=Y \ -d SECURETOKENID=12528208de1413abc3d60c86cb15
The response should be similar to the following. The response contains
RESULT=0 for success, a SECURETOKEN (for use in a
subsequent transaction call), a SECURETOKENID (which you provided
in the request to identify the received token), and a
RESPMSG value of Approved.
1RESULT=0&2SECURETOKEN=123456NYslUGMy0tlKafELwct&3SECURETOKENID=12528208de1413abc3d60c86cb15&4RESPMSG=Approved
Using the Secure Token and Obtaining Transaction Details
The secure token (obtained above) can be used in an iframe tag
from within a test HTML file. The iframe tag enables you to embed
the PayPal hosted page that you customized above.
Note: In contrast to the test code below (in which only the
iframe window redirects after payment), the parent window
generally should redirect. Therefore, in contrast to the test code below,
you can create an intermediary page, to which PayPal will redirect, and
using that intermediary page, capture the return data and force the
customer's browser to redirect to your final receipt page.
In the test code below, the following parameters are used in the
iframe tag, which points to the Payflow Link endpoint,
https://payflowlink.paypal.com. After using the test HTML file
below, you can begin adding parameters and functionality specific to your PPA
integration; see the
Payflow Gateway Developer Guide and Reference.
The following test HTML file submits the secure token in test mode. This table
contains the parameters for the iframe tag in the HTML file:
| Name | Description |
|---|---|
| MODE |
Specify TEST to indicate that your call is a test call. For
production applications, you can set the value to
LIVE (which is the default).
|
| SECURETOKENID |
Specify the ID that you created (described above) for the secure token.
When you submit the secure token (below), use the same
SECURETOKENID value as you used above.
|
| SECURETOKEN |
Specify the value of the SECURETOKEN that you just received
(above) from the Payflow pilot endpoint
(https://pilot-payflowpro.paypal.com).
|
Create the test HTML file below. Then, in the src attribute of
the iframe tag, substitute your own
SECURETOKENID and SECURETOKEN values. This test HTML
file illustrates how to include a hosted page in a merchant page, to enable
the merchant to accept payments.
1<html>2 <head>3 <title></title>4 </head>5 <body>6 <p>This is a test HTML file.</p>78 <iframe src="https://payflowlink.paypal.com?MODE=TEST&SECURETOKENID=MySecureTokenID&SECURETOKEN=MySecureToken"9 name="test_iframe" scrolling="no" width="570px" height="540px"></iframe>1011 </body>12</html>
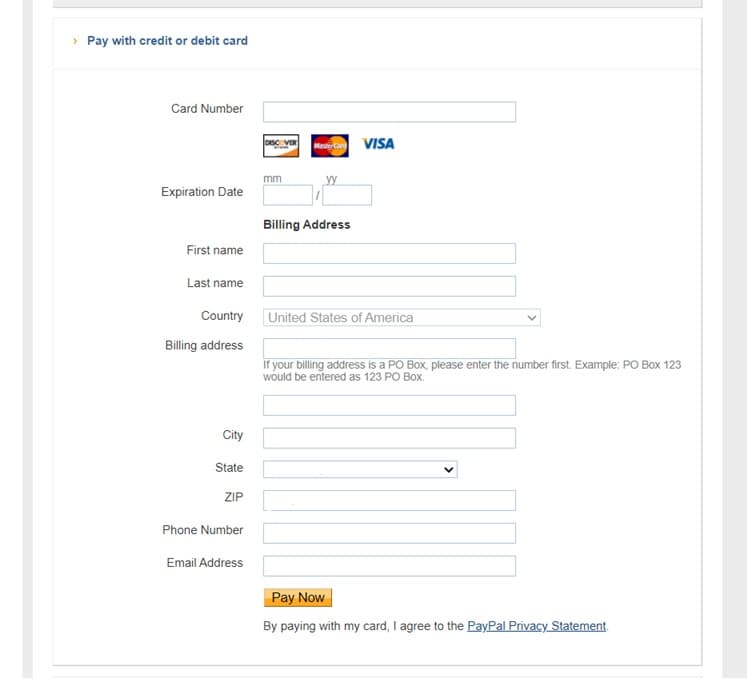
Save and open the above HTML file in a browser. Below the text that says,
"this is a merchant page," the iframe (inline-frame) part of the
page is displayed. This "hosted checkout" part of the page enables a customer
to choose to pay with PayPal or with a credit card, and then make the payment.
Note: Inform your payers that PayPal is processing the payment by implementing one of the following options:
- Include the following text and a link to the PayPal privacy notice at checkout: "By paying with your card, you acknowledge that your data will be processed by PayPal subject to the PayPal Privacy Statement available at PayPal.com."
- Include the following language in your privacy notice, which must be shown before payment: "We use PayPal for payments and other services. If you wish to use one of these services and pay on our website, PayPal may collect the personal data you provide, such as payment and other identifying information. PayPal uses this information to operate and improve the services it provides to us and others, including for fraud detection, harm and loss prevention, authentication, analytics related to the performance of its services, and to comply with applicable legal requirements. The processing of this information will be subject to the PayPal Privacy Statement available at PayPal.com."
Receive the transaction data
In the iframe part of the page above, in which the hosted
checkout frame is displayed, enter a test credit card number of
4111111111111111 and expiration date values of 12 and 12
.
Then click Pay Now. The following confirmation page is displayed:
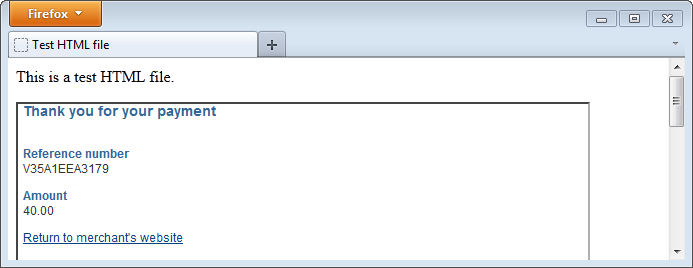
This confirmation page enables the customer to click "Return to the merchant's website." If you click that link, the following occurs: The server redirects your browser to your return URL, i.e. the return URL that you provided on the Set Up page in PayPal Manager. (See "Setting up Hosted Checkout Pages," above. Note that the Help button on the Set Up page, in PayPal Manager, contains information about customization options.)
In redirecting your browser to the return URL, the server sends transaction data to the return URL, via POST.
In our example, the transaction data, returned via POST, would be the following, without link breaks:
1TYPE=S&2RESPMSG=Approved&3ACCT=1234&4COUNTRY=US&5VISACARDLEVEL=12&6TAX=0.00&7CARDTYPE=0&8PNREF=12341EE308F6&9TENDER=CC&10AVSDATA=XXN&11METHOD=CC&12SECURETOKEN=123456NYslUGMy0tlKafELwct&13SHIPTOCOUNTRY=US&14AMT=40.00&15SECURETOKENID=12528208de1413abc3d60c86cb15&16TRANSTIME=2012-03-26+14%3A07%3A59&17HOSTCODE=A&18COUNTRYTOSHIP=US&19RESULT=0&20AUTHCODE=124PNI&21EXPDATE=1212
You can parse this transaction data as necessary. See the Payflow Gateway Developer Guide and Reference for informaton about other parameters that can be sent to your return URL via POST.