On this page
No Headings
Last updated: June 3, 2026
This chapter describes the following:
PayPal enables you to customize the hosted checkout pages so that they reflect the look and feel of your website. In doing so, the buyer seamlessly transitions from your website to the PayPal hosted checkout pages to make the payment and complete the transaction. Since the pages are hosted on PayPal servers, you do not have to capture or store credit card information on your website, thereby helping towards achieving PCI compliance. PayPal's hosted checkout pages are optimized for supported desktop and mobile browsers.
Note: The Payflow Gateway implementation helps to achieve PCI compliance but does not necessarily guarantee it.
There are two ways to configure hosted checkout pages:
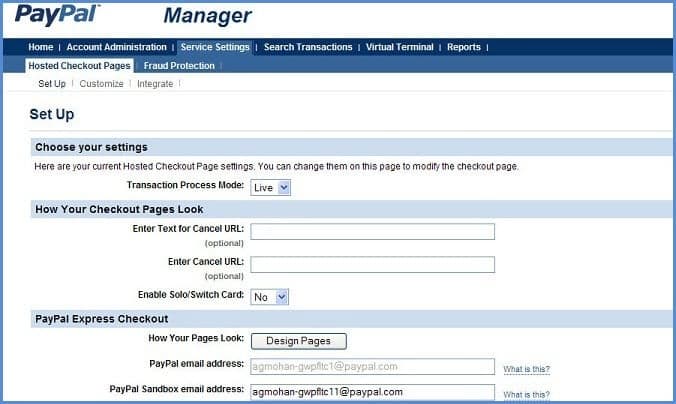
You can specify the content of your hosted checkout pages and configure their appearance to reflect the look and feel of your website. To do so, log into PayPal Manager and click on the Service Settings tab. In the Hosted Checkout Pages section, you have the following options:
The Setup page in PayPal Manager enables you to select the information you want to collect from buyers and what you want displayed on your hosted checkout pages. This includes selecting the billing and the shipping information fields, the payment confirmation page settings, the confirmation email details, security options and other settings.
You can perform tasks such as:
Configure your PayPal Express Checkout display and specify email addresse for live and test transactions.
Determine the cancel URL and the text of the link the buyer clicks on to cancel the payment on your website. The cancel URL is the page to which PayPal redirects the buyer's browser if the buyer does not approve the payment.
Note: Payflow ignores the cancel URL field that you enter in PayPal Manager if you select layout template C. To force Payflow to use the cancel URL field with layout template C, add DISPLAY_URL | in PayPal Manager before your cancel URL. Example: DISPLAY_URL | https://example.com/home.php
Select the billing and shipping information fields that the customer i required to complete during checkout.
Choose to display a PayPal hosted payment confirmation page or host your own confirmation page on your website. You can also specify the PayPal hosted confirmation page header and footer text and the URL and text for the return link. Additionally, you can choose to enable the silent post feature.
Opt to send email receipts to the buyer for each successful transaction.
For complete details on these settings, click the Help button on the Setup page. To quickly get started with your hosted pages, go to the Get started with hosted pages on the PayPal developer portal. For more information on the Silent Post feature, see Silent Posts.
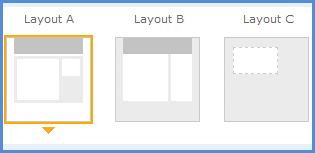
The Customize page enables you to customize the layout and appearance of your hosted checkout page. You can customize the header, background, payment method section and the order summary column of your payment page. PayPal offers three design layouts for you to choose from. Layout A is the default layout but you can choose any of the three layouts offered (Layouts A, B and C).

On the Customize page, you can either change the design of your existing layout, or select and customize a different layout. To make changes, double-click on the section of the template you are trying to modify or the corresponding Click to Edit button for that section. In the pop-up that appears, click the color selector to change the color, or enter the appropriate URL. The customization options vary for the different Layouts. These options are described in greater detail in the next section: Customizing Your Layout.
After making the changes, click one of these buttons:
Note: You must make all modifications (including changing layouts) within the same session, otherwise all changes will be lost and you will have to redo your changes. If the session times out, the design of the layout will remain at the version that was last published.
Note: Payflow ignores the cancel URL field that you enter
in PayPal Manager if you select layout template C. To force Payflow to use
the cancel URL field with layout template C, in PayPal Manager, add
DISPLAY_URL | before your cancel URL. Example:
DISPLAY_URL | https://example.com/home.php
Customizing Your Layout You can customize the appearance of the Layout template that you selected on the customize page. These customizations apply mostly to Layouts A and B. Layout C is embedded on a page you host in an iFrame. So for Layout C, you already control the appearance of the page.
Note: These customizations are not applied to the mobile version of the hosted checkout pages.
See Set Up and Test Hosted Pages to learn how to set up a test account, configure a hosted checkout page, and submit a test transaction.
Another way to configure your hosted checkout pages is to submit hosted checkout page configuration parameters to the Payflow Gateway in a form post. These parameters will override your hosted checkout page settings in PayPal Manager.
First, you will need to create a secure token. You then pass the secure token with the hosted pages configuration parameters. To learn how to create a secure token, see the Secure Token chapter.
The table below describes the form post parameters that you can use to dynamically configure the hosted checkout pages.
**Note: See the section regarding Prohibited Characters to prevent any issues while displaying the hosted checkout page.
| Variable | Description |
|---|---|
CANCELURL | The URL that customers would go to if pressing a Cancel link from the hosted page (Layouts A and B only) and from the Express Checkout flow if the buyer chooses Express Checkout as their payment method. Maximum length: 512 characters. |
CSCREQUIRED | Determines if the card security code is required. Values: TRUE or FALSE |
CSCEDIT | Determines if the card security code is editable. Values: TRUE or FALSE |
DISABLERECEIPT | Determines if the payment confirmation / order receipt page is a PayPal hosted page or a page on the merchant site. For carts we recommend the carts host the order confirmation page. Values: TRUE or FALSE |
EMAILCUSTOMER | Send the buyer an email confirmation or not. Default value is FALSE. |
ERRORURL | The URL that customers are directed to if an error occurs. Maximum length: 512 characters. |
RETURNURL | The URL that customers are directed to after a transaction completes successfully. Maximum length: 512 characters. |
SILENTPOSTURL | The URL to which the Gateway sends Silent Post. Maximum length: 512 characters. |
TEMPLATE | Determines whether to use one of the two redirect templates (Layout A or B) or the embedded template (Layout C). For Layouts A or B pass: TEMPLATEA or TEMPLATEB. Layouts A & B auto-redirect to mobile-optimized pages if a supported mobile browser is detected. No action is required from the merchant for Layouts A & B. For Layout C, pass MOBILE to force redirection to the mobile-optimized page or MINLAYOUT for the default Layout C embedded template. |
URLMETHOD | The technical method used to deliver the CANCELURL. The default is GET and cannot be changed without affecting the installed base, but this value will likely be changed to Post by most carts. Values: POST or GET |
| Variable | Description |
|---|---|
PAGECOLLAPSEBGCOLOR | Sets the color of the border around the embedded template C. Example: PAGECOLLAPSEBGCOLOR=993300 |
PAGECOLLAPSETEXTCOLOR | Sets the color of the words "Pay with PayPal" and "Pay with credit or debit card". Example: PAGECOLLAPSETEXTCOLOR=990000 |
PAGEBUTTONBGCOLOR | Sets the color of the Pay Now / Submit button. Example: PAGEBUTTONBGCOLOR=AA66FF |
PAGEBUTTONTEXTCOLOR | Sets the color of the text on the Pay Now / Submit button. Example: PAGEBUTTONTEXTCOLOR=33FFFF |
LABELTEXTCOLOR | Sets the color of the text for "card number", "expiration date", .etc. Example: LABELTEXTCOLOR=330000 |
| Variable | Description |
|---|---|
MODE | (Optional) Used in conjunction with secure token. It lets Payflow know that the secure token passed in is a live or test token. Values: LIVE/TEST. Default is LIVE. Note: This parameter is *deprecated*. Instead of using this parameter to specify if you are passing a live or test secure token, post your form parameters to either https://payflowlink.paypal.com or tohttps://pilot-payflowlink.paypal.com. See the Host URL Addresses section for more information. |
PARMLIST | An HTTP Post parameter used with a secure token.PARMLIST takes a string of name-value pairs as its value. Payflow parses out these name-value pairs and uses them to run the transaction. PARMLIST is especially useful for merchants that already use this parameter with the Payflow SDK and want to use an existing name-value pair string. |
SECURETOKEN/SECURETOKENID | Used with the secure token. |
SHOWAMOUNT | If you pass in $0 amount and TRXTYPE=A, then if SHOWAMOUNT=FALSE, Payflow will not display the amount in the order summary table. Values: TRUE/FALSE |
SUBTOTAL | Amount you pass to Payflow. It is displayed in the order summary section. This amount is only for display purposes and is not passed to the transaction servers. |
VERBOSITY | Additional values returned from the transaction response to the merchant in the Silent Post. By default, there is no verbosity set, which means the standard set of values that Silent Post currently uses is returned. Passing in a verbosity returns the extra values that we get back in the transaction response. Value: HIGH |
VERIFY | Runs a $0 authorization transaction using the credit card information the buyer enters. If the $0 authorization is verified, then Payflow will immediately run the transaction for the amount and transaction type you pass to Payflow. Values: TRUE/FALSE |
PARMLIST is an HTTP Post parameter used with a secure token to
pass information to the Gateway hosted checkout pages.
PARMLIST takes a string of name-value pairs as its value. Payflow
parses out these name-value pairs and uses them to run the transaction.
PARMLIST is especially useful for merchants that already use this
parameter with the Payflow SDK and want to use an existing name-value pair
string.
**Note: See the section regarding Prohibited Characters to prevent any issues while displaying the hosted checkout page.
<html> <head> <title>PageTitle</title> </head> <body> <form method="post" action="https://payflowlink.paypal.com"> <input type="hidden" name="SECURETOKEN" value="Fj+1AFUWft0+IOCUFOKh5WA==" /> <input type="hidden" name="SECURETOKENID" value="9a9ea8208de1413abc3d60c86cb1f4c5" /> <input type="hidden" name="PARMLIST" value="INVNUM=INV1234&AMT=25.50&CURRENCY=USD &PONUM=PO12345" /> </form> </body> </html>If you choose to use PARMLIST, then you can only pass the
following 3 HTTP Post parameters to Payflow with PARMLIST:
SECURETOKEN, and SECURETOKENID. If you try to pass
in any other parameter (such as VERIFY=TRUE), then you will
receive an error message.
Note: The MODE parameter is deprecated. If you
are using a test secure token, instead of passing MODE=TEST,
change the Form Action attribute value to the testing URL:
https://pilot-payflowlink.paypal.com.
If you are using Transparent Redirect with PARMLIST, you must
pass the credit card information (ACCT, EXPDATE and
CSC) in the PARMLIST. For more information on
Transparent Redirect, see
Integrating the Secure Token Without the Hosted Checkout Pages -
Transparent Redirect.
In PayPal Manager you can select one of 3 hosted pages Layout templates: Layouts A and B (the redirect templates) or Layout C (the embedded template). Layout A is the default Layout.
You can also dynamically select your hosted pages Layout template using the
form post TEMPLATE parameter. This will override your default
Layout template set in PayPal Manager. Please see
Using a Secure Token to Pass Hosted Pages Customization Parameters
for more information on passing form post parameters to customize the checkout
experience.
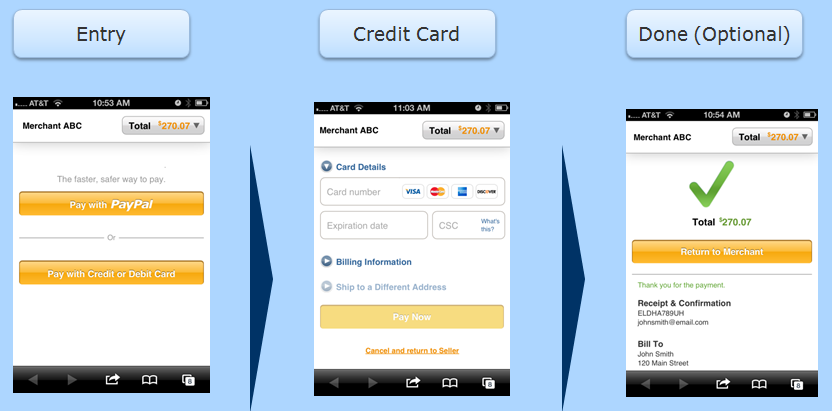
PayPal's hosted checkout pages are mobile optimized for iPhone and Android devices. This mobile optimized experience is available for all 3 Layout templates A, B and C.
In the case of Layouts A and B, PayPal will auto-detect if the checkout page is being viewed from a supported mobile browser and will redirect to the mobile optimized checkout page.
For Layout C, PayPal does not automatically redirect mobile users to a
mobile-optimized flow. Using a mobile-optimized embedded template within a
merchant web page that is not mobile-optimized can create unexpected and
undesirable results. To display the mobile checkout page for Layout C, detect
the supported mobile browser and then explicitly pass the form post
parameters: TEMPLATE=MOBILE.
To support the mobile page in the latest browsers, you'll need to add sandbox section to the iframe tag; as shown in the example below:
<iframe id="payflow-link-iframe" sandbox="allow-top-navigation allow-scripts allow-same-origin allow-forms allow-modals" src="https://pilot-payflowlink.paypal.com/?SECURETOKEN=XXXXX&SECURETOKENID=XXXX"></iframe>| Layout | TEMPLATE parameter value | Behavior on a mobile device |
|---|---|---|
| Layout A | TEMPLATE=TEMPLATEA | Auto-redirects to mobile optimized page |
| Layout B | TEMPLATE=TEMPLATEB | Auto-redirects to mobile optimized page |
| Layout C | TEMPLATE=MINLAYOUT | (default) |
TEMPLATE=MOBILE | Use TEMPLATE=MINLAYOUT for your general online checkout. To redirect to a mobile optimized experience, explicitly pass TEMPLATE=MOBILE instead to show PayPal's mobile optimized page. |
The mobile checkout pages are identical for all Layout templates: Layouts A, B and the mobile version of Layout C. Additionally, appearance customizations that you set in PayPal Manager or submit as form post parameters are not applied to the mobile pages. The figures below show the mobile optimized page flow for a PayPal payment and for a credit card payment:

Silent Post ensures that the transaction data is passed back to your website when a transaction is completed. The Silent Post feature uses the HTML Post method to return data to your server for both approved and declined transactions. This occurs even if a customer closes the browser before returning to your site, or if the PayPal-hosted payment confirmation page is disabled. Silent Post data is sent to your server at the same time as when a payment confirmation page is displayed or as soon as a transaction is declined.
This feature is configured through https://manager.paypal.com:
Note: To ensure that transactions proceed only if your script actually receives the data returned by the Silent Post, you must Force Silent Post Confirmation by checking Void transaction when my server fails to receive data sent by the silent post.
The Force Silent Post Confirmation feature ensures that no transactions proceed unless your website receives the Silent Post data. If you enable this feature, Payflow Gateway sends the Silent Post data and waits for a 200 OK from your server (indicating the server's receipt of the data). If Payflow Gateway does not receive the success response, then the transaction is voided and the customer sees a communication error message. In this case, PayPal Manager displays both a transaction that succeeded and a transaction that was voided. To select this feature, be sure to check Void transaction when my server fails to receive data sent by the silent post when setting up Silent Posts in PayPal Manager.
The USER1 through USER10 Payflow parameters are ten
optional string type parameters intended to store your temporary data, such as
variables, session IDs, order numbers, and so on. These parameters enable you
to pass internal information to your server using the Post or Silent Post
feature.
Note: USER1 through USER10 are
not displayed to the customer and are not stored in the PayPal transaction
database.