Integrate Expanded PayPal Checkout
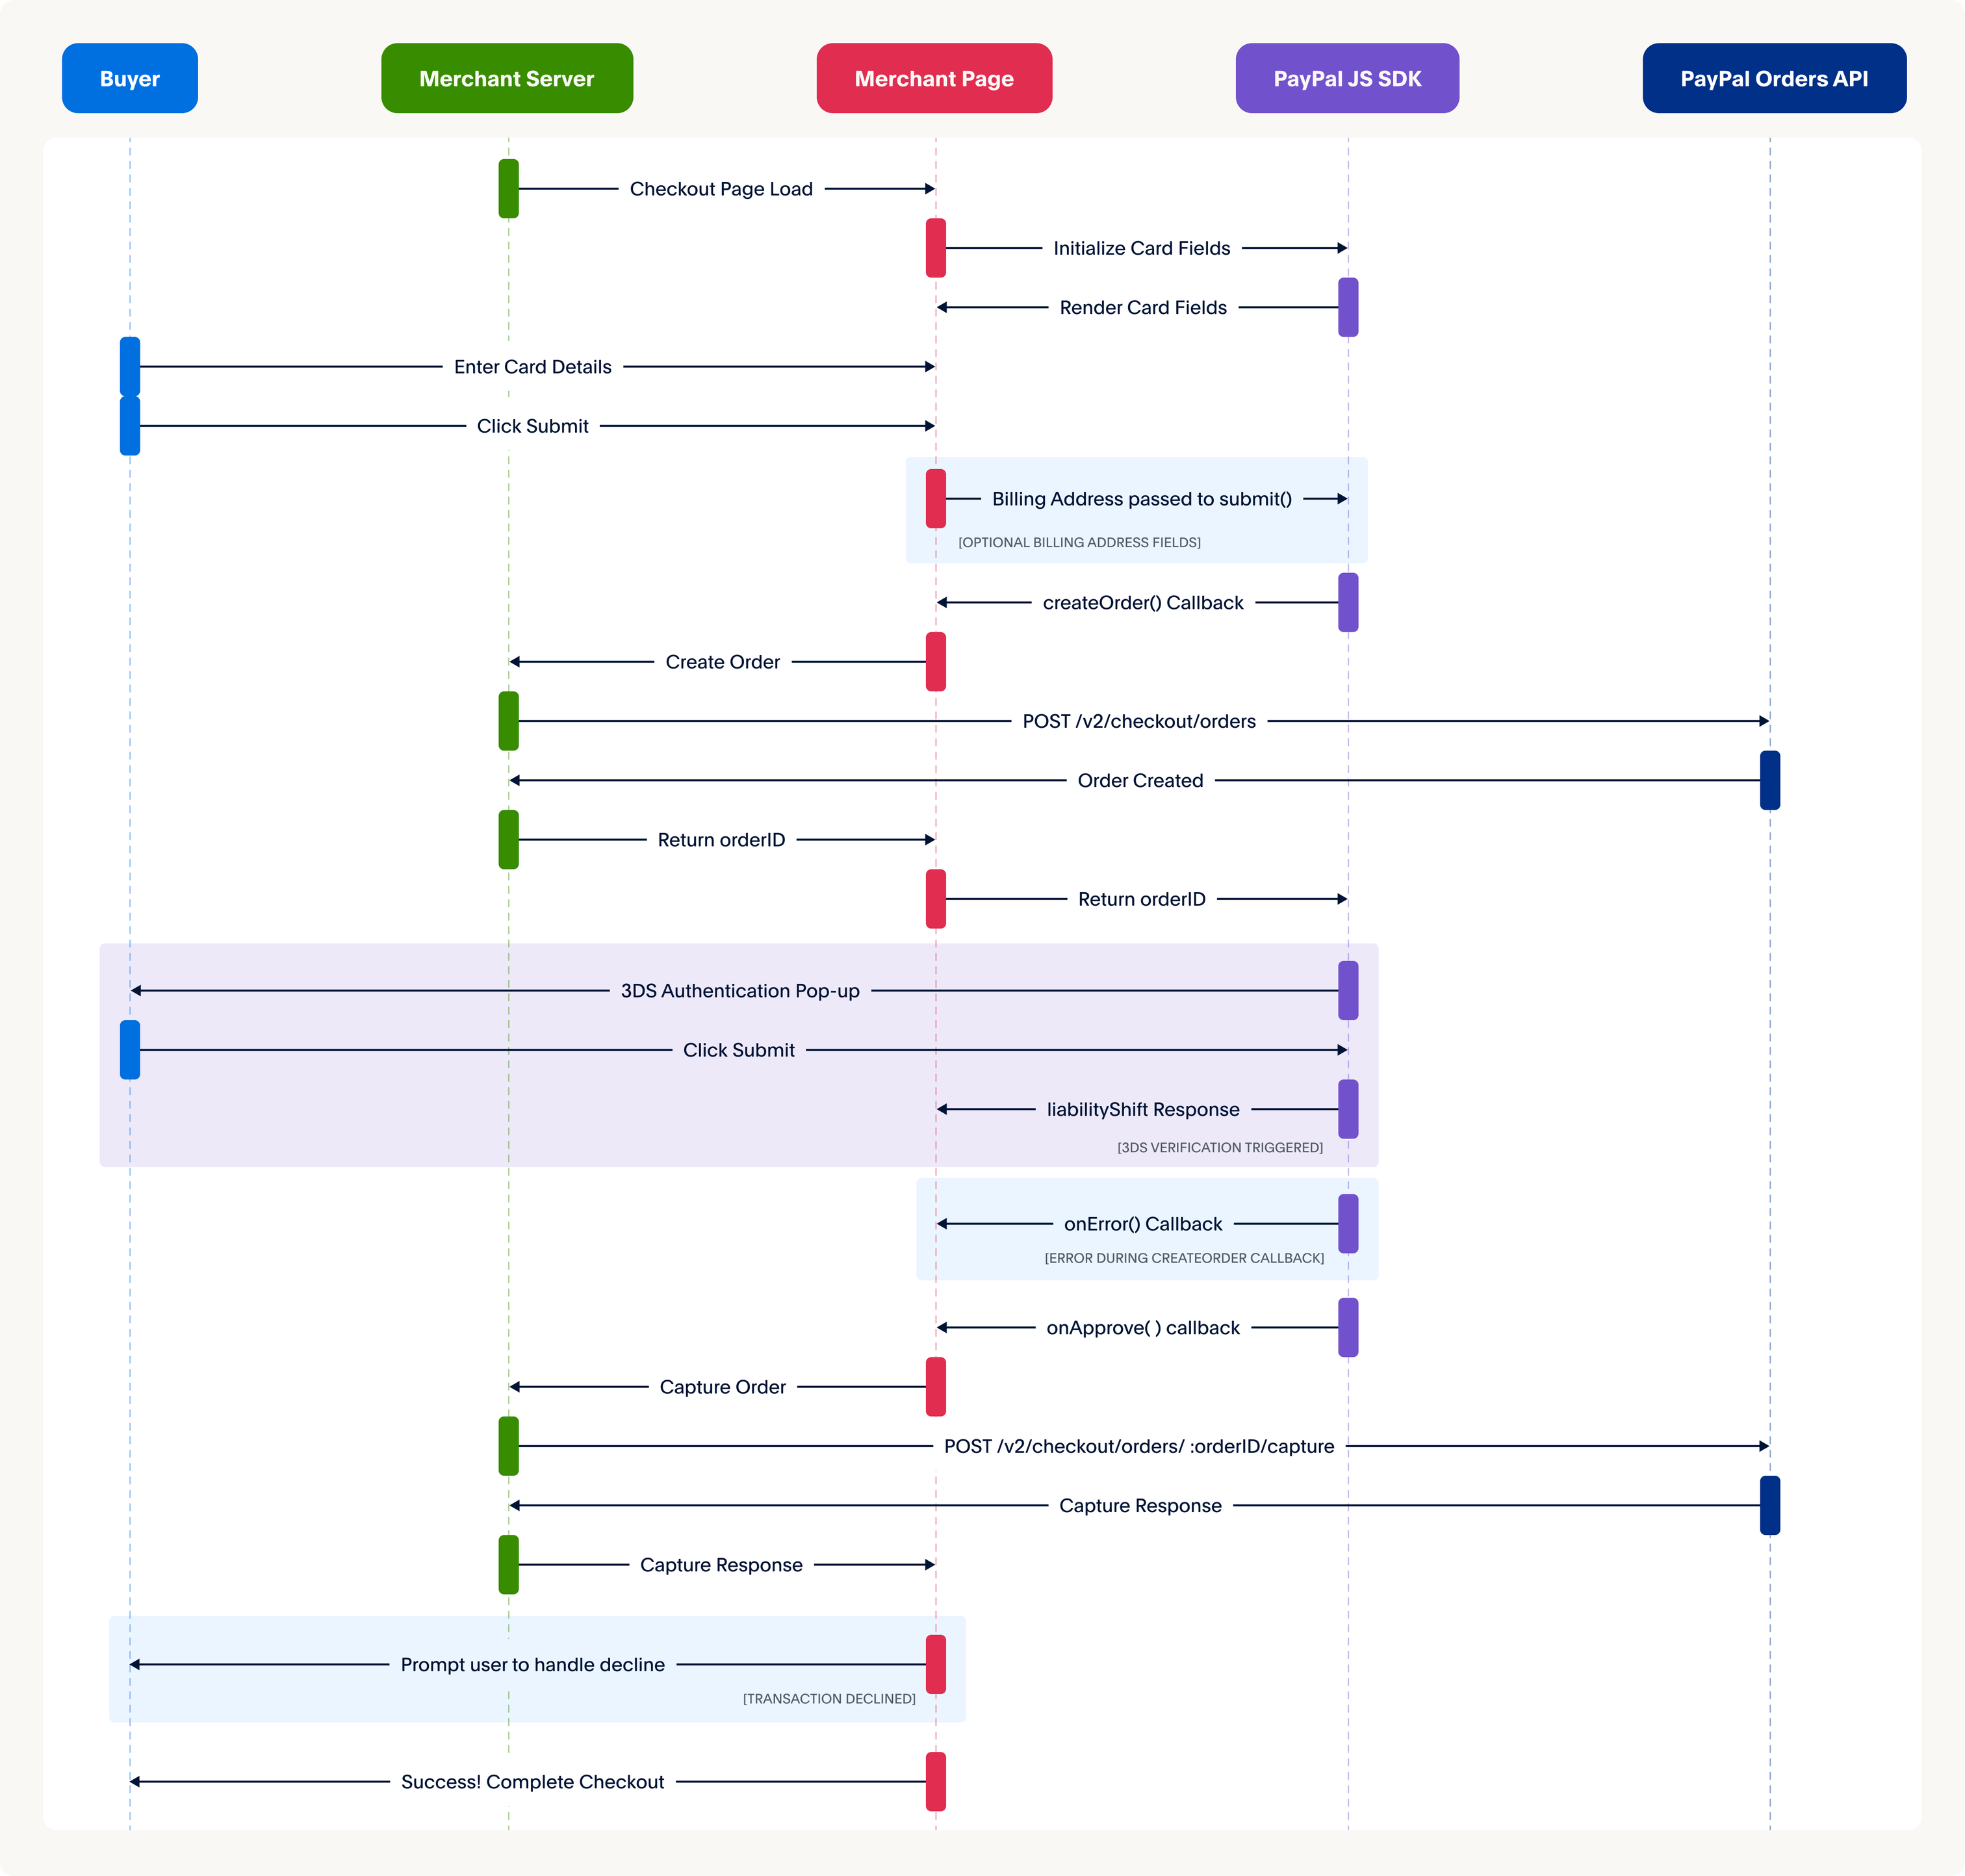
Before beginning your integration, you need to set up your development environment. You can refer to this flow diagram, and watch a video demonstrating how to integrate PayPal Expanded Checkout.
Start your integration by grabbing the sample code from PayPal’s GitHub repo, or visiting the PayPal GitHub Codespace. Read the Codespaces Guide for more information. You can also use Postman to explore and test PayPal APIs. Read the Postman Guide for more information.
Important: These are the integration instructions for the JavaScript SDK
component CardFields. If your integration uses the
HostedFields component, see
Integrate PayPal buttons and Hosted Fields
instead.
1. Integrate front end
Set up your front end to integrate expanded checkout payments.
Front-end process
- Your app shows the PayPal card fields and payment buttons
- Your app calls server endpoints to create the order and capture the payment. The request details depend on a number of factors, such as the type of payment method, and SDK component.
Front-end code
The /src/index.html and /src/app.js files handle the client-side logic and define how the PayPal front-end components connect with the back end. Use these files to set up the PayPal checkout using the JavaScript SDK and handle the payer's interactions with the PayPal checkout button.
You’ll need to:
- Save the
index.htmlfile in a folder named/src. - Save the
app.jsfile in a folder named/src
Step 1. Initialize JavaScript SDK
Add the JavaScript SDK to your web page and include the following:
- Your app's client ID.
- A
<div>to render the PayPal buttons. - A
<div>to render each of the card fields.
The JavaScript file included in the sample code includes reference routes on the server that you’ll add in a later step.
Include the <script>tag on any page that shows the PayPal buttons. This script will fetch all the necessary JavaScript to access the buttons on the window object.
Pass a client-id and specify which components you want to use. The SDK offers Buttons, Marks, Card Fields, and other components. This sample focuses on the buttons component.
In addition to passing the client-id and specifying which components you want to use, you can also pass the currency you want to use for pricing. For this exercise, we'll use USD.
Step 2: Render Card fields and PayPal buttons
After setting up the SDK for your website, you need to render the PayPal buttons and the card fields components.
Card Fields
The paypal namespace has a CardFields component to accept and save cards
without handling card information. PayPal handles all security and compliance
issues associated with processing cards. The CardFields function checks to see
if a payment is eligible for card fields. If not, the card fields won't show
up during the payment flow.
-
The
/src/app.jsfile needs a function that submits acreateOrder()request. -
Declare a
createOrdercallback that launches when the customer clicks the payment button. The callback starts the order and returns an order ID. After the customer checks out using the PayPal pop-up, this order ID helps you to confirm when the payment is completed. -
Set up your app to call
cardField.isEligible()for each card field to determine if a payment is eligible for card fields. -
Render each card field by declaring it as an object in
cardFieldand then applying a.render()function. - Create the order by calling the
createOrderfunction. - Define styles for the card fields. You can change these styles as needed for your implementation.
-
Define the
selectorandplaceholdervalues for the input fields. You can edit this section as needed for your implementation, such as adding more fields. For more information about optional configurations, see Options in the JavaScript SDK reference.
-
Set up your app to capture the payment when it is eligible for card fields
by adding code to the PayPal button in
/src/app.js, right after rendering the card fields. -
You need to declare an event listener
/src/app.jsfor when the payer submits an eligible card payment. -
Pass the card field values, such as the cardholder's name and address, to
the
POSTcall. Anything you pass into thesubmitfunction is sent to the iframe that communicates with the Orders API. The iframe retrieves the data and sends it along to the POST call. See the Orders v2 API for details about billing address fields and other parameters. For example, use the 2-character country code to test the billing address. -
Completing the payment launches an onApprove callback, which sends a
call to
ordersCapturemethod in theOrdersControllerusing theorderIdin the data object in the server. Use theonApproveresponse to update business logic, show a celebration page, or handle error responses. - Set up your app to handle the payment capture response, such as when the payment is successfully captured, when the payer's instrument is declined, or when there is an error.
-
Include a function that shows a message to the user by passing data to the
result-messageHTML element container ofindex.html. -
Your app needs to call the JavaScript SDK that defines the PayPal card
fields and links them to the
createOrder()function.
If your website handles shipping physical items, this documentation includes details about our shipping callbacks.
PayPal Buttons
The paypal namespace has a Buttons function that initiates the callbacks
needed to set up a payment.
-
The
app.jsfile needs a function that submits acreateOrder()request. -
Declare a
createOrdercallback that launches when the customer clicks the payment button. The callback starts the order and returns an order ID. After the customer checks out using the PayPal pop-up, this order ID helps you to confirm when the payment is completed. -
Completing the payment launches an
onApprovecallback. Use theonApproveresponse to update business logic, show a celebration page, or handle error responses. - Set up your app to handle the payment capture response, such as when the payment is successfully captured, when the payer's instrument is declined, or when there is an error.
-
Include a function that shows a message to the user by passing data to the
result-messageHTML element container ofindex.html. -
Your app needs to call the JavaScript SDK that defines the PayPal buttons
and links them to the
createOrder()function.
Handle Billing Address
Step 3: Customize the Card Fields OPTIONAL
This section explains how to customize the PayPal buttons and card fields for your integration.
Configure the layout of the card fields
-
Copy and paste both
examples of card field style objects
into your existing
/src/index.htmland/src/app.jsfiles. -
Include the required card form elements:
card number,security code, andexpiration date. To learn about the available card form elements, see card fields . - Add your own fields to accept billing address information.
- A complete set of sample integration code is available from the GitHub repo.
-
Optional: Change the layout, width, height, and outer styling of the card
fields, such as
border,box-shadow, andbackground. You can modify the elements you supply as containers.
Style parent fields
Font Size
Style Cardholder Name field
Color
Invalid state color
Step 4. Configure the layout of the Buttons component OPTIONAL
Depending on where you want these buttons to show up on your website, you can lay out the buttons in a horizontal or vertical stack. You can also customize the buttons with different colors and shapes.
To override the default style settings for your page, use a style object inside the Buttons component. Read more about how to customize your payment buttons in the style section of the JavaScript SDK reference page.
Button Shape
Button Color
Button Layout
Button Label Text
Button Message
Integrate 3D Secure using JavaScript SDK
To trigger 3D Secure authentication pass the verification method in the
Create order
payload. The verification method can be a contingencies parameter with
SCA_ALWAYS or SCA_WHEN_REQUIRED:
-
Pass
SCA_ALWAYSto trigger an authentication for every transaction. -
Pass
SCA_WHEN_REQUIREDto trigger an authentication only when required by a regional compliance mandate such as PSD2. 3D Secure is supported only in countries with a PSD2 compliance mandate.
Important: These are the 3D Secure instructions for the JavaScript SDK
component CardFields. If your integration uses the
HostedFields component, see
Integrate 3D Secure using Hosted Fields
instead.
2. Integrate back end SERVER
This section explains how to set up your backend to integrate PayPal checkout payments.
The PayPal Server SDK provides integration access to the PayPal REST APIs. The API endpoints are divided into distinct controllers:
- Orders Controller: Orders API v2
- Payments Controller: Payments API v2
Backend process
-
Your app creates an order on the backend by calling to the
ordersCreatemethod in the Orders Controller. See Create Orders V2 API endpoint. -
Your app calls the
ordersCapturemethod in the Orders Controller on the backend to move the money when the payer confirms the order. See Capture Payment for Order V2 API endpoint .
Backend Code
The sample integration uses the PayPal Server SDK to
connect to the PayPal REST APIs. Use the server folder to setup the
backend to integrate with the payments flow.
- The server side code runs on port
8080 -
Declare the
PAYPAL_CLIENT_IDandPAYPAL_CLIENT_SECRETas environment variables. The server side code is configured to fetch these values from the environment to authorize the calls to the PayPal REST APIs. - By default the server SDK clients are configured to connect to the PayPal's sandbox API.
Step 1. Generate access token
Initialize the Server SDK client using OAuth 2.0 Client Credentials (PAYPAL_CLIENT_ID and PAYPAL_CLIENT_SECRET). The SDK will automatically retrieve the OAuth token when any endpoint that require OAuth 2.0 Client Credentials is invoked.
Step 2. Create Order
You need a createOrder function to start a payment between a
payer and a merchant
Set up the createOrder function to make a request to the
ordersCreate method in the Orders Controller and pass data from
the cart object to calculate the purchase units for the order.
See the Create order endpoint of the PayPal Orders v2 API for sample responses and other details.
Intent
Currency Code
Amount
Step 3: Capture Payment
You need a captureOrder function to to move money from the payer
to the merchant
Set up the captureOrder function to make a request to the
ordersCapture method in the Orders Controller and pass the
orderID generated from the Create Order step.
See the Capture Payment for Order V2 API endpoint for sample responses and other details.
3. Custom Integration
Handle buyer checkout errors (optional)
Use onError callbacks and alternate checkout pages to handle
buyer checkout errors.
If an error prevents buyer checkout, alert the user that an error has occurred
with the buttons using the onError callback. This error handler
is a catch-all. Errors at this point are not expected to be handled beyond
showing a generic error message or page.
Handle funding failures (optional)
If your payer's funding source fails, the Orders API returns an
INSTRUMENT_DECLINED error.
A funding source might fail because the billing address associated with the payment method is incorrect, the transaction exceeds the card limit, or the card issuer denies the transaction. To handle this error, restart the payment so the payer can select a different payment option.
Refund a captured payment
Refund a captured payment from a seller back to a buyer.
4. Test integration
Before going live, test your integration in the sandbox environment.
Learn more about the following resources on the Card Testing page:
- Use test card numbers to simulate successful payments for expanded checkout integrations.
- Use rejection triggers to simulate card error scenarios.
- Test 3D Secure authentication scenarios.
- Test your integration by following these recommended use cases.
5. Go live
If you have fulfilled the requirements for accepting Expanded Credit and Debit Card Payments for your business account, review the Move your app to production page to learn how to test and go live.
If this is your first time testing in a live environment, follow these steps:
- Log into the PayPal Developer Dashboard with your PayPal business account.
- Complete production onboarding so you can process card payments with your live PayPal business account.
- Request Expanded Credit and Debit Card Payments for your business account.
loading
Customize
Add more payment methods or customize your integration.